

How to implement custom directives in Vue?
This article mainly introduces the usage of Vue’s native instructions and custom instructions. Friends in need can refer to
1. Native instructions
When I started learning Vue, I saw the word "instruction" when I looked at the official website. I was stunned, what? What is the instruction? Later, as we read on, "v-for", "v-show" and "v-if" like this are called instructions. Later, when I was almost done playing with Vue, when I started writing projects, I found that there were only a few common instructions, such as "v-if" "v-show" "v-model" "v-for" "v -bind” “v-on” .
You can think of this as syntax sugar or as a command. Among these common instructions, the general usage method is as follows:
1.v-text: string Usage: To update the textContent of the element, update the textContent of the part, you need to use {{Mustache}} interpolation.
2.v-show: any Usage: Switch the display css attribute of the element based on the true or false value of the expression.
3.v-if: any Usage: Render elements based on the true and false conditions of the expression. The element and its data bindings/components are destroyed and recreated on switch. If it is , and proposes its contents as a conditional block. Change the command to trigger the transition effect when conditions change.
4.v-for :Array | Object | number | string Usage: Render elements or template blocks multiple times based on source data Syntax: alias in expression.
5.v-on: Function | Inline Statement parameter $event(required) modifier.
6.v-bind: any Type: any (with argument) | Object (without argument) Parameter: attrOrProp (optional) ; Modifier: .prop --- is used to bind DOM attributes;. camel ---transform the kebab-case attribute name into camelCase .(supported since 2.1.0) Usage: Support other types of values when binding class and style attributes. Such as objects and arrays; when binding props, subcomponents must declare props.
7.v-model: Limit
2. Custom instructions
However, relying on the above alone is sometimes not enough, such as a recent project our company did , the UI makes a page. Then when the UI and I were discussing the requirements, I said it would be best to add an effect to this input box. When the input box pops up, it will gain focus and display a jumping cursor. This way the user can more clearly see where to type.

After reaching a consensus, when writing the function, I suddenly realized, WTF? I'm using Vue, a data-driven view, so I can't document.getElementById(inputid).focus().
Ever since, I went to find the document, and suddenly I found a word directive. I checked the meaning of this word:

I took a look The general meaning of the document is that although the v-model and v-show are already very easy to use, they cannot stop the unscrupulous front-end personnel from doing the crazy operations. Therefore, in some cases, it is necessary to perform low-level processing on ordinary DOM elements. Operation, custom instructions will be used at this time. Of course, the official example was what I needed, and I immediately gained a wave of new knowledge.

Just like this HTML I wrote down casually, there is a v-focus in it. I have probably never seen it before. What is it? Don’t worry, keep reading:
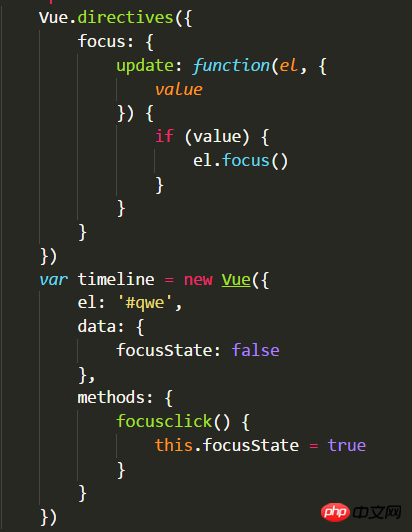
That’s right, this v-focus is a command I defined myself. Of course, you can also use other than keywords. Words to name, convenient and free.
Let’s take a look at this custom instruction. I believe everyone understands the following part. It is nothing more than that if the value of value is equal to true, then el will focus and gain focus.
What does the previous update mean? update means update, this is a hook function, that is, function is called when focusState is updated. When calling the function, continue to judge focusState - if true, get the focus; if false, go ahead and cool off. Similarly, when we check the official documentation, we will find that the same hook functions are:
•bind: only called once, called when the instruction is bound to the element for the first time. One-time initialization settings can be performed here.
•inserted: Called when the bound element is inserted into the parent node (only the parent node is guaranteed to exist, but not necessarily inserted into the document).
•update: Called when the VNode of the component is updated, but may occur before its child VNode is updated. The value of the directive may or may not have changed. But you can ignore unnecessary template updates by comparing the values before and after the update.
•componentUpdated: Called after all the VNode of the component where the instruction is located and its sub-VNodes have been updated.
•unbind: Called only once, when the instruction is unbound from the element.
Using these operations, we can complete many more cool routines. For example, when loading a large image, we can first use a solid color placeholder, and then render it directly after the image is loaded. For example, the picture below:

In this example, the hook function we call is inserted, which is triggered after inserting the parent node. When the image has not been loaded, first replace it with a random color. After the image is loaded, remove the background color and replace it with the image.
The parameters we pass in here are el----the current dom node and binding-----an object, including the following attributes:
•def: hook function.
•rawName: The name of the instruction.
•value: The value passed to the command

The above is what I compiled for everyone. I hope it will be helpful to everyone in the future.
Related articles:
How to create an automatic website building project with vue (detailed tutorial)
How to implement a node express personalized chat room?
How to load the five-level regions across the country after clicking in the zTree tree plug-in
The above is the detailed content of How to implement custom directives in Vue?. For more information, please follow other related articles on the PHP Chinese website!

Hot AI Tools

Undresser.AI Undress
AI-powered app for creating realistic nude photos

AI Clothes Remover
Online AI tool for removing clothes from photos.

Undress AI Tool
Undress images for free

Clothoff.io
AI clothes remover

Video Face Swap
Swap faces in any video effortlessly with our completely free AI face swap tool!

Hot Article
Hot Tools

Notepad++7.3.1
Easy-to-use and free code editor

SublimeText3 Chinese version
Chinese version, very easy to use

Zend Studio 13.0.1
Powerful PHP integrated development environment

Dreamweaver CS6
Visual web development tools

SublimeText3 Mac version
God-level code editing software (SublimeText3)
Hot Topics
 1668
1668
 14
1428
52
1329
25
1273
29
1256
24
14
1428
52
1329
25
1273
29
1256
24

 JavaScript Engines: Comparing Implementations
Apr 13, 2025 am 12:05 AM
JavaScript Engines: Comparing Implementations
Apr 13, 2025 am 12:05 AM
Different JavaScript engines have different effects when parsing and executing JavaScript code, because the implementation principles and optimization strategies of each engine differ. 1. Lexical analysis: convert source code into lexical unit. 2. Grammar analysis: Generate an abstract syntax tree. 3. Optimization and compilation: Generate machine code through the JIT compiler. 4. Execute: Run the machine code. V8 engine optimizes through instant compilation and hidden class, SpiderMonkey uses a type inference system, resulting in different performance performance on the same code.
 Python vs. JavaScript: The Learning Curve and Ease of Use
Apr 16, 2025 am 12:12 AM
Python vs. JavaScript: The Learning Curve and Ease of Use
Apr 16, 2025 am 12:12 AM
Python is more suitable for beginners, with a smooth learning curve and concise syntax; JavaScript is suitable for front-end development, with a steep learning curve and flexible syntax. 1. Python syntax is intuitive and suitable for data science and back-end development. 2. JavaScript is flexible and widely used in front-end and server-side programming.
 From C/C to JavaScript: How It All Works
Apr 14, 2025 am 12:05 AM
From C/C to JavaScript: How It All Works
Apr 14, 2025 am 12:05 AM
The shift from C/C to JavaScript requires adapting to dynamic typing, garbage collection and asynchronous programming. 1) C/C is a statically typed language that requires manual memory management, while JavaScript is dynamically typed and garbage collection is automatically processed. 2) C/C needs to be compiled into machine code, while JavaScript is an interpreted language. 3) JavaScript introduces concepts such as closures, prototype chains and Promise, which enhances flexibility and asynchronous programming capabilities.
 JavaScript and the Web: Core Functionality and Use Cases
Apr 18, 2025 am 12:19 AM
JavaScript and the Web: Core Functionality and Use Cases
Apr 18, 2025 am 12:19 AM
The main uses of JavaScript in web development include client interaction, form verification and asynchronous communication. 1) Dynamic content update and user interaction through DOM operations; 2) Client verification is carried out before the user submits data to improve the user experience; 3) Refreshless communication with the server is achieved through AJAX technology.
 JavaScript in Action: Real-World Examples and Projects
Apr 19, 2025 am 12:13 AM
JavaScript in Action: Real-World Examples and Projects
Apr 19, 2025 am 12:13 AM
JavaScript's application in the real world includes front-end and back-end development. 1) Display front-end applications by building a TODO list application, involving DOM operations and event processing. 2) Build RESTfulAPI through Node.js and Express to demonstrate back-end applications.
 Understanding the JavaScript Engine: Implementation Details
Apr 17, 2025 am 12:05 AM
Understanding the JavaScript Engine: Implementation Details
Apr 17, 2025 am 12:05 AM
Understanding how JavaScript engine works internally is important to developers because it helps write more efficient code and understand performance bottlenecks and optimization strategies. 1) The engine's workflow includes three stages: parsing, compiling and execution; 2) During the execution process, the engine will perform dynamic optimization, such as inline cache and hidden classes; 3) Best practices include avoiding global variables, optimizing loops, using const and lets, and avoiding excessive use of closures.
 Python vs. JavaScript: Community, Libraries, and Resources
Apr 15, 2025 am 12:16 AM
Python vs. JavaScript: Community, Libraries, and Resources
Apr 15, 2025 am 12:16 AM
Python and JavaScript have their own advantages and disadvantages in terms of community, libraries and resources. 1) The Python community is friendly and suitable for beginners, but the front-end development resources are not as rich as JavaScript. 2) Python is powerful in data science and machine learning libraries, while JavaScript is better in front-end development libraries and frameworks. 3) Both have rich learning resources, but Python is suitable for starting with official documents, while JavaScript is better with MDNWebDocs. The choice should be based on project needs and personal interests.
 Python vs. JavaScript: Development Environments and Tools
Apr 26, 2025 am 12:09 AM
Python vs. JavaScript: Development Environments and Tools
Apr 26, 2025 am 12:09 AM
Both Python and JavaScript's choices in development environments are important. 1) Python's development environment includes PyCharm, JupyterNotebook and Anaconda, which are suitable for data science and rapid prototyping. 2) The development environment of JavaScript includes Node.js, VSCode and Webpack, which are suitable for front-end and back-end development. Choosing the right tools according to project needs can improve development efficiency and project success rate.
