This time I will bring you how to operate the WeChat applet login authentication from scratch. What are the precautions for operating the WeChat applet login authentication from scratch? The following is a practical case, let’s take a look.
Preface
In order to facilitate mini program applications to use the WeChat login state for authorized login, the WeChat mini program provides an open interface for login authorization. At first glance, I feel that the document is very reasonable, but when it comes to implementation, it is really confusing and I don’t know how to manage and maintain the login state. This article will teach you step by step how to access and maintain the WeChat login status in business. I won’t go into more details below, let’s take a look at the detailed introduction.
Access process
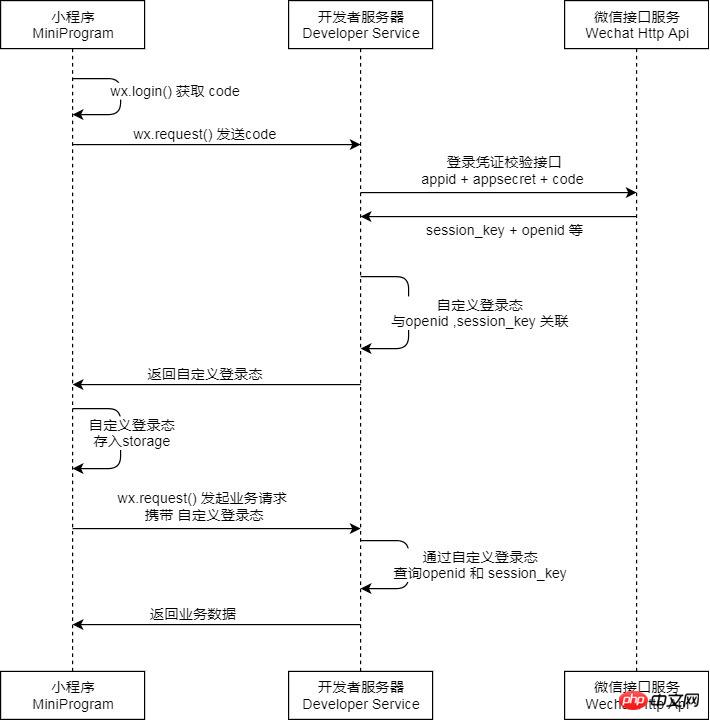
The flow chart in the official document here is clear enough, so we will directly elaborate and supplement it.

First of all, when you see this picture, you will definitely notice that the mini program communicates and interacts not only with the mini program front end and our own server, but also with the WeChat third-party server Also involved, so what role does the WeChat server play in it? Let’s go through the login authentication process together and we’ll understand.
1. Call wx.login to generate code
wx.login() The function of this API is to generate a temporary login for the current user Credentials, this temporary login credential is only valid for five minutes. After we get this login credentials, we can proceed to the next step: Get openid and session_key
wx.login({
 success: function(loginRes) {
 if (loginRes.code) {
  // example: 081LXytJ1Xq1Y40sg3uJ1FWntJ1LXyth
 }
 }
});2. Get openid and session_key
us Let’s first introduce openid. Children’s shoes who have used public accounts should be familiar with this logo. In the public platform, it is used to identify each user’s unique identity in three different applications: subscription account, service account, and mini program. That is to say, the openid of each user in each application is inconsistent, so in the mini program, we can use openid to identify the uniqueness of the user.
So what is session_key used for? With the user ID, we need to let the user log in, then the session_key ensures the validity of the current user's session operation. This session_key is distributed to us by the WeChat server. In other words, we can use this identifier to indirectly maintain the login status of our applet users. So how did we get this session_key? We need to request the third-party interface https://api.weixin.qq.com/sns/jscode2session provided by WeChat on our own server. This interface needs to bring four parameter fields:
| Parameter | Value |
|---|---|
| appid | The appid of the applet |
| secret | Secret of the mini program |
| js_code | The code sent by the previous call to wx.login |
| grant_type | 'authorization_code' |
从这几个参数,我们可以看出,要请求这个接口必须先调用wx.login()来获取到用户当前会话的code。那么为什么我们要在服务端来请求这个接口呢?其实是出于安全性的考量,如果我们在前端通过request调用此接口,就不可避免的需要将我们小程序的appid和小程序的secret暴露在外部,同时也将微信服务端下发的session_key暴露给“有心之人”,这就给我们的业务安全带来极大的风险。除了需要在服务端进行session_key的获取,我们还需要注意两点:
session_key和微信派发的code是一一对应的,同一code只能换取一次session_key。每次调用wx.login() ,都会下发一个新的code和对应的session_key,为了保证用户体验和登录态的有效性,开发者需要清楚用户需要重新登录时才去调用wx.login()
session_key是有失效性的,即便是不调用wx.login,session_key也会过期,过期时间跟用户使用小程序的频率成正相关,但具体的时间长短开发者和用户都是获取不到的
function getSessionKey (code, appid, appSecret) {
 var opt = {
 method: 'GET',
 url: 'https://api.weixin.qq.com/sns/jscode2session',
 params: {
  appid: appid,
  secret: appSecret,
  js_code: code,
  grant_type: 'authorization_code'
 }
 };
 return http(opt).then(function (response) {
 var data = response.data;
 if (!data.openid || !data.session_key || data.errcode) {
  return {
  result: -2,
  errmsg: data.errmsg || '返回数据字段不完整'
  }
 } else {
  return data
 }
 });
}3. 生成3rd_session
前面说过通过 session_key 来“间接”地维护登录态,所谓间接,也就是我们需要 自己维护用户的登录态信息 ,这里也是考虑到安全性因素,如果直接使用微信服务端派发的session_key来作为业务方的登录态使用,会被“有心之人”用来获取用户的敏感信息,比如wx.getUserInfo()这个接口呢,就需要session_key来配合解密微信用户的敏感信息。
那么我们如果生成自己的登录态标识呢,这里可以使用几种常见的不可逆的哈希算法,比如md5、sha1等,将生成后的登录态标识(这里我们统称为'skey')返回给前端,并在前端维护这份登录态标识(一般是存入storage)。而在服务端呢,我们会把生成的skey存在用户对应的数据表中,前端通过传递skey来存取用户的信息。
可以看到这里我们使用了sha1算法来生成了一个skey:
const crypto = require('crypto');
return getSessionKey(code, appid, secret)
 .then(resData => {
 // 选择加密算法生成自己的登录态标识
 const { session_key } = resData;
 const skey = encryptSha1(session_key);
 });

function encryptSha1(data) {
 return crypto.createHash('sha1').update(data, 'utf8').digest('hex')
}4. checkSession
前面我们将skey存入前端的storage里,每次进行用户数据请求时会带上skey,那么如果此时session_key过期呢?所以我们需要调用到wx.checkSession()这个API来校验当前session_key是否已经过期,这个API并不需要传入任何有关session_key的信息参数,而是微信小程序自己去调自己的服务来查询用户最近一次生成的session_key是否过期。如果当前session_key过期,就让用户来重新登录,更新session_key,并将最新的skey存入用户数据表中。
checkSession这个步骤呢,我们一般是放在小程序启动时就校验登录态的逻辑处,这里贴个校验登录态的流程图:

下面代码即校验登录态的简单流程:
let loginFlag = wx.getStorageSync('skey');
if (loginFlag) {
 // 检查 session_key 是否过期
 wx.checkSession({
 // session_key 有效(未过期)
 success: function() {
  // 业务逻辑处理
 },

 // session_key 过期
 fail: function() {
  // session_key过期,重新登录
  doLogin();
 }
 });
) else {
 // 无skey,作为首次登录
 doLogin();
}5. 支持emoji表情存储
如果需要将用户微信名存入数据表中,那么就确认数据表及数据列的编码格式。因为用户微信名可能会包含emoji图标,而常用的UTF8编码只支持1-3个字节,emoji图标刚好是4个字节的编码进行存储。
这里有两种方式(以mysql为例):
1.设置存储字符集
在mysql5.5.3版本后,支持将数据库及数据表和数据列的字符集设置为 utf8mb4 ,因此可在 /etc/my.cnf 设置默认字符集编码及服务端编码格式
// my.cnf

[client]
default-character-set=utf8mb4
[mysql]
default-character-set=utf8mb4
[mysqld]
character-set-client-handshake = FALSE
character-set-server=utf8mb4
collation-server=utf8mb4_unicode_ci
设置完默认字符集编码及服务端字符集编码,如果是对已经存在的表和字段进行编码转换,需要执行下面几个步骤:
设置数据库字符集为 utf8mb4
ALTER DATABASE 数据库名称 CHARACTER SET = utf8mb4 COLLATE = utf8mb4_unicode_ci;
设置数据表字符集为 utf8mb4
ALTER TABLE 数据表名称 CONVERT TO CHARACTER SET utf8mb4 COLLATE utf8mb4_unicode_ci;
设置数据列字段字符集为 utf8mb4
ALTER TABLE 数据表名称 CHANGE 字段列名称 VARCHAR(n) CHARACTER SET utf8mb4 COLLATE utf8mb4_unicode_ci;
这里的 COLLATE 指的是排序字符集,也就是用来对存储的字符进行排序和比较的, utf8mb4 常用的collation有两种: utf8mb4_unicode_ci 和 utf8mb4_general_ci ,一般建议使用 utf8mb4_unicode_ci ,因为它是基于标准的 Unicode Collation Algorithm(UCA) 来排序的,可以在各种语言进行精确排序。这两种排序方式的具体区别可以参考: What's the difference between utf8_general_ci and utf8_unicode_ci
2.通过使用sequelize对emoji字符进行编码入库,使用时再进行解码
这里是sequelize的配置,可参考 Sequelize文档
{
 dialect: 'mysql', // 数据库类型
 dialectOptions: {
  charset: 'utf8mb4',
  collate: "utf8mb4_unicode_ci"
 },
}相信看了本文案例你已经掌握了方法,更多精彩请关注php中文网其它相关文章!
推荐阅读:
The above is the detailed content of Operate WeChat applet login authentication from scratch. For more information, please follow other related articles on the PHP Chinese website!
 Mini program path acquisition
 Where to buy Bitcoin
 The difference between fprintf and printf
 How to use the notnull annotation
 How to solve the problem of black screen after turning on the computer and unable to enter the desktop
 The difference between export and export default
 How to solve Java large file reading exception
 What is the Chinese name of fil coin?


