This article describes how to implement a login page with a cool background video. The browser window can be stretched at will. Both the background video and the foreground login component can be perfectly adapted. The background video can always fill the window, and the foreground component is always centered. The video The content is always retained to the maximum extent, and the best visual effects can be obtained
This article describes how to implement a login page with a cool background video, the browser window can be stretched at will, and the background video and foreground login components can be perfect Adaptation, the background video can always fill the window, the foreground component is always centered, the content of the video is always preserved to the maximum extent, and the best visual effect can be obtained. And based on Vue.js 2.0 family bucket. The specific effect is shown in the figure below:
You can turn to the end of the article to watch the final effect.

1. The existing implementation method of background video Web page
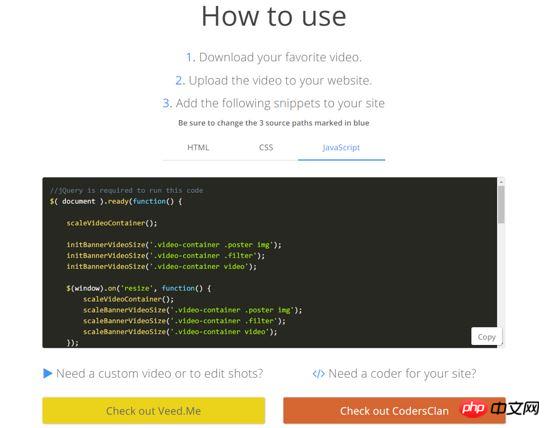
There is one abroad A very good website "Coverr" provides complete tutorials and video resources to help front-end developers build cool background video homepages. An example of the website effect is as shown below:

The tutorial is as follows:

From the picture and my practice, the following opinions can be drawn:
This tutorial uses jQuery. Since we want to use Vue.js, jQuery can be completely replaced.
The CSS and JavaScript codes in this tutorial are too redundant.
Run the example directly and find that the effect is not good. When the browser window is stretched at will, the background video cannot perfectly adapt "black edges and other defects will appear", and the effect is not as expected. .
2. Design the perfect background video Web page
First create a using the scaffolding tool vue-cli After the vue-loader project is built, create a ".vue" file in the corresponding directory as the template file for the login page. The specific details will not be repeated. The content of this section is limited to the .vue file.
2.1 HTML template
Based on the needs, the HTML template provided by Coverr has been slightly modified. The results are as follows:
<template>
 <p class="homepage-hero-module">
 <p class="video-container">
 <p :style="fixStyle" class="filter"></p>
 <video :style="fixStyle" autoplay loop class="fillWidth" v-on:canplay="canplay">
 <source src="PATH_TO_MP4" type="video/mp4"/>
 浏览器不支持 video 标签,建议升级浏览器。
 <source src="PATH_TO_WEBM" type="video/webm"/>
 浏览器不支持 video 标签,建议升级浏览器。
 </video>
 <p class="poster hidden" v-if="!vedioCanPlay">
 <img :style="fixStyle" src="PATH_TO_JPEG" alt="">
 </p>
 </p>
 </p>
</template>
In the template, the filter class The p tag is a layer of background video mask, which can control the brightness and color temperature of the video. The
video tag is a standard HTML5 tag, providing two formats of video and an image placeholder. The background video will automatically play after loading.
The original template provided by Coverr can be debugged directly. The page only displays pictures but cannot play videos. This problem is solved by using the v-if directive of Vue.js.
2.2 CSS
The original template CSS code has been greatly streamlined. The modified CSS code is as follows:
<style scoped>
 .homepage-hero-module,
 .video-container {
 position: relative;
 height: 100vh;
 overflow: hidden;
 }
 .video-container .poster img,
 .video-container video {
 z-index: 0;
 position: absolute;
 }
 .video-container .filter {
 z-index: 1;
 position: absolute;
 background: rgba(0, 0, 0, 0.4);
 }
</style>Due to most styles All have been modified globally by the project, so there are only three styles dedicated to this template. The brief description is as follows:
Container p fills the browser window
The mask p is located above the video to function as a mask.
2.3 JavaScript code
<script>
export default {
name: 'login',
data() {
return {
vedioCanPlay: false,
fixStyle: ''
}
},
methods: {
canplay() {
this.vedioCanPlay = true
}
},
mounted: function() {
window.onresize = () => {
const windowWidth = document.body.clientWidth
const windowHeight = document.body.clientHeight
const windowAspectRatio = windowHeight / windowWidth
let videoWidth
let videoHeight
if (windowAspectRatio < 0.5625) {
videoWidth = windowWidth
videoHeight = videoWidth * 0.5625
this.fixStyle = {
height: windowWidth * 0.5625 + 'px',
width: windowWidth + 'px',
'margin-bottom': (windowHeight - videoHeight) / 2 + 'px',
'margin-left': 'initial'
}
} else {
videoHeight = windowHeight
videoWidth = videoHeight / 0.5625
this.fixStyle = {
height: windowHeight + 'px',
width: windowHeight / 0.5625 + 'px',
'margin-left': (windowWidth - videoWidth) / 2 + 'px',
'margin-bottom': 'initial'
}
}
}
window.onresize()
}
}
</script>The most important part of the above code is the monitoring of the onresize event of the window object. When the window size changes, the program simultaneously modifies the size of the video and mask dom so that the narrowest side of the video always fills the browser window, while the long sides are evenly cut off on the left and right sides.
By doing this, the video will not be stretched. The center of the video is always located in the center of the browser. When the browser window is stretched at will, the content of the video is always retained to the maximum extent and can be obtained. Best visual effects.
The final effect is as follows:

The above is what I compiled for everyone. I hope it will be helpful to everyone in the future.
Related articles:
How to implement DIV delay for a few seconds before disappearing or displaying in JS/jQuery
How to implement in jQuery Realizing timed hiding of dialog boxes
Using native js to realize three-level linkage between provinces and municipalities
The above is the detailed content of How to implement a background video login page using Vue.js 2.0. For more information, please follow other related articles on the PHP Chinese website!
 Why does vue.js report an error?
 What are the uses of vue.js slots?
 How to jump with parameters in vue.js
 How to solve scripterror
 What to do if css cannot be loaded
 Advantages of plc control system
 orientdb
 The difference between vscode and visual studio
 Comparative analysis of win10 home version and professional version


