This article mainly introduces the Vue.js universal application framework-Nuxt.js getting started tutorial. Now I share it with you and give it as a reference.
For single-page applications built with React and Vue, SEO is a well-known problem. Server-side rendering (SSR-server Side Render) seems to be the best solution at present. React applications have Next.js, and the solution for Vue is Nuxt.js.

1. Introduction
Official website: https://nuxtjs.org/
GitHub: https: //github.com/nuxt/nuxt.js
What is Nuxt.js?
Nuxt.js is a universal application framework based on Vue.js.
By abstractly organizing the client/server infrastructure, Nuxt.js mainly focuses on the UI rendering of the application.
Our goal is to create a flexible application framework that you can use to initialize the infrastructure code of new projects, or use Nuxt.js in existing Node.js projects.
Nuxt.js presets various configurations required to develop server-rendered applications using Vue.js.
In addition, we also provide a command called: nuxt generate, which provides the function of generating corresponding static sites for Vue.js-based applications.
We believe that the functionality provided by this command is a new step towards developing web applications that integrate various microservices.
As a framework, Nuxt.js provides many useful features for the typical application architecture pattern of client/server, such as asynchronous data loading, middleware support, layout support, etc.
2. Build the first Nuxt.js project
It is recommended to use the template provided by Nuxt. It is assumed that you have installed vue-cli. If not, please execute npm install vue-cli -g to install vue-cli first.
$ vue init nuxt-community/starter-template <project-name>
Go to the project folder to install dependent packages.
cd <project-name>
npm install
Start the project.
npm run dev
Open the browser and visit http://localhost:3000. You can see the page rendered by Next.
3. Add page
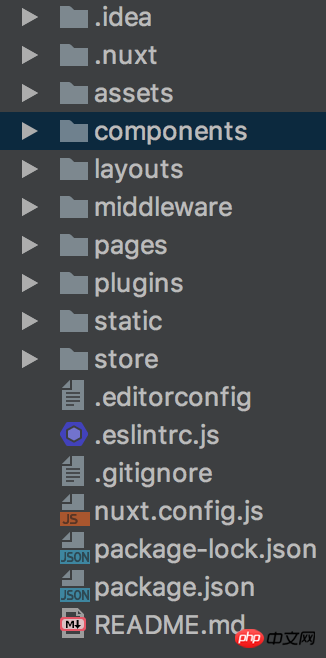
The newly completed project structure is as shown below:

Project structure
Nuxt agrees that all pages are placed in the pages folder, and Nuxt will automatically generate the corresponding route based on the directory structure.
Now create a new Vue file test.vue under pages, and visit http://localhost:3000/test to see the page you just added.
4. Introduce third-party plug-ins
Normally we need to introduce third-party plug-ins, such as front-end components, logs, etc.
The first step is of course to install the plug-in. Here we take element-UI as an example.
npm install element-ui
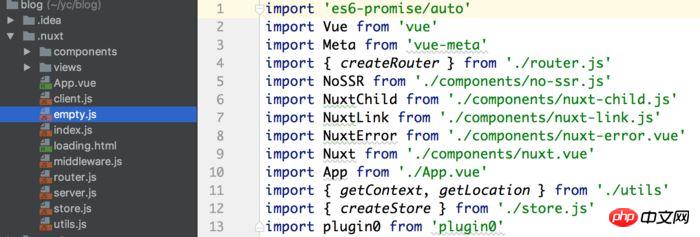
Although I downloaded the element-ui package, it cannot be directly imported and used in the Vue instance like a normal project. Nuxt's kernel projects are all in the .nuxt directory. Modifying the files below will not take effect. Because the file will be regenerated every time you compile, directly modifying the project file is invalid.

Kernel project structure
Although it cannot be modified directly, Nuxt provides a special way to introduce third-party plug-ins.
The first step is to create a new js file element-ui.js in the pulgin folder. The contents of the file are as follows.
import Vue from 'vue'
import Element from 'element-ui'
import 'element-ui/lib/theme-chalk/index.css'
Vue.use(Element)
The second step is to modify nuxt.config.js. Add plugins attribute.
/**
   * include third-party plugin
   */
  plugins: ['~plugins/element-ui'] // element-ui.js文件地址
After recompiling, Nuxt will compile the third-party plug-in and use it. At this time, the third-party plug-in can be used in any Vue file.
5. Static resource files
You can put the static resource files in the static folder, and then use http://localhost:3000/< Filename> to access static resource files.
Nuxt provides many more functions, such as dynamic routing and ESLint code detection. That’s it for today. For more in-depth information, please refer to the official website.
The above is what I compiled for everyone. I hope it will be helpful to everyone in the future.
Related articles:
Use Vue to imitate Toutiao (detailed tutorial)
How to configure eslint for React development
JS scope and pre-parsing mechanism (detailed tutorial)
How to use enumeration types to implement HTML drop-down boxes in Vue
How to package static resources in vue
The above is the detailed content of Nuxt.js framework (detailed tutorial). For more information, please follow other related articles on the PHP Chinese website!
 What file is mydrivers
 What is the difference between dubbo and zookeeper
 What format is doc?
 There are several ways to position CSS position
 How to calculate the factorial of a number in python
 Usage of source command in linux
 What keys do arrows refer to in computers?
 Solution to the problem that vscode cannot run after downloading python


