I have been learning the basic knowledge of mongdb these days, following the footsteps (code) of the online masters to simulate connecting to the mongodb database. The following article summarizes and introduces the two method tutorials for node.js to connect to the MongoDB database. The introduction in the article is very detailed. Friends who need it can refer to it. Let’s take a look together.
Preface
The MongoDB Node.js driver is the officially supported native node.js driver. It is the best so far. implementation, and is officially supported by MongoDB. The MongoDB team has adopted the MongoDB Node.js driver as a standard approach.
npm install mongodb@1.4.3  // MongoDB Node.js驱动程序
npm install mongoose@3.8.8 //mongoose模块
To connect to the MongoDB database from Node.js we have two methods to choose from:
By instantiating the mongodbClient class provided in the mongodb module, and then using this instantiated object to create and manage mongodb connections;
Use strings to connect;
1. Connect to MongoDB through the client object
It is most commonly used to connect to the MongoDB database by instantiating a MongoClient object. The best way.
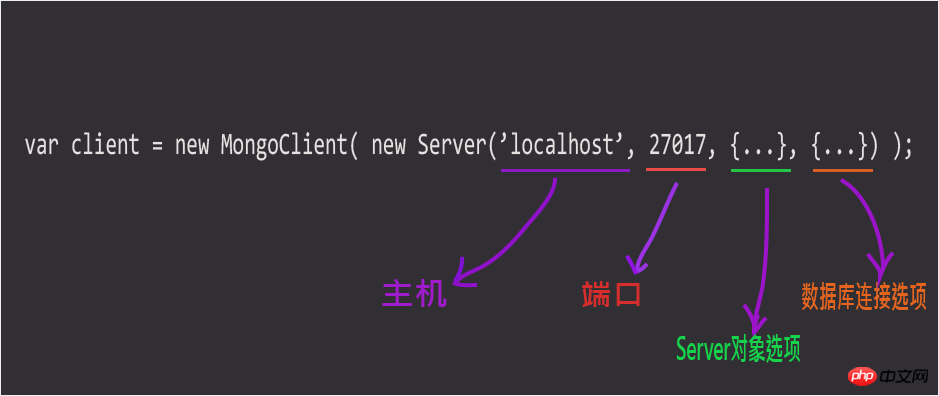
Syntax for creating a MongoClient object instance:
MongoClient( server, options );
server: a serverd object;
options: database Connection options;

#As shown in the figure above, the MongoClient connection uses the background Server object. The function of this object is to define how the MongoDB driver connects to the server.
Below, look at an example:
var MongoClient = require('mongodb').MongoClient,
 Server  = require('mongodb').server;

// 创建客户端连接对象
var client = new MongoClient( new Server('localhost', 27017, {
           socketOpations: { connectTimeoutMS: 500 },
           poolSize: 5,
           auto_reconnect: true
          }, {
           numberOfRetries: 3,
           retryMilliSeconds: 500
          }));

// 打开对服务器端MongoDB数据库的连接
client.open(function(err, client) {
 if ( err ) {
  console.log('连接失败!');
 } else {
  var db = client.db('blogdb'); // 建立到数据库blogdb的连接
  if ( db ) {
   console.log('连接成功');
   db.authenticate('username', 'pwd', function(err, result) { // 对用户数据库身份进行验证
    if ( err ) {
     console.log('数据库用户身份验证失败');
     client.close(); // 关闭对MongoDB的连接
     console.log('连接已关闭......');
    } else {
     console.log('用户身份验证通过');
     db.logout(function (err, result) { // 关闭对数据库的连接,即退出数据库
      if ( !err ) {
       console.log('退出数据库出错');
      }

      client.close(); // 关闭对MongoDB的连接
      console.log( '已关闭连接......' );
     });
    }
   });
  }
 }
});Note: To log out of the database, use the logout() method on the database object. This will close the connection to the database and you will no longer be able to use the Db object. For example: db.logout();To close the connection to MongoDB, call the close() method on the client connection, for example: client.close() .
Write Concern
First of all, when we connect to the database, we will use a question about the write concern level. To put it bluntly, from my personal understanding, it is equivalent to A priority order for handling problems. You can choose whether you need to confirm before writing to the database, or whether to ignore an error, etc., as shown below:
| Write Level | Description |
|---|---|
| -1 | Network errors ignored |
| 0 | Write confirmation is unnecessary |
| 1 | Request write confirmation |
| 2 | Write acknowledgment requests span the primary server and a secondary server in the replica set |
| majority | Write acknowledgment is requested from the primary server in the replica set The |
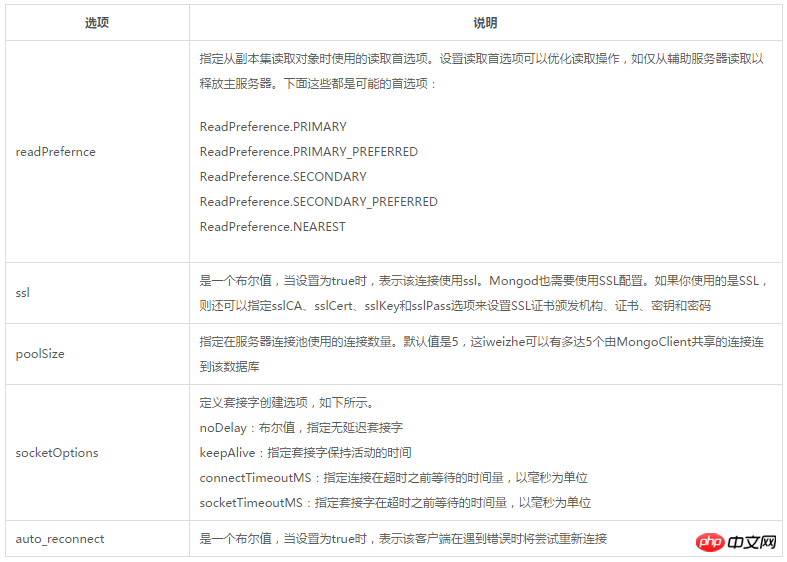
options used to create the Server object for the MongoClient connection are as follows:

The database connection options used to create a MongoClient connection are as follows:

2. Connect to MongoDB through a connection string
This method requires calling the connect( ) method of the MongoClient class. The syntax for connect is as follows:
MongoClient.connect(connString, options, callback)
The syntax for connString string is as follows:
mongodb://username:password@host:port/database?opations
MongoClient connection string component:
| Options | Description |
|---|---|
| mongodb:// | Specify the string to use the mongodb connection format |
| username | Used for verification username. Optional |
| password | The password to use for authentication. Optional |
| host | MongoDB server host name or domain name. It can be multiple host:port combinations to connect to multiple MongoDB servers. For example: mongodb://host1:270017, host2://270017, host3:270017/testDB |
| port | The port used to connect to the MongoDB server. The default value is 27017 |
| database | The name of the database to be connected. The default is admin |
| options | The key-value pair of options used when connecting. These options can be specified on the dbOpt and serverOpt parameters |
下面,看一个使用连接字符串方法连接MongoDB数据库的示例:
var MongoClient = require('mongodb').MongoClient;
MongoClient.connect('mongodb://mongodb:test@localhost:27017/blogdb', {
      db: { w: 1, native_parser: false },
      server: {
       poolSize: 5,
       socketOpations: { connectTimeoutMS: 500 },
       auto_reconnect: true
      },
      replSet: {},
      mongos: {}

     }, function(err, db) {
      if ( err ) {
       console.log('连接失败!');
      } else {
       console.log('连接成功!');
       // 注销数据库
       db.logout(function(err, result) {
        if ( err ) {
         console.log('注销失败...');
        }

        db.close(); // 关闭连接
        console.log('连接已经关闭!');
       });
      }

});以上就是本文的全部内容,希望对大家的学习有所帮助,更多相关内容请关注PHP中文网!
相关推荐:
The above is the detailed content of 2 ways to connect node.js to MongoDB database. For more information, please follow other related articles on the PHP Chinese website!


