This article mainly introduces the use of mixin to write plug-ins for self-made vue component communication plug-ins. It has a certain reference value. Now I share it with you. Friends in need can refer to it.
Although this project is szpoppy It is a personal project, but it is widely used in the szpoppy company and has been maintained by szpoppy. I have personally worked with szpoppy for nearly a year, often looking at his source code, and learning a lot from him.
Structure of this article:
1. Comparison with VUEX
2. Plug-in already has functions
3. How to use the plug-in
4. Demo demonstration
5. Specific usage
6. Source code analysis, teach you how to use mixin to write vue plug-in (you can understand it at a glance, easy to understand)
'vue-unicom' syntax is intuitive, and there is basically no learning cost to use it; this plug-in can greatly simplify your project
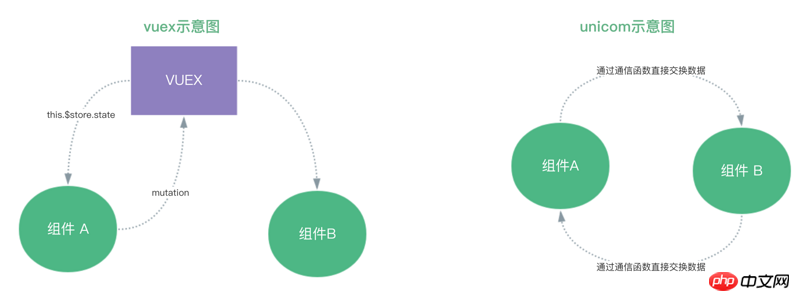
If you talk about vuex It creates a data warehouse outside the view layer component tree and modifies it through Mutaion; then unicom builds a pipeline between components, which allows components to pass and distribute data through functions, and unlike VUEX, it is A lot of syntax
VUEX mainly does state management, while 'vue-unicom' is purely for one-to-one and one-to-many component communication
'vue-unicom' source code is only more than 200 lines, with clear comments. Users can have a deeper understanding of how to write vue components, which is convenient for creating their own plug-ins in the future.
If you If you are not sure whether you want to use vuex, don’t use it. You don’t need to use vuex for the sake of using vuex. Just know how to use it. Don’t start a small and medium-sized project and just use vuex directly. FamilyMart still adds a lot of specific syntax; while unicom has In terms of performance and practice, it can fully bear the application of train ticket purchasing system.

provide communication issues between any two Vue components;
Any Vue component sends instructions to all other components;
Any Vue component sends instructions to a group of Vue components;
Any Vue component sends a message to a specific id component;
Get a list of a group of components in any Vue component;
Get a specific id component in any Vue component;
Send instructions to components that have not been initialized yet;
Send instructions to the group component that has not been initialized;
Send instructions to the id component that has not been initialized;
npm install vue-unicom
import VueUnicom from 'vue-unicom'
// 非 cli 也必须 install一下
Vue.use(VueUnicom, {
    // 制定名称, 默认为 unicom
    unicom: 'unicom',
    // 定制分组使用名称 默认为 unicom + 'Name'
    unicomName: 'unicomName',
    // 定制id使用名称 默认为 unicom + 'Id'
    unicomId: 'unicomId'
})For details, visit the readme address of this github
// 1. 下载
git clone https://github.com/szpoppy/vue-unicom.git

// 2.
cd vue-unicom

//3.运行demo,可以直接打开src目录下的index.html(推荐这种更方便的方法)也可以用gulp运行

// 4.‘vue-unicom’源代码在‘/src/lib/unicom.js’
Component writing examples are as follows, further below Detailed introduction
    Vue.component('ca', {
    template: '<p></p><p>text:{{text}}#{{unicomId}}</p><p>msg: {{msg}}</p>',
    unicomName: 'a',
    unicom: {
        message: function(sender, text){
            this.msg = text
        }
    },
    data: function(){
        return {
            text: 'component - ca',
            msg: 'a'
        }
    },
    mounted(){
        console.log(' a component  ',this)
    }
})Component calling examples are as follows
    <p>
        <ca></ca>
        <ca></ca>
        <cb1></cb1>
        <cb2></cb2>
        <cc></cc>
        </p><hr>
        <cbtn></cbtn>
{
    // Vue中增加 增加unicom参数
    // 这里的unicom,指 上面传入的参数
    unicom: {
        // instruct1:通讯指令
        // sender:发送指令者($vm)
        // args:指令发出者附带参数
        // 参数如果为对象,是引用类型,如果需要设置,请深度克隆一遍
        instruct1 (sender, ...args) {
            // .... this 为当前组件
        },
        instruct2 (sender, ...args) {

        }
    }
}{
// Vue中增加 增加unicomName参数
// 指定分组 属于 group, 所有实例,都属于这个分组
unicomName: 'group'
}{
// 组件可以加入多个分组
unicomName: ['group1', 'group2']
}<!-- 加入group分组 --> <component></component>
<!-- 指定$vm的 id 为 id1 -->
<component></component>
{
    methods:{
        method1 () {
            // 发送 instruct1 指令,参数为 1, 2
            this.$unicom('instruct1', 1, 2)
        }
    }
}instruct1@group (Send to the specified group)instruct1#id1 (Send to the specified component)
@group (Get the specified group component)
#id1 # , until the component containing the instruct1 instruction appears)
~instruct1@group (The instruction is delayed until the component named group appears)
Component monitoring is used, the command starts with ~, the second parameter is callback
~@group (the listening group is named group Component appears)
~#id1 ‐ with ’ s ’ ’s ’ ‐ ‐ ‐ ‐ ‐ (Monitoring the emergence of a component named id1)
6.1 Use ximin as a plug-in, prototype defines global functions (the focus of the plug-in mechanism)
It is recommended to read the vue plug-in mechanism https: //cn.vuejs.org/v2/guide/plugins.htmlThe first step to get the source code 'unicom.js' is to use the compiler to collect all methods except the install functionNext, we will focus on the entrance install. In addition, in the process of importing the plug-in and app.use, the first step is actually to call the install function
function install(vue, {
        name = 'unicom',
        idName,
        groupName
    } = {}) {
        //简单几行代码判断是否安装过

        // 添加原型方法,全局组件调用
        vue.prototype['$' + name] = unicomQuery

        // unicomIdName = 'unicomId'        id作为唯一标识
        unicomIdName = idName || (name + 'Id')
        // unicomGroupName = 'unicomName'       分组
        unicomGroupName = groupName || (name + 'Name')

        // 全局混入
        vue.mixin({
            props:
            watch:
            beforeCreate(){}
            created(){},
            destroyed(){}
        })

        // 自定义属性合并策略
        let merge = vue.config.optionMergeStrategies
        // 改变了自定义属性unicomName和unicom的合并策略
        merge[name] = merge[unicomGroupName] = function (parentVal, childVal){
        //...
        }
}利用vue原型链挂载一个全局的‘$unicom’方法,可以在全局内调用,也可以作为组件内节点click时的方法,click直接发送数据
<button>发送指令 message</button>
<button>发送指令 message@a</button>
methods:{
      sendData(){
          this.$unicom('message@c', '测试数据')
      }
},如不了解,建议阅读https://cn.vuejs.org/v2/guide/mixins.html
插件逻辑处理的重点部分:全局混入mixin
props:这个部分非常简单,就是为了让每个组件都能在组件调用时传递变量‘unicom-id’或者‘unicom-name’(一般是静态变量)
watch:这个部分主要就是当组件调用时‘unicom-id’或者‘unicom-name’传递过来的是动态变量对其进行实时监听
beforeCreate:在组件已解析但未加载时,利用‘this.$options’去获取自定义‘unicom’属性,然后在每一个组件内加入事件机制;最后利用Map集合以组件vm作为key,将该组件的分组和通信函数合并的对象作为value存起来
created:在组件已经解析和载入到dom结构之后,从Map集合中获取当前组件的分组和通信函数信息,判断是否有其它组件在当前组件未创建之前给它发送了数据,如果有,响应该延迟发送的数据
destroyed:组件销毁逻辑
如不了解,建议阅读vue中的optionMergeStrategies
这个部分看起来简单的几行,其实却是个插件开发过程中比较重点的部分
如何理解这个‘optionMergeStrategies’呢?该组件主要针对自定义option属性的混合;官方解释是:’当组件和混入对象含有同名选项时,这些选项将以恰当的方式混合‘。
肯定很多人还是不明白,其实说实话我也不算明白,但是我简单解释一下:
这个东西具体的使用你其实可以仔细的看看vuex对这个的使用和‘vue-unicom’中optionMergeStrategies的使用
官网的这句‘当组件和混入对象含有同名选项时,这些选项将以恰当的方式混合’是很透彻的在讲这个东西的概念
在‘vue-unicom’插件中optionMergeStrategies有两个用处,一般情况下主要是将‘unicom-id’和‘vue-unicom’从原本数据格式变成数组;但是,如果当前组件或者vue全局被混入了和我们插件自定义option属性同名的变量,默认的合并策略是后面定义的option属性覆盖前面的,但是我们这里对合并策略进行了重写,就可以保证当前组件上所有的‘unicom-id’或者‘vue-unicom’属性都被push到一个数组中并挂载在当前组件上
简单理解它在当前插件的作用:子组件和上层组件有相同option属性时,让子组件正确合并上层组件的自定义属性
我们可以很肯定一点:vue本身并没有这两个option属性,甚至很可能很多人也从来没有自己在组件声明时自定义options属性
如果你没有试过,也没有关系,看了本篇文章之后你就知道了
为什么我们要自定义option属性呢?这两个属性的作用很明确,‘unicomName’是做分组声明的,‘unicom’是做通信函数的;然后在mixin的各个声明周期再利用‘this.$options’获取自定义option属性进行进一步的逻辑处理,并声明optionMergeStrategies合并策略
利用map集合以组件vm为单位存储该组件的分组和通信函数
每次存通信函数、分组的时候都会把对应的vm示例存储下来,所以要找通信函数或者对应分组就非常简单
这个组件较我一开始使用已经经过了一次对代码更加直观的改进,个人觉得非常值得大家阅读和使用
以上就是本文的全部内容,希望对大家的学习有所帮助,更多相关内容请关注PHP中文网!
相关推荐:
The above is the detailed content of Self-made vue component communication plug-in using mixin to write plug-ins. For more information, please follow other related articles on the PHP Chinese website!


