One of the pain points of reading source code is that you will fall into the dilemma of not straightening out the backbone. This series of articles implements a (x)react while straightening out the backbone content of the React framework (JSX/virtual DOM/components/... )
In the previous article JSX and Virtual DOM, the process of rendering JSX to the interface was explained and the corresponding code was implemented. The code call is as follows:
import React from 'react'
import ReactDOM from 'react-dom'

const element = (
  <p>
    hello<span>world!</span>
  </p>
)

ReactDOM.render(
  element,
  document.getElementById('root')
)In this section, we will continue to explore the process of component rendering to the interface. Here we introduce the concept of components. A component is essentially a function. The following is a standard component code:
import React from 'react'

// 写法 1:
class A {
  render() {
    return <p>I'm componentA</p>
  }
}

// 写法 2:无状态组件
const A = () => <p>I'm componentA</p>

ReactDOM.render(<a></a>, document.body)<a name="componentA"></a> is the way to write JSX. Same as the previous article, babel converts it into the form of React.createElement(). The conversion result is as follows:
React.createElement(A, null)
You can see that when JSX is a custom component , the first parameter after createElement becomes a function, and <a name="componentA"></a> is printed in repl, and the result is as follows:
{
  attributes: undefined,
  children: [],
  key: undefined,
  nodeName: ƒ A()
}Note that it is returned at this time nodeName in Virtual DOM has also become a function. Based on these clues, we transformed the previous render function.
function render(vdom, container) {
  if (_.isFunction(vdom.nodeName)) { // 如果 JSX 中是自定义组件
    let component, returnVdom
    if (vdom.nodeName.prototype.render) {
      component = new vdom.nodeName()
      returnVdom = component.render()
    } else {
      returnVdom = vdom.nodeName() // 针对无状态组件:const A = () => <p>I'm componentsA</p>
    }
    render(returnVdom, container)
    return
  }
}At this point, we have completed the processing logic of the component.
In component A in the previous section, no properties and states were introduced. We hope that properties (props) can be transferred between components and that components can Record the state (state).
import React, { Component } from 'react'

class A extends Component {
  render() {
    return <p>I'm {this.props.name}</p>
  }
}

ReactDOM.render(<a></a>, document.body)In the above code, we see that the A function inherits from Component. Let's construct this parent class Component and add state, props, setState and other attribute methods to it, so that subclasses can inherit them.
function Component(props) {
  this.props = props
  this.state = this.state || {}
}First, we pass the props outside the component into the component and modify the following code in the render function:
function render(vdom, container) {
  if (_.isFunction(vdom.nodeName)) {
    let component, returnVdom
    if (vdom.nodeName.prototype.render) {
      component = new vdom.nodeName(vdom.attributes) // 将组件外的 props 传进组件内
      returnVdom = component.render()
    } else {
      returnVdom = vdom.nodeName(vdom.attributes)     // 处理无状态组件:const A = (props) => <p>I'm {props.name}</p>
    }
    ...
  }
  ...
}After completing the transfer of props between components, let’s talk about state. In react In this example, setState is used to complete the change of component state. Subsequent chapters will delve into this API (asynchronous). Here is a simple implementation as follows:
function Component(props) {
  this.props = props
  this.state = this.state || {}
}

Component.prototype.setState = function() {
  this.state = Object.assign({}, this.state, updateObj) // 这里简单实现,后续篇章会深入探究
  const returnVdom = this.render() // 重新渲染
  document.getElementById('root').innerHTML = null
  render(returnVdom, document.getElementById('root'))
}Although the setState function has been implemented at this time, document.getElementById('root') It is obviously not what we want to write the node in setState. We transfer the dom node related to the _render function:
Component.prototype.setState = function(updateObj) {
  this.state = Object.assign({}, this.state, updateObj)
  _render(this) // 重新渲染
}Naturally, the reconstruction is related to it The render function:
function render(vdom, container) {
  let component
  if (_.isFunction(vdom.nodeName)) {
    if (vdom.nodeName.prototype.render) {
      component = new vdom.nodeName(vdom.attributes)
    } else {
      component = vdom.nodeName(vdom.attributes) // 处理无状态组件:const A = (props) => <p>I'm {props.name}</p>
    }
  }
  component ? _render(component, container) : _render(vdom, container)
}The purpose of separating the _render function from the render function is to allow the _render logic to be called in the setState function. The complete _render function is as follows:
function _render(component, container) {
  const vdom = component.render ? component.render() : component
  if (_.isString(vdom) || _.isNumber(vdom)) {
    container.innerText = container.innerText + vdom
    return
  }
  const dom = document.createElement(vdom.nodeName)
  for (let attr in vdom.attributes) {
    setAttribute(dom, attr, vdom.attributes[attr])
  }
  vdom.children.forEach(vdomChild => render(vdomChild, dom))
  if (component.container) {  // 注意:调用 setState 方法时是进入这段逻辑,从而实现我们将 dom 的逻辑与 setState 函数分离的目标;知识点: new 出来的同一个实例
    component.container.innerHTML = null
    component.container.appendChild(dom)
    return
  }
  component.container = container
  container.appendChild(dom)
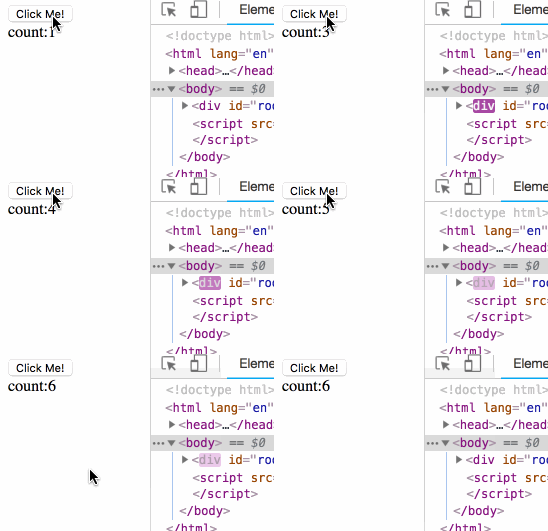
}Let us use the following use case to run the written react!
class A extends Component {
  constructor(props) {
    super(props)
    this.state = {
      count: 1
    }
  }

  click() {
    this.setState({
      count: ++this.state.count
    })
  }

  render() {
    return (
      <p>
        <button>Click Me!</button>
        </p><p>{this.props.name}:{this.state.count}</p>

    )
  }
}

ReactDOM.render(
  <a></a>,
  document.getElementById('root')
)The rendering is as follows:

At this point, we have implemented the logic of the props and state parts.
Components are functions; when JSX is a custom component, the first parameter in React.createElement(fn, ..) after babel conversion becomes a function , except that other logic is the same as when it is an html element in JSX;
In addition, we have encapsulated apis such as state/props/setState into the parent class React.Component, so that they can be called in subclasses these properties and methods.
The above is the entire content of this article. I hope it will be helpful to everyone's study. For more related content, please pay attention to the PHP Chinese website!
Related recommendations:
Detailed explanation of config/index.js: configuration in vue
The above is the detailed content of Parsing of React components and state|props. For more information, please follow other related articles on the PHP Chinese website!


