This article mainly introduces the communication between parent and child components in Vue. It has certain reference value. Now I share it with you. Friends in need can refer to
Vue. js is a progressive framework for building user interfaces. Unlike other heavyweight frameworks, Vue fundamentally adopts a minimal-cost, incremental design. Vue's core library focuses solely on the view layer and is easy to integrate with other third-party libraries or existing projects. On the other hand, Vue is also perfectly capable of powering complex single-page applications when combined with single-file components and libraries supported by the Vue ecosystem.
There are generally three ways to introduce Vue:
The first CDN introduction
<script></script>
The second type uses NPM to install
$ npm install vue//安装最新稳定版
The third type is to build scaffolding CLI
The so-called scaffolding is a development environment built through webpack, used for Quickly build large single-page applications. It can bring a durable and powerful infrastructure to modern front-end development workflow. In just a few minutes, you can have a project up and running with hot reloading, code checking on save, and a production-ready build configuration.
You must first install node.js. Node.js has built-in npm since version 0.6.3, so after node.js is installed, npm will be installed. Then operate the following command line through git bash:
$ node -v//检查是否已经装好了node
$ npm -v//检查是否已经装好了npm
$ npm install --global vue-cli //安装 vue-cli
$ vue init webpack project//进入目标文件夹创建一个新项目
$ cd project//进入新项目
$ npm install//安装package.json中依赖的node_modules
$ npm run dev//运行该项目
For mainland users, it is recommended to set the npm registry source to a domestic mirror, which can greatly improve the installation speed. This type of installation scaffolding is recommended.
npm config set registry https://registry.npm.taobao.org//配置淘宝镜像
npm config get registry//验证是否成功
npm install -g cnpm --registry=https://registry.npm.taobao.org//安装cnpm
cnpm install -g vue-cli//cnpm安装脚手架
vue init webpack my-project
cd my-project
cnpm install
cnpm run dev
Finally open http://localhost:8080, and the following page will appear, indicating that the scaffolding is completed. 
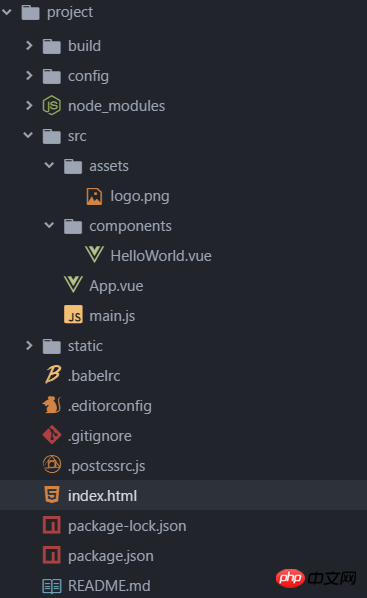
After the scaffolding is completed, each folder and file in the project is as shown below: 
index.html (entry file)=>main.js=>App.vue (root component), root component The content of the template is directly inserted into the entry file at #app, and then the page is presented.
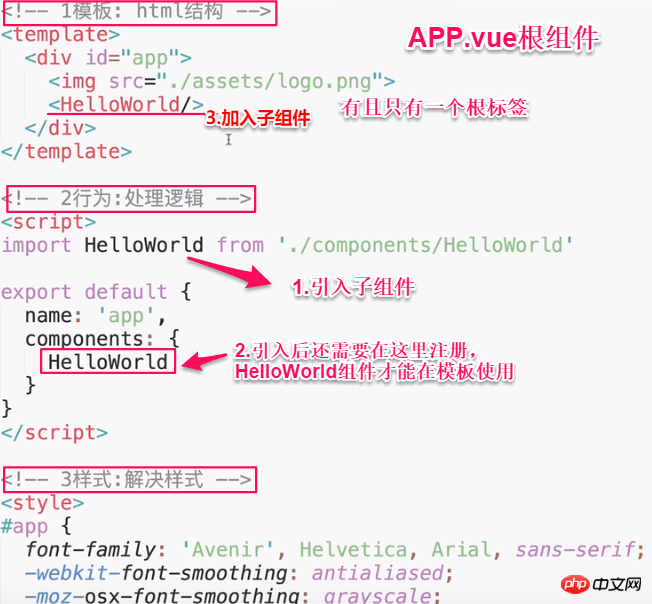
It mainly consists of three parts, namely template (html structure), behavior (processing logic) and style (solving style)
Vue component nesting refers to how the written sub-component is associated with the root component. It can usually be divided into component global definition and component local definition. The latter is more common.
Generally the following two steps:
①main.js introduces sub-components
②template in App.vue component Call
//main.js
import Vue from 'vue'
import App from './App'
import Users from "./components/Users";//引入子组件Users
Vue.config.productionTip = false
Vue.component("users",Users);//自定义名字便于App.vue组件调用,后者为组件名
new Vue({
  el: '#app',
  components: { App },
  template: '<app></app>'
})Generally the following three steps:
①import introduce sub-component
②export default registration sub-component
③Add sub-components to the template

Next we use an example to illustrate how the parent component transfers values to the sub-components. Subcomponent transfer value: How to get the data in the parent component App.vue in the subcomponent Users.vue users:["Henry","Bucky","Emily"]
//App.vue组件
<template>
  <p>
   <users></users>//在这里调用,自定义名字是小写的
  </p>
</template>
//App.vue父组件
<template>
<p>
<users></users>//前者自定义名称便于子组件调用,后者要传递数据名
</p>
</template>
<script>
import Users from "./components/Users"
export default {
name: 'App',
data(){
return{
users:["Henry","Bucky","Emily"]
}
},
components:{
"users":Users
}
}</script>Next we use an example to illustrate the subcomponent How to pass a value to the parent component:
When we click "Vue.js Demo", the child component passes the value to the parent component, and the text changes from the original "A value is passed" to "The child passes a value to the parent component" , to realize the transfer of value from the child component to the parent component.

//users子组件
<template>
<p>
</p>
<ul>
<li>{{user}}</li>//遍历传递过来的值,然后呈现到页面
</ul>
</template>
<script>
export default {
name: 'HelloWorld',
props:{
users:{ //这个就是父组件中子标签自定义名字
type:Array,
required:true
}
}
}
</script><script></script> {{title}}
//绑定一个点击事件
<script>
export default {
name: 'app-header',
data() {
return {
title:"Vue.js Demo"
}
},
methods:{
changeTitle() {
this.$emit("titleChanged","子向父组件传值");//自定义事件 传递值“子向父组件传值”
}
}
}
</script>In communication, whether a child component passes a value to a parent component or a parent component passes a value to a child component, they all have one thing in common. There are intermediate media. The media from the child to the parent is a custom event, and the media from the parent to the child is the attribute in props.
The above is the entire content of this article. I hope it will be helpful to everyone's study. For more related content, please pay attention to the PHP Chinese website!
related suggestion:
Use c v to return vue to the top component
The above is the detailed content of Communication between parent and child components in Vue. For more information, please follow other related articles on the PHP Chinese website!


