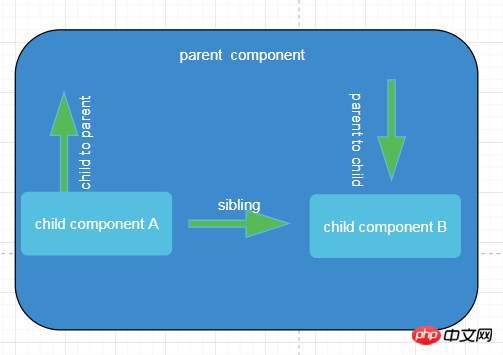
This article mainly introduces the analysis of angular component communication, which has certain reference value. Now I share it with everyone. Friends in need can refer to it.
Single page application component communication has the following This article mainly talks about Angular communication

| sibling => sibling | ||
|---|---|---|
|
setters (essentially still @input) |
||
|
ngOnChanges() (deprecated) |
||
| # #Local variables |
||
|
service |
||
| Observalbe for Rxjs | Observalbe of Rxjs | |
| localStorage,sessionStorage | localStorage,sessionStorage | |
|
The above chart summarizes the communication solutions that can be used. The last three types in the period are universal. These three types can be used among Angular components. Among them, Rxjs is the most powerful usage, dumping redux. promise, these are also based on functional state management. , let’s talk about them one by one. Parent component=> Child component@input, the most commonly used method@Component({
selector: 'app-parent',
template: '<p>childText:<app-child></app-child></p>',
styleUrls: ['./parent.component.css']
})
export class ParentComponent implements OnInit {
varString: string;
constructor() { }
ngOnInit() {
this.varString = '从父组件传过来的' ;
}
}Copy after login import { Component, OnInit, Input } from '@angular/core';
@Component({
selector: 'app-child',
template: '<h1>{{textContent}}</h1>',
styleUrls: ['./child.component.css']
})
export class ChildComponent implements OnInit {
@Input() public textContent: string ;
constructor() { }
ngOnInit() {
}
}Copy after login setterSetter is to intercept the @input attribute. Because when we communicate with components, we often need to process the input attributes, so we need a setter. Setter and getter are often used together. Slightly modify the above child.component.ts import { Component, OnInit, Input } from '@angular/core';
@Component({
selector: 'app-child',
template: '<h1>{{textContent}}</h1>',
styleUrls: ['./child.component.css']
})
export class ChildComponent implements OnInit {
_textContent:string;
@Input()
set textContent(text: string){
this._textContent = !text: "啥都没有给我" ? text ;
} ;
get textContent(){
return this._textContent;
}
constructor() { }
ngOnInit() {
}
}Copy after login onChangeThis is detected through the angular life cycle hook. It is not recommended to use it. If you want to use it, you can Refer to angular documentation @ViewChild()@ViewChild() is generally used to call non-private methods of sub-components import {Component, OnInit, ViewChild} from '@angular/core';
import {ViewChildChildComponent} from "../view-child-child/view-child-child.component";
@Component({
selector: 'app-parent',
templateUrl: './parent.component.html',
styleUrls: ['./parent.component.css']
})
export class ParentComponent implements OnInit {
varString: string;
@ViewChild(ViewChildChildComponent)
viewChildChildComponent: ViewChildChildComponent;
constructor() { }
ngOnInit() {
this.varString = '从父组件传过来的' ;
}
clickEvent(clickEvent: any) {
console.log(clickEvent);
this.viewChildChildComponent.myName(clickEvent.value);
}
}Copy after login import { Component, OnInit } from '@angular/core';
@Component({
  selector: 'app-view-child-child',
  templateUrl: './view-child-child.component.html',
  styleUrls: ['./view-child-child.component.css']
})
export class ViewChildChildComponent implements OnInit {

  constructor() { }
  name: string;
  myName(name: string) {
      console.log(name);
      this.name = name ;
  }
  ngOnInit() {
  }

}
Copy after login Local variablesLocal variables Similar to viewChild, it can only be used in html templates. Modify parent.component.html and use the variable <p> <input> <button>局部变量传值</button> <app-view-child-child></app-view-child-child> </p> Copy after login child component is as follows @Component({
selector: 'app-view-child-child',
templateUrl: './view-child-child.component.html',
styleUrls: ['./view-child-child.component.css']
})
export class ViewChildChildComponent implements OnInit {
constructor() { }
name: string;
myName(name: string) {
console.log(name);
this.name = name ;
}
ngOnInit() {
}
}Copy after login Child component=> Parent component@output()Output, a common communication, essentially passes a # to the child component ##function parent.component.ts
@Component({
selector: 'app-child-to-parent',
templateUrl: './parent.component.html',
styleUrls: ['./parent.component.css']
})
export class ChildToParentComponent implements OnInit {
childName: string;
childNameForInject: string;
constructor( ) { }
ngOnInit() {
}
showChildName(name: string) {
this.childName = name;
}
}Copy after login <p>
</p><p>output方式 childText:{{childName}}</p>
<br>
<app-output-child></app-output-child>
Copy after login child.component.ts
export class OutputChildComponent implements OnInit {
// 传入的回调事件
@Output() public childNameEventEmitter: EventEmitter<any> = new EventEmitter();
constructor() { }
ngOnInit() {
}
showMyName(value) {
//这里就执行,父组件传入的函数
this.childNameEventEmitter.emit(value);
}
}</any>Copy after login export class OutputChildComponent implements OnInit {
// 注入父组件
constructor(private childToParentComponent: ChildToParentComponent) { }
ngOnInit() {
}
showMyName(value) {
this.childToParentComponent.childNameForInject = value;
}
}Copy after login . When you inject a service into a module, all the components of this module can get the properties and methods of this service. They are shared, so you often inject the log service in app.moudule.ts. , http interception service. The service injected in the sub-module can only be shared by this sub-module. The service injected in the component can only be obtained by the sub-component. The following is the service injected into app.module.ts. To demonstrate user.service.ts
@Injectable()
export class UserService {
age: number;
userName: string;
constructor() { }
}
app.module.ts
@NgModule({
declarations: [
AppComponent,
SiblingAComponent,
SiblingBComponent
],
imports: [
BrowserModule
],
providers: [UserService],
bootstrap: [AppComponent]
})
export class AppModule { }
SiblingBComponent.ts
@Component({
selector: 'app-sibling-b',
templateUrl: './sibling-b.component.html',
styleUrls: ['./sibling-b.component.css']
})
export class SiblingBComponent implements OnInit {
constructor(private userService: UserService) {
this.userService.userName = "王二";
}
ngOnInit() {
}
}
SiblingAComponent.ts
@Component({
selector: 'app-sibling-a',
templateUrl: './sibling-a.component.html',
styleUrls: ['./sibling-a.component.css']
})
export class SiblingAComponent implements OnInit {
userName: string;
constructor(private userService: UserService) {
}
ngOnInit() {
this.userName = this.userService.userName;
}
}Copy after login component, which is very cumbersome and has to be done once for each component. If it is based on Rx.js, you can put this in app.component.ts Prompt component, and then app.component.ts subscribes to the public service, which is easier. The code is as follows import {Injectable} from "@angular/core";
import {Subject} from "rxjs/Subject";
@Injectable()
export class AlertService {
private messageSu = new Subject<string>(); //
messageObserve = this.messageSu.asObservable();
private setMessage(message: string) {
this.messageSu.next(message);
}
public success(message: string, callback?: Function) {
this.setMessage(message);
callback();
}
}</string>Copy after login @Component({
selector: 'app-sibling-a',
templateUrl: './sibling-a.component.html',
styleUrls: ['./sibling-a.component.css']
})
export class SiblingAComponent implements OnInit {
userName: string;
constructor(private userService: UserService, private alertService: AlertService) {
}
ngOnInit() {
this.userName = this.userService.userName;
// 改变alertService的信息源
this.alertService.success("初始化成功");
}
}Copy after login @Component({
selector: 'app-root',
templateUrl: './app.component.html',
styleUrls: ['./app.component.css']
})
export class AppComponent {
title = 'app';
message: string;
constructor(private alertService: AlertService) {
//订阅alertServcie的message服务
this.alertService.messageObserve.subscribe((res: any) => {
this.message = res;
});
}
}Copy after login |
The above is the detailed content of Analysis of angular component communication. For more information, please follow other related articles on the PHP Chinese website!


