
Angular is an open source web front-end framework developed by Google. It was born in 2009 by Misko Hevery and others. Founded by Google and later acquired by Google. It is an excellent front-end JS framework that has been used in many Google products.
According to the statistics of the number of projects, angular (1.x, 2.x, 4.x, 5.x, 6.x, 7.x, 8.x, 9.x) is the most commonly used framework on the Internet.
Angular is based on TypeScript and is more suitable for medium and large enterprise-level projects than react and vue.
Recommended related tutorials: "angular Tutorial"
Regarding the Angular version, Angular has officially named Angular 1.x collectively as Angular JS; Angular 2.x and above Collectively called Angular;
The latest version of angular is angular9.x on December 25, 2019. According to the official introduction, Angular will be updated with a version every few months. The usage is the same for all Angular versions after Angular2.x. This tutorial is also applicable to Angular7.x, Angular8.x, Angular9.x and other future versions...
Necessary basics for learning Angular
Necessary basics: html, css, js, es6, ts
1. Preparation work before installation:
1.1. Install nodejs
The computer where angular is installed must have the latest nodejs installed – pay attention to installing the stable version of nodejs
1.2. Choose a command tool, npm, cnpm, yarn, choose any one
Set Taobao source mirror, if you use npm
npm config set registry https://registry.npm.taobao. org
If you use cnpm, install cnpm
npm may fail to install. It is recommended to install it with npm first. cnpm is installed with Taobao mirror
https://npm.taobao.org/
npm install -g cnpm --registry=https://registry.npm.taobao.org
Or install yarn. Note that you only need to choose a command tool
yarn
Yarn claims to be a package management tool ten times faster than npm, and it also has some great features. It should be a surprise for the front-end in 2017. According to my personal experience, it is really fast, so I strongly recommend it. Friends, please use it too! The usage is very simple, install it with your npm
npm install yarn -g
Then switch to Taobao source and you can feel the speed:
yarn config set registry https: //registry.npm.taobao.org --global
yarn config set disturl https://npm.taobao.org/dist --global
Okay, it's really simple, its command Almost the same as npm:
Initialization: yarn init
Install a package: yarn add package name
Update a package: yarn upgrade package name
Delete a package: yarn remove package name
Install all packages: yarn or yarn install
After successful setting, there will be surprises.
CLI is the abbreviation of Command Line Interface, which is a command line interface for automation Development processes, such as ionic cli, vue cli, etc.; it can create projects, add files, and perform a lot of development tasks, such as testing, packaging, and publishing.
yarn global add @angular/cli or npm install @angular/cli -g
After a long wait, your Angular CLI will be installed. Confirm:
ng new my-app
If you want to skip npm i installation
ng new my-app --skip-install
take advantage While it is downloading, let’s take a look at what Angular cli has done for us after running ng new:
So, at this time Angular cli has done the following things for you:
After the installation is complete, you can start the project:
cd my-app / /Enter my-app
npm start or ng serve //Start the service
The ng serve command will start the development server, monitor file changes, and rebuild the application when these files are modified.
Use the –open (or -o) parameter to automatically open the browser and access http://localhost:4200/.
ng serve command provides many parameters, you can refer to them appropriately.
The following parameters are for reference only:
--dry-run: boolean, 默认为 false, 若设置 dry-run 则不会创建任何文件--verbose: boolean, 默认为 false--link-cli: boolean, 默认为 false, 自动链接到 @angular/cli 包--skip-install: boolean, 默认为 false, 表示跳过 npm install--skip-git: boolean, 默认为 false, 表示该目录不初始化为 git 仓库--skip-tests: boolean, 默认为 false, 表示不创建 tests 相关文件--skip-commit: boolean, 默认为 false, 表示不进行初始提交--directory: string, 用于设置创建的目录名,默认与应用程序的同名--source-dir: string, 默认为 'src', 用于设置源文件目录的名称--style: string, 默认为 'css', 用于设置选用的样式语法 ('css', 'less' or 'scss')--prefix: string, 默认为 'app', 用于设置创建新组件时,组件选择器使用的前缀--mobile: boolean, 默认为 false,表示是否生成 Progressive Web App 应用程序--routing: boolean, 默认为 false, 表示新增带有路由信息的模块,并添加到根模块中--inline-style: boolean, 默认为 false, 表示当创建新的应用程序时,使用内联样式--inline-template: boolean, 默认为 false, 表示当创建新的应用程序时,使用内联模板Other files:
  .editorconfig: 给你的编辑器看的一个简单配置文件  .gitignore: git 排除文件
  angular.json: angular cli 的配置文件  package.json:npm 配置文件,项目使用到的第三方依赖包
  protractor.conf.js:运行 ng e2e 的时候会用到  README.md:项目的基础文档
  tsconfig.json:TypeScript 编译器的配置
  tslint.json:运行 ng lint 时会用到
$ ng generate component news
installing component
create src/app/great-angular/news.component.css
create src/app/great-angular/news.component.html
create src/app/great-angular/news.component.spec.ts
create src/app/great-angular/news.component.ts
update src/app/app.module.ts
如你所见,Angular cli帮我们干了如下事情:
src/app/news 目录被创建
news目录下会生成以下四个文件:
CSS 样式文件,用于设置组件的样式
HTML 模板文件,用于设置组件的模板
TypeScript 文件,里面包含一个 组件类和组件的元信息
Spec 文件,包含组件相关的测试用例
news 组件会被自动地添加到 app.module.ts @NgModule 装饰器的 declarations 属性中。
Angualr CLI提供了许多常用命令供我们选择:
ng generate class my-new-class // 新建类, 新建一个名为my-new-class的类 (class)
ng generate component my-new-component // 新建组件
ng generate directive my-new-directive // 新建指令
ng generate enum my-new-enum // 新建枚举
ng generate module my-new-module // 新建模块
ng generate pipe my-new-pipe // 新建管道
ng generate service my-new-service // 新建服务
当然选择。。简写:
ng g cl my-new-class // 新建 class
ng g c my-new-component // 新建组件
ng g d my-new-directive // 新建指令
ng g e my-new-enum // 新建枚举
ng g m my-new-module // 新建模块
ng g p my-new-pipe // 新建管道
ng g s my-new-service // 新建服务
Angular默认帮我们集成了``karma`测试框架,我们只需要:
ng test
ng e2e
ng build
其中过程应该是这样的:
Angular CLI 从 .angular-cli.json 文件中加载配置信息
Angular CLI 运行 Webpack 打包项目相关的 JavaScript、 CSS 等文件
打包后的资源,将被输出到配置文件中 outDir 所指定的目录,默认是输出到 dist 目录。
Angular开发工具介绍
Visual Studio Code
文件 说明
|--E2e	应用的端对端(e2e)测试,用 Jasmine 写成并用 protractor 端对端测试运行器测试。|--Node_modules	依赖包|--Src
   |--App	Angular应用文件      |--App.module.ts
      |---App.component.ts
   |--assets	资源文件   |--environments	环境配置:开发、部署   |--index.html	应用的宿主页面。 它以特定的顺序加载一些基本脚本。 然后它启动应用,将根AppComponent放置到自定义<my-app>标签里。   |--main.ts	项目的入口文件   |--polyfills.ts	处理浏览器兼容问题|--angular.json	Cli配置文件|--.editorconfig	统一代码风格工具配置,不支持的需要安装插件|--.gitignore	Git配置文件|--karma.conf.js	在测试指南中提到的 karma 测试运行器的配置。|--package.json	项目指定npm依赖包|--tsconfig.app.json	Typescript编译配置|--tsconfig.spec.json	Typescript测试编译配置|--tsconfig.json	Typescript编译配置|--tslint.json	Typescript语法检查器</my-app>
详情参考:https://www.angular.cn/guide/file-structure
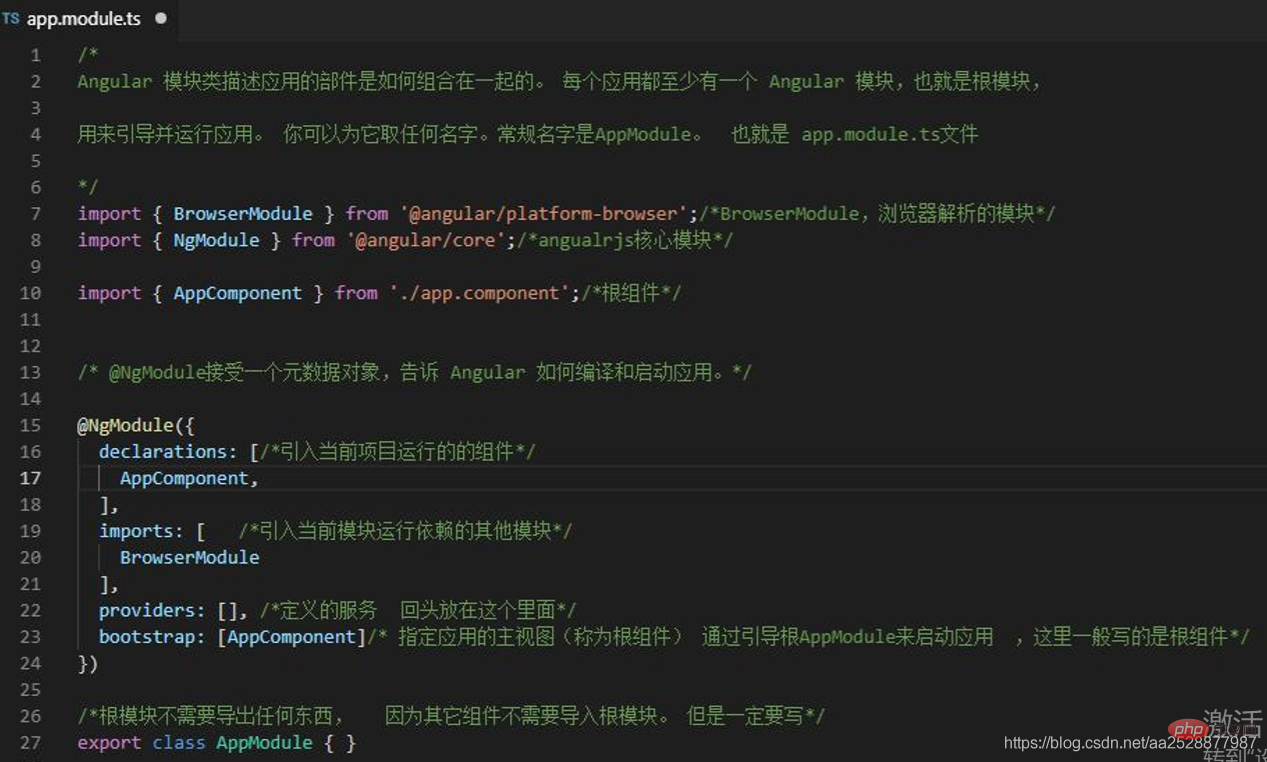
定义 AppModule,这个根模块会告诉 Angular 如何组装该应用。 目前,它只声明了 AppComponent。 稍后它还会声明更多组件。
https://cli.angular.io/
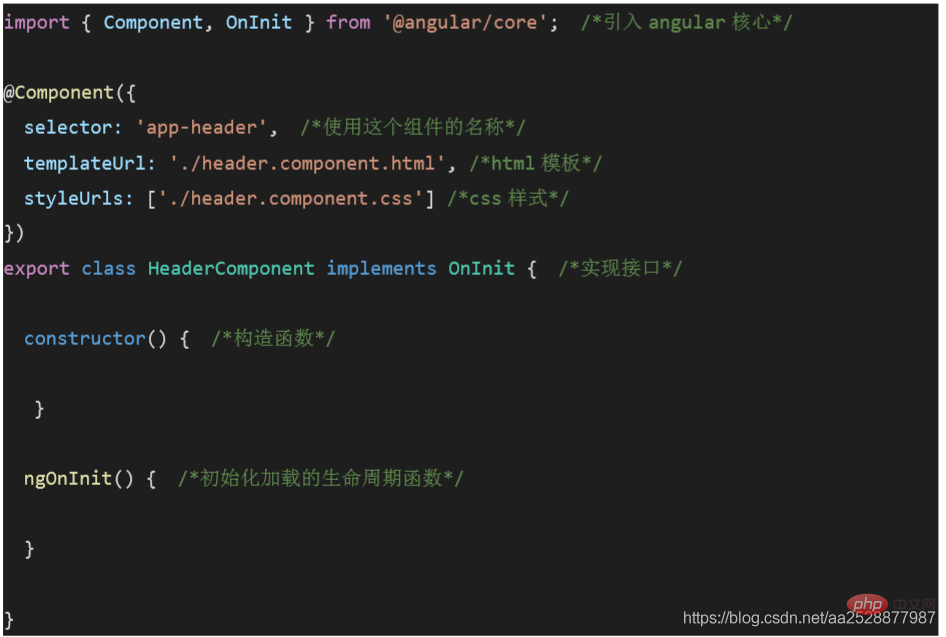
创建组件:
ng g component components/header
组件内容详解:
Angular应用中,模板指的的是@Component装饰器的template或templateUrl指向的HTML页面
例如:
import { Component } from '@angular/core';interface Course {
  id:number,
  description:string}@Component({
  selector: 'app-root',
  // templateUrl: './app.component.html',
  template:`
    <p>
        <span>{{courseObj.description}}</span>
    </p>
  `,
  styleUrls: ['./app.component.css']})export class AppComponent{
  title = 'ng-module-routes';
    id:number = 1;
    description:string = 'sss';

   public courseObj: Course = {
      id: 1,
      description: "Angular For Beginners"
};}很明显Angular不是简单地用一个字符串来处理模板。 那么这是如何工作的?
Angular不会生成HTML字符串,它直接生成DOM数据结构
实际上,Angular把组件类中的数据模型应用于一个函数(DOM component renderer)。 该函数的输出是对应于此HTML模板的DOM数据结构。
一旦数据状态发生改变,Angular数据检测器检测到,将重新调用
该DOM component renderer。
mvvm
Mvvm定义MVVM是Model-View-ViewModel的简写。即模型-视图-视图模型。
它有两个方向:
实现的方式是:DOM 事件监听。这两个方向都实现的,我们称之为数据的双向绑定。
在MVVM的框架下视图和模型是不能直接通信的。它们通过ViewModel来通信,ViewModel通常要实现一个observer观察者,当数据发生变化,ViewModel能够监听到数据的这种变化,然后通知到对应的视图做自动更新,而当用户操作视图,ViewModel也能监听到视图的变化,然后通知数据做改动,这实际上就实现了数据的双向绑定。
And View and ViewModel in MVVM can communicate with each other. The MVVM flow chart is as follows: 
For more computer programming related knowledge, please visit: Introduction to Programming! !
The above is the detailed content of Angular introductory learning environment and project construction. For more information, please follow other related articles on the PHP Chinese website!
 php development tools
 How to open php in a web page
 What is the difference between TCP protocol and UDP protocol?
 What is mobile HD
 What is the reason why the computer screen is black but the computer is on?
 Solution to reboot and select proper boot device
 What are the levels of mobile user star ratings?
 win10 connect to shared printer