AJAX와 MySQL
예제 설명 - MySQL 데이터베이스
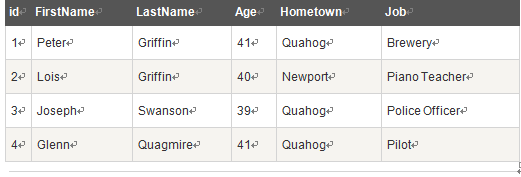
위 예에서 사용하는 데이터베이스 테이블은 다음과 같습니다.

예제 설명 - HTML 페이지
사용자가 위 드롭다운 목록에서 사용자를 선택하면 "showUser( "가 실행됩니다)" 기능을 수행합니다. 이 함수는 "onchange" 이벤트에 의해 트리거됩니다:
<html>
 <head>
     <script>
         function showUser(str)
         {
             if (str=="")
             {
                 document.getElementById("txtHint").innerHTML="";
                 return;
             }
             if (window.XMLHttpRequest)
             {
                 // IE7+, Firefox, Chrome, Opera, Safari 浏览器执行代码
                 xmlhttp=new XMLHttpRequest();
             }
             else
             {
                 // IE6, IE5 浏览器执行代码
                 xmlhttp=new ActiveXObject("Microsoft.XMLHTTP");
             }
             xmlhttp.onreadystatechange=function()
             {
                 if (xmlhttp.readyState==4 && xmlhttp.status==200)
                 {
                     document.getElementById("txtHint").innerHTML=xmlhttp.responseText;
                 }
             }
             xmlhttp.open("GET","getuser.php?q="+str,true);
             xmlhttp.send();
         }
     </script>
 </head>
 <body>
 <form>
     <select name="users" onchange="showUser(this.value)">
         <option value="">Select a person:</option>
         <option value="1">Peter Griffin</option>
         <option value="2">Lois Griffin</option>
         <option value="3">Glenn Quagmire</option>
         <option value="4">Joseph Swanson</option>
     </select>
 </form>
 <br>
 <div id="txtHint"><b>Person info will be listed here.</b></div>
 </body>
 </html>
showUser() 이 함수는 다음 단계를 수행합니다.
· ~ ~ ~ 하지 않음 콘텐츠)
PHP 파일
위에서 JavaScript를 통해 호출된 서버 페이지의 이름은 PHP 파일 "getuser.php"입니다.
"getuser.php"의 소스 코드는 MySQL 데이터베이스에 대해 쿼리를 실행하고 결과를 HTML 테이블로 반환합니다. <?php
$q=$_GET["q"];
$con = mysqli_connect('localhost','peter','abc123','my_db');
if (!$con)
{
die('Could not connect: ' . mysqli_error($con));
}
mysqli_select_db($con,"ajax_demo");
$sql="SELECT * FROM user WHERE id = '".$q."'";
$result = mysqli_query($con,$sql);
echo "<table border='1'>
<tr>
<th>Firstname</th>
<th>Lastname</th>
<th>Age</th>
<th>Hometown</th>
<th>Job</th>
</tr>";
while($row = mysqli_fetch_array($result))
{
echo "<tr>";
echo "<td>" . $row['FirstName'] . "</td>";
echo "<td>" . $row['LastName'] . "</td>";
echo "<td>" . $row['Age'] . "</td>";
echo "<td>" . $row['Hometown'] . "</td>";
echo "<td>" . $row['Job'] . "</td>";
echo "</tr>";
}
echo "</table>";
mysqli_close($con);
?>설명: 쿼리가 JavaScript에서 PHP로 전송되는 경우 1. PHP가 MySQL 데이터베이스에 대한 연결을 엽니다.
2. 선택한 사용자를 찾습니다.
3. HTML 테이블을 만들고, "txtHint" 자리 표시자를 다시 보냅니다.


