PHP 개발 소규모 포럼 튜토리얼 게시물 답변-1

reply.php 파일 만들기

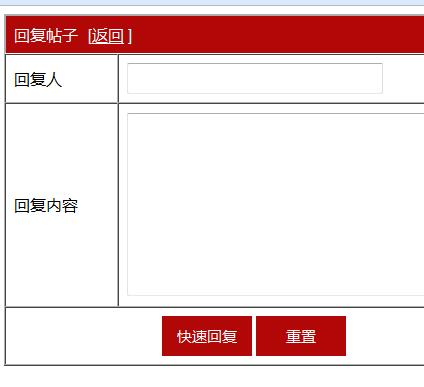
저희 답글 페이지도 페이지 레이아웃에 <table> 테이블 + CSS 스타일을 사용합니다.

최종 페이지 효과는 아래와 같습니다
03.jpg

코드는 다음과 같습니다.

<!DOCTYPE html>
<html lang="en">
        <head>
        <meta charset="UTF-8">
        <title>回复</title>
        <style>
.title{
    background-color: #B10707;
    color: white;
}
.sub{
    text-align: center;
}
.but{
    background-color: #B10707;
    width: 90px;
    height: 40px;
    font-size: 15px;
    color: white;
    border: none;
}
input{
    width: 250px;
    height: 25px;
}
.right{
    margin-left: 10px;
}
</style>
            <script type="text/javascript">
                function checkinput()
                {
                    if(myform.reply_author.value=="")
                    {
                        alert("请输入你的昵称");
                        myform.reply_author.focus();
                        return false;
                    }
                    if (myform.reply.value=="")
                    {
                        alert("请输入你想回复的内容");
                        myform.reply.focus();
                        return false;
                    }
                }
            </script>
</head>
<body>
<form method="post" action="reply_post.php?id=<?php echo $_GET['id']; ?>" onsubmit=" return checkinput();" name="myform">
        <table width="500px" border="1" cellpadding="8" cellspacing="0" align="center">
        <tr class="title">
        <td colspan="2">
        回复帖子<span class="right">[<a style="color: white" href="forums.php">返回</a> ]</span>
</td>
</tr>
<tr>
<td width="100px">回复人</td>
        <td><input type="text" name="reply_author"></td>
        </tr>
        <tr>
        <tr>
        <td width="100px">回复内容</td>
        <td><textarea cols="43" rows="10" name="reply">
        </textarea></td>
        </tr>
        <tr class="sub">
        <td colspan="2">
        <input type="submit" value="快速回复" class="but">
        <input type="reset" value="重置" class="but">
        </td>
        </tr>
        </table>
        </form>
        </body>
        </html>

다음 단계는 데이터 처리를 위해 reply_post.php 페이지에 답글 내용을 제출하는 것입니다


지속적인 학습
||
<!DOCTYPE html> <html lang="en"> <head> <meta charset="UTF-8"> <title>回复</title> <style> .title{ background-color: #B10707; color: white; } .sub{ text-align: center; } .but{ background-color: #B10707; width: 90px; height: 40px; font-size: 15px; color: white; border: none; } input{ width: 250px; height: 25px; } .right{ margin-left: 10px; } </style> <script type="text/javascript"> function checkinput() { if(myform.reply_author.value=="") { alert("请输入你的昵称"); myform.reply_author.focus(); return false; } if (myform.reply.value=="") { alert("请输入你想回复的内容"); myform.reply.focus(); return false; } } </script> </head> <body> <form method="post" action="reply_post.php?id=<?php echo $_GET['id']; ?>" onsubmit=" return checkinput();" name="myform"> <table width="500px" border="1" cellpadding="8" cellspacing="0" align="center"> <tr class="title"> <td colspan="2"> 回复帖子<span class="right">[<a style="color: white" href="forums.php">返回</a> ]</span> </td> </tr> <tr> <td width="100px">回复人</td> <td><input type="text" name="reply_author"></td> </tr> <tr> <tr> <td width="100px">回复内容</td> <td><textarea cols="43" rows="10" name="reply"> </textarea></td> </tr> <tr class="sub"> <td colspan="2"> <input type="submit" value="快速回复" class="but"> <input type="reset" value="重置" class="but"> </td> </tr> </table> </form> </body> </html>
  • 코스 추천
  • 코스웨어 다운로드
현재 코스웨어를 다운로드할 수 없습니다. 현재 직원들이 정리하고 있습니다. 앞으로도 본 강좌에 많은 관심 부탁드립니다~