

搭pl/proxy集群

最近朋友要上一个系统,设计百亿级数据。我去帮着搭建系统,采用pg/proxy集群,业务相关就不说了,这里就把简单技术验证放出来。相关人员比较保守,就用了OS官方的安装包,pg版本9.1. 规划中两台服务器上验证,一个上三个实例(一个实例做代理,另外两个做数
最近朋友要上一个系统,设计百亿级数据。我去帮着搭建系统,采用pg/proxy集群,业务相关就不说了,这里就把简单技术验证放出来。相关人员比较保守,就用了OS官方的安装包,pg版本9.1.
规划中两台服务器上验证,一个上三个实例(一个实例做代理,另外两个做数据节点),一个上两个实例(做数据节点)
数据节目录如下,不过是在两台服务器上,如上所说。
/opt/pg91/pgdata0
/opt/pg91/pgdata1
/opt/pg91/pgdata2
/opt/pg91/pgdata3
/opt/pg91/pgdata4
0
第一部分,安装
1
查询可安装版本
zxw@pgproxy1:~$ apt-cache search postgres | grep 9
libpgtypes3 - shared library libpgtypes for PostgreSQL 9.1
postgresql-9.1 - object-relational SQL database, version 9.1 server
。。。
postgresql-9.1-slony1-2 - replication system for PostgreSQL: PostgreSQL 9.1 server plug-in
skytools-modules-9.1 - PostgreSQL 9.1 modules for skytools
2
装
zxw@pgproxy1:~$ sudo apt-get install -y postgresql-9.1 postgresql-client-9.1 postgresql-contrib-9.1 postgresql-server-dev-9.1
... ...
update-alternatives: using /usr/share/postgresql/9.1/man/man1/postmaster.1.gz to provide /usr/share/man/man1/postmaster.1.gz (postmaster.1.gz) in auto mode.
* Starting PostgreSQL 9.1 database server
...done.
Setting up postgresql-contrib-9.1 (9.1.14-0ubuntu0.12.04) ...
Setting up postgresql-server-dev-9.1 (9.1.14-0ubuntu0.12.04) ...
Processing triggers for libc-bin ...
ldconfig deferred processing now taking place
看到上面这句就ok了,就是说有些事情在以上安装过程中给deferred(推迟)了,推迟到现在集中处理了。
3
查看,已经跑起来了
zxw@pgproxy1:~$ ps -ef | grep postgres
postgres 8362 1 0 17:22 ? 00:00:00 /usr/lib/postgresql/9.1/bin/postgres -D /var/lib/postgresql/9.1/main -c config_file=/etc/postgresql/9.1/main/postgresql.conf
postgres 8364 8362 0 17:22 ? 00:00:00 postgres: writer process
postgres 8365 8362 0 17:22 ? 00:00:00 postgres: wal writer process
postgres 8366 8362 0 17:22 ? 00:00:00 postgres: autovacuum launcher process
postgres 8367 8362 0 17:22 ? 00:00:00 postgres: stats collector process
zxw 8425 1486 0 17:34 pts/0 00:00:00 grep --color=auto postgres
zxw@pgproxy1:~$
zxw@pgproxy1:~$ /etc/init.d/postgresql status
Running clusters: 9.1/main
4
这样登录不行,默认Peer authentication
zxw@pgproxy1:~$ psql -U postgres postgres
psql: FATAL: Peer authentication failed for user "postgres"
zxw@pgproxy1:~$
5
这样登录
zxw@pgproxy1:~$ sudo -u postgres psql
[sudo] password for zxw:
psql (9.1.14)
Type "help" for help.
postgres=# \q
5
确认Peer authentication
zxw@pgproxy1:~$ sudo nl /etc/postgresql/9.1/main/pg_hba.conf | more
79 # Database administrative login by Unix domain socket
80 local all postgres peer
81 # TYPE DATABASE USER ADDRESS METHOD
82 # "local" is for Unix domain socket connections only
83 local all all peer
84 # IPv4 local connections:
85 host all all 127.0.0.1/32 md5
peer
Obtain the client’s operating system user name from the operating system and check if it
matches the requested database user name. This is only available for local connections. See
Section 19.3.7 for details.
给改成md5认证,
6
安装时没提示设置密码,超级用户密码随机了一个,给修改一下
postgres=# select * from pg_user;
usename | usesysid | usecreatedb | usesuper | usecatupd | userepl | passwd | valuntil | useconfig
----------+----------+-------------+----------+-----------+---------+----------+----------+-----------
postgres | 10 | t | t | t | t | ******** | |
(1 row)
postgres=# alter user postgres password 'postgres';
ALTER ROLE
postgres=# select * from pg_user;
usename | usesysid | usecreatedb | usesuper | usecatupd | userepl | passwd | valuntil | useconfig
----------+----------+-------------+----------+-----------+---------+----------+----------+-----------
postgres | 10 | t | t | t | t | ******** | |
(1 row)
7
md5 authentication ok:
zxw@pgproxy1:~$ psql -h 127.0.0.1 -U postgres postgres
Password for user postgres:
psql (9.1.14)
SSL connection (cipher: DHE-RSA-AES256-SHA, bits: 256)
Type "help" for help.
postgres=#
8
修改监听地址等,加载配置参数
zxw@pgproxy1:~$ sudo -u postgres /etc/init.d/postgresql reload
* Reloading PostgreSQL 9.1 database server
...done.
zxw@pgproxy1:~$
9
验证ok
zxw@pgproxy1:~$ psql -h127.0.0.1 -Upostgres postgres
Password for user postgres:
psql (9.1.14)
SSL connection (cipher: DHE-RSA-AES256-SHA, bits: 256)
Type "help" for help.
postgres=# show all ;
name | setting | description
---------------------------------+------------------------------------------+-------------------------------------------------------------------------------------------------------------------------------
allow_system_table_mods | off | Allows modifications of the structure of system tables.
。。。。。。
listen_addresses | * | Sets the host name or IP address(es) to listen to.
lo_compat_privileges | off | Enables backward compatibility mode for privilege checks on large objects.
local_preload_libraries | | Lists shared libraries to preload into each backend.
10
验证ok
zxw@pgproxy1:~$ psql -h192.168.11.131 -Upostgres postgres
Password for user postgres:
psql (9.1.14)
SSL connection (cipher: DHE-RSA-AES256-SHA, bits: 256)
Type "help" for help.
postgres=#
11
ubuntu12上官方pg包安装完后的目录基本如下:
istall directory
/usr/lib/postgresql/9.1/bin/postgres proc
/var/lib/postgresql/9.1/main data
/etc/postgresql/9.1/main/postgresql.conf option file
/usr/share/postgresql/9.1/contrib/
/usr/share/postgresql/9.1/extension/
/usr/share/postgresql-common/
第二部分
初始化n个实例
1
准备目录
root@pgproxy1:~# mkdir /opt/pg91
root@pgproxy1:~# chown postgres:postgres /opt/pg91/
2
初始化一个实例
root@pgproxy1:~# sudo -u postgres /usr/lib/postgresql/9.1/bin/initdb -E utf8 -Upostgres --locale=C -W -D /opt/pg91/pgdata1
could not change directory to "/root"
The files belonging to this database system will be owned by user "postgres".
This user must also own the server process.
The database cluster will be initialized with locale C.
The default text search configuration will be set to "english".
creating directory /opt/pg91/pgdata1 ... ok
creating subdirectories ... ok
selecting default max_connections ... 100
。。。
Enter new superuser password:
。。。
vacuuming database template1 ... ok
copying template1 to template0 ... ok
copying template1 to postgres ... ok
WARNING: enabling "trust" authentication for local connections
You can change this by editing pg_hba.conf or using the -A option the
next time you run initdb.
Success. You can now start the database server using:
/usr/lib/postgresql/9.1/bin/postgres -D /opt/pg91/pgdata1
or
/usr/lib/postgresql/9.1/bin/pg_ctl -D /opt/pg91/pgdata1 -l logfile start
root@pgproxy1:~#
3
查看数据集目录
root@pgproxy1:~# ll /opt/pg91/pgdata1/
total 88
drwx------ 13 postgres postgres 4096 Oct 23 15:49 ./
drwxr-xr-x 3 postgres postgres 4096 Oct 23 15:49 ../
drwx------ 5 postgres postgres 4096 Oct 23 15:49 base/
drwx------ 2 postgres postgres 4096 Oct 23 15:49 global/
drwx------ 2 postgres postgres 4096 Oct 23 15:49 pg_clog/
-rw------- 1 postgres postgres 4476 Oct 23 15:49 pg_hba.conf
-rw------- 1 postgres postgres 1636 Oct 23 15:49 pg_ident.conf
drwx------ 4 postgres postgres 4096 Oct 23 15:49 pg_multixact/
drwx------ 2 postgres postgres 4096 Oct 23 15:49 pg_notify/
drwx------ 2 postgres postgres 4096 Oct 23 15:49 pg_serial/
drwx------ 2 postgres postgres 4096 Oct 23 15:49 pg_stat_tmp/
drwx------ 2 postgres postgres 4096 Oct 23 15:49 pg_subtrans/
drwx------ 2 postgres postgres 4096 Oct 23 15:49 pg_tblspc/
drwx------ 2 postgres postgres 4096 Oct 23 15:49 pg_twophase/
-rw------- 1 postgres postgres 4 Oct 23 15:49 PG_VERSION
drwx------ 3 postgres postgres 4096 Oct 23 15:49 pg_xlog/
-rw------- 1 postgres postgres 19129 Oct 23 15:49 postgresql.conf
4
搞个放日志的地方
root@pgproxy1:~# mkdir /opt/pg91/pgdata1/pg_log
root@pgproxy1:~# chown postgres:postgres /opt/pg91/pgdata1/pg_log/
root@pgproxy1:~# chmod 700 /opt/pg91/pgdata1/pg_log/
修改认证监听等相关参数,后跑一个
root@pgproxy1:~# sudo -u postgres /usr/lib/postgresql/9.1/bin/pg_ctl -D /opt/pg91/pgdata1 -l /opt/pg91/pgdata1/pg_log/pg.log start
重复以上跑起5个实例。
第三部分
安装pl/proxy
1
查一下能装啥
zxw@pgproxy1:~$ 【本文来自鸿网互联 (http://www.68idc.cn)】apt-cache search plproxy
postgresql-9.1-plproxy - database partitioning system for PostgreSQL 9.1
2
装
zxw@pgproxy1:~$ sudo apt-get install -y postgresql-9.1-plproxy
[sudo] password for zxw:
Reading package lists... Done
Building dependency tree
Reading state information... Done
The following NEW packages will be installed:
postgresql-9.1-plproxy
0 upgraded, 1 newly installed, 0 to remove and 69 not upgraded.
Need to get 65.3 kB of archives.
After this operation, 268 kB of additional disk space will be used.
Get:1 http://hk.archive.ubuntu.com/ubuntu/ precise/universe postgresql-9.1-plproxy amd64 2.3-1 [65.3 kB]
Fetched 65.3 kB in 10s (6,138 B/s)
Selecting previously unselected package postgresql-9.1-plproxy.
(Reading database ... 58432 files and directories currently installed.)
Unpacking postgresql-9.1-plproxy (from .../postgresql-9.1-plproxy_2.3-1_amd64.deb) ...
Setting up postgresql-9.1-plproxy (2.3-1) ...
zxw@pgproxy1:~$
3
规划
proxy node:
ip
port portN
create user beiigang
create user proxy
create database proxy;
schema beiigang
data node:
ip
port portN
create user beiigang
create user devart
create database datadb
schema beiigang
4
跑规划
#
#proxy
#
create role beiigang superuser login encrypted password 'beiigang';
create role proxy nosuperuser nocreatedb nocreaterole noinherit login encrypted password 'proxy';
create database proxy with owner beiigang template template0 encoding 'UTF8' lc_collate 'en_US.UTF-8' lc_ctype 'en_US.UTF-8';
grant all on database proxy to proxy;
create schema proxy authorization proxy;
#
#data node
#
create role beiigang superuser login encrypted password 'beiigang';
create role devart nosuperuser nocreatedb nocreaterole noinherit login encrypted password 'devart';
create database datadb with owner beiigang template template0 encoding 'UTF8' lc_collate 'en_US.UTF-8' lc_ctype 'en_US.UTF-8';
grant all on database datadb to devart;
create schema devart authorization devart;
#
#proxy node
#
postgres=# create role beiigang superuser login encrypted password 'beiigang';
CREATE ROLE
postgres=# create role proxy nosuperuser nocreatedb nocreaterole noinherit login encrypted password 'proxy';
CREATE ROLE
postgres=# create database proxy with owner beiigang template template0 encoding 'UTF8' lc_collate 'en_US.UTF-8' lc_ctype 'en_US.UTF-8';
CREATE DATABASE
postgres=# grant all on database proxy to proxy;
GRANT
proxy=# create schema proxy authorization proxy;
CREATE SCHEMA
#
#data node
#
postgres=# create role beiigang superuser login encrypted password 'beiigang';
CREATE ROLE
postgres=# create role datasch nosuperuser nocreatedb nocreaterole noinherit login encrypted password 'datasch';
CREATE ROLE
postgres=# create database datadb with owner beiigang template template0 encoding 'UTF8' lc_collate 'en_US.UTF-8' lc_ctype 'en_US.UTF-8';
CREATE DATABASE
postgres=# grant all on database datadb to datasch;
GRANT
datadb=> create schema datasch authorization datasch;
CREATE SCHEMA
5
在代理上跑plproxy.sql
root@pgproxy1:~# psql -h ip -p portN -Upostgres -f /usr/share/postgresql/9.1/contrib/plproxy.sql proxy
Password for user postgres:
CREATE FUNCTION
CREATE LANGUAGE
CREATE FUNCTION
CREATE FOREIGN DATA WRAPPER
plproxy.sql的内容如下
## nl /usr/share/postgresql/9.1/contrib/plproxy.sql | more
#
# 1 -- handler function
# 2 CREATE FUNCTION plproxy_call_handler ()
# 3 RETURNS language_handler AS '$libdir/plproxy' LANGUAGE C;
#
# 4 -- language
# 5 CREATE LANGUAGE plproxy HANDLER plproxy_call_handler;
#
# 6 -- validator function
# 7 CREATE FUNCTION plproxy_fdw_validator (text[], oid)
# 8 RETURNS boolean AS '$libdir/plproxy' LANGUAGE C;
#
# 9 -- foreign data wrapper
# 10 CREATE FOREIGN DATA WRAPPER plproxy VALIDATOR plproxy_fdw_validator;
6
查看上面创建的对象
#proxy=# select * from pg_language;
# lanname | lanowner | lanispl | lanpltrusted | lanplcallfoid | laninline | lanvalidator | lanacl
#----------+----------+---------+--------------+---------------+-----------+--------------+--------
# internal | 10 | f | f | 0 | 0 | 2246 |
# c | 10 | f | f | 0 | 0 | 2247 |
# sql | 10 | f | t | 0 | 0 | 2248 |
# plpgsql | 10 | t | t | 11678 | 11679 | 11680 |
# plproxy | 10 | t | f | 16399 | 0 | 0 |
#(5 rows)
#
#proxy=# select * from pg_foreign_data_wrapper;
# fdwname | fdwowner | fdwhandler | fdwvalidator | fdwacl | fdwoptions
#---------+----------+------------+--------------+--------+------------
# plproxy | 10 | 0 | 16401 | |
#(1 row)
#还drop了一回,这个不要跑啊
#proxy=# drop language plproxy cascade;
#DROP LANGUAGE
#proxy=#
#proxy=# drop FOREIGN DATA WRAPPER plproxy cascade;
#DROP FOREIGN DATA WRAPPER
#proxy=#
#proxy=# drop function plproxy_call_handler();
#DROP FUNCTION
#proxy=#
#proxy=# drop function plproxy_fdw_validator (text[], oid);
#DROP FUNCTION
#
7
授权
########这句报错
#proxy=# grant usage on language plproxy to proxy;
#ERROR: language "plproxy" is not trusted
#HINT: Only superusers can use untrusted languages.
########下面的ok
#proxy=# grant usage on foreign data wrapper plproxy to proxy;
#GRANT
#proxy=# grant usage on foreign server cluster_art to proxy;
#GRANT
8
proxy node创建plproxy server
#super user do
#drop server cluster_art;
CREATE SERVER cluster_art FOREIGN DATA WRAPPER plproxy OPTIONS
(connection_lifetime '1800',
p0 'dbname=datadb port=9901 host=192.168.11.196 application_name=testart',
p1 'dbname=datadb port=9902 host=192.168.11.197 ',
p2 'dbname=datadb port=9903 host=192.168.11.196 ',
p3 'dbname=datadb port=9904 host=192.168.11.197 ');
9
proxy node授权
grant usage on foreign server cluster_art to proxy;
10
proxy node创建user mapping
create user mapping for proxy server cluster_art options (user 'devart', password 'xxxxxxxx');
plproxy集群搭好了。。。。。。
第四部分
测试
这儿前前后后测试了不少场景,花了好几天,基本上没有记录,下面的也不是一个完整一致的测试,只是记录到这儿,大家就不要看了,看了就晕了
--test
CREATE OR REPLACE FUNCTION proxy.test_pl_clust(sql text)
RETURNS SETOF record
LANGUAGE plproxy
STRICT
AS $function$
cluster 'cluster_art';
run on all;
target devart.test_pl_clust;
$function$;
grant execute on function datasch.test_pl_clust(text) to proxy;
CREATE OR REPLACE FUNCTION test_pl_clust(sql text)
RETURNS SETOF record
LANGUAGE plpgsql
STRICT
AS $function$
declare
rec record;
begin
for rec in execute sql loop
return next rec;
end loop;
return;
end;
$function$;
select * from datasch.test_pl_clust('select count(*) from pg_class') as t(i int8);
proxy=> select * from test_pl_clust('select count(*) from pg_user') as t(k int8);
k
---
3
3
3
3
(4 rows)
proxy=> select sum(k) from test_pl_clust('select count(*) from pg_user') as t(k int8);
sum
-----
12
(1 row)
附记
1
pl/proxy源码下载地址,好像是吧
http://pgfoundry.org/projects/plproxy
2
官网上记录的一个bug
dumpall 不能正常工作
http://pgfoundry.org/tracker/index.php?func=detail&aid=1011283&group_id=1000207&atid=814
pg_dumpall sorts 'create server FOREIGN DATA WRAPPER' options
(keys) as varchar and not as integer.
Example from dumped sql (see "pX" option key):
CREATE SERVER can_master_cluster FOREIGN DATA WRAPPER plproxy OPTIONS (
connection_lifetime '1800',
p0 'dbname=database11 host=xxx-11 port=9811',
p1 'dbname=database12 host=xxx-12 port=9812',
p10 'dbname=database21 host=xxx-21 port=9821',
p11 'dbname=database22 host=xxx-22 port=9822',
p12 'dbname=database23 host=xxx-23 port=9823',
p13 'dbname=database24 host=xxx-24 port=9824',
p14 'dbname=database25 host=xxx-25 port=9825',
p15 'dbname=database26 host=xxx-26 port=9826',
p2 'dbname=database13 host=xxx-13 port=9813',
p3 'dbname=database14 host=xxx-14 port=9814',
p4 'dbname=database15 host=xxx-15 port=9815',
p5 'dbname=database16 host=xxx-16 port=9816',
p6 'dbname=database17 host=xxx-17 port=9817',
p7 'dbname=database18 host=xxx-18 port=9818',
p8 'dbname=database19 host=xxx-19 port=9819',
p9 'dbname=database20 host=xxx-20 port=9820'
);
which causes next error during the load:
ERROR: Pl/Proxy: partitions must be numbered consecutively
HINT: next valid partition number is 2
STATEMENT: CREATE SERVER can_master_cluster ...
Old 9.0 'pg_dumpall' doing job correct.

핫 AI 도구

Undresser.AI Undress
사실적인 누드 사진을 만들기 위한 AI 기반 앱

AI Clothes Remover
사진에서 옷을 제거하는 온라인 AI 도구입니다.

Undress AI Tool
무료로 이미지를 벗다

Clothoff.io
AI 옷 제거제

Video Face Swap
완전히 무료인 AI 얼굴 교환 도구를 사용하여 모든 비디오의 얼굴을 쉽게 바꾸세요!

인기 기사
뜨거운 도구

메모장++7.3.1
사용하기 쉬운 무료 코드 편집기

SublimeText3 중국어 버전
중국어 버전, 사용하기 매우 쉽습니다.

스튜디오 13.0.1 보내기
강력한 PHP 통합 개발 환경

드림위버 CS6
시각적 웹 개발 도구

SublimeText3 Mac 버전
신 수준의 코드 편집 소프트웨어(SublimeText3)
뜨거운 주제
 7677
7677
 15
1393
52
1207
24
91
11
73
19
15
1393
52
1207
24
91
11
73
19

 오픈 소스! ZoeDepth를 넘어! DepthFM: 빠르고 정확한 단안 깊이 추정!
Apr 03, 2024 pm 12:04 PM
오픈 소스! ZoeDepth를 넘어! DepthFM: 빠르고 정확한 단안 깊이 추정!
Apr 03, 2024 pm 12:04 PM
0. 이 글은 어떤 내용을 담고 있나요? 우리는 다재다능하고 빠른 최첨단 생성 단안 깊이 추정 모델인 DepthFM을 제안합니다. DepthFM은 전통적인 깊이 추정 작업 외에도 깊이 인페인팅과 같은 다운스트림 작업에서 최첨단 기능을 보여줍니다. DepthFM은 효율적이며 몇 가지 추론 단계 내에서 깊이 맵을 합성할 수 있습니다. 이 작품을 함께 읽어보아요~ 1. 논문 정보 제목: DepthFM: FastMoncularDepthEstimationwithFlowMatching 저자: MingGui, JohannesS.Fischer, UlrichPrestel, PingchuanMa, Dmytr
 화웨이의 Qiankun ADS3.0 지능형 운전 시스템은 8월에 출시될 예정이며 처음으로 Xiangjie S9에 출시될 예정입니다.
Jul 30, 2024 pm 02:17 PM
화웨이의 Qiankun ADS3.0 지능형 운전 시스템은 8월에 출시될 예정이며 처음으로 Xiangjie S9에 출시될 예정입니다.
Jul 30, 2024 pm 02:17 PM
7월 29일, AITO Wenjie의 400,000번째 신차 출시 행사에 Huawei 전무이사이자 Terminal BG 회장이자 Smart Car Solutions BU 회장인 Yu Chengdong이 참석하여 연설을 했으며 Wenjie 시리즈 모델이 출시될 것이라고 발표했습니다. 올해 출시 예정 지난 8월 Huawei Qiankun ADS 3.0 버전이 출시되었으며, 8월부터 9월까지 순차적으로 업그레이드를 추진할 계획입니다. 8월 6일 출시되는 Xiangjie S9에는 화웨이의 ADS3.0 지능형 운전 시스템이 최초로 탑재됩니다. LiDAR의 도움으로 Huawei Qiankun ADS3.0 버전은 지능형 주행 기능을 크게 향상시키고, 엔드투엔드 통합 기능을 갖추고, GOD(일반 장애물 식별)/PDP(예측)의 새로운 엔드투엔드 아키텍처를 채택합니다. 의사결정 및 제어), 주차공간부터 주차공간까지 스마트 드라이빙의 NCA 기능 제공, CAS3.0 업그레이드
 Google은 열광하고 있습니다. JAX 성능이 Pytorch와 TensorFlow를 능가합니다! GPU 추론 훈련을 위한 가장 빠른 선택이 될 수 있습니다.
Apr 01, 2024 pm 07:46 PM
Google은 열광하고 있습니다. JAX 성능이 Pytorch와 TensorFlow를 능가합니다! GPU 추론 훈련을 위한 가장 빠른 선택이 될 수 있습니다.
Apr 01, 2024 pm 07:46 PM
Google이 추진하는 JAX의 성능은 최근 벤치마크 테스트에서 Pytorch와 TensorFlow를 능가하여 7개 지표에서 1위를 차지했습니다. 그리고 JAX 성능이 가장 좋은 TPU에서는 테스트가 이루어지지 않았습니다. 개발자들 사이에서는 여전히 Tensorflow보다 Pytorch가 더 인기가 있습니다. 그러나 앞으로는 더 큰 모델이 JAX 플랫폼을 기반으로 훈련되고 실행될 것입니다. 모델 최근 Keras 팀은 기본 PyTorch 구현을 사용하여 세 가지 백엔드(TensorFlow, JAX, PyTorch)와 TensorFlow를 사용하는 Keras2를 벤치마킹했습니다. 첫째, 그들은 주류 세트를 선택합니다.
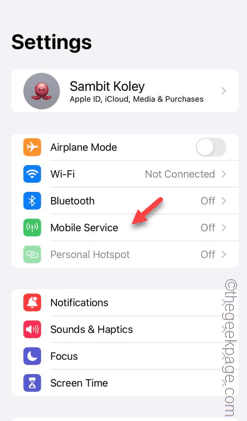 iPhone의 느린 셀룰러 데이터 인터넷 속도: 수정 사항
May 03, 2024 pm 09:01 PM
iPhone의 느린 셀룰러 데이터 인터넷 속도: 수정 사항
May 03, 2024 pm 09:01 PM
지연이 발생하고 iPhone의 모바일 데이터 연결 속도가 느립니까? 일반적으로 휴대폰의 셀룰러 인터넷 강도는 지역, 셀룰러 네트워크 유형, 로밍 유형 등과 같은 여러 요소에 따라 달라집니다. 더 빠르고 안정적인 셀룰러 인터넷 연결을 얻기 위해 할 수 있는 일이 몇 가지 있습니다. 수정 1 – iPhone 강제 다시 시작 때로는 장치를 강제로 다시 시작하면 셀룰러 연결을 포함한 많은 항목이 재설정됩니다. 1단계 – 볼륨 높이기 키를 한 번 눌렀다가 놓습니다. 그런 다음 볼륨 작게 키를 눌렀다가 다시 놓습니다. 2단계 - 프로세스의 다음 부분은 오른쪽에 있는 버튼을 누르는 것입니다. iPhone이 다시 시작되도록 하세요. 셀룰러 데이터를 활성화하고 네트워크 속도를 확인하세요. 다시 확인하세요 수정 2 – 데이터 모드 변경 5G는 더 나은 네트워크 속도를 제공하지만 신호가 약할 때 더 잘 작동합니다
 ZTE 5G 휴대용 Wi-Fi U50S는 초기 가격 NT$899에 판매됩니다: 최대 네트워크 속도 500Mbps
Apr 26, 2024 pm 03:46 PM
ZTE 5G 휴대용 Wi-Fi U50S는 초기 가격 NT$899에 판매됩니다: 최대 네트워크 속도 500Mbps
Apr 26, 2024 pm 03:46 PM
4월 26일 뉴스에 따르면 ZTE의 5G 휴대용 Wi-Fi U50S는 현재 899위안부터 공식 판매되고 있습니다. 외관 디자인 측면에서 ZTE U50S 휴대용 Wi-Fi는 심플하고 스타일리시하며 쥐기 쉽고 포장이 쉽습니다. 크기는 159/73/18mm로 휴대가 간편해 언제 어디서나 5G 고속 네트워크를 즐길 수 있어 방해받지 않는 모바일 오피스와 엔터테인먼트 경험을 선사합니다. ZTE 5G 휴대용 Wi-Fi U50S는 최대 1800Mbps의 속도로 고급 Wi-Fi 6 프로토콜을 지원합니다. Snapdragon X55 고성능 5G 플랫폼을 사용하여 사용자에게 매우 빠른 네트워크 경험을 제공합니다. 5G 듀얼 모드 SA+NSA 네트워크 환경과 Sub-6GHz 주파수 대역을 지원할 뿐만 아니라 측정된 네트워크 속도도 놀라운 500Mbps에 도달해 쉽게 만족할 수 있습니다.
 레트로 트렌드! HMD와 하이네켄, 투명 쉘 디자인 플립폰 공동 출시
Apr 17, 2024 pm 06:50 PM
레트로 트렌드! HMD와 하이네켄, 투명 쉘 디자인 플립폰 공동 출시
Apr 17, 2024 pm 06:50 PM
17일 뉴스에 따르면 HMD는 유명 맥주 브랜드 하이네켄, 크리에이티브 기업 보데가와 손잡고 독특한 폴더폰 '보링폰(The Boring Phone)'을 출시했다. 이 전화기는 디자인 혁신으로 가득 차 있을 뿐만 아니라 기능면에서도 자연으로 돌아가 사람들을 진정한 대인 관계로 돌아가게 하고 친구들과 함께 술을 마시는 순수한 시간을 즐기는 것을 목표로 합니다. Boring 휴대폰은 독특한 투명 플립 디자인을 채택하여 단순하면서도 우아한 미학을 보여줍니다. 내부에는 2.8인치 QVGA 디스플레이, 외부에는 1.77인치 디스플레이가 탑재되어 사용자에게 기본적인 시각적 상호 작용 경험을 제공합니다. 사진의 경우 3000만 화소 카메라만 탑재되어 있지만 간단한 일상 업무를 처리하기에는 충분하다.
 초지능의 생명력이 깨어난다! 하지만 자동 업데이트 AI가 등장하면서 엄마들은 더 이상 데이터 병목 현상을 걱정할 필요가 없습니다.
Apr 29, 2024 pm 06:55 PM
초지능의 생명력이 깨어난다! 하지만 자동 업데이트 AI가 등장하면서 엄마들은 더 이상 데이터 병목 현상을 걱정할 필요가 없습니다.
Apr 29, 2024 pm 06:55 PM
세상은 미친 듯이 큰 모델을 만들고 있습니다. 인터넷의 데이터만으로는 충분하지 않습니다. 훈련 모델은 '헝거게임'처럼 생겼고, 전 세계 AI 연구자들은 이러한 데이터를 탐식하는 사람들에게 어떻게 먹이를 줄지 고민하고 있습니다. 이 문제는 다중 모드 작업에서 특히 두드러집니다. 아무것도 할 수 없던 시기에, 중국 인민대학교 학과의 스타트업 팀은 자체 새로운 모델을 사용하여 중국 최초로 '모델 생성 데이터 피드 자체'를 현실화했습니다. 또한 이해 측면과 생성 측면의 두 가지 접근 방식으로 양측 모두 고품질의 다중 모드 새로운 데이터를 생성하고 모델 자체에 데이터 피드백을 제공할 수 있습니다. 모델이란 무엇입니까? Awaker 1.0은 중관촌 포럼에 최근 등장한 대형 멀티모달 모델입니다. 팀은 누구입니까? 소폰 엔진. 런민대학교 힐하우스 인공지능대학원 박사과정 학생인 Gao Yizhao가 설립했습니다.
 공장에서 일하는 테슬라 로봇, 머스크 : 올해 손의 자유도가 22도에 달할 것!
May 06, 2024 pm 04:13 PM
공장에서 일하는 테슬라 로봇, 머스크 : 올해 손의 자유도가 22도에 달할 것!
May 06, 2024 pm 04:13 PM
테슬라의 로봇 옵티머스(Optimus)의 최신 영상이 공개됐는데, 이미 공장에서 작동이 가능한 상태다. 정상 속도에서는 배터리(테슬라의 4680 배터리)를 다음과 같이 분류합니다. 공식은 또한 20배 속도로 보이는 모습을 공개했습니다. 작은 "워크스테이션"에서 따고 따고 따고 : 이번에 출시됩니다. 영상에는 옵티머스가 공장에서 이 작업을 전 과정에 걸쳐 사람의 개입 없이 완전히 자율적으로 완료하는 모습이 담겨 있습니다. 그리고 Optimus의 관점에서 보면 자동 오류 수정에 중점을 두고 구부러진 배터리를 집어 넣을 수도 있습니다. NVIDIA 과학자 Jim Fan은 Optimus의 손에 대해 높은 평가를 했습니다. Optimus의 손은 세계의 다섯 손가락 로봇 중 하나입니다. 가장 능숙합니다. 손은 촉각적일 뿐만 아니라
