

OSX as Transparent Wifi MITM Proxy

Yesterday I was in the situation where I wanted to debug an iOS deviceand what network calls it would make. Normally the trivial step is tojust define an HTTP proxy server in the wifi settings but that will onlywork for as long as you have
Yesterday I was in the situation where I wanted to debug an iOS device and what network calls it would make. Normally the trivial step is to just define an HTTP proxy server in the wifi settings but that will only work for as long as you have something that actually honors this proxy server. But there are better ways to transparently proxy connections from a device connected via Wifi which does not require any changes on the actual device.
The Tools
In order for this to work you need a device running OS X which is connected to the same network as the Wifi. Then you need to convince the Wifi device to see you as the gateway instead of the actual gateway. The easiest way is just to go to the settings and change the gateway to your computer's IP. The second ingredient is an HTTP proxy, ideally one that can also decrypt and reencrypt SSL traffic. Personally I can recommend Charles for that. Lastly you will need another proxy that can work transparently which sits between your device and Charles. On OS X redsocks gets this job done.
If you don't want to spend the money on Charles or you want to rewrite traffic with Python you can use mitmproxy.
The Setup
The first thing you will notice is that when you point your Wifi device to your computer it will loose network connectivity. That's because by default your computer won't forward packets. This can easily be changed through sysctl:
$ sudo sysctl -w net.inet.ip.forwarding=1
After that you should be able to browse the internet again on your Wifi device.
The second step is installing redsocks. If you have brew that's a very trivial operation:
$ brew install redsocks
Once installed you will need to create a config file for it. Call it redsocks.conf and place it in a folder from which you run redsocks:
base {
    log_debug = on;
    log_info = on;
    log = stderr;
    daemon = off;
    redirector = generic;
}
redsocks {
    local_ip = 0.0.0.0;
    local_port = 12345;
    ip = 127.0.0.1;
    port = 8889;
    // known types: socks4, socks5, http-connect, http-relay
    type = socks5;
}
Since I'm using Charles I take advantage of it's socks5 support and point it to localhost:8889 where Charles normally starts up if configured as Socks5 proxy. If you're using a regular HTTP proxy you can use http-connect as proxy type. The local_port defines where the actual transparent redsocks proxy opens.
All you have to do then is to start it:
$ redsocks
After that you will need to point all the traffic that is not from your computer and from port 80 and 443 of your Wifi through redsocks. On OS X the firewall canbe controlled through ipfw. In my case the wifi device is en1:
$ sudo ipfw add fwd 127.0.0.1,12345 tcp from not me to any 80 in via en1
$ sudo ipfw add fwd 127.0.0.1,12345 tcp from not me to any 443 in via en1
Working around OS X Bugs
Now currently if you finish that above setup you will notice that nothing actually works. The cause for this is a Bug in the OS X kernel that requires flipping the net.inet.ip.scopedroute flag to 0. I am not entirely sure what it does, but the internet reports that it breaks network sharing through the user preferences. In any case it fixes ipfw based forwarding so you can flip it with sysctl:
$ sudo sysctl -w net.inet.ip.scopedroute=0
Unfortunately in OS X Lion this flag can actually not be flipped from userspace so you need to set it as boot parameter and then restart your computer. You can do this by editing the /Library/Preferences/SystemConfiguration/com.apple.Boot.plist file:
<?xml version="1.0" encoding="UTF-8"?>

<plist version="1.0">
<dict>
  <key>Kernel Flags</key>
  <string>net.inet.ip.scopedroute=0</string>
</dict>
</plist>
Installing SSL Certificates
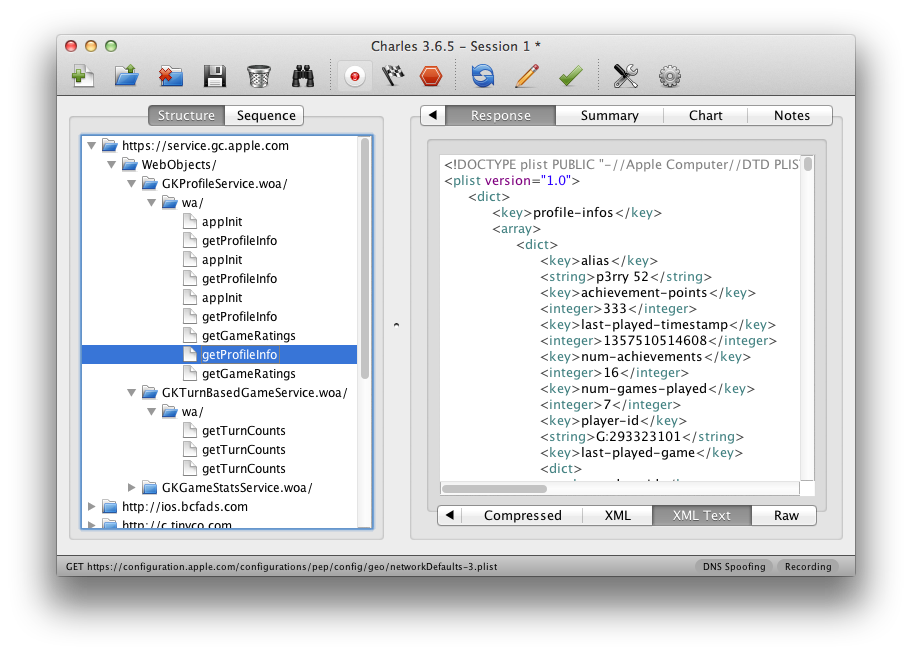
After all that your HTTP traffic should show up in your SSL interception proxy. SSL will only work if the application on your Wifi device is trusting your SSL interception proxy's CA. For browsers for instance that's trivial to change. The Charles Certificate can be added to the trust store by following this link: charles.crt. Note that this will not work with applications that don't use the system's CA trust store. In that case you will need to recompile your application so that it trusts the Charles CA.
原文地址:OSX as Transparent Wifi MITM Proxy, 感谢原作者分享。

핫 AI 도구

Undresser.AI Undress
사실적인 누드 사진을 만들기 위한 AI 기반 앱

AI Clothes Remover
사진에서 옷을 제거하는 온라인 AI 도구입니다.

Undress AI Tool
무료로 이미지를 벗다

Clothoff.io
AI 옷 제거제

Video Face Swap
완전히 무료인 AI 얼굴 교환 도구를 사용하여 모든 비디오의 얼굴을 쉽게 바꾸세요!

인기 기사
뜨거운 도구

메모장++7.3.1
사용하기 쉬운 무료 코드 편집기

SublimeText3 중국어 버전
중국어 버전, 사용하기 매우 쉽습니다.

스튜디오 13.0.1 보내기
강력한 PHP 통합 개발 환경

드림위버 CS6
시각적 웹 개발 도구

SublimeText3 Mac 버전
신 수준의 코드 편집 소프트웨어(SublimeText3)


 HP 프린터가 Wi-Fi에 연결할 수 없는 경우 수행할 작업 - HP 프린터가 Wi-Fi에 연결할 수 없는 경우 수행할 작업
Mar 06, 2024 pm 01:00 PM
HP 프린터가 Wi-Fi에 연결할 수 없는 경우 수행할 작업 - HP 프린터가 Wi-Fi에 연결할 수 없는 경우 수행할 작업
Mar 06, 2024 pm 01:00 PM
많은 사용자가 HP 프린터를 사용할 때 HP 프린터가 Wi-Fi에 연결되지 않는 경우 어떻게 해야 하는지 잘 모릅니다. 아래에서 편집자는 HP 프린터가 Wi-Fi에 연결되지 않는 문제에 대한 솔루션을 제공합니다. HP 프린터의 MAC 주소를 설정하여 자동으로 네트워크에 연결됩니다. 네트워크 구성을 변경하려면 선택하세요. dhcp를 사용하여 HP 프린터에 연결하려면 Wi-Fi에 연결되어 있는 것으로 표시됩니다.
 집 Wi-Fi에 '안전하지 않은 네트워크'가 표시되는 이유는 무엇입니까?
Nov 15, 2023 pm 02:39 PM
집 Wi-Fi에 '안전하지 않은 네트워크'가 표시되는 이유는 무엇입니까?
Nov 15, 2023 pm 02:39 PM
이유는 다음과 같습니다. 1. WiFi 자체에 문제가 있을 수 있습니다. 2. 라우터가 과열되거나 손상될 수 있습니다. 3. 광대역 연결이 지연되어 인터넷에 접속할 수 없습니다. 4. WiFi 이름에 중국어가 포함되어 있습니다. 문자로 인해 일부 컴퓨터에서 인터넷에 연결할 수 없습니다. 5. 컴퓨터 시스템 문제 6, IP 주소 설정 문제. 7. 무선 네트워크에 무선 비밀번호가 설정되어 있지 않습니다. 해결 방법: 1. Wi-Fi 연결을 확인하여 장치가 올바른 Wi-Fi 네트워크에 연결되어 있는지 확인하세요. 2. 라우터 설정을 확인하고, 라우터 재설정을 시도하고, SSID와 비밀번호가 올바른지 확인하세요.
 모바일 Wi-Fi에 느낌표가 표시되는 이유는 무엇인가요?
Sep 18, 2023 pm 04:05 PM
모바일 Wi-Fi에 느낌표가 표시되는 이유는 무엇인가요?
Sep 18, 2023 pm 04:05 PM
모바일 Wi-Fi에 느낌표가 나타나는 이유는 인터넷에 연결할 수 없거나 신호가 약하거나 인증 문제 및 IP 주소 충돌 등이 있을 수 있습니다. 자세한 소개: 1. 인터넷에 연결할 수 없습니다. Wi-Fi 아이콘에 느낌표가 나타나면 휴대폰이 인터넷에 연결할 수 없기 때문일 수 있습니다. 이는 라우터 연결 끊김, 네트워크 오류로 인해 발생할 수 있습니다. 2. 신호가 약합니다. Wi-Fi 아이콘에 느낌표가 나타나면 Wi-Fi 신호가 약한 경우일 수 있습니다. 라우터와의 거리가 너무 멀기 때문일 수 있습니다. 장애물이나 신호 방해 등으로 인해
 Windows 10에서 Wi-Fi에 연결할 수 없는 이유는 무엇입니까?
Jan 16, 2024 pm 04:18 PM
Windows 10에서 Wi-Fi에 연결할 수 없는 이유는 무엇입니까?
Jan 16, 2024 pm 04:18 PM
win10 운영 체제를 사용하여 Wi-Fi 무선 네트워크에 연결하면 Wi-Fi 네트워크를 연결할 수 없으며 제한된다는 메시지가 표시됩니다. 이런 문제는 네트워크 및 공유센터에서 자신만의 네트워크를 찾아보시고 일련의 조정을 하시면 될 것 같습니다. 편집자가 어떻게 했는지 구체적인 단계를 살펴보겠습니다~Win10이 Wi-Fi에 연결할 수 없는 이유는 무엇인가요? 방법 1: 1. 컴퓨터 화면 하단 알림 영역에 있는 무선 WIFI 아이콘을 마우스 오른쪽 버튼으로 클릭하고 "네트워크 및 인터넷 설정 열기"를 클릭한 다음 "어댑터 옵션 변경" 버튼을 클릭하세요. 2. 팝업 네트워크 연결 인터페이스에서 "WLAN"이라는 무선 연결을 찾아 다시 마우스 오른쪽 버튼을 클릭한 다음 "닫기"(또는 "비활성화")를 선택합니다. 3. 잠깐
 Wi-Fi 기능이 켜지지 않는 이유는 무엇인가요? 첨부: Wi-Fi 기능이 켜지지 않는 문제 해결 방법
Mar 14, 2024 pm 03:34 PM
Wi-Fi 기능이 켜지지 않는 이유는 무엇인가요? 첨부: Wi-Fi 기능이 켜지지 않는 문제 해결 방법
Mar 14, 2024 pm 03:34 PM
요즘에는 데이터와 Wi-Fi 외에도 휴대폰으로 인터넷에 액세스할 수 있는 두 가지 방법이 있으며 OPPO 휴대폰도 예외는 아닙니다. 하지만 Wi-Fi 기능을 사용할 수 없으면 어떻게 해야 할까요? 아직 걱정하지 마세요. 이 튜토리얼을 읽어보시면 도움이 될 것입니다! 휴대폰의 Wi-Fi 기능이 켜지지 않으면 어떻게 해야 하나요? WLAN 스위치를 켰을 때 약간의 지연이 있기 때문일 수 있습니다. 계속해서 클릭하지 마세요. 1. "설정>WLAN"으로 들어가서 WLAN 스위치를 다시 켜보십시오. 2. 비행기 모드를 켰다/껐다가 다시 WLAN 스위치를 켜보세요. 3. 전화기를 다시 시작하고 WLAN이 정상적으로 켜질 수 있는지 확인하십시오. 4. 데이터를 백업한 후 공장 출하시 설정으로 복원해 보시기를 권장합니다. 위의 방법으로도 문제가 해결되지 않으면 구입한 제품을 지참하시기 바랍니다.
 Win10에서 Wi-Fi 비밀번호를 입력할 수 없는 문제를 해결하는 방법
Dec 30, 2023 pm 05:43 PM
Win10에서 Wi-Fi 비밀번호를 입력할 수 없는 문제를 해결하는 방법
Dec 30, 2023 pm 05:43 PM
win10 wifi의 비밀번호를 입력할 수 없다는 것은 매우 우울한 문제입니다. 일반적으로 카드 소유자입니다. 여전히 문제를 해결할 수 없는 사용자는 서둘러서 컴퓨터를 다시 시작하십시오. 자세한 솔루션 튜토리얼. Win10 Wifi 비밀번호를 입력할 수 없음 튜토리얼 방법 1: 1. 비밀번호를 입력할 수 없는 것은 키보드 연결에 문제가 있을 수 있으므로 키보드를 사용할 수 있는지 주의 깊게 확인하십시오. 2. 숫자를 입력하기 위해 키패드를 사용해야 하는 경우 키패드가 잠겨 있는지도 확인해야 합니다. 방법 2: 참고: 일부 사용자는 이 작업을 수행한 후에 컴퓨터를 켤 수 없다고 보고했습니다. 사실 이는 이 설정의 원인이 아니라 컴퓨터 시스템 자체의 문제입니다. 이 작업을 수행한 후에도 컴퓨터의 정상적인 시작에는 영향을 미치지 않으며 컴퓨터 시스템도 작동하지 않습니다.
 Wi-Fi가 연결되어 있는데 왜 인터넷에 접속할 수 없나요?
Dec 07, 2023 pm 05:00 PM
Wi-Fi가 연결되어 있는데 왜 인터넷에 접속할 수 없나요?
Dec 07, 2023 pm 05:00 PM
WiFi가 연결되어 있지만 인터넷에 액세스할 수 없는 이유: 1. WiFi 신호가 약함 2. IP 주소 충돌 4. 라우터 오류 6. WiFi 네트워크 자체 문제 7. 라우터 문제 8. 장비 네트워크 설정 문제 9. 신호 간섭 또는 장애물 자세한 소개: 1. WiFi 신호가 약합니다. WiFi 신호의 강도는 네트워크의 안정성과 속도에 직접적인 영향을 미칩니다. 연결된 WiFi 신호가 약하면 네트워크 연결이 불안정해지거나 인터넷에 액세스하지 못할 수 있습니다. , 등.
 Ubuntu18.04에서 숨겨진 WiFi 네트워크에 어떻게 연결합니까?
Jan 01, 2024 pm 03:58 PM
Ubuntu18.04에서 숨겨진 WiFi 네트워크에 어떻게 연결합니까?
Jan 01, 2024 pm 03:58 PM
Ubuntu18.04 숨겨진 무선 네트워크를 원하시나요? Wi-Fi 네트워크에 연결하는 방법은 무엇입니까? 아래의 자세한 튜토리얼을 살펴보겠습니다. 1. Ubuntu를 시작한 후, 바탕화면 오른쪽 상단에 있는 역삼각형을 클릭하세요. 2. 드롭다운 메뉴가 나타나면 클릭하여 [WiFi 설정]을 선택하세요. 3. [WiFi 설정] 상세페이지로 진입합니다. 4. Wi-Fi 스위치 상태 오른쪽에 있는 가로 세 개의 아이콘에 마우스를 가져다 대고 아이콘을 클릭하세요. 5. 드롭다운 메뉴가 나타나면 마우스로 클릭하여 [숨겨진 네트워크에 연결]을 선택하세요. 6. [숨겨진 WiFi 네트워크에 연결] 대화상자가 나타납니다. WiFi 네트워크 이름, 암호화 방법 및 기타 정보를 입력해야 합니다. 7. 숨겨진 WiFi 네트워크 이름을 입력하고 암호화 방법으로 [WPA 및 WPA2 개인]을 선택한 후 입력합니다.
