

ubuntu14.04 LEMP(linux+nginx+mysql+php5)构建环境,

ubuntu14.04 LEMP(linux+nginx+mysql+php5)构建环境,
Install LEMP (Linux, Nginx, MySQL and PHP) Stack on Ubuntu Linux 14.04 LTS
by VIVEK GITE on DECEMBER 2, 2014I'm a new Ubuntu Linux user. How do I install the LEMP stack on an Ubuntu Linux 14.04 LTS server using command line options to serve dynamic web apps?
What is new in Ubuntu 14.04 (Trusty Tahr) version?
You may see it on cyberciti.biz or visit the Ubuntu home page at ubuntu.com.
Nginx Installation
Nginx is one of the robust web server in Linux world. Nginx is a free, open source, high performance HTTP server and reverse proxy, as weell as an IMAP/POP3 proxy server. Now, we are going to install Nginx web server.
First, make sure system is upto date:
$ sudo apt-get update
#1 - Download and Install Nginx
The easiest way to download and install Nginx is using apt-get command. Here is the command:
$ sudo apt-get install nginx
Fig.01: Download and Install Nginx on Ubuntu Linux
#2 - Test Nginx
Once it get done, you can open your browser and type url http://localhost or http://your_ip_address to test it. If everything goes normal, you will see Nginx welcome page:
Fig.02: Welcome nginx page on Ubuntu Linux
MySQL Installation On Ubuntu
MySQL is one of the most powerful database management system in Linux world. Next, we are going to install it with PHP support.
#1 - Install MySQL and PHP support
Type the following command:
$ sudo apt-get install mysql-server php5-mysql
Fig.03: Ubuntu Linux Install MySQL to Manage Site Data with PHP
#2 - Test MySQL
Once mysql installation finished, we can test it. Open your console and type the following command:
$ mysql -u root -p
Fig.04: Ubuntu test Mysql installation
#3 - Securing access to MySQL
If we are going to use MySQL as a production database, we may want to secure it. MySQL provides a shell script to help us securing it. Just type the following command on your console:
$ sudo mysql_secure_installation
1. Enter your root password
Enter your current root password to continue to the next step.
Fig.05: MySQL enter your root db password
2.Change the root password
If you want to change it, press Y. Otherwise, press N.
Fig.06: MySQL security
3.Remove anonymous user
It is recommended to remove anonymous user to mitigate risk who can log in into your database.
Fig.07: MySQL security
4.Disallow root login remotely
To make sure that no one remote your database as root from another machines, we need to disallow root login remotely.
Fig.08: MySQL security
5.Remove test database
Sometimes some MySQL installation will create a database named ëtestí for testing purpose. We can remove it if we donít use it.
Fig.09: MySQL security
6.Reload privilege tables
Then we need to reloading the privilege tables to ensure all changes made so far will take effect immediately.
Fig.10: MySQL security
7.Done
Fig.11: MySQL securityPHP Installation For Server Side Scripting
Since PHP is popular, a lot of websites is built using PHP language. As of January 2013, PHP was installed on more than 240 millions websites. Now we are going to install PHP on Ubuntu 14.04
#1 - Download and install PHP
As usual, we can download and install PHP using apt-get command. Just type the following command on your Ubuntu console or over the ssh based session:
$ sudo apt-get install php5-fpm
Fig.12: Install PHP for Server Side Processing on Ubuntu
Configure Nginx to work with PHP and MySQL Server on Ubuntu
Now we have all components installed. The next step is we need to configure Nginx with PHP and MySQL. Let's start to configure them.
#1 - Configure PHP5-FPM
PHP5-FPM configuration file is located at /etc/php5/fpm/php.ini. Open it with your text editor
$ sudo vi /etc/php5/fpm/php.ini
cgi.fix_pathinfo=1
cgi.fix_pathinfo=0
$ sudo service php5-fpm restart
#2 - Configure Nginx
Nginx configuration file is located at /etc/nginx/nginx.conf. But basically, we don't need to touch it. The configuration of nginx website is located in /etc/nginx/sites-available/default file.
location ~ \.php$ {
fastcgi_split_path_info ^(.+\.php)(/.+)$;
# # NOTE: You should have "cgi.fix_pathinfo = 0;" in php.ini
#
# # With php5-cgi alone:
# fastcgi_pass 127.0.0.1:9000;
# # With php5-fpm:
fastcgi_pass unix:/var/run/php5-fpm.sock;
fastcgi_index index.php;
include fastcgi_params;
}
Then restart the services.
$ sudo service nginx restart
$ tail /var/log/nginx/error.log
fastcgi_pass unix:/var/run/php5-fpm.sock
location ~ \.php$ {
#3 - Configure MySQL
After the configuration section is done, now we need to test them to make sure that our configuration is working as required. On Ubuntu 14.04 the root document folder is located in /usr/share/nginx/html. So create a file called /usr/share/nginx/html/phpinfo.php with the following code:
[php] view plaincopyAfter restarting PHP-FPM and Nginx, open the browser and browse to the php file, we got only a blank screen. No error message on the screen. No error message on PHP-FPM and Nginx log file.
And then open the browser again and type url http://your_ip_address/phpinfo.php
To enable short php tag, we need to change the value of short_open_tag parameter on php.ini file:
sudo service php5-fpm restart
Then try again to test your phpinfo file. Next, we will see if the MySQL support is enabled or not. Scroll down the php configuration screen on your browser, if you see MySQL block there, then MySQL support already enabled.
You are now ready to use Nginx, PHP5 and MySQL on Ubuntu server. I hope this quick article help anyone who wish to install Linux, Nginx, PHP and MySQL on Ubuntu 14.04.

핫 AI 도구

Undresser.AI Undress
사실적인 누드 사진을 만들기 위한 AI 기반 앱

AI Clothes Remover
사진에서 옷을 제거하는 온라인 AI 도구입니다.

Undress AI Tool
무료로 이미지를 벗다

Clothoff.io
AI 옷 제거제

AI Hentai Generator
AI Hentai를 무료로 생성하십시오.

인기 기사
뜨거운 도구

메모장++7.3.1
사용하기 쉬운 무료 코드 편집기

SublimeText3 중국어 버전
중국어 버전, 사용하기 매우 쉽습니다.

스튜디오 13.0.1 보내기
강력한 PHP 통합 개발 환경

드림위버 CS6
시각적 웹 개발 도구

SublimeText3 Mac 버전
신 수준의 코드 편집 소프트웨어(SublimeText3)
뜨거운 주제
 7467
7467
 15
1376
52
77
11
46
19
18
20
15
1376
52
77
11
46
19
18
20

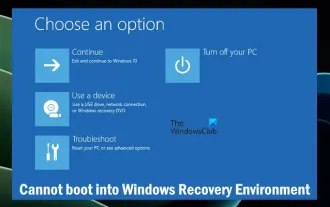 Windows 복구 환경으로 부팅할 수 없습니다
Feb 19, 2024 pm 11:12 PM
Windows 복구 환경으로 부팅할 수 없습니다
Feb 19, 2024 pm 11:12 PM
WinRE(Windows 복구 환경)는 Windows 운영 체제 오류를 복구하는 데 사용되는 환경입니다. WinRE에 들어간 후 시스템 복원, 공장 초기화, 업데이트 제거 등을 수행할 수 있습니다. WinRE로 부팅할 수 없는 경우 이 문서에서는 문제 해결을 위한 수정 사항을 안내합니다. Windows 복구 환경으로 부팅할 수 없습니다. Windows 복구 환경으로 부팅할 수 없는 경우 아래 제공된 수정 사항을 사용하십시오. Windows 복구 환경 상태 확인 다른 방법을 사용하여 Windows 복구 환경으로 들어가십시오. 실수로 Windows 복구 파티션을 삭제하셨습니까? 아래에서 전체 업그레이드 또는 Windows 새로 설치를 수행하십시오. 이러한 모든 수정 사항에 대해 자세히 설명했습니다. 1] Wi-Fi 확인
 Python과 Anaconda의 차이점은 무엇입니까?
Sep 06, 2023 pm 08:37 PM
Python과 Anaconda의 차이점은 무엇입니까?
Sep 06, 2023 pm 08:37 PM
이번 포스팅에서는 Python과 Anaconda의 차이점에 대해 알아보겠습니다. 파이썬이란 무엇입니까? Python은 줄을 들여쓰고 공백을 제공하여 코드를 읽고 이해하기 쉽게 만드는 데 중점을 둔 오픈 소스 언어입니다. Python의 유연성과 사용 용이성은 과학 컴퓨팅, 인공 지능, 데이터 과학은 물론 온라인 애플리케이션 생성 및 개발을 포함하되 이에 국한되지 않는 다양한 애플리케이션에 이상적입니다. Python은 해석된 언어이기 때문에 테스트를 하면 즉시 기계어로 번역됩니다. C++와 같은 일부 언어를 이해하려면 컴파일이 필요합니다. Python에 대한 능숙도는 이해, 개발, 실행 및 읽기가 매우 쉽기 때문에 중요한 이점입니다. 이는 파이썬을
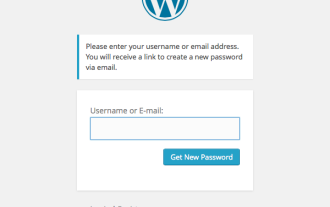 사용자 정의 WordPress 사용자 흐름 구축, 3부: 비밀번호 재설정
Sep 03, 2023 pm 11:05 PM
사용자 정의 WordPress 사용자 흐름 구축, 3부: 비밀번호 재설정
Sep 03, 2023 pm 11:05 PM
이 시리즈의 처음 두 튜토리얼에서는 로그인 및 새 사용자 등록을 위한 사용자 정의 페이지를 구축했습니다. 이제 탐색하고 교체해야 할 로그인 흐름의 한 부분만 남았습니다. 사용자가 비밀번호를 잊어버렸고 WordPress 비밀번호를 재설정하려는 경우 어떻게 되나요? 이 튜토리얼에서는 마지막 단계를 다루고 시리즈 전반에 걸쳐 구축한 개인화된 로그인 플러그인을 완성하겠습니다. WordPress의 비밀번호 재설정 기능은 오늘날 웹사이트의 표준 접근 방식을 어느 정도 따릅니다. 사용자는 사용자 이름이나 이메일 주소를 입력하고 WordPress에 비밀번호 재설정을 요청하여 재설정을 시작합니다. 임시 비밀번호 재설정 토큰을 생성하여 사용자 데이터에 저장합니다. 이 토큰이 포함된 링크가 사용자의 이메일 주소로 전송됩니다. 사용자가 링크를 클릭합니다. 중요한
 원활한 빌드: Maven 이미지 주소를 올바르게 구성하는 방법
Feb 20, 2024 pm 08:48 PM
원활한 빌드: Maven 이미지 주소를 올바르게 구성하는 방법
Feb 20, 2024 pm 08:48 PM
원활한 빌드: Maven 이미지 주소를 올바르게 구성하는 방법 Maven을 사용하여 프로젝트를 빌드할 때 올바른 이미지 주소를 구성하는 것이 매우 중요합니다. 미러 주소를 올바르게 구성하면 프로젝트 구성 속도를 높이고 네트워크 지연과 같은 문제를 피할 수 있습니다. 이 기사에서는 Maven 미러 주소를 올바르게 구성하는 방법을 소개하고 구체적인 코드 예제를 제공합니다. Maven 이미지 주소를 구성해야 하는 이유는 무엇입니까? Maven은 프로젝트 빌드, 종속성 관리, 보고서 생성 등을 자동으로 수행할 수 있는 프로젝트 관리 도구입니다. Maven으로 프로젝트를 빌드할 때 일반적으로
 ChatGPT Java: 지능형 음악 추천 시스템을 구축하는 방법
Oct 27, 2023 pm 01:55 PM
ChatGPT Java: 지능형 음악 추천 시스템을 구축하는 방법
Oct 27, 2023 pm 01:55 PM
ChatGPTJava: 지능형 음악 추천 시스템을 구축하려면 구체적인 코드 예제가 필요합니다. 소개: 인터넷의 급속한 발전으로 음악은 사람들의 일상 생활에 없어서는 안 될 부분이 되었습니다. 음악 플랫폼이 계속 등장하면서 사용자들은 자신의 취향에 맞는 음악을 어떻게 찾을 수 있을까라는 공통적인 문제에 직면하는 경우가 많습니다. 이러한 문제를 해결하기 위해 지능형 음악 추천 시스템이 탄생했습니다. 이 기사에서는 ChatGPTJava를 사용하여 지능형 음악 추천 시스템을 구축하는 방법을 소개하고 특정 코드 예제를 제공합니다. 아니요.
 Python을 사용하여 지능형 음성 도우미를 구축하는 방법
Sep 09, 2023 pm 04:04 PM
Python을 사용하여 지능형 음성 도우미를 구축하는 방법
Sep 09, 2023 pm 04:04 PM
Python을 사용하여 지능형 음성 비서를 구축하는 방법 소개: 현대 기술의 급속한 발전 시대에 지능형 비서에 대한 사람들의 수요가 점점 더 높아지고 있습니다. 그 형태 중 하나로 스마트 음성비서는 휴대폰, 컴퓨터, 스마트 스피커 등 다양한 기기에 널리 활용되고 있다. 이 기사에서는 Python 프로그래밍 언어를 사용하여 간단한 지능형 음성 도우미를 구축하여 처음부터 자신만의 맞춤형 지능형 도우미를 구현하는 방법을 소개합니다. 준비 음성 어시스턴트 구축을 시작하기 전에 먼저 몇 가지 필요한 도구를 준비해야 합니다.
 Maven 프로젝트 패키징 프로세스 최적화 및 개발 효율성 향상
Feb 24, 2024 pm 02:15 PM
Maven 프로젝트 패키징 프로세스 최적화 및 개발 효율성 향상
Feb 24, 2024 pm 02:15 PM
Maven 프로젝트 패키징 단계 가이드: 빌드 프로세스를 최적화하고 개발 효율성을 향상시킵니다. 소프트웨어 개발 프로젝트가 점점 더 복잡해짐에 따라 프로젝트 구성의 효율성과 속도는 개발 프로세스에서 무시할 수 없는 중요한 링크가 되었습니다. 널리 사용되는 프로젝트 관리 도구인 Maven은 프로젝트 구성에서 핵심적인 역할을 합니다. 이 가이드에서는 Maven 프로젝트의 패키징 단계를 최적화하여 개발 효율성을 향상시키는 방법을 살펴보고 구체적인 코드 예제를 제공합니다. 1. Maven 프로젝트 패키징 단계 최적화를 시작하기 전에 프로젝트 구조를 확인해야 합니다.
 Windows 3에서 환경 변수를 설정하는 11가지 방법
Sep 15, 2023 pm 12:21 PM
Windows 3에서 환경 변수를 설정하는 11가지 방법
Sep 15, 2023 pm 12:21 PM
Windows 11에서 환경 변수를 설정하면 시스템을 사용자 지정하고, 스크립트를 실행하고, 애플리케이션을 구성하는 데 도움이 될 수 있습니다. 이 가이드에서는 시스템을 원하는 대로 구성할 수 있도록 단계별 지침과 함께 세 가지 방법을 설명합니다. 환경 변수에는 세 가지 유형이 있습니다. 시스템 환경 변수 - 전역 변수는 우선 순위가 가장 낮고 Windows의 모든 사용자 및 응용 프로그램에 액세스할 수 있으며 일반적으로 시스템 전체 설정을 정의하는 데 사용됩니다. 사용자 환경 변수 – 우선 순위가 더 높은 이러한 변수는 현재 사용자 및 해당 계정에서 실행되는 프로세스에만 적용되며 해당 계정에서 실행되는 사용자 또는 응용 프로그램에 의해 설정됩니다. 프로세스 환경 변수 – 우선 순위가 가장 높고 임시적이며 현재 프로세스와 해당 하위 프로세스에 적용되어 프로그램을 제공합니다.
