

HTMX 및 Express.js를 사용하여 Rick and Morty 캐릭터 탐색기 구축

Wubba lubba 더빙 더빙 개발자 여러분! 웹 개발이라는 렌즈를 통해 Rick과 Morty의 광대한 다중우주를 탐험하는 것이 어떤 것인지 궁금한 적이 있습니까? 자, 포털 건을 들고 준비하세요. 오늘 우리는 바로 그 일을 할 것이기 때문입니다. 우리는 HTMX와 Express.js를 사용하여 Rick and Morty Character Explorer를 구축할 것입니다. 이 튜토리얼의 목표는 HTMX를 사용하여 웹 개발 및 페이지 매김 구현이 얼마나 쉬운지 보여주는 것입니다
이 모험에서 다룰 내용은 다음과 같습니다.
- Express.js 서버 설정(다차원 여행 장치)
- EJS 및 HTMX(포털 뷰어)를 사용하여 동적 프런트엔드 만들기
- HTMX(차원 간 이동 방법)를 사용하여 원활한 서버측 페이지 매김 구현
초보 프로그래머이든 레벨 업을 원하는 노련한 개발자이든 이 가이드는 매우 인상적인 웹 앱을 만드는 데 도움이 될 것입니다.
다차원 작업대 설정
차원 간 이동을 시작하기 전에 차원 간 작업대를 설정해야 합니다. 이것을 Rick의 차고를 정리하는 것과 같지만 죽음의 광선이 적고 JavaScript가 더 많다고 생각하세요.
- 먼저 Node.js가 설치되어 있는지 확인하세요. 그렇지 않은 경우 nodejs.org에서 다운로드할 수 있습니다.
- 다음으로 프로젝트 디렉토리를 설정하고 필요한 패키지를 설치하겠습니다. 터미널을 열고 다음 명령을 실행하십시오.
mkdir rick-and-morty-explorer
cd rick-and-morty-explorer
npm init -y
npm install express axios ejs
- 프로젝트 구조: 프로젝트를 구성하는 것은 Rick의 장치를 정리하는 것과 유사합니다. 기본 구조는 다음과 같습니다.
rick-and-morty-explorer/
├── node_modules/
├── public/
│   └── styles.css
├── views/
│   └── index.ejs
├── package.json
└── server.js
이제 작업대가 준비되었으니 우주 서버 제작을 시작해 보겠습니다.
Cosmic Server 제작(Express.js 백엔드)
이제 Express.js 서버를 만들어 보겠습니다. 이는 포털 건의 엔진을 만드는 것과 같습니다. 이것이 차원 간 여행의 원동력입니다.
이 튜토리얼에서는 캐릭터 목록, 위치, 등장 에피소드를 가져올 수 있는 팬이 만든 Rick and Morty API를 사용할 것입니다. 또한 인기 있는 자바스크립트 템플릿인 ejs도 사용할 것입니다. 엔진을 사용하여 HTML을 작성합니다. ejs는 필수는 아니지만 깔끔하고 재사용 가능한 방식으로 HTML 작성을 단순화합니다.
server.js를 열고 코딩을 시작해 보겠습니다.
const express = require('express');
const axios = require('axios');
const app = express();

app.use(express.static('public'));
app.set('view engine', 'ejs');

const BASE_URL = 'https://rickandmortyapi.com/api/character';

app.get('/', async (req, res) => {
  const { page = 1, name, status } = req.query;
  let url = `${BASE_URL}?page=${page}`;

  if (name) url += `&name=${name}`;
  if (status) url += `&status=${status}`;

  try {
    const response = await axios.get(url);
    res.render('index', { data: response.data, query: req.query });
  } catch (error) {
    console.error('Error fetching data:', error.message);
    res.status(500).render('error', { message: 'Error fetching data' });
  }
});

app.listen(3000, () => console.log('Server running on port 3000'));
이 서버 설정은 Rick의 차고와 같습니다. 모든 마법이 일어나는 곳입니다. 우리는 서버를 생성하고 라우팅을 처리하기 위해 Express를 사용하고 있습니다. 기본 경로(/)는 쿼리 매개변수를 기반으로 Rick and Morty API에서 문자 데이터를 가져오는 곳입니다.
여기서 페이지 매김과 필터를 어떻게 처리하는지 살펴보세요. 페이지 매개변수는 우리가 요청하는 결과 페이지를 결정하고, 이름과 상태는 문자 필터링을 허용합니다. 이러한 유연성은 HTMX 페이지 매김 구현에 매우 중요합니다.
Multiverse Viewer 설계(EJS 및 HTMX를 사용한 프런트엔드)
우주 서버가 준비되면 다중우주를 볼 수 있는 방법이 필요합니다. 다차원적인 보기 화면과 효율적인 가젯 디자인인 EJS와 HTMX를 만나보세요.
HTMX는 JavaScript(React, Angular, Vue 등)를 작성하지 않고도 HTML에서 직접 AJAX, CSS 전환, WebSocket 및 서버 전송 이벤트에 액세스할 수 있는 새로운 JavaScript 라이브러리입니다. 마치 Rick의 신경 임플란트와 같습니다. 꿈을 꾸는 것 이상으로 HTML의 기능을 향상시킵니다.
views/index.ejs 파일에 다음 코드를 추가하세요.
<!DOCTYPE html>
<html lang="en">
<head>
    <meta charset="UTF-8">
    <meta name="viewport" content="width=device-width, initial-scale=1.0">
    <title>Rick and Morty Explorer</title>
    <script src="https://unpkg.com/htmx.org@1.9.10"></script>
    <link rel="stylesheet" href="/styles.css">
</head>
<body>
    <h1>Rick and Morty Character Explorer</h1>

     <!-- Filter section will go here -->

        <div id="character-table">
          <% if (data.results && data.results.length > 0) { %>
            <table>
                <thead>
                    <tr>
                        <th>Image</th>
                        <th>Name</th>
                        <th>Status</th>
                        <th>Species</th>
                        <th>Origin</th>
                        <th>Actions</th>
                    </tr>
                </thead>
                <tbody>
                    <% data.results.forEach(character => { %>
                        <tr>
                            <td><img src="<%= character.image %>" alt="<%= character.name %>" width="50"></td>
                            <td><%= character.name %></td>
                            <td><%= character.status %></td>
                            <td><%= character.species %></td>
                            <td><%= character.origin.name %></td>
                            <td><a href="/character/<%= character.id %>" hx-get="/character/<%= character.id %>" hx-target="body" hx-push-url="true">View More</a></td>
                        </tr>
                    <% }); %>
                </tbody>
            </table>

    <!-- Pagination section will go here -->
</body>
</html>
위 코드는 웹사이트의 기본 테이블을 설정하며, 다음 섹션에서는 HTMX를 사용하여 페이지 매김 및 필터링을 추가하겠습니다.
다차원 페이지 매김 구현
이제 앱의 다차원 여행 메커니즘인 페이지 매김을 구현해 보겠습니다. 이것이 HTMX의 진가를 발휘하는 부분으로, 맞춤 JavaScript 없이도 원활한 서버 측 페이지 매김을 구현할 수 있습니다.
index.ejs의 문자표 바로 뒤에 이 페이지 매기기 섹션을 추가하세요.
<div class="pagination">
    <% const currentPage = parseInt(query.page) || 1; %>
    <% if (data.info.prev) { %>
        <a href="/?page=<%= currentPage - 1 %><%= query.name ? `&name=${query.name}` : '' %><%= query.status ? `&status=${query.status}` : '' %>"
           hx-get="/?page=<%= currentPage - 1 %><%= query.name ? `&name=${query.name}` : '' %><%= query.status ? `&status=${query.status}` : '' %>"
           hx-target="body"
           hx-push-url="true">Previous</a>
    <% } %>
    <span>Page <%= currentPage %> of <%= data.info.pages %></span>
    <% if (data.info.next) { %>
        <a href="/?page=<%= currentPage + 1 %><%= query.name ? `&name=${query.name}` : '' %><%= query.status ? `&status=${query.status}` : '' %>"
           hx-get="/?page=<%= currentPage + 1 %><%= query.name ? `&name=${query.name}` : '' %><%= query.status ? `&status=${query.status}` : '' %>"
           hx-target="body"
           hx-push-url="true">Next</a>
    <% } %>
</div>
이 페이지 매김 섹션은 HTMX 구현의 핵심입니다. 분석해 보겠습니다.
- 현재 페이지를 계산해서 이전 페이지인지 다음 페이지인지 확인합니다.
- 각 링크의 hx-get 속성은 HTMX가 적절한 페이지 번호와 활성 필터를 사용하여 서버에 GET 요청을 하도록 지시합니다.
- hx-target="body"는 탐색 시 전체 페이지 콘텐츠가 업데이트되도록 보장합니다.
- hx-push-url="true"는 URL을 업데이트하여 사용자가 특정 페이지를 공유하거나 북마크에 추가할 수 있도록 합니다.
이 HTMX 페이지 매김의 장점은 단순성과 효율성입니다. 우리는 사용자 정의 JavaScript를 한 줄도 작성하지 않고도 원활한 서버 측 페이지 매김을 구현할 수 있습니다. Rick의 포털 건처럼 원활하게 작동합니다. 링크를 클릭하면 즉시 다음 캐릭터 페이지로 이동합니다.
HTMX를 활용하여 구현하기 쉬울 뿐만 아니라 앱과 같은 원활한 사용자 경험을 제공하는 페이지 매김 시스템을 만들었습니다. 속도가 빠르고 페이지 로드 전반에 걸쳐 상태를 유지하며 최소한의 Javascript를 사용합니다.
Crafting the Multiverse Filter
Let's take our interdimensional exploration to the next level by adding filters to our character explorer. Think of this as tuning into different channels on interdimensional cable – you want to find the right show (or character) amidst the multiverse chaos.
Add this filter section to your index.ejs file, right above the character table:
<form id="filter-form" hx-get="/" hx-target="body" hx-push-url="true">
    <input type="text" name="name" placeholder="Name" value="<%= query.name || '' %>">
    <select name="status">
        <option value="">All Statuses</option>
        <option value="alive" <%= query.status === 'alive' ? 'selected' : '' %>>Alive</option>
        <option value="dead" <%= query.status === 'dead' ? 'selected' : '' %>>Dead</option>
        <option value="unknown" <%= query.status === 'unknown' ? 'selected' : '' %>>Unknown</option>
    </select>
    <button type="submit">Filter</button>
</form>
These filters allow users to narrow down their search, just like Rick tuning his interdimensional cable to find the perfect show. Enhanced with the power HTMX, our filter implementation is powerful and intuitive, providing real-time updates without needing custom JavaScript. Our app with both filters and pagination should look like this:

Creating Character Profiles: Adding the Details Screen
Now that our Rick and Morty Character Explorer looks slick and functional, it's time to add another exciting feature: individual character profiles. Imagine diving into a detailed dossier on Morty or Rick, complete with all their vital stats and episode appearances. Let's add a "View More" button to our character table to take users to a detailed character profile page.
Let's add a new route to our server.js file:
// Route to display character details
app.get('/character/:id', async (req, res) => {
  const { id } = req.params;

  try {
    const response = await axios.get(`${BASE_URL}/${id}`);
    res.render('character', { character: response.data });
  } catch (error) {
    console.error('Error fetching character details:', error.message);
    res.status(500).render('error', { message: 'Error fetching character details' });
  }
});
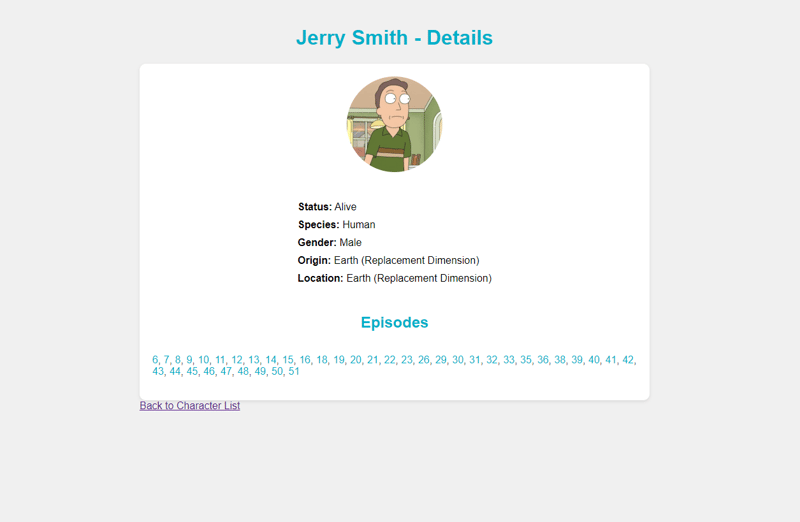
Let's also add a new file views/character.ejs the necessary HTML for our character detail page:
<!DOCTYPE html>
<html lang="en">
<head>
    <meta charset="UTF-8">
    <meta name="viewport" content="width=device-width, initial-scale=1.0">
    <title><%= character.name %> - Details</title>
    <link rel="stylesheet" href="/styles.css">
</head>
<body>
    <h1><%= character.name %> - Details</h1>
    <div class="character-details">
        <img src="<%= character.image %>" alt="<%= character.name %>">
        <ul>
            <li><strong>Status:</strong> <%= character.status %></li>
            <li><strong>Species:</strong> <%= character.species %></li>
            <li><strong>Gender:</strong> <%= character.gender %></li>
            <li><strong>Origin:</strong> <%= character.origin.name %></li>
            <li><strong>Location:</strong> <%= character.location.name %></li>
        </ul>
        <h2>Episodes</h2>
        <ul>
            <% character.episode.forEach(episode => { %>
                <li><a href="<%= episode %>" target="_blank">Episode <%= episode.split('/').pop() %></a></li>
            <% }); %>
        </ul>
    </div>
    <a href="/" hx-get="/" hx-target="body" hx-push-url="true" class="back-link">Back to Character List</a>
</body>
</html>
The code above defines a new route on our web server /character/:id. This new route is resolved when the user clicks on the view more option in the characters table. It fetches details for the specific character and returns a neatly rendered HTML page with all the character details. This page will look like this:
Putting It All Together: Your Interdimensional Character Explorer
Now that we've built our interdimensional travel device, it's time to see it in action. Here's a complete overview of our code, bringing together everything we've covered so far and also defining custom CSS styles to make the application look better.
Conclusion: Your Portal to Advanced Web Development
Congratulations—you've just built an interdimensional character explorer! In this adventure, we've covered a lot of ground, from setting up our Express.js server and designing a dynamic frontend with EJS and HTMX to implementing smooth pagination and filters.
This project is a testament to the power of HTMX. It shows how we can create dynamic, server-side rendered applications with minimal JavaScript. It's fast, efficient, and user-friendly—just like Rick's portal gun.
But don't stop here! There's a whole multiverse of possibilities waiting for you. Experiment with new features, add more filters or integrate additional APIs. The only limit is your imagination.
"Post-Credits Scene": Additional Resources and Easter Eggs
Before you go, here are some additional resources to help you on your journey:
- HTMX Documentation
- Express.js Documentation
- Rick and Morty API
And for those who made it to the end, here are a few hidden Rick and Morty references:
- Remember, "Wubba Lubba Dub Dub!" means you're in great pain, but also having a great time coding.
- Lastly, always be like Rick – curious, inventive, and never afraid to break the rules (of JavaScript).
Happy coding, and may your interdimensional travels be filled with endless possibilities!
위 내용은 HTMX 및 Express.js를 사용하여 Rick and Morty 캐릭터 탐색기 구축의 상세 내용입니다. 자세한 내용은 PHP 중국어 웹사이트의 기타 관련 기사를 참조하세요!

핫 AI 도구

Undresser.AI Undress
사실적인 누드 사진을 만들기 위한 AI 기반 앱

AI Clothes Remover
사진에서 옷을 제거하는 온라인 AI 도구입니다.

Undress AI Tool
무료로 이미지를 벗다

Clothoff.io
AI 옷 제거제

Video Face Swap
완전히 무료인 AI 얼굴 교환 도구를 사용하여 모든 비디오의 얼굴을 쉽게 바꾸세요!

인기 기사
뜨거운 도구

메모장++7.3.1
사용하기 쉬운 무료 코드 편집기

SublimeText3 중국어 버전
중국어 버전, 사용하기 매우 쉽습니다.

스튜디오 13.0.1 보내기
강력한 PHP 통합 개발 환경

드림위버 CS6
시각적 웹 개발 도구

SublimeText3 Mac 버전
신 수준의 코드 편집 소프트웨어(SublimeText3)


 Python vs. JavaScript : 학습 곡선 및 사용 편의성
Apr 16, 2025 am 12:12 AM
Python vs. JavaScript : 학습 곡선 및 사용 편의성
Apr 16, 2025 am 12:12 AM
Python은 부드러운 학습 곡선과 간결한 구문으로 초보자에게 더 적합합니다. JavaScript는 가파른 학습 곡선과 유연한 구문으로 프론트 엔드 개발에 적합합니다. 1. Python Syntax는 직관적이며 데이터 과학 및 백엔드 개발에 적합합니다. 2. JavaScript는 유연하며 프론트 엔드 및 서버 측 프로그래밍에서 널리 사용됩니다.
 JavaScript 및 웹 : 핵심 기능 및 사용 사례
Apr 18, 2025 am 12:19 AM
JavaScript 및 웹 : 핵심 기능 및 사용 사례
Apr 18, 2025 am 12:19 AM
웹 개발에서 JavaScript의 주요 용도에는 클라이언트 상호 작용, 양식 검증 및 비동기 통신이 포함됩니다. 1) DOM 운영을 통한 동적 컨텐츠 업데이트 및 사용자 상호 작용; 2) 사용자가 사용자 경험을 향상시키기 위해 데이터를 제출하기 전에 클라이언트 확인이 수행됩니다. 3) 서버와의 진실한 통신은 Ajax 기술을 통해 달성됩니다.
 자바 스크립트 행동 : 실제 예제 및 프로젝트
Apr 19, 2025 am 12:13 AM
자바 스크립트 행동 : 실제 예제 및 프로젝트
Apr 19, 2025 am 12:13 AM
실제 세계에서 JavaScript의 응용 프로그램에는 프론트 엔드 및 백엔드 개발이 포함됩니다. 1) DOM 운영 및 이벤트 처리와 관련된 TODO 목록 응용 프로그램을 구축하여 프론트 엔드 애플리케이션을 표시합니다. 2) Node.js를 통해 RESTFULAPI를 구축하고 Express를 통해 백엔드 응용 프로그램을 시연하십시오.
 JavaScript 엔진 이해 : 구현 세부 사항
Apr 17, 2025 am 12:05 AM
JavaScript 엔진 이해 : 구현 세부 사항
Apr 17, 2025 am 12:05 AM
보다 효율적인 코드를 작성하고 성능 병목 현상 및 최적화 전략을 이해하는 데 도움이되기 때문에 JavaScript 엔진이 내부적으로 작동하는 방식을 이해하는 것은 개발자에게 중요합니다. 1) 엔진의 워크 플로에는 구문 분석, 컴파일 및 실행; 2) 실행 프로세스 중에 엔진은 인라인 캐시 및 숨겨진 클래스와 같은 동적 최적화를 수행합니다. 3) 모범 사례에는 글로벌 변수를 피하고 루프 최적화, Const 및 Lets 사용 및 과도한 폐쇄 사용을 피하는 것이 포함됩니다.
 Python vs. JavaScript : 커뮤니티, 라이브러리 및 리소스
Apr 15, 2025 am 12:16 AM
Python vs. JavaScript : 커뮤니티, 라이브러리 및 리소스
Apr 15, 2025 am 12:16 AM
Python과 JavaScript는 커뮤니티, 라이브러리 및 리소스 측면에서 고유 한 장점과 단점이 있습니다. 1) Python 커뮤니티는 친절하고 초보자에게 적합하지만 프론트 엔드 개발 리소스는 JavaScript만큼 풍부하지 않습니다. 2) Python은 데이터 과학 및 기계 학습 라이브러리에서 강력하며 JavaScript는 프론트 엔드 개발 라이브러리 및 프레임 워크에서 더 좋습니다. 3) 둘 다 풍부한 학습 리소스를 가지고 있지만 Python은 공식 문서로 시작하는 데 적합하지만 JavaScript는 MDNWebDocs에서 더 좋습니다. 선택은 프로젝트 요구와 개인적인 이익을 기반으로해야합니다.
 Python vs. JavaScript : 개발 환경 및 도구
Apr 26, 2025 am 12:09 AM
Python vs. JavaScript : 개발 환경 및 도구
Apr 26, 2025 am 12:09 AM
개발 환경에서 Python과 JavaScript의 선택이 모두 중요합니다. 1) Python의 개발 환경에는 Pycharm, Jupyternotebook 및 Anaconda가 포함되어 있으며 데이터 과학 및 빠른 프로토 타이핑에 적합합니다. 2) JavaScript의 개발 환경에는 Node.js, VScode 및 Webpack이 포함되어 있으며 프론트 엔드 및 백엔드 개발에 적합합니다. 프로젝트 요구에 따라 올바른 도구를 선택하면 개발 효율성과 프로젝트 성공률이 향상 될 수 있습니다.
 JavaScript 통역사 및 컴파일러에서 C/C의 역할
Apr 20, 2025 am 12:01 AM
JavaScript 통역사 및 컴파일러에서 C/C의 역할
Apr 20, 2025 am 12:01 AM
C와 C는 주로 통역사와 JIT 컴파일러를 구현하는 데 사용되는 JavaScript 엔진에서 중요한 역할을합니다. 1) C는 JavaScript 소스 코드를 구문 분석하고 추상 구문 트리를 생성하는 데 사용됩니다. 2) C는 바이트 코드 생성 및 실행을 담당합니다. 3) C는 JIT 컴파일러를 구현하고 런타임에 핫스팟 코드를 최적화하고 컴파일하며 JavaScript의 실행 효율을 크게 향상시킵니다.
 Python vs. JavaScript : 사용 사례 및 응용 프로그램 비교
Apr 21, 2025 am 12:01 AM
Python vs. JavaScript : 사용 사례 및 응용 프로그램 비교
Apr 21, 2025 am 12:01 AM
Python은 데이터 과학 및 자동화에 더 적합한 반면 JavaScript는 프론트 엔드 및 풀 스택 개발에 더 적합합니다. 1. Python은 데이터 처리 및 모델링을 위해 Numpy 및 Pandas와 같은 라이브러리를 사용하여 데이터 과학 및 기계 학습에서 잘 수행됩니다. 2. 파이썬은 간결하고 자동화 및 스크립팅이 효율적입니다. 3. JavaScript는 프론트 엔드 개발에 없어서는 안될 것이며 동적 웹 페이지 및 단일 페이지 응용 프로그램을 구축하는 데 사용됩니다. 4. JavaScript는 Node.js를 통해 백엔드 개발에 역할을하며 전체 스택 개발을 지원합니다.
