Windows is the most targeted operating system on the planet. That means you should fortify your PC's defenses to stay safe both online and offline. This guide shows you how to enable or disable Secure Sign-In for Windows 10 and Windows 11.
Secure Sign-In is an additional component on the Windows 10 login screen. It doesn’t prevent anyone from accessing your PC if they have your credentials. Instead, Windows 10 removes the login fields until you type a string of keys. After that, enter your password or PIN as usual.
This feature aims to thwart malware. Malicious code could reside in the background and spoof the Windows 10 or Windows 11 login screen to capture your credentials. Because apps and programs typically don’t have access to the Ctrl+At+Del command, you can bypass the fake login screen by using Secure Sign-In that's activated by typing this three-key command.
To start, launch the Run command by pressing the "Windows" and "R" keys simultaneously (Windows+R). A small pop-up window will appear. Type netplwiz in the text field and then click the “OK” button (or press the Enter key) to continue.

Alternatively, you can access the User Accounts panel by typing netplwiz into the taskbar’s search field and selecting the resulting Run command.
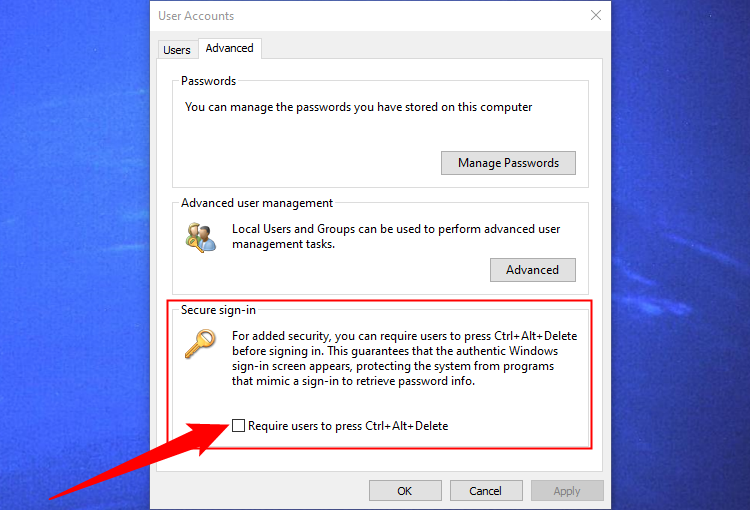
The User Accounts panel will appear onscreen. Click the “Advanced” tab (if it’s not loaded by default). Locate the “Require Users to Press Ctrl+Alt+Delete” option listed under “Secure Sign-In.” Check to enable or uncheck to disable.
Click the “Apply” button and then the “OK” button to finish.

If you want to take the hardcore route, why not edit the registry? Remember, tread lightly: Any changes you make could cause system instability. This option is for experienced individuals who enjoy digging deep into Windows.
Launch the Run command by pressing the "Windows" and "R" keys simultaneously (Windows+R). A small pop-up window will appear. Type regedit (without quotes) in the text field and then click the “OK” button (or press the Enter key) to continue.

You can also access the Registry Editor by typing regedit into the taskbar’s search field and selecting the resulting desktop app.
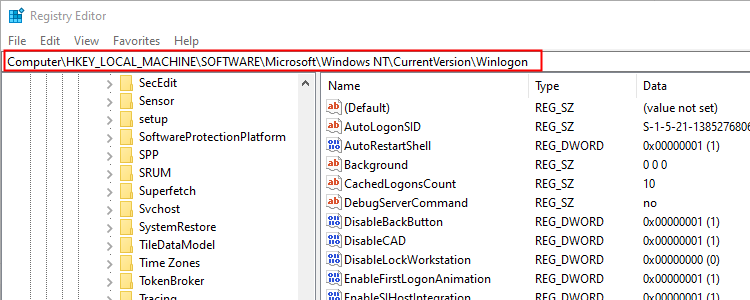
Type or paste the following path into Registry Editor's address bar:
ComputerHKEY_LOCAL_MACHINESOFTWAREMicrosoftWindows NTCurrentVersionWinlogon <p> </p>

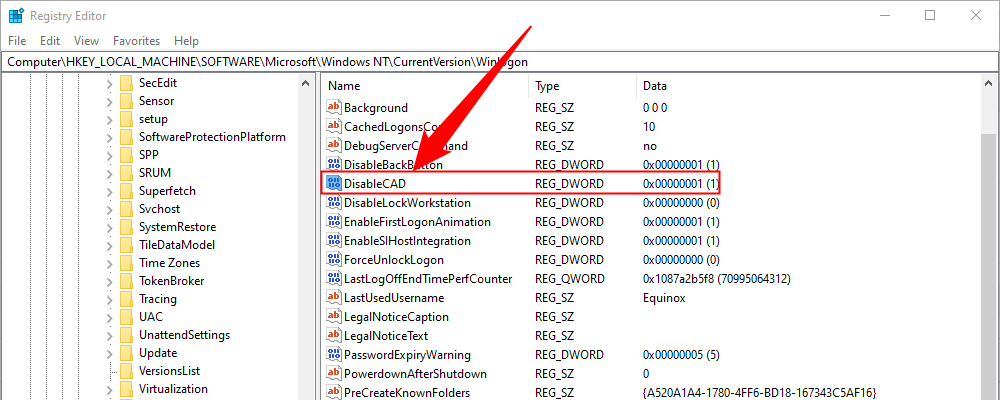
Double-click the "DisableCad" entry to edit its values.

In the "Edit DWORD (32-bit) Value" pop-up box, change the Value Data with one of these values:
Click the “OK” button to finish. Restart your PC to save the settings.

If you don’t see a "DisableCad" entry in the "Winlogon" settings, right-click on "Winlogon," select “New” in the pop-up menu, and then click “DWORD (32-bit) Value" in the next list. Name this new DWORD DisableCAD and change its value.

Here’s another method that’s somewhat busier than following the User Accounts instructions. Use this method if you want to take the scenic route but avoid the Windows registry.
This option is not available on Home Editions of Windows 10 or Windows 11, only Pro or higher.
"Windows"와 "R" 키를 동시에 눌러(Windows+R) 실행 명령을 실행하세요. 작은 팝업 창이 나타납니다. 텍스트 필드에 secpol.msc를 입력한 다음 “확인” 버튼을 클릭하거나 Enter 키를 눌러 계속합니다.

이전과 마찬가지로 작업 표시줄의 검색 필드에 secpol.msc를 입력하고 결과 데스크탑 앱을 선택하여 로컬 보안 정책 패널에 액세스할 수도 있습니다.
로컬 정책 창에서 왼쪽에 나열된 “로컬 정책”을 확장하고 아래의 “보안 옵션” 하위 폴더를 선택하세요. 그런 다음 오른쪽에서 아래로 스크롤하여 "대화형 로그온: CTRL+ALT+DEL 필요 없음" 항목을 두 번 클릭합니다.

기본적으로 "로컬 보안 설정" 탭이 표시된 항목의 속성 패널이 화면에 나타납니다. 이 기능을 활성화하거나 비활성화하려면 라디오 버튼을 클릭하십시오. "적용" 버튼을 클릭한 후 "확인" 버튼을 클릭하여 완료합니다.

보안 로그인을 활성화한다고 해서 컴퓨터가 공격자로부터 무적 상태가 되는 것은 아니지만 작은 변화를 주면 상황에 따라 도움이 될 수 있습니다. 요즘에는 너무 많은 민감한 정보가 컴퓨터를 통해 저장되거나 액세스되므로 항상 보안 문제를 염두에 두어야 합니다. Windows를 최신 상태로 유지하고 일종의 바이러스 백신을 사용하고 있는지 확인하세요.
위 내용은 Windows 10에서 보안 로그인을 활성화 또는 비활성화하는 방법의 상세 내용입니다. 자세한 내용은 PHP 중국어 웹사이트의 기타 관련 기사를 참조하세요!