발음 평가 앱 만들기(1부)
이 튜토리얼의 목적은 사용자의 발음을 제어하는 애플리케이션을 만드는 것입니다.
따라가려면 javascript, 더 이상적으로는 Vue.js 3에 대한 지식이 있어야 합니다.
아이디어
저는 최근 독일로 돌아가기로 결정했습니다. 이 언어에서 내가 직면하는 가장 큰 어려움은 그것을 정확하게 발음하는 것입니다. 보통 예를 듣고, 그것을 반복해서 녹음하고, 다시 직접 듣습니다. 과정이 복잡하고 귀가 좋지 않다는 점을 인정해야 합니다.
이러한 관찰을 바탕으로 내가 독일어로 단어나 문장을 올바르게 발음하고 있는지 알려줄 수 있는 앱이나 API가 있는지 궁금했습니다! 몇 가지 조사와 훌륭한 발견 후에 저는 문제를 해결하기 위해 나만의 앱을 코딩하고 싶었습니다.
제가 했던 방법은 이렇습니다!
사용 가능한 API
몇 가지 조사 끝에 내 문제를 해결하는 앱을 찾을 수 있었습니다. 그러나 전반적으로 발음 확인은 유료 애플리케이션(또는 구독과 함께 작동하는 애플리케이션)의 추가 기능인 경우가 많습니다. 그러다가 API를 찾기로 결정했습니다.
이 작업을 수행하는 API 목록은 다음과 같습니다.
- Google Cloud 음성-텍스트 API
- Microsoft Azure 음성 서비스
- iSpeech 발음
- 언어학
- 연설
- 엘사 나우
- 스피치슈퍼
이러한 API는 유료이지만 일반적으로 테스트 및 실험에 2주간 액세스할 수 있습니다.
독일어 발음을 확인하고 싶어서 독일어를 포함한 여러 언어를 지원하는 SpeechSuper API를 사용해 테스트하기로 했습니다. 튜토리얼 후반부에서는 Speechace API를 사용해 필요에 따라 한 API에서 다른 API로 전환하는 것이 얼마나 쉬운지 보여드리겠습니다.
애플리케이션의 인체공학적 정의
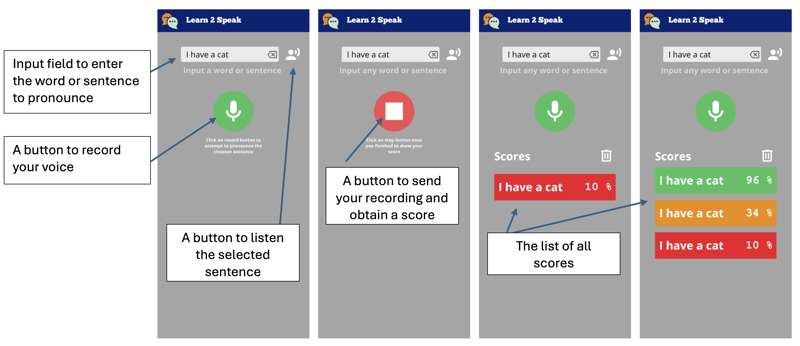
단어를 입력하고, 음성을 녹음하고, 오디오 녹음을 API로 보내고, 점수를 표시할 수 있는 간단한 앱을 구현하는 것이 목표입니다.
애플리케이션은 다음과 같습니다.

그래서 단어나 문장을 입력할 수 있는 텍스트 필드를 표시하는 애플리케이션을 만들어 보겠습니다. 버튼을 누르면 들을 수 있습니다.
그런 다음 음성을 녹음할 수 있는 버튼이 있습니다. 이 버튼은 녹음 모드에 있을 때 스타일을 변경합니다. 중지하려면 클릭하고 API로 전송하여 발음 점수를 얻으세요.
점수를 획득하면 빨간색에서 녹색, 주황색까지 우리의 점수를 나타내는 색상의 타일로 표시됩니다.
애플리케이션 초기화
이상적인 것은 앱을 웹앱으로 배포할 수 있을 뿐만 아니라 기본 Android 애플리케이션으로도 배포할 수 있는 것입니다. 이러한 이유로 우리는 Quasar를 사용하게 됩니다.
퀘이사 프레임워크
Quasar는 단일 코드베이스로 애플리케이션을 개발하기 위한 오픈 소스 Vue.js 프레임워크입니다. 웹(SPA, PWA, SSR), 모바일 애플리케이션(Android, iOS) 또는 데스크톱 애플리케이션(MacOs, Windows, Linux)으로 배포할 수 있습니다.
준비
아직 그렇지 않다면 NodeJS를 설치해야 합니다. 프로젝트에 따라 다양한 버전의 NodeJ를 사용할 수 있는 volta를 사용하는 것이 더 좋습니다.
Quasar 비계 도구를 사용하여 프로젝트를 초기화하는 것부터 시작하겠습니다.
npm i -g @quasar/cli
npm init quasar
Cli는 몇 가지 질문을 합니다. 다음 옵션을 선택하세요.
옵션 목록
명령이 실행되면 디렉터리를 입력하고 로컬에서 애플리케이션을 제공할 수 있습니다.
cd learn2speak
npm run dev
기본 브라우저는 http://localhost:9000 주소의 페이지를 열어야 합니다

목표한 인체공학적 특성을 얻기 위해 제안된 골격 수정
예제 애플리케이션이 제공되므로 필요하지 않은 요소는 제거하겠습니다. 이를 위해 VSCode에서 소스 코드를 엽니다(물론 다른 편집기를 사용할 수도 있습니다)
code .
Layout modification
Quasar provides us with the notion of Layout and then of page included in the latter. The pages and the layout are chosen via the router. For this tutorial, we do not need to know these notions, but you can learn them here: Quasar layout
We do not need drawer, at least not for now so we will delete it from the src/layouts/MainLayout.vue file. To do this, delete the section of the included between the
<template>
  <q-layout view="lHh Lpr lFf">
    <q-header elevated>
      <q-toolbar>
        <q-icon name="interpreter_mode" size="md" />
        <q-toolbar-title>
          Learn2Speak
        </q-toolbar-title>
      </q-toolbar>
    </q-header>

    <q-page-container>
      <router-view />
    </q-page-container>
  </q-layout>
</template>
We can then remove the entire script part and replace it with the following code:
<script>
import { defineComponent } from 'vue'

export default defineComponent({
  name: 'MainLayout',
  setup () {
  }
})
</script>
We don't need more for the layout part because our application will define only one page.
The main page
The implementation of the main page is in the file: src/pages/IndexPage.vue
this is the main page where we will position our text field and the save button.
For this file, we simply remove the Quasar logo from the template (the tag) and modify the script part to use the vueJS 3 composition api, so that the source looks like the following file:
<template>
  <q-page class="flex flex-center">

  </q-page>
</template>

<script setup>

</script>
We will now add the text field using the Quasar component QInput
To do this we add the q-input component to the page template:
<template>
  <q-page class="flex flex-center">
    <q-input
      type="textarea"
      :lines="2"
      autogrow
      hint="Input a word or a sentence"
      clearable
    />
  </q-page>
</template>
You can see that the text field is displayed in the center of the screen, this is due to the Quasar flex and flex-center classes. These classes are defined by Quasar: Flexbox. We will fix this by placing the text field at the top of the screen, we will also take advantage of this to style the component.
Quasar even provides us with a Flex Playground to experiment and find the classes to put.
<template>
  <q-page class="column wrap content-center items-center">
    <q-input
      class="input-text"
      v-model="sentence"
      type="textarea"
      :lines="2"
      autogrow
      hint="Input a word or a sentence"
      clearable
    />
  </q-page>
</template>

<script setup>
import { ref } from 'vue'

// Reference on the word or sentence to be pronounced
const sentence = ref('')

</script>

<style scoped>
.input-text {
  width: 80vw;
  max-width: 400px;
}
</style>
As you can see, we have defined a sentence reference in the script part to store the value entered by the user. It is associated via the v-model directive to the q-input component
We will finish this first part by adding the button allowing the recording of our pronunciation of the word or sentence. For this we will simply use the q-button component of Quasar and position it after our text field.
<template>
  <q-page class="column wrap content-center items-center">
    <q-input
      class="input-text q-mt-lg"
      v-model="sentence"
      type="textarea"
      :lines="2"
      autogrow
      hint="Input a word or a sentence"
      clearable
    />
    <div>
    <q-btn
      class="q-mt-lg"
      icon="mic"
      color="primary"
      round
      size="30px"
      @click="record"
    />
    </div>
  </q-page>
</template>

<script setup>
import { ref } from 'vue'

// Reference on the word or sentence to be pronounced
const sentence = ref('')

function record () {
  console.log('Record')
}
</script>

<style scoped>
.input-text {
  width: 80vw;
  max-width: 400px;
}
</style>
Note that we added the q-mt-lg class to air out the interface a bit by leaving some space above each component. You can refer to the Quasar documentation on spacing.
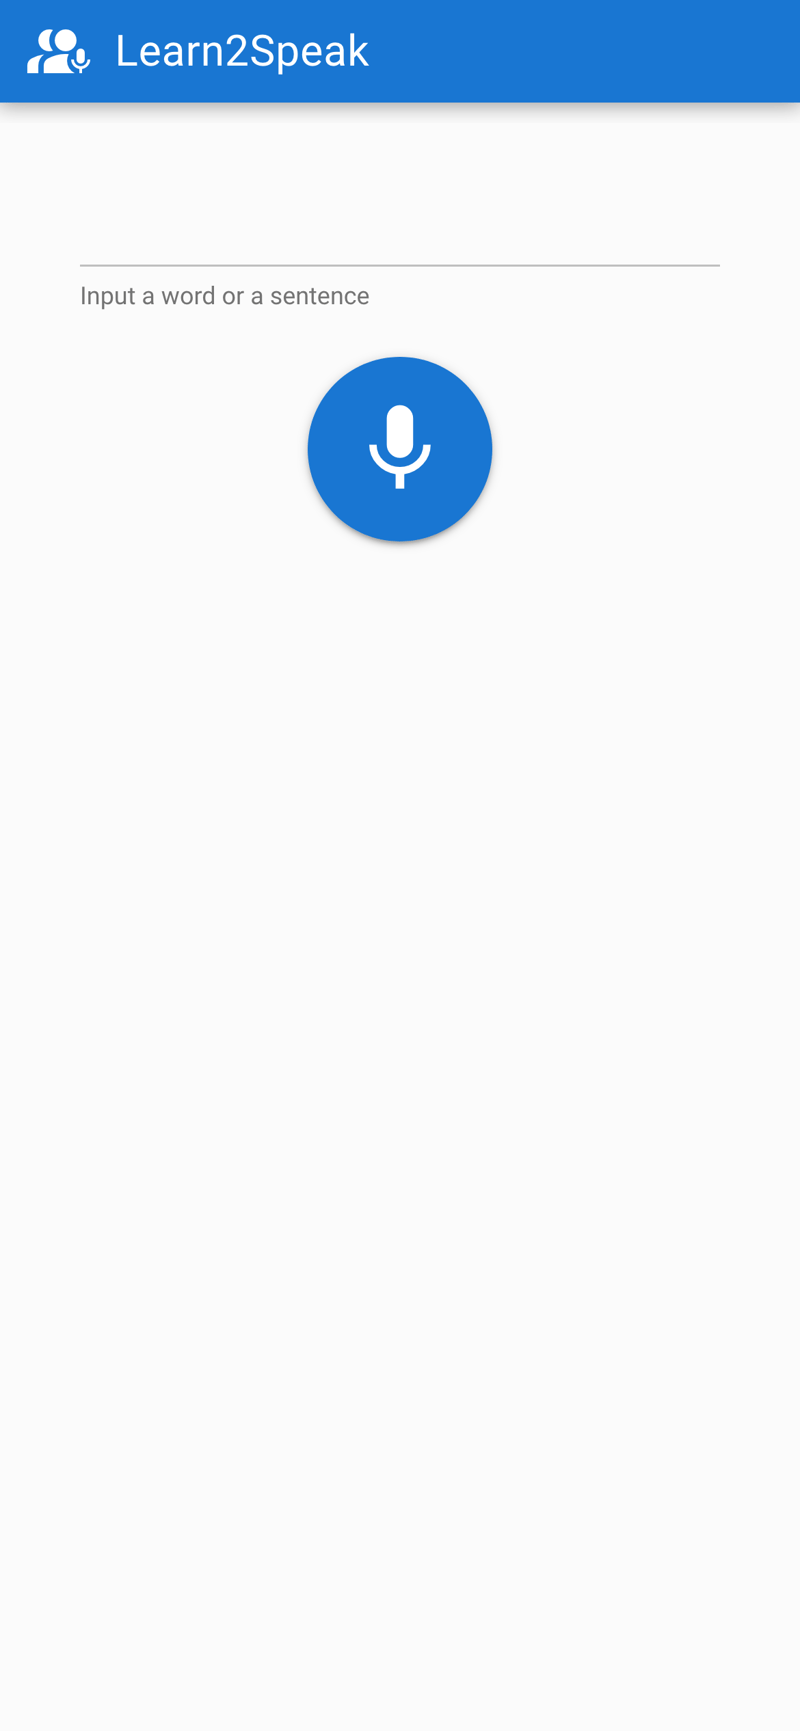
The application will look like:

What will we do next
We have therefore managed to obtain the skeleton of our application.
In a future part we will see how to acquire the audio, then how to obtain a score via the SpeechSuper API
- Part 2: Acquiring the audio
- Part 3: Obtaining the score via the SpeechSuper API
- Part 4: Packaging the application
Conclusion
Don't hesite on comments the post ! Part 2 will follow soon !
위 내용은 발음 평가 앱 만들기(1부)의 상세 내용입니다. 자세한 내용은 PHP 중국어 웹사이트의 기타 관련 기사를 참조하세요!

핫 AI 도구

Undresser.AI Undress
사실적인 누드 사진을 만들기 위한 AI 기반 앱

AI Clothes Remover
사진에서 옷을 제거하는 온라인 AI 도구입니다.

Undress AI Tool
무료로 이미지를 벗다

Clothoff.io
AI 옷 제거제

AI Hentai Generator
AI Hentai를 무료로 생성하십시오.

인기 기사

뜨거운 도구

메모장++7.3.1
사용하기 쉬운 무료 코드 편집기

SublimeText3 중국어 버전
중국어 버전, 사용하기 매우 쉽습니다.

스튜디오 13.0.1 보내기
강력한 PHP 통합 개발 환경

드림위버 CS6
시각적 웹 개발 도구

SublimeText3 Mac 버전
신 수준의 코드 편집 소프트웨어(SublimeText3)

뜨거운 주제
 7315
7315
 9
9
 1625
1625
 14
14
 1348
1348
 46
46
 1260
1260
 25
25
 1207
1207
 29
29


