

HTMX 및 Golang을 사용한 파일 업로드
Aug 20, 2024 am 06:32 AM물론 HTMX의 훌륭함에 대해 이미 들어보셨을 겁니다(아직 모르셨나요? 여기 오셔서 다행이네요 ?)
오늘은 HTMX의 단순성과 Golang의 강력한 기능을 결합하여 서버에 파일을 업로드할 것입니다. 네, 우리는 HTMX와 Go를 사용하여 또 다른 흥미로운 웹 기능을 구축할 예정입니다.
그런데 HTMX를 사용하여 풀스택 앱을 구축하는 데 대한 실용적인 프로젝트 기반 가이드를 정말로 원한다면 내 HTMX + Go: Golang을 사용하여 풀스택 애플리케이션 구축 및 HTMX 과정 [할인 포함]을 확인하세요.
자, 시작해 보겠습니다.
Go 프로젝트 설정
첫 번째 단계는 간단한 Go 프로젝트를 설정하는 것입니다. 아래 명령을 사용하여 폴더를 만들고 해당 폴더로 이동하여 Go 프로젝트로 초기화하면 됩니다.
mkdir go-htmx-file-uploads
cd go-htmx-file-uploads
go mod init go-htmx-file-uploads
프로젝트가 초기화되면 이제 프로젝트 내에서 필요한 일부 종속성을 설치해 보겠습니다.
이것은 업로드 양식이 포함된 단일 페이지와 파일 업로드에 사용되는 엔드포인트를 포함하는 간단한 서버입니다.
라우팅에는 Gorilla Mux 라우팅 라이브러리를 사용하지만 원하는 라우팅 솔루션을 자유롭게 사용해도 됩니다. 또한 Go용 Google의 UUID 라이브러리를 사용하여 파일을 업로드할 때 파일의 임의 이름을 생성할 것입니다. 다양한 방법으로 파일 이름을 생성할 수 있으므로 이는 개인 취향입니다.
아래 명령을 사용하여 이 두 가지를 설치하세요.
고릴라 먹스
go get -u github.com/gorilla/mux
구글 UUID
go get github.com/google/uuid
이 두 가지를 설치하면 프로젝트가 완전히 설정되었으며 다음 단계로 넘어갈 수 있습니다.
템플릿 만들기
이 작은 프로젝트를 위해 두 개의 HTML 템플릿을 만들 예정입니다.
첫 번째 템플릿은 서버에서 클라이언트로 보낼 수 있는 문자열 메시지 조각을 간단히 취하는 HTML 조각입니다.
이 조각은 이 메시지 조각을 가져와 이를 반복하여 클라이언트에 반환할 HTML 목록을 생성합니다(HTMX가 하이퍼미디어 API와 어떻게 작동하는지 기억하시나요? 꽤 멋지죠?).
그럼 먼저 만들어 보겠습니다.
Go 프로젝트의 루트에서 먼저 모든 템플릿을 저장할 템플릿 폴더를 만듭니다.
다음으로 템플릿 폴더 안에 message.html 파일을 만들고 다음 코드를 추가합니다.
{{define "messages"}}
<ul>
    {{range .}}
        <li>{{ . }}</li>
    {{end}}
</ul>
{{end}}
이는 메시지 템플릿을 정의하고 수신되는 문자열 메시지 조각을 반복하여 HTML 목록을 형성합니다.
다음 템플릿에서는 파일 업로드 페이지 자체를 만들 예정입니다.
템플릿 폴더 안에 upload.html이라는 새 파일을 만들고 아래 코드를 붙여넣으세요.
{{define "upload"}}
<!DOCTYPE html>
<html lang="en">
<head>
    <meta charset="UTF-8">
    <meta name="viewport" content="width=device-width, initial-scale=1.0">
    <link href="https://cdn.jsdelivr.net/npm/bootstrap@5.1.3/dist/css/bootstrap.min.css" rel="stylesheet">
    <script src="https://unpkg.com/htmx.org@1.9.12"></script>
    <title>Upload File</title>
</head>
<body>

    <div class="row">
        <div class="col-md-6 p-5 mt-5">
            <h4>Upload File</h4>
            <form  class="form">
                <div id="messages"></div>
                <div class="mb-3">
                    <label for="avatarInput" class="form-label">Select Image</label>
                    <input type="file" class="form-control" id="avatarInput" name="avatar" required>
                </div>
                <button
                    hx-post="/upload"
                    hx-encoding="multipart/form-data"
                    hx-target="#messages"
                    type="submit" class="btn btn-primary">Upload</button>
            </form>
        </div>
    </div>


</body>
</html>
{{end}}
완벽해요!
이제 이 파일의 코드를 살펴보겠습니다.
먼저 upload라는 이름으로 템플릿을 정의했습니다. 이 이름은 나중에 경로 핸들러에서 참조하는 데 사용할 이름입니다.
헤드 섹션에 몇 가지 상용구 HTML 코드가 있지만 여기에 두 개의 중요한 라이브러리를 포함했습니다. 하나는 정말 중요하고 다른 하나는 CSS 느낌을 위한 것입니다.
HTMX 라이브러리는 <script> HTMX를 가져오는 태그, 라이브러리만 가져오며 종속성은 필요하지 않습니다.
그런 다음 Bootstrap CSS 라이브러리도 가져왔습니다. 이는 단지 페이지 요소에 멋진 스타일을 부여하기 위한 것입니다. 이 데모에서는 필수 사항이 아닙니다.
페이지 자체에 업로드를 수행하는 양식이 있습니다. <form> 내에 있는 내용을 분석해 보겠습니다. 태그.
먼저 <div> 메시지 ID를 사용하면 HTML로 들어오는 모든 서버 메시지를 로드할 컨테이너입니다. 메시지 템플릿을 기억하세요. 여기에 메시지 목록이 들어갈 것입니다.
그 다음에는 파일 업로드 위젯을 표시하도록 파일로 설정된 양식 입력 요소가 있습니다. 백엔드에서 참조할 수 있도록 아바타라는 이름을 지정했지만 원하는 이름을 지정할 수 있습니다. 프로필 이미지 업로드용으로 사용하고 있어서 아바타로 드렸습니다.
마지막으로 HTMX로 강화된 버튼이 생겼습니다. 아래에 다시 표시해 두었으니 살펴보세요
<button
                    hx-post="/upload"
                    hx-encoding="multipart/form-data"
                    hx-target="#messages"
                    type="submit" class="btn btn-primary">Upload</button>
먼저 hx-post="/upload" 를 추가했습니다. 이는 곧 생성될 /upload 엔드포인트에 양식을 제출하고 파일 업로드를 처리하도록 지시합니다.
다음은 hx-encoding="multipart/form-data"입니다. 이는 요청과 함께 파일을 함께 보내고 있음을 서버에 알리기 위해 HTMX를 사용하여 파일을 업로드하는 데 필수입니다.
그런 다음 서버의 응답을 <div> 메시지 ID로.
이 세 가지는 백엔드에 파일을 업로드하기 위한 구성을 정의합니다.
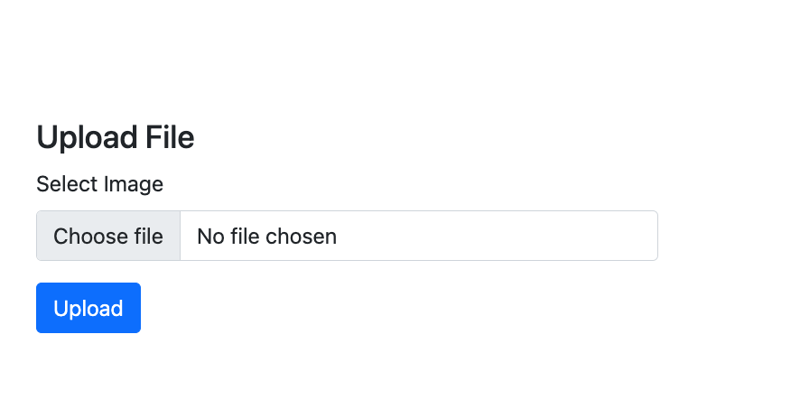
다음은 페이지의 미리보기입니다.
Processing the File Upload
Now that we have our templates, it’s time to write the code that will display our upload page and also handle our file uploads.
To begin, at the root of the Go project, create a uploads folder. This is the folder where all our uploaded files will be stored.
With that in place, let’s write our main file.
Create the file main.go at the root of your project and add the following code:
package main

import (
    "html/template"
    "log"
    "net/http"
    "io"
    "os"
    "path/filepath"
    "github.com/google/uuid"
    "github.com/gorilla/mux"
)

var tmpl *template.Template

func init(){
    tmpl, _ = template.ParseGlob("templates/*.html")
}

func main() {


    router := mux.NewRouter()

    router.HandleFunc("/", homeHandler).Methods("GET")

    router.HandleFunc("/upload", UploadHandler).Methods("POST")

    log.Println("Server starting on :8080")
    log.Fatal(http.ListenAndServe(":8080", router))
}

func homeHandler(w http.ResponseWriter, r *http.Request) {

    tmpl.ExecuteTemplate(w, "upload", nil)

}

func UploadHandler(w http.ResponseWriter, r *http.Request) {


        // Initialize error messages slice
        var serverMessages []string

        // Parse the multipart form, 10 MB max upload size
        r.ParseMultipartForm(10 << 20)

        // Retrieve the file from form data
        file, handler, err := r.FormFile("avatar")
        if err != nil {
            if err == http.ErrMissingFile {
                serverMessages = append(serverMessages, "No file submitted")
            } else {
                serverMessages = append(serverMessages, "Error retrieving the file")
            }

            if len(serverMessages) > 0 {
                tmpl.ExecuteTemplate(w, "messages", serverMessages)
                return
            }

        }
        defer file.Close()

        // Generate a unique filename to prevent overwriting and conflicts
        uuid, err := uuid.NewRandom()
        if err != nil {
            serverMessages = append(serverMessages, "Error generating unique identifier")
            tmpl.ExecuteTemplate(w, "messages", serverMessages)

            return
        }
        filename := uuid.String() + filepath.Ext(handler.Filename) // Append the file extension

        // Create the full path for saving the file
        filePath := filepath.Join("uploads", filename)

        // Save the file to the server
        dst, err := os.Create(filePath)
        if err != nil {
            serverMessages = append(serverMessages, "Error saving the file")
            tmpl.ExecuteTemplate(w, "messages", serverMessages)

            return
        }
        defer dst.Close()
        if _, err = io.Copy(dst, file); err != nil {
            serverMessages = append(serverMessages, "Error saving the file")
            tmpl.ExecuteTemplate(w, "messages", serverMessages)
            return
        }


        serverMessages = append(serverMessages, "File Successfully Saved")
        tmpl.ExecuteTemplate(w, "messages", serverMessages)


}
Yope, that’s a bunch of code. Don’t worry, we’ll go through it all step by step to figure out what this is all doing.
First we define our package main and import a bunch of libraries we will be making use of. These imports include the Gorilla mux router and the Google UUID library that we installed earlier.
After that, I create a global tmpl variable to hold all the HTML templates in the project and in the init() function, the templates are all loaded from the templates folder.
The main() Function
Now to the main() function. Here, we have initlialized the Gorilla Mux router and set up two routes.
The GET / base route which will be handled by a homeHandler function and displays our upload form, and the POST /upload route that will be handled by UploadHandler and handles the upload itself.
Finally, we print out a message to indicate that our server is running, and run the server on port 8080.
The Handler Functions
First we have homeHandler . This is the function that handles our base route, and it simply calls ExecuteTemplate on the tmpl variable with the name we gave to our template
tmpl.ExecuteTemplate(w, "upload", nil)
This call is enough to simply render our upload page to the screen when we visit the base route.
After that is the UploadHandler function. This is where the real magic happens, so let’s walk through the function.
First, we create a slice of strings called serverMessages to hold any message we want to send back to the client.
After that, we call ParseMultipartForm on the request pointer to limit the size of uploaded files to within 20MB.
r.ParseMultipartForm(10 << 20)
Next, we get a hold on our file by referencing the name of the file field with FormFile on the request pointer.
With our reference to the file, we check if there is actually a file, and if not, we return a message saying that no file was submitted or an error was encountered when trying to retrieve the file to account for other errors.
file, handler, err := r.FormFile("avatar")
        if err != nil {
            if err == http.ErrMissingFile {
                serverMessages = append(serverMessages, "No file submitted")
            } else {
                serverMessages = append(serverMessages, "Error retrieving the file")
            }

            if len(serverMessages) > 0 {
                tmpl.ExecuteTemplate(w, "messages", serverMessages)
                return
            }

        }
At this point, if our messages slice is not empty, we return the messages to the client and exit the function.
If a file is found, we keep the file open and move to generating a new name for it with the UUID library and also handle the errors in that process accordingly.
We build a new file name with the generated string and the file extension and set it’s path to the uploads folder.
    uuid, err := uuid.NewRandom()
        if err != nil {
            serverMessages = append(serverMessages, "Error generating unique identifier")
            tmpl.ExecuteTemplate(w, "messages", serverMessages)

            return
        }
        filename := uuid.String() + filepath.Ext(handler.Filename)

        // Create the full path for saving the file
        filePath := filepath.Join("uploads", filename)
Once the new file path is constructed, we then use the os library to create the file path
After that, we use the io library to move the file from it’s temporary location to the new location and also handle errors accordingly.
    dst, err := os.Create(filePath)
        if err != nil {
            serverMessages = append(serverMessages, "Error saving the file")
            tmpl.ExecuteTemplate(w, "messages", serverMessages)

            return
        }
        defer dst.Close()
        if _, err = io.Copy(dst, file); err != nil {
            serverMessages = append(serverMessages, "Error saving the file")
            tmpl.ExecuteTemplate(w, "messages", serverMessages)
            return
        }
If we get no errors from the file saving process, we then return a successful message to the client using our messages template as we have done with previous messages.
serverMessages = append(serverMessages, "File Successfully Saved")
tmpl.ExecuteTemplate(w, "messages", serverMessages)
And that’s everything.
Now let’s take this code for a spin.
Testing the File Upload
Save the file and head over to the command line.
At the root of the project, use the command below to run our little file upload application:
go run main.go
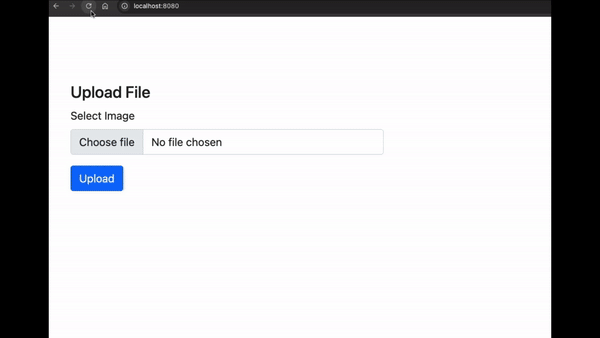
Now go to your browser and head over to http://localhost:8080, you should see the upload screen displayed.
Try testing with no file to see the error message displayed. Then test with an actual file and also see that you get a successful message.
Check the uploads folder to confirm that the file is actually being saved there.
And Wholla! You can now upload files to your Go servers using HTMX.
Conclusion
If you have enjoyed this article, and will like to learn more about building projects with HTMX, I’ll like you to check out HTMX + Go: Build Fullstack Applications with Golang and HTMX, and The Complete HTMX Course: Zero to Pro with HTMX to further expand your knowledge on building hypermedia-driven applications with HTMX.
위 내용은 HTMX 및 Golang을 사용한 파일 업로드의 상세 내용입니다. 자세한 내용은 PHP 중국어 웹사이트의 기타 관련 기사를 참조하세요!

인기 기사


인기 기사

뜨거운 기사 태그

메모장++7.3.1
사용하기 쉬운 무료 코드 편집기

SublimeText3 중국어 버전
중국어 버전, 사용하기 매우 쉽습니다.

스튜디오 13.0.1 보내기
강력한 PHP 통합 개발 환경

드림위버 CS6
시각적 웹 개발 도구

SublimeText3 Mac 버전
신 수준의 코드 편집 소프트웨어(SublimeText3)
뜨거운 주제
 7277
7277
 9
1622
14
1285
46
1257
25
1205
29
9
1622
14
1285
46
1257
25
1205
29

 Go Language Pack 가져 오기 : 밑줄과 밑줄이없는 밑줄의 차이점은 무엇입니까?
Mar 03, 2025 pm 05:17 PM
Go Language Pack 가져 오기 : 밑줄과 밑줄이없는 밑줄의 차이점은 무엇입니까?
Mar 03, 2025 pm 05:17 PM
Go Language Pack 가져 오기 : 밑줄과 밑줄이없는 밑줄의 차이점은 무엇입니까?
 이동 중에 테스트를 위해 모의 개체와 스터브를 작성하려면 어떻게합니까?
Mar 10, 2025 pm 05:38 PM
이동 중에 테스트를 위해 모의 개체와 스터브를 작성하려면 어떻게합니까?
Mar 10, 2025 pm 05:38 PM
이동 중에 테스트를 위해 모의 개체와 스터브를 작성하려면 어떻게합니까?
 Beego 프레임 워크에서 페이지간에 단기 정보 전송을 구현하는 방법은 무엇입니까?
Mar 03, 2025 pm 05:22 PM
Beego 프레임 워크에서 페이지간에 단기 정보 전송을 구현하는 방법은 무엇입니까?
Mar 03, 2025 pm 05:22 PM
Beego 프레임 워크에서 페이지간에 단기 정보 전송을 구현하는 방법은 무엇입니까?
 추적 도구를 사용하여 GO 응용 프로그램의 실행 흐름을 이해하려면 어떻게해야합니까?
Mar 10, 2025 pm 05:36 PM
추적 도구를 사용하여 GO 응용 프로그램의 실행 흐름을 이해하려면 어떻게해야합니까?
Mar 10, 2025 pm 05:36 PM
추적 도구를 사용하여 GO 응용 프로그램의 실행 흐름을 이해하려면 어떻게해야합니까?
 GO에서 제네릭에 대한 사용자 정의 유형 제약 조건을 어떻게 정의 할 수 있습니까?
Mar 10, 2025 pm 03:20 PM
GO에서 제네릭에 대한 사용자 정의 유형 제약 조건을 어떻게 정의 할 수 있습니까?
Mar 10, 2025 pm 03:20 PM
GO에서 제네릭에 대한 사용자 정의 유형 제약 조건을 어떻게 정의 할 수 있습니까?

 MySQL 쿼리 결과 목록을 GO 언어로 사용자 정의 구조 슬라이스로 변환하는 방법은 무엇입니까?
Mar 03, 2025 pm 05:18 PM
MySQL 쿼리 결과 목록을 GO 언어로 사용자 정의 구조 슬라이스로 변환하는 방법은 무엇입니까?
Mar 03, 2025 pm 05:18 PM
MySQL 쿼리 결과 목록을 GO 언어로 사용자 정의 구조 슬라이스로 변환하는 방법은 무엇입니까?
 Linters 및 정적 분석 도구를 사용하여 GO 코드의 품질과 유지 관리를 향상시킬 수 있습니까?
Mar 10, 2025 pm 05:38 PM
Linters 및 정적 분석 도구를 사용하여 GO 코드의 품질과 유지 관리를 향상시킬 수 있습니까?
Mar 10, 2025 pm 05:38 PM
Linters 및 정적 분석 도구를 사용하여 GO 코드의 품질과 유지 관리를 향상시킬 수 있습니까?
