

OpenCV를 사용한 이미지 압축에 대한 전체 가이드

이미지 압축은 시각적 품질을 유지하면서 이미지를 보다 효율적으로 저장하고 전송할 수 있게 해주는 컴퓨터 비전의 중요한 기술입니다. 이상적으로는 최고의 품질을 갖춘 작은 파일을 갖고 싶습니다. 그러나 우리는 균형을 이루고 어느 것이 더 중요한지 결정해야 합니다.
이 튜토리얼에서는 OpenCV를 사용한 이미지 압축에 대해 설명하고 이론과 실제 적용을 다룹니다. 마지막에는 컴퓨터 비전 프로젝트(또는 다른 프로젝트)를 위해 사진을 성공적으로 압축하는 방법을 이해하게 될 것입니다.
이미지 압축이란 무엇입니까?
이미지 압축은 허용 가능한 수준의 시각적 품질을 유지하면서 이미지의 파일 크기를 줄이는 것입니다. 압축에는 두 가지 주요 유형이 있습니다.
- 무손실 압축: 모든 원본 데이터를 보존하여 정확한 이미지 재구성이 가능합니다.
- 손실 압축: 파일 크기를 줄이기 위해 일부 데이터를 삭제하므로 이미지 품질이 저하될 수 있습니다.
이미지를 압축하는 이유는 무엇입니까?
자주 듣는 것처럼 "디스크 공간이 저렴하다"면 왜 이미지를 압축합니까? 소규모에서는 이미지 압축이 크게 중요하지 않지만 대규모에서는 매우 중요합니다.
예를 들어, 하드 드라이브에 이미지가 몇 개 있는 경우 해당 이미지를 압축하여 몇 메가바이트의 데이터를 저장할 수 있습니다. 하드 드라이브를 테라바이트 단위로 측정하는 경우 이는 큰 영향을 미치지 않습니다. 하지만 하드 드라이브에 100,000개의 이미지가 있다면 어떨까요? 일부 기본 압축은 실시간 시간과 비용을 절약해 줍니다. 성능 측면에서도 마찬가지다. 이미지가 많은 웹사이트가 있고 하루에 10,000명의 사람들이 웹사이트를 방문한다면 압축이 중요합니다.
우리가 그렇게 하는 이유는 다음과 같습니다.
- 저장 요구 사항 감소: 같은 공간에 더 많은 이미지 저장
- 더 빠른 전송: 웹 애플리케이션 및 대역폭이 제한된 시나리오에 이상적
- 처리 속도 향상: 작은 이미지를 로드하고 처리하는 속도가 더 빠릅니다
이미지 압축에 대한 이론
이미지 압축 기술은 두 가지 유형의 중복성을 활용합니다.
- 공간적 중복성: 인접 픽셀 간의 상관관계
- 색상 중복성: 인접 영역의 색상 값 유사성
공간 중복성은 대부분의 자연 이미지에서 인접 픽셀이 유사한 값을 갖는 경향이 있다는 사실을 활용합니다. 이렇게 하면 부드러운 전환이 생성됩니다. 한 영역에서 다른 영역으로 자연스러운 흐름이 있기 때문에 많은 사진이 "실제처럼 보입니다". 인접한 픽셀의 값이 크게 다른 경우 "노이즈가 있는" 이미지가 나타납니다. 픽셀을 단일 색상으로 그룹화하여 이미지를 더 작게 만들어 이러한 전환을 덜 "부드럽게" 만들기 위해 픽셀이 변경되었습니다.

색상 중복은 이미지의 인접한 영역이 유사한 색상을 공유하는 경우가 얼마나 많은지에 중점을 둡니다. 푸른 하늘이나 녹색 들판을 생각해 보세요. 이미지의 많은 부분이 매우 유사한 색상 값을 가질 수 있습니다. 공간을 절약하기 위해 함께 그룹화하여 단일 색상으로 만들 수도 있습니다.

OpenCV는 이러한 아이디어를 작업할 수 있는 견고한 도구를 제공합니다. 예를 들어 OpenCV의 cv2.inpaint() 함수는 공간 중복성을 사용하여 근처 픽셀의 정보를 사용하여 그림의 누락되거나 손상된 영역을 채웁니다. OpenCV를 사용하면 개발자는 cv2.cvtColor()를 사용하여 색상 중복과 관련된 여러 색상 공간 간에 이미지를 변환할 수 있습니다. 특정 종류의 이미지를 인코딩할 때 일부 색상 공간이 다른 색상 공간보다 더 효과적이기 때문에 이는 다양한 압축 기술의 전처리 단계로 어느 정도 도움이 될 수 있습니다.
이제 이 이론 중 일부를 테스트해 보겠습니다. 그것을 가지고 놀자.
이미지 압축 실습
OpenCV의 Python 바인딩을 사용하여 이미지를 압축하는 방법을 살펴보겠습니다. 이 코드를 작성하거나 복사하세요.
여기에서 소스 코드를 얻을 수도 있습니다
import cv2
import numpy as np

def compress_image(image_path, quality=90):
    # Read the image
 img = cv2.imread(image_path)

    # Encode the image with JPEG compression
 encode_param = [int(cv2.IMWRITE_JPEG_QUALITY), quality]
 _, encoded_img = cv2.imencode('.jpg', img, encode_param)

    # Decode the compressed image
 decoded_img = cv2.imdecode(encoded_img, cv2.IMREAD_COLOR)

    return decoded_img

# Example usage
original_img = cv2.imread('original_image.jpg')
compressed_img = compress_image('original_image.jpg', quality=50)

# Display results
cv2.imshow('Original', original_img)
cv2.imshow('Compressed', compressed_img)
cv2.waitKey(0)
cv2.destroyAllWindows()

# Calculate compression ratio
original_size = original_img.nbytes
compressed_size = compressed_img.nbytes
compression_ratio = original_size / compressed_size
print(f"Compression ratio: {compression_ratio:.2f}")
이 예에는 두 개의 매개변수를 사용하는 압축_이미지 함수가 포함되어 있습니다.
- 이미지 경로(이미지가 위치한 곳)
- 품질(원하는 이미지의 품질)
그런 다음 원본 이미지를 original_img에 로드하겠습니다. 그런 다음 동일한 이미지를 50% 압축하여 새 인스턴스인 압축 이미지에 로드합니다.
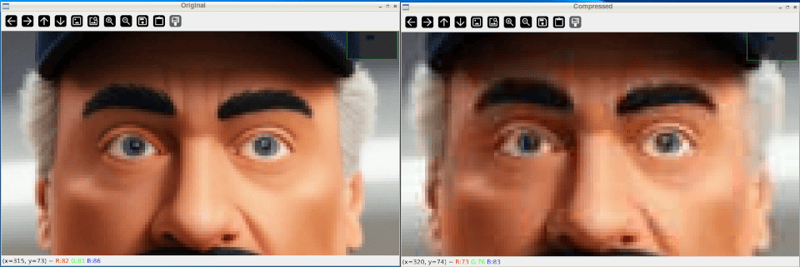
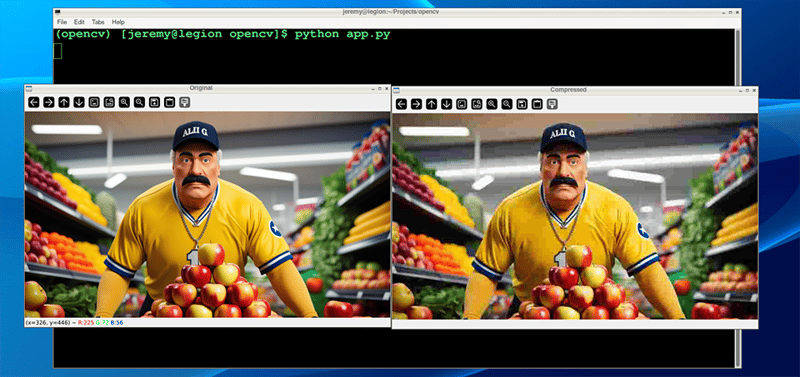
그럼 원본과 압축 이미지를 나란히 보실 수 있도록 보여드리겠습니다.
그런 다음 압축률을 계산하여 표시합니다.
이 예제는 OpenCV에서 JPEG 압축을 사용하여 이미지를 압축하는 방법을 보여줍니다. 품질 매개변수는 파일 크기와 이미지 품질의 균형을 제어합니다.
실행해 보겠습니다.

While intially looking at the images, you see little difference. However, zooming in shows you the difference in the quality:
And after closing the windows and looking at the files, we can see the file was reduced in size dramatically:

Also, if we take it down further, we can change our quality to 10%
compressed_img = compress_image('sampleimage.jpg', quality=10)
And the results are much more drastic:
And the file size results are more drastic as well:

You can adjust these parameters quite easily and achieve the desired balance between quality and file size.
Evaluating Compression Quality
To assess the impact of compression, we can use metrics like:
- Mean Squared Error (MSE)
Mean Squared Error (MSE) measures how different two images are from each other. When you compress an image, MSE helps you determine how much the compressed image has changed compared to the original.
It does this by sampling the differences between the colors of corresponding pixels in the two images, squaring those differences, and averaging them. The result is a single number: a lower MSE means the compressed image is closer to the original. In comparison, a higher MSE means there's a more noticeable loss of quality.
Here's some Python code to measure that:
def calculate_mse(img1, img2):
    return np.mean((img1 - img2) ** 2)

mse = calculate_mse(original_img, compressed_img)
print(f"Mean Squared Error: {mse:.2f}")
Here's what our demo image compression looks like:

- Peak Signal-to-Noise Ratio (PSNR)
Peak Signal-to-Noise Ratio (PSNR) is a measure that shows how much an image's quality has degraded after compression. This is often visible with your eyes, but it assigns a set value. It compares the original image to the compressed one and expresses the difference as a ratio.
A higher PSNR value means the compressed image is closer in quality to the original, indicating less loss of quality. A lower PSNR means more visible degradation. PSNR is often used alongside MSE, with PSNR providing an easier-to-interpret scale where higher is better.
Here is some Python code that measures that:
def calculate_psnr(img1, img2):
 mse = calculate_mse(img1, img2)
    if mse == 0:
        return float('inf')
 max_pixel = 255.0
    return 20 * np.log10(max_pixel / np.sqrt(mse))

psnr = calculate_psnr(original_img, compressed_img)
print(f"PSNR: {psnr:.2f} dB")
Here's what our demo image compression looks like:
"Eyeballing" your images after compression to determine quality is fine; however, at a large scale, having scripts do this is a much easier way to set standards and ensure the images follow them.
Let's look at a couple other techniques:
Advanced Compression Techniques
For more advanced compression, OpenCV supports various algorithms:
- PNG Compression:
You can convert your images to PNG format, which has many advantages. Use the following line of code, and you can set your compression from 0 to 9, depending on your needs. 0 means no compression whatsoever, and 9 is maximum. Keep in mind that PNGs are a "lossless" format, so even at maximum compression, the image should remain intact. The big trade-off is file size and compression time.
Here is the code to use PNG compression with OpenCV:
cv2.imwrite('compressed.png', img, [cv2.IMWRITE_PNG_COMPRESSION, 9])
And here is our result:
Note: You may notice sometimes that PNG files are actually larger in size, as in this case. It depends on the content of the image.
- WebP Compression:
You can also convert your images to .webp format. This is a newer method of compression that's gaining in popularity. I have been using this compression on the images on my blog for years.
In the following code, we can write our image to a webp file and set the compression level from 0 to 100. It's the opposite of PNG's scale because 0, because we're setting quality instead of compression. This small distinction matters, because a setting of 0 is the lowest possible quality, with a small file size and significant loss. 100 is the highest quality, which means large files with the best image quality.
Here's the Python code to make that happen:
cv2.imwrite('compressed.webp', img, [cv2.IMWRITE_WEBP_QUALITY, 80])
And here is our result:

These two techniques are great for compressing large amounts of data. You can write scripts to compress thousands or hundreds of thousands of images automatically.
Conclusion
Image compression is fantastic. It's essential for computer vision tasks in many ways, especially when saving space or increasing processing speed. There are also many use cases outside of computer vision anytime you want to reduce hard drive space or save bandwidth. Image compression can help a lot.
By understanding the theory behind it and applying it, you can do some powerful things with your projects.
Remember, the key to effective compression is finding the sweet spot between file size reduction and maintaining acceptable visual quality for your application.
Thanks for reading, and feel free to reach out if you have any comments or questions!
위 내용은 OpenCV를 사용한 이미지 압축에 대한 전체 가이드의 상세 내용입니다. 자세한 내용은 PHP 중국어 웹사이트의 기타 관련 기사를 참조하세요!

핫 AI 도구

Undresser.AI Undress
사실적인 누드 사진을 만들기 위한 AI 기반 앱

AI Clothes Remover
사진에서 옷을 제거하는 온라인 AI 도구입니다.

Undress AI Tool
무료로 이미지를 벗다

Clothoff.io
AI 옷 제거제

Video Face Swap
완전히 무료인 AI 얼굴 교환 도구를 사용하여 모든 비디오의 얼굴을 쉽게 바꾸세요!

인기 기사
뜨거운 도구

메모장++7.3.1
사용하기 쉬운 무료 코드 편집기

SublimeText3 중국어 버전
중국어 버전, 사용하기 매우 쉽습니다.

스튜디오 13.0.1 보내기
강력한 PHP 통합 개발 환경

드림위버 CS6
시각적 웹 개발 도구

SublimeText3 Mac 버전
신 수준의 코드 편집 소프트웨어(SublimeText3)


 Python vs. C : 학습 곡선 및 사용 편의성
Apr 19, 2025 am 12:20 AM
Python vs. C : 학습 곡선 및 사용 편의성
Apr 19, 2025 am 12:20 AM
Python은 배우고 사용하기 쉽고 C는 더 강력하지만 복잡합니다. 1. Python Syntax는 간결하며 초보자에게 적합합니다. 동적 타이핑 및 자동 메모리 관리를 사용하면 사용하기 쉽지만 런타임 오류가 발생할 수 있습니다. 2.C는 고성능 응용 프로그램에 적합한 저수준 제어 및 고급 기능을 제공하지만 학습 임계 값이 높고 수동 메모리 및 유형 안전 관리가 필요합니다.
 파이썬과 시간 : 공부 시간을 최대한 활용
Apr 14, 2025 am 12:02 AM
파이썬과 시간 : 공부 시간을 최대한 활용
Apr 14, 2025 am 12:02 AM
제한된 시간에 Python 학습 효율을 극대화하려면 Python의 DateTime, Time 및 Schedule 모듈을 사용할 수 있습니다. 1. DateTime 모듈은 학습 시간을 기록하고 계획하는 데 사용됩니다. 2. 시간 모듈은 학습과 휴식 시간을 설정하는 데 도움이됩니다. 3. 일정 모듈은 주간 학습 작업을 자동으로 배열합니다.
 Python vs. C : 성능과 효율성 탐색
Apr 18, 2025 am 12:20 AM
Python vs. C : 성능과 효율성 탐색
Apr 18, 2025 am 12:20 AM
Python은 개발 효율에서 C보다 낫지 만 C는 실행 성능이 높습니다. 1. Python의 간결한 구문 및 풍부한 라이브러리는 개발 효율성을 향상시킵니다. 2.C의 컴파일 유형 특성 및 하드웨어 제어는 실행 성능을 향상시킵니다. 선택할 때는 프로젝트 요구에 따라 개발 속도 및 실행 효율성을 평가해야합니다.
 Python 학습 : 2 시간의 일일 연구가 충분합니까?
Apr 18, 2025 am 12:22 AM
Python 학습 : 2 시간의 일일 연구가 충분합니까?
Apr 18, 2025 am 12:22 AM
하루에 2 시간 동안 파이썬을 배우는 것으로 충분합니까? 목표와 학습 방법에 따라 다릅니다. 1) 명확한 학습 계획을 개발, 2) 적절한 학습 자원 및 방법을 선택하고 3) 실습 연습 및 검토 및 통합 연습 및 검토 및 통합,이 기간 동안 Python의 기본 지식과 고급 기능을 점차적으로 마스터 할 수 있습니다.
 Python vs. C : 주요 차이점 이해
Apr 21, 2025 am 12:18 AM
Python vs. C : 주요 차이점 이해
Apr 21, 2025 am 12:18 AM
Python과 C는 각각 고유 한 장점이 있으며 선택은 프로젝트 요구 사항을 기반으로해야합니다. 1) Python은 간결한 구문 및 동적 타이핑으로 인해 빠른 개발 및 데이터 처리에 적합합니다. 2) C는 정적 타이핑 및 수동 메모리 관리로 인해 고성능 및 시스템 프로그래밍에 적합합니다.
 Python Standard Library의 일부는 무엇입니까? 목록 또는 배열은 무엇입니까?
Apr 27, 2025 am 12:03 AM
Python Standard Library의 일부는 무엇입니까? 목록 또는 배열은 무엇입니까?
Apr 27, 2025 am 12:03 AM
Pythonlistsarepartoftsandardlardlibrary, whileraysarenot.listsarebuilt-in, 다재다능하고, 수집 할 수있는 반면, arraysarreprovidedByTearRaymoduledlesscommonlyusedDuetolimitedFunctionality.
 파이썬 : 자동화, 스크립팅 및 작업 관리
Apr 16, 2025 am 12:14 AM
파이썬 : 자동화, 스크립팅 및 작업 관리
Apr 16, 2025 am 12:14 AM
파이썬은 자동화, 스크립팅 및 작업 관리가 탁월합니다. 1) 자동화 : 파일 백업은 OS 및 Shutil과 같은 표준 라이브러리를 통해 실현됩니다. 2) 스크립트 쓰기 : PSUTIL 라이브러리를 사용하여 시스템 리소스를 모니터링합니다. 3) 작업 관리 : 일정 라이브러리를 사용하여 작업을 예약하십시오. Python의 사용 편의성과 풍부한 라이브러리 지원으로 인해 이러한 영역에서 선호하는 도구가됩니다.
 웹 개발을위한 파이썬 : 주요 응용 프로그램
Apr 18, 2025 am 12:20 AM
웹 개발을위한 파이썬 : 주요 응용 프로그램
Apr 18, 2025 am 12:20 AM
웹 개발에서 Python의 주요 응용 프로그램에는 Django 및 Flask 프레임 워크 사용, API 개발, 데이터 분석 및 시각화, 머신 러닝 및 AI 및 성능 최적화가 포함됩니다. 1. Django 및 Flask 프레임 워크 : Django는 복잡한 응용 분야의 빠른 개발에 적합하며 플라스크는 소형 또는 고도로 맞춤형 프로젝트에 적합합니다. 2. API 개발 : Flask 또는 DjangorestFramework를 사용하여 RESTFULAPI를 구축하십시오. 3. 데이터 분석 및 시각화 : Python을 사용하여 데이터를 처리하고 웹 인터페이스를 통해 표시합니다. 4. 머신 러닝 및 AI : 파이썬은 지능형 웹 애플리케이션을 구축하는 데 사용됩니다. 5. 성능 최적화 : 비동기 프로그래밍, 캐싱 및 코드를 통해 최적화
