

Svelte와 빠르고 동기화됨

반응형 실시간 웹 애플리케이션을 구축할 준비가 되셨나요?
tl;dr 이 튜토리얼 전체를 읽고 작업할 시간이 없습니까? 당신은 운이 좋다! GitHub에서 완벽하게 작동하는 예제를 찾을 수 있습니다. 자유롭게 이동하여 저장소를 복제하고 탐색을 시작하세요.
이 튜토리얼에서는 Svelte와 Couchbase Capella의 조합을 탐색하여 동적인 대화형 채팅 애플리케이션을 만들어 보겠습니다. 2024년 스택 오버플로 개발자 설문조사에 따르면 72.8%라는 인상적인 감탄률을 기록한 Svelte는 여러 가지 이유로 호평을 받았습니다. DOM을 직접 조작하는 매우 효율적이고 명령적인 코드로 구성 요소를 컴파일하여 가상 DOM의 필요성을 없애고 더 빠른 업데이트와 더 작은 번들 크기로 이어져 브라우저에서 많은 작업을 효율적으로 수행합니다.
Svelte에 내장된 반응성은 자동으로 상태 변경을 추적하여 복잡한 상태 관리 라이브러리 없이도 빠르고 효율적인 업데이트를 보장합니다. 이러한 반응성은 개발 프로세스를 단순화하고 성능을 향상시킵니다. 또한 Svelte의 구성 요소 기반 아키텍처를 사용하면 복잡한 사용자 인터페이스를 더 쉽게 구축하고 유지 관리할 수 있어 더욱 간단하고 즐거운 개발 경험을 제공할 수 있습니다. 그리고 애플리케이션에 반응형 적응형 데이터가 필요한 경우 Couchbase Capella는 구현할 수 있는 간단한 솔루션을 제공합니다.
Couchbase Capella는 단순한 NoSQL 클라우드 데이터베이스 플랫폼이 아닙니다. 전체 텍스트 검색, 벡터 검색, 데이터 캐싱, 분석 등을 제공하는 올인원 데이터 플랫폼입니다. 이 포괄적인 기능을 사용하면 다양한 데이터 요구 사항을 충족하는 강력한 애플리케이션을 구축할 수 있습니다. Svelte와 Couchbase Capella를 함께 사용하면 엄청나게 빠르고 성능이 뛰어난 실시간 애플리케이션이 가능해집니다.
자, 이야기는 이쯤 할게요. 시작해 보세요!
개발 환경 설정
새로운 SvelteKit 프로젝트 생성
설정을 시작하기 전에 Svelte와 SvelteKit의 차이점을 명확히 하겠습니다. Svelte는 DOM을 직접 조작하는 매우 효율적이고 명령적인 코드로 코드를 컴파일하는 프런트 엔드 프레임워크입니다. 결과적으로 업데이트 속도가 빨라지고 번들 크기가 작아집니다. 반면, SvelteKit은 Svelte 위에 구축된 프레임워크로, 풀 스택 웹 애플리케이션 구축을 위해 설계되었습니다. SvelteKit은 라우팅, 서버측 렌더링, 정적 사이트 생성과 같은 추가 기능을 제공하므로 최신 웹 애플리케이션 개발을 위한 강력한 도구입니다.
프로젝트에서 SvelteKit은 애플리케이션 구조, 라우팅 및 서버 측 렌더링을 처리하고 Svelte는 UI 구성 요소의 효율적인 렌더링을 관리합니다.
새 프로젝트를 시작하려면 명령줄에서 초기화할 수 있습니다.
> npm create svelte@latest svelte-couchbase-real-time-chat
> cd svelte-couchbase-real-time-chat
CLI 도구에서 몇 가지 선택 사항을 묻는 메시지가 표시됩니다. 다음과 같이 답변해 주세요.
- - 스켈레톤 프로젝트: 기본 프로젝트 구조로 시작하려면 예를 선택하세요.
- Typescript: 작업을 단순하게 유지하려면 지금은 아니요를 선택하세요.
- ESLint: 코드 품질을 유지하는 데 도움이 되는 Linting을 포함하려면 yes를 선택하세요.
- 더 예쁘다: 코드 서식을 지정하려면 예를 선택하세요.
- 극작가: 처음부터 엔드투엔드 테스트를 작성할 계획이 아니라면 아니요를 선택하세요.
그런 다음 명령줄에서 npm install을 실행하여 종속성을 설치합니다. 이 명령을 실행하면 새로운 SvelteKit 프로젝트가 설정되고 사용할 준비가 됩니다!
종속성 설치
다음으로, 스타일링을 위한 Tailwind CSS, 데이터베이스 상호 작용을 위한 Couchbase SDK, 실시간 통신을 위한 WebSocket 지원 등 프로젝트에 필요한 추가 종속성을 설치하겠습니다.
> npm install -D tailwindcss postcss autoprefixer couchbase ws dotenv
> npx tailwindcss init -p
이러한 각 종속성은 애플리케이션에서 어떤 역할을 합니까?
- TailwindCSS is a utility-first CSS framework that makes it more straightforward to style your application with predefined classes.
- The Couchbase Node.js SDK introduces functionality to interact with your data on Couchbase Capella using methods that abstract away a lot of the work.
- ws is a small Websocket library for Node.js. You will be enabling the real-time chat functionality in the application with Websockets.
- Lastly, dotenv loads environment variables from a .env file into process.env making it easier to manage configuration.
Configuring TailwindCSS
As mentioned above, TailwindCSS introduces classes that you can use to define the styling for your application. This is helpful if you are not a frontend expert, or even if you are, if you wish to shortcut the process of building elegantly designed applications. To use TailwindCSS in your Svelte project, follow these steps:
Configure tailwind.config.js
Update the tailwind.config.cjs file to specify the content sources. This ensures that Tailwind CSS can remove unused styles from your production build, making it more efficient.
/** @type {import('tailwindcss').Config} */
module.exports = {
  content: ['./src/**/*.{html,js,svelte,ts}'],
  theme: {
    extend: {},
  },
  plugins: [],
}
Add Tailwind CSS directives
Create or update the src/app.css file to include Tailwind CSS directives. These directives load Tailwind’s base, components, and utility styles.
@tailwind base;
@tailwind components;
@tailwind utilities;
Include the CSS in your Svelte project
Open or create the src/routes/+layout.svelte file and import the CSS file. This ensures that Tailwind’s styles are available throughout your application.
<script>
  import "../app.css";
</script>

<slot />
Now that you’ve completed these steps, TailwindCSS has been successfully initialized in your application! You’re ready to move on to setting up Couchbase Capella and building the backend for your chat application.
Setting Up Couchbase Capella
Creating a Cluster
It is free to sign up and try Couchbase Capella, and if you have not done so yet, you can do so by navigating to cloud.couchbase.com and creating an account using your GitHub or Google credentials, or by making a new account with an email address and password combination.
Once you have done so, from within your Capella dashboard, you will create your first cluster. For the purposes of this walkthrough, let’s name it SvelteChatApp.
The summary of your new cluster will be presented on the left-hand side of the dashboard. Capella is multi-cloud and can work with AWS, Google Cloud or Azure. For this example, you will deploy to AWS.
After you have created your cluster, you need to create a bucket. A bucket in Couchbase is the container where the data is stored. Each item of data, known as a document, is kept in JSON making its syntax familiar to most developers. You can name your bucket whatever you want. However, for the purposes of this walkthrough, let’s name this bucket svelte_chat_app_messages.
Now that you have created both your database and your bucket, you are ready to create your database access credentials and to fetch your connection URL that you will be using in your Lambda function.
Obtaining Connection Details
The connection details are essential as you will be using them in your application to establish a connection to your Couchbase data and to interact with the data. Navigate to the Connect section in the Capella dashboard and take note of the Connection String.
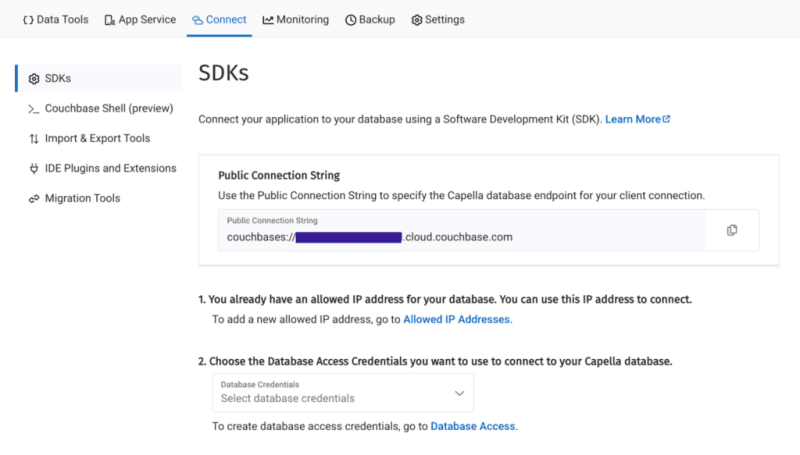
Then, click on the Database Access link under section two. In that section, you will create credentials – a username and password – that your application will use to authenticate with the database. You can scope the credentials to the specific bucket you created or give it permission for all buckets and databases in your account. You need to make sure it has both read and write access, regardless.
Once you have finished, the last step in this part of the process is to add your new connection string and connection credentials to your application as environment variables.
Setting Up Environment Variables
In a production environment, you will store your credentials and other confidential information for your application in a secure format. Different cloud providers have different paths to store sensitive information, and you should follow the procedure defined by the cloud provider you are using, whether it is AWS, Google Cloud, Azure, Netlify, Vercel or any other. For our purposes, you are adding your credentials to a .env file in the root folder of your application. The dotenv package reads those credentials from there and loads them into your application.
# .env
COUCHBASE_BUCKET=your_bucket_name
COUCHBASE_CONNECTION_STRING=your_connection_string
COUCHBASE_USER=your_username
COUCHBASE_PASSWORD=your_password
That’s it! Your Couchbase cluster is all set up and ready to be used. At this point, you are ready to build the application. Let’s start with the backend server with Nodejs and then move on to the frontend with Svelte.
Building the Backend with Node.js
With our development environment set up, it’s time to build the backend for our real-time chat application. We’ll use Node.js to create the server, connect to Couchbase Capella for data storage, and set up a WebSocket server for real-time communication.
Creating server.cjs
First, we’ll create a file named server.cjs which will serve as the entry point for our backend.
-
- Create server.cjs: In the root directory of your project, create a new file named server.cjs.
- Setup Express and Dependencies: We’ll use Express for our server framework, the Couchbase SDK for database operations, WebSocket for real-time communication, and dotenv for environment variables management. Add the following code to server.cjs:
const express = require('express');
const couchbase = require('couchbase');
const { createServer } = require('http');
const { WebSocketServer } = require('ws');
const dotenv = require('dotenv');

dotenv.config();

const app = express();
const server = createServer(app);
const wss = new WebSocketServer({ server });
Connecting to Couchbase
Next, we’ll set up the connection to Couchbase Capella. Ensure your .env file contains the correct connection details. Add the following code to server.cjs to connect to Couchbase:
let cluster, bucket, collection;

async function connectToCouchbase() {
    try {
        console.log('Connecting to Couchbase...');
        const clusterConnStr = process.env.COUCHBASE_CONNECTION_STRING;
        const username = process.env.COUCHBASE_USER;
        const password = process.env.COUCHBASE_PASSWORD;
        const bucketName = process.env.COUCHBASE_BUCKET;

        cluster = await couchbase.connect(clusterConnStr, {
          username: username,
          password: password,
          configProfile: 'wanDevelopment',
        });
        bucket = cluster.bucket(bucketName);
        collection = bucket.defaultCollection();

        console.log('Connected to Couchbase successfully.');
    } catch (error) {
        console.error('Error connecting to Couchbase:', error);
        process.exit(1);
    }
}

connectToCouchbase();
This function handles the connection to Couchbase, ensuring that all necessary parameters are properly configured. All that is left for our backend is to create the websocket server to handle the sending and receiving of new chat messages.
Setting up the Websocket Server
The Websocket server functionality is also added to the server.cjs file. The server will broadcast all new messages for the frontend of the application to receive, and send all newly created messages to Couchbase for saving in the bucket you created.
wss.on('connection', (ws) => {
    console.log('New WebSocket connection established.');
    ws.on('message', async (message) => {
        try {
            const messageString = message.toString();
            console.log('Received message:', messageString);
            // Save message to Couchbase
            const id = `message::${Date.now()}`;
            await collection.upsert(id, { text: messageString });
            console.log('Message saved to Couchbase:', id);

            // Broadcast message
            wss.clients.forEach((client) => {
                if (client.readyState === WebSocket.OPEN) {
                    client.send(messageString);
                    console.log('Broadcasted message to client:', messageString);
                }
            });
        } catch (error) {
            console.error('Error handling message:', error);
        }
    });
});

server.listen(3000, () => {
    console.log('Server started on http://localhost:3000');
});
Note that before sending the message to Couchbase, you first convert the message into a String as it is received as binary data buffers by default. The conversion to String format is achieved by calling the toString() function on the message. The newly defined messageString variable now contains the data in readable format for both sending to Couchbase and rendering in the application.
That is the entire backend of your new real-time chat application. However, as good as any backend for a web application is, it needs a frontend to render it for the user. Svelte offers us the performance and reactivity to do so with speed and with an excellent developer experience.
Creating the Frontend with Svelte
With your backend set up, it’s time to build the frontend of our real-time chat application using Svelte. You’ll leverage Svelte’s strengths to create a responsive and dynamic chat interface.
Building the Chat Interface
- Create the Svelte Component In your SvelteKit project, create a new file named +page.svelte in the src/routes directory. This file will serve as the main component for our chat interface.
touch src/routes/+page.svelte
- Set Up the Basic Structure Open +page.svelte and set up the basic HTML structure with TailwindCSS classes for styling:
<script>
import { onMount } from 'svelte';
let messages = [];
let newMessage = '';
let ws;
onMount(() => {
ws = new WebSocket('ws://localhost:3000');
ws.onmessage = (event) => {
messages = [...messages, event.data];
};
ws.onopen = () => {
console.log('WebSocket connection opened');
};
ws.onclose = () => {
console.log('WebSocket connection closed');
};
});
function sendMessage() {
ws.send(newMessage);
newMessage = '';
}
</script>
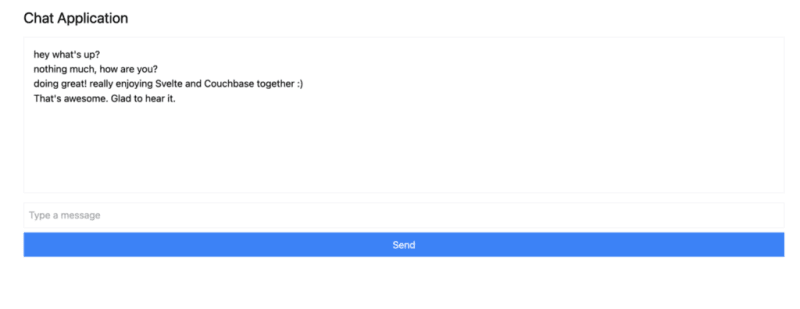
<div class="container mx-auto p-4">
<h1 class="text-2xl mb-4">Chat Application</h1>
<div class="border p-4 mb-4 h-64 overflow-y-scroll">
{#each messages as message}
<div>{message}</div>
{/each}
</div>
<input
type="text"
bind:value={newMessage}
class="border p-2 w-full mb-2"
placeholder="Type a message"
/>
<button on:click={sendMessage} class="bg-blue-500 text-white p-2 w-full">Send</button>
</div>
The section of the above code example initializes Websocket and handles the messages, both sending and receiving. The onMount function ensures that the Websocket connection is established when the component is initialized. Svelte’s reactivity automatically updates the DOM whenever the messages array changes, ensuring new messages are displayed in real-time. With that your frontend is now complete.
You did it! You have built an entire chat application enabling real-time communication utilizing the performance, flexibility and adaptability of both Svelte and Couchbase to deliver an optimal experience for your users. Yes, this is a fairly simple implementation, however, it provides the skeleton for you to build even more expansive and complex real-time applications. The potential is only limited by your imagination.
한번 해보고 싶으신가요? 애플리케이션을 시작하고 채팅을 시작해 보세요.
애플리케이션 실행
애플리케이션을 실행하려면 백엔드 Node.js 서버와 SvelteKit 프런트엔드를 모두 초기화해야 합니다. 먼저 터미널에서 백엔드를 시작해 보겠습니다.
그런 다음 새 터미널 창에서 프런트엔드를 시작하세요.
이제 브라우저에서 http://localhost:5173으로 이동하여 채팅을 시작하세요!
여러 브라우저 탭을 열어 여러 사용자를 시뮬레이션하거나 ngrok와 같은 서비스를 사용하여 친구들과 애플리케이션을 공유하고 실시간으로 채팅할 수 있습니다.
마무리
이 튜토리얼에서는 실시간 데이터로 작동하는 완전 반응형 애플리케이션을 얼마나 빨리 만들 수 있는지 배웠습니다. Svelte는 DOM을 쉽게 업데이트하고 Couchbase를 사용하면 단 몇 초 만에 메시지 생성 및 저장을 시작할 수 있습니다.
Svelte가 경쟁이 치열한 웹 프레임워크 공간에서 감탄과 인기가 빠르게 성장하는 데에는 많은 이유가 있습니다. Svelte와 결합된 데이터 백엔드인 Couchbase는 훨씬 더 많은 것을 구축하고 달성할 수 있는 잠재력을 높여줍니다. 복잡한 스키마를 정의할 필요가 없고 나중에 데이터 캐싱이나 검색 기능을 구현하려는 경우 더 많은 종속성을 추가할 필요가 없습니다. 모두 Couchbase에 내장되어 있어 바로 사용할 수 있습니다.
남은 유일한 질문은 다음에는 무엇을 만들 것인가입니다.
Couchbase Capella를 무료로 시작해 보세요.
위 내용은 Svelte와 빠르고 동기화됨의 상세 내용입니다. 자세한 내용은 PHP 중국어 웹사이트의 기타 관련 기사를 참조하세요!

핫 AI 도구

Undresser.AI Undress
사실적인 누드 사진을 만들기 위한 AI 기반 앱

AI Clothes Remover
사진에서 옷을 제거하는 온라인 AI 도구입니다.

Undress AI Tool
무료로 이미지를 벗다

Clothoff.io
AI 옷 제거제

Video Face Swap
완전히 무료인 AI 얼굴 교환 도구를 사용하여 모든 비디오의 얼굴을 쉽게 바꾸세요!

인기 기사
뜨거운 도구

메모장++7.3.1
사용하기 쉬운 무료 코드 편집기

SublimeText3 중국어 버전
중국어 버전, 사용하기 매우 쉽습니다.

스튜디오 13.0.1 보내기
강력한 PHP 통합 개발 환경

드림위버 CS6
시각적 웹 개발 도구

SublimeText3 Mac 버전
신 수준의 코드 편집 소프트웨어(SublimeText3)
뜨거운 주제
 7930
7930
 15
1652
14
1411
52
1303
25
1250
29
15
1652
14
1411
52
1303
25
1250
29

 프론트 엔드 열 용지 영수증에 대한 차량 코드 인쇄를 만나면 어떻게해야합니까?
Apr 04, 2025 pm 02:42 PM
프론트 엔드 열 용지 영수증에 대한 차량 코드 인쇄를 만나면 어떻게해야합니까?
Apr 04, 2025 pm 02:42 PM
프론트 엔드 개발시 프론트 엔드 열지대 티켓 인쇄를위한 자주 묻는 질문과 솔루션, 티켓 인쇄는 일반적인 요구 사항입니다. 그러나 많은 개발자들이 구현하고 있습니다 ...
 Demystifying JavaScript : 그것이하는 일과 중요한 이유
Apr 09, 2025 am 12:07 AM
Demystifying JavaScript : 그것이하는 일과 중요한 이유
Apr 09, 2025 am 12:07 AM
JavaScript는 현대 웹 개발의 초석이며 주요 기능에는 이벤트 중심 프로그래밍, 동적 컨텐츠 생성 및 비동기 프로그래밍이 포함됩니다. 1) 이벤트 중심 프로그래밍을 사용하면 사용자 작업에 따라 웹 페이지가 동적으로 변경 될 수 있습니다. 2) 동적 컨텐츠 생성을 사용하면 조건에 따라 페이지 컨텐츠를 조정할 수 있습니다. 3) 비동기 프로그래밍은 사용자 인터페이스가 차단되지 않도록합니다. JavaScript는 웹 상호 작용, 단일 페이지 응용 프로그램 및 서버 측 개발에 널리 사용되며 사용자 경험 및 크로스 플랫폼 개발의 유연성을 크게 향상시킵니다.
 누가 더 많은 파이썬이나 자바 스크립트를 지불합니까?
Apr 04, 2025 am 12:09 AM
누가 더 많은 파이썬이나 자바 스크립트를 지불합니까?
Apr 04, 2025 am 12:09 AM
기술 및 산업 요구에 따라 Python 및 JavaScript 개발자에 대한 절대 급여는 없습니다. 1. 파이썬은 데이터 과학 및 기계 학습에서 더 많은 비용을 지불 할 수 있습니다. 2. JavaScript는 프론트 엔드 및 풀 스택 개발에 큰 수요가 있으며 급여도 상당합니다. 3. 영향 요인에는 경험, 지리적 위치, 회사 규모 및 특정 기술이 포함됩니다.
 Shiseido의 공식 웹 사이트와 같은 시차 스크롤 및 요소 애니메이션 효과를 달성하는 방법은 무엇입니까?
또는:
Shiseido의 공식 웹 사이트와 같은 페이지 스크롤과 함께 애니메이션 효과를 어떻게 달성 할 수 있습니까?
Apr 04, 2025 pm 05:36 PM
Shiseido의 공식 웹 사이트와 같은 시차 스크롤 및 요소 애니메이션 효과를 달성하는 방법은 무엇입니까?
또는:
Shiseido의 공식 웹 사이트와 같은 페이지 스크롤과 함께 애니메이션 효과를 어떻게 달성 할 수 있습니까?
Apr 04, 2025 pm 05:36 PM
이 기사에서 시차 스크롤 및 요소 애니메이션 효과 실현에 대한 토론은 Shiseido 공식 웹 사이트 (https://www.shiseido.co.jp/sb/wonderland/)와 유사하게 달성하는 방법을 살펴볼 것입니다.
 JavaScript는 배우기가 어렵습니까?
Apr 03, 2025 am 12:20 AM
JavaScript는 배우기가 어렵습니까?
Apr 03, 2025 am 12:20 AM
JavaScript를 배우는 것은 어렵지 않지만 어려운 일입니다. 1) 변수, 데이터 유형, 기능 등과 같은 기본 개념을 이해합니다. 2) 마스터 비동기 프로그래밍 및 이벤트 루프를 통해이를 구현하십시오. 3) DOM 운영을 사용하고 비동기 요청을 처리합니다. 4) 일반적인 실수를 피하고 디버깅 기술을 사용하십시오. 5) 성능을 최적화하고 모범 사례를 따르십시오.
 JavaScript의 진화 : 현재 동향과 미래 전망
Apr 10, 2025 am 09:33 AM
JavaScript의 진화 : 현재 동향과 미래 전망
Apr 10, 2025 am 09:33 AM
JavaScript의 최신 트렌드에는 Typescript의 Rise, 현대 프레임 워크 및 라이브러리의 인기 및 WebAssembly의 적용이 포함됩니다. 향후 전망은보다 강력한 유형 시스템, 서버 측 JavaScript 개발, 인공 지능 및 기계 학습의 확장, IoT 및 Edge 컴퓨팅의 잠재력을 포함합니다.
 JavaScript를 사용하여 동일한 ID와 동일한 ID로 배열 요소를 하나의 객체로 병합하는 방법은 무엇입니까?
Apr 04, 2025 pm 05:09 PM
JavaScript를 사용하여 동일한 ID와 동일한 ID로 배열 요소를 하나의 객체로 병합하는 방법은 무엇입니까?
Apr 04, 2025 pm 05:09 PM
동일한 ID로 배열 요소를 JavaScript의 하나의 객체로 병합하는 방법은 무엇입니까? 데이터를 처리 할 때 종종 동일한 ID를 가질 필요가 있습니다 ...
 프론트 엔드 개발에서 VSCODE와 유사한 패널 드래그 앤 드롭 조정 기능을 구현하는 방법은 무엇입니까?
Apr 04, 2025 pm 02:06 PM
프론트 엔드 개발에서 VSCODE와 유사한 패널 드래그 앤 드롭 조정 기능을 구현하는 방법은 무엇입니까?
Apr 04, 2025 pm 02:06 PM
프론트 엔드에서 VSCODE와 같은 패널 드래그 앤 드롭 조정 기능의 구현을 탐색하십시오. 프론트 엔드 개발에서 VSCODE와 같은 구현 방법 ...
