Spring Boot의 OAuth 인증: Google과 GitHub 로그인 통합 가이드
OAuth 2.0으로 보안 강화: Spring Boot에서 소셜 로그인 구현
최신 웹 개발 세계에서는 애플리케이션을 보호하고 사용자를 위해 최대한 원활한 인증을 제공하는 것이 최우선 과제입니다. OAuth 2.0은 API 보안에 도움이 될 뿐만 아니라 사용자가 Google 및 GitHub와 같은 플랫폼에서 기존 계정으로 로그인할 수 있게 해주는 강력한 도구입니다. 이를 통해 모든 사람이 작업을 더 쉽게 할 수 있습니다. 사용자는 또 다른 비밀번호를 기억할 필요가 없으며 개발자는 신뢰할 수 있는 인증 관리 방법을 얻게 됩니다.
이 블로그에서는 Spring Boot 애플리케이션에서 OAuth 2.0을 설정하는 방법을 단계별로 안내하겠습니다. 인증을 위해 Google과 GitHub를 모두 통합할 예정이므로 사용자는 로그인에 사용할 서비스를 선택할 수 있습니다. 또한 JWT(JSON 웹 토큰)를 사용하여 API 엔드포인트를 보호하는 방법도 보여 드리겠습니다. 인증된 사용자는 자신이 원하는 리소스에 액세스할 수 있습니다.
새로운 앱을 구축하든 기존 앱에 보안을 추가하든 이 가이드는 Spring Boot 애플리케이션을 안전하고 사용자 친화적으로 유지하는 데 필요한 도구를 제공합니다.
https://start.spring.io/ 방문
프로젝트 생성
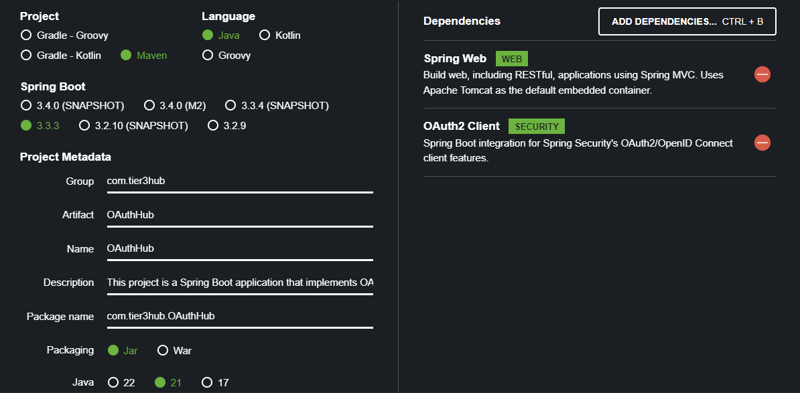
zip을 다운로드하고 압축을 푼 후 프로젝트를 IDE에 로드하세요.
Spring Boot의 "OAuth2 클라이언트" 종속성은 OAuth 2.0 인증을 Google 및 GitHub와 같은 제공업체와 통합하는 것을 단순화합니다. 사용자를 공급자의 로그인 페이지로 리디렉션하고, 토큰을 관리하고, API 엔드포인트를 보호하는 등 전체 OAuth 로그인 흐름을 처리합니다. 이 종속성을 추가하면 Spring Boot 애플리케이션에서 안전하고 사용자 친화적인 인증을 쉽게 활성화할 수 있습니다.
Spring Boot의 "Spring Web" 종속성은 웹 애플리케이션 개발에 매우 중요합니다. RESTful API 생성, MVC 아키텍처 지원, HTML 보기 제공 기능과 같은 필수 기능을 제공합니다. Spring Web을 사용하면 HTTP 요청 및 응답을 쉽게 처리하고, 라우팅을 관리하고, 다른 Spring 구성 요소와 통합할 수 있으므로 강력한 웹 애플리케이션 구축의 기본 부분이 됩니다.
애플리케이션 구성
Google 및 GitHub에서 OAuth 2.0 인증을 위해 Spring Boot 애플리케이션을 설정하려면 application.properties 파일을 구성해야 합니다. 이 파일에는 OAuth 클라이언트 자격 증명, 로깅 수준, JWT 구성 등 애플리케이션에 대한 필수 설정이 포함되어 있습니다.
spring.application.name=oauth2-authentication-service
server.port=8000

#for google
spring.security.oauth2.client.registration.google.client-id=YOUR_GOOGLE_CLIENT_ID
spring.security.oauth2.client.registration.google.client-secret=YOUR_GOOGLE_CLIENT_SECRET

#for github
spring.security.oauth2.client.registration.github.client-id=YOUR_GITHUB_CLIENT_ID
spring.security.oauth2.client.registration.github.client-secret= YOUR_GITHUB_CLIENT_SECRET
OAuth 클라이언트 구성: YOUR_GOOGLE_CLIENT_ID, YOUR_GOOGLE_CLIENT_SECRET, YOUR_GITHUB_CLIENT_ID 및 YOUR_GITHUB_CLIENT_SECRET를 애플리케이션 등록 시 Google 및 GitHub에서 얻은 자격 증명으로 바꾸세요.
OAuth 2.0 인증을 위해 Google 및 GitHub에 애플리케이션을 등록하려면 https://console.cloud.google.com으로 이동해야 합니다.
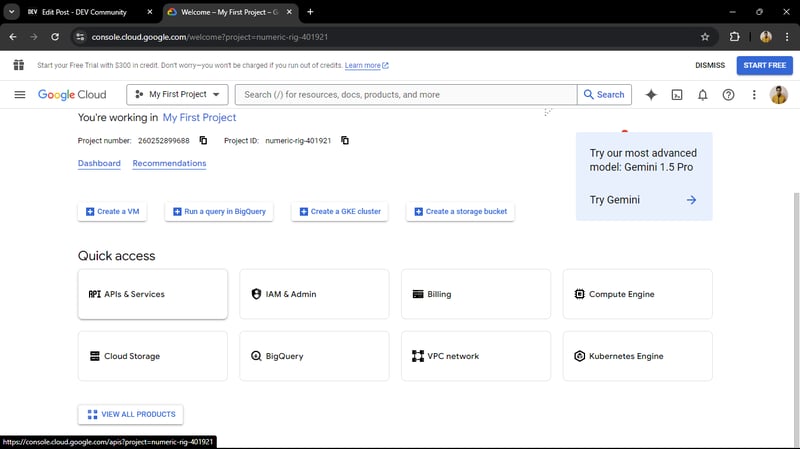
API 서비스 클릭
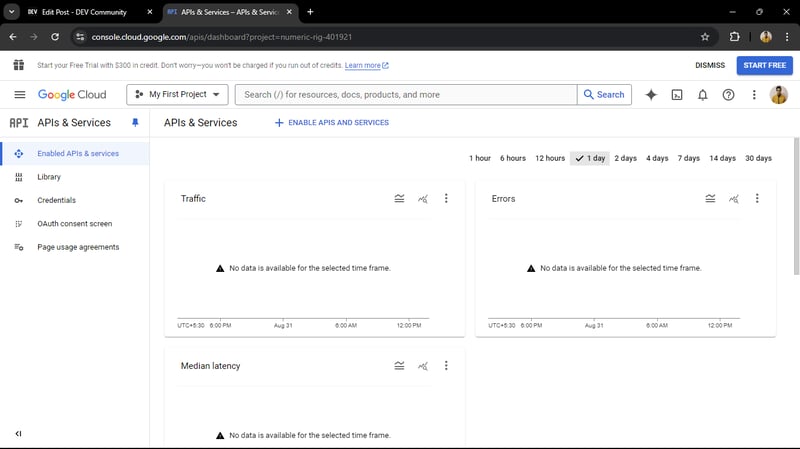
자격증명 -> 자격 증명 만들기 -> OAuth 클라이언트 ID
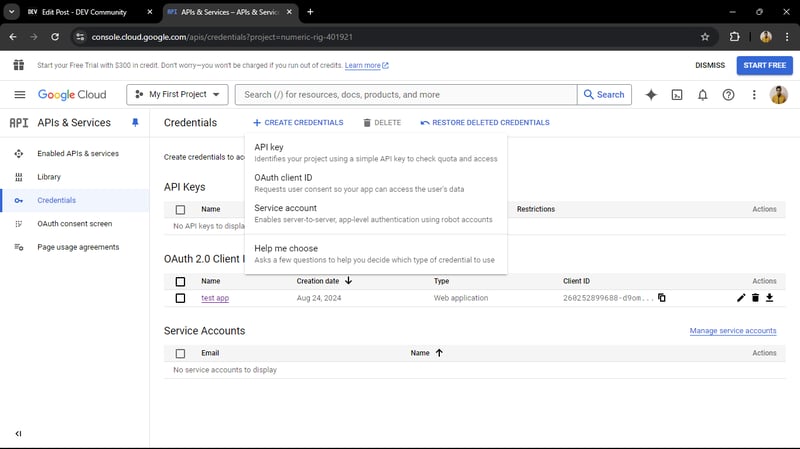
OAuth 클라이언트 ID -> OAuth 클라이언트 ID 생성
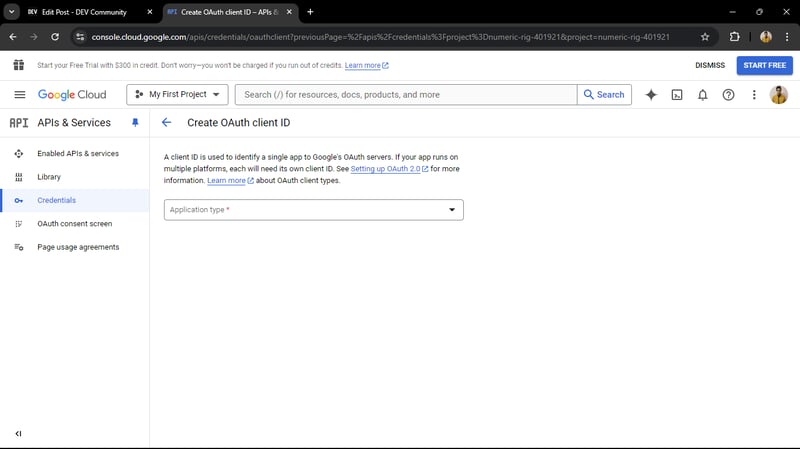
애플리케이션 유형을 웹 애플리케이션
으로 선택하세요.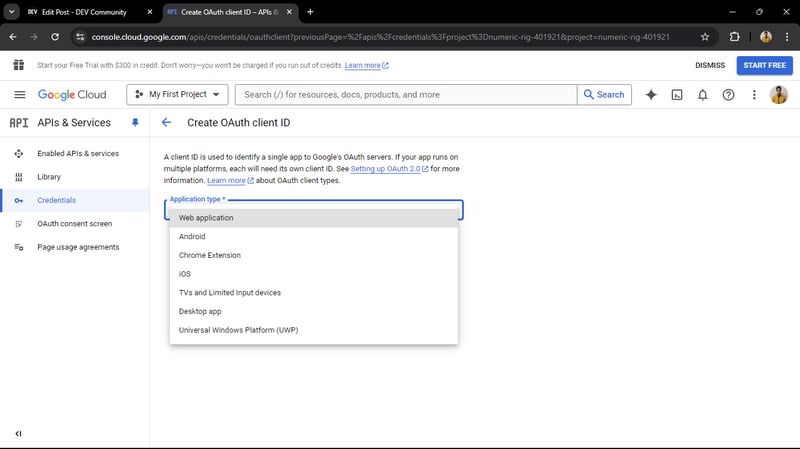
애플리케이션 이름 지정
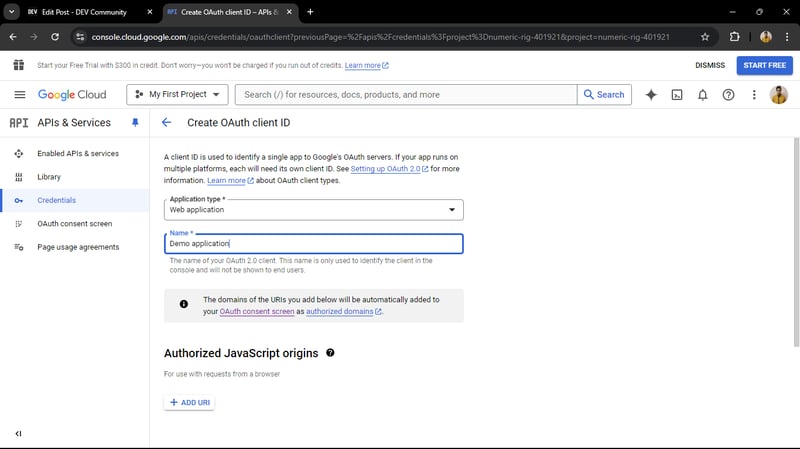
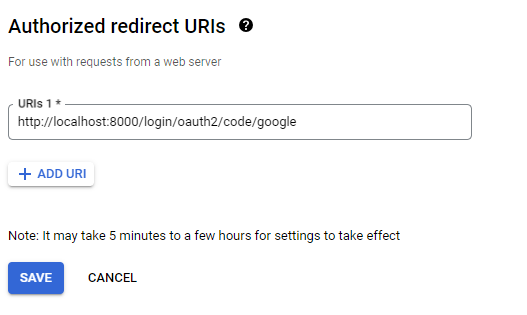
이 URL을 사용하여 승인된 리디렉션 URI를 설정하고 여기서 애플리케이션이 8000 포트에서 실행되고 있으므로 애플리케이션 포트는 8000입니다. 그런 다음 만들기를 클릭하세요
http://localhost:8000/login/oauth2/code/google
이후 OAuth 클라이언트가 생성되고 클라이언트 ID와 클라이언트 비밀번호를 받습니다.
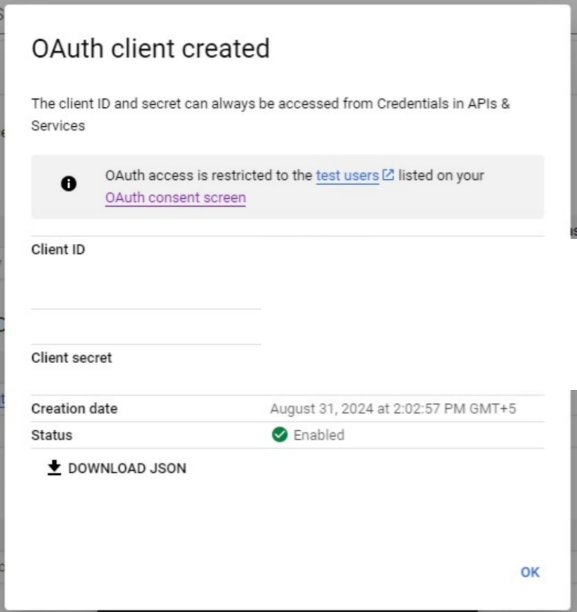
copy both and replace with the the properties of application.properties file
spring.security.oauth2.client.registration.google.client-id=YOUR_GOOGLE_CLIENT_ID
spring.security.oauth2.client.registration.google.client-secret=YOUR_GOOGLE_CLIENT_SECRET
The SecurityConfig class configures security for a Spring Boot application using OAuth2. It defines a SecurityFilterChain bean, which sets up security rules. The authorizeHttpRequests method ensures that all incoming requests require authentication. The .oauth2Login(Customizer.withDefaults()) line enables OAuth2 login functionality with default settings. Finally, the securityFilterChain method returns the configured security filter chain by calling http.build(). This setup ensures that the application is secure and supports OAuth2 authentication for users.
Accessing Your Application via Chrome
When developing and testing your Spring Boot application, it's crucial to know how to interact with it through Postman. If your application is running locally on port 8000, you can access it using the following base URL:
http://localhost:8000
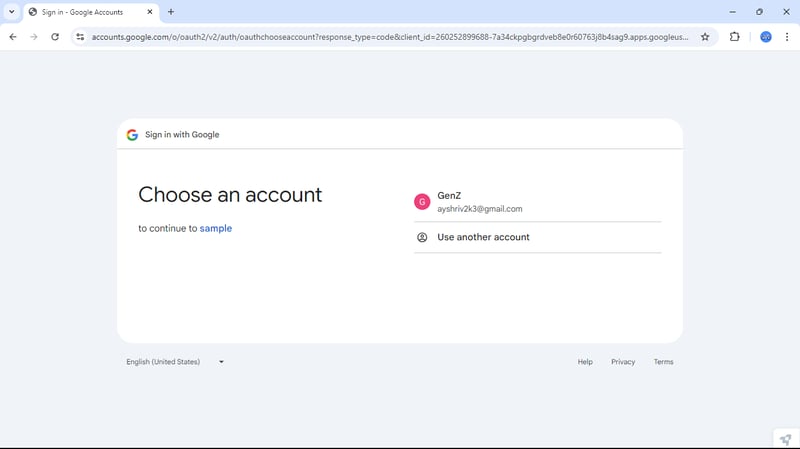
we get the similar response like this

now we can access the end points.
GitHub Authentication
GitHub Authentication in Spring Boot allows users to log in using their GitHub accounts, streamlining the authentication process and enhancing security. By integrating GitHub as an OAuth 2.0 provider, your application can authenticate users through GitHub's trusted platform. This involves registering your application on GitHub to obtain a Client ID and Client Secret, which are then configured in your Spring Boot application. Users are redirected to GitHub for login, and upon successful authentication, they are redirected back to your application with an access token, allowing secure access to your protected resources. This integration is ideal for applications targeting developers and tech-savvy users.
create GitHub account and go to settings
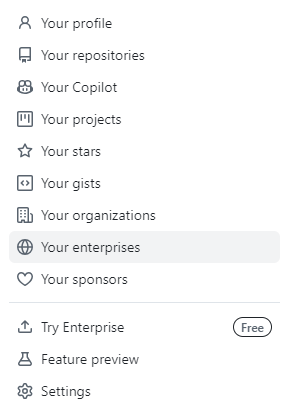
in the left corner we get the developer settings
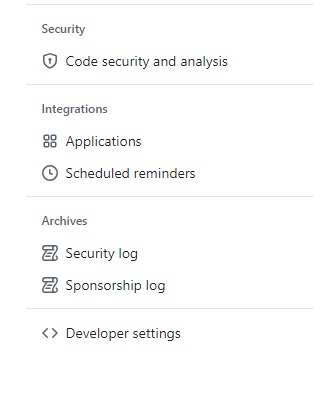
Navigate to OAuth Apps

click on create OAuth App

we get the interface like this
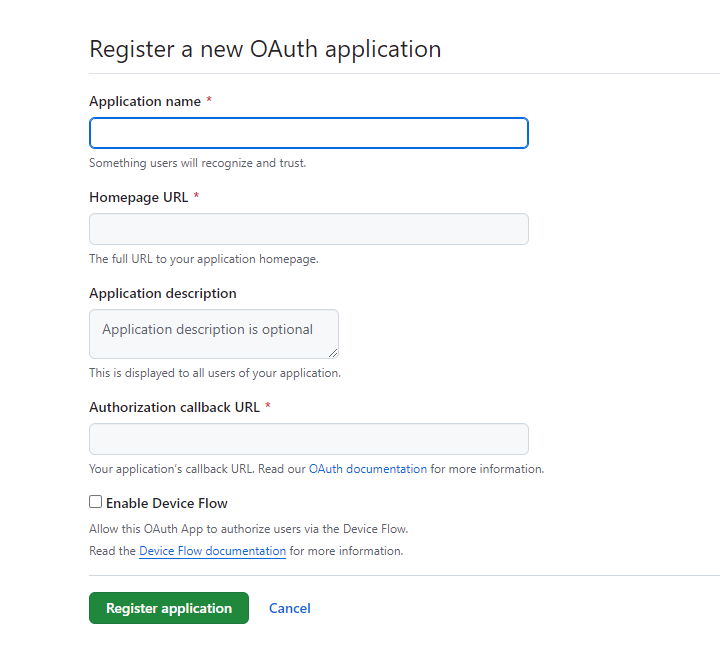
set ** Authorization callback URL ** according to your application port
http://localhost:8000/login/oauth2/code/github
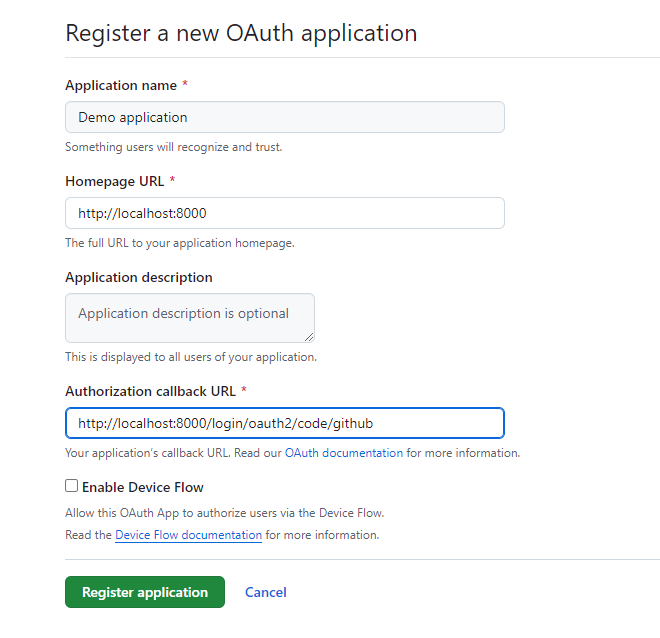
and set Homepage URL
http://localhost:8000
after registering the Application we get the Client ID and Client Secret

now replace with the Application.properties file properties
spring.security.oauth2.client.registration.github.client-id=Ov23liBMLc5e1ItoONPx
spring.security.oauth2.client.registration.github.client-secret=

Test the GitHub Login
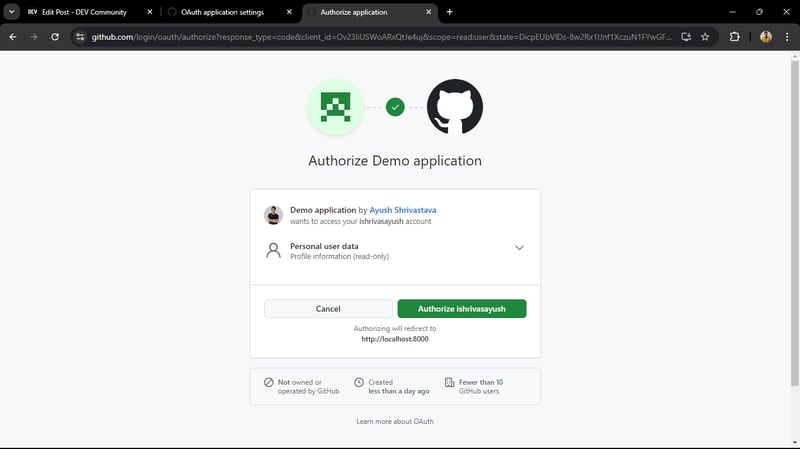
Login with GitHub: When prompted, log in with your GitHub credentials.
Success Redirect: Upon successful authentication, you'll be redirected to the /home page of your application.
내 GitHub 저장소에서 사용자 인증 서비스의 전체 소스 코드를 탐색할 수 있습니다. 이 프로젝트에서는 인증을 위해 JWT를 사용한 사용자 등록, 로그인, 보안 액세스 등 다양한 기능을 선보입니다. 자유롭게 확인하고, 기여하고, 자신의 프로젝트에 참고 자료로 사용하세요!
GitHub 저장소: https://github.com/ishrivasayush/oauth2-authentication-service
결론
Google 및 GitHub를 인증 공급자로 사용하여 Spring Boot로 OAuth 2.0을 구현하는 것은 애플리케이션의 보안과 유용성을 향상시키는 강력한 방법입니다. 사용자가 기존 계정으로 로그인할 수 있도록 허용하면 마찰을 줄이고 보다 원활한 사용자 경험을 제공할 수 있습니다. 동시에 JWT로 API 엔드포인트를 보호하면 인증된 사용자만 민감한 리소스에 액세스할 수 있습니다.
이 가이드를 통해 Google 및 GitHub에서 OAuth 자격 증명을 설정하는 것부터 인증을 처리하고 엔드포인트를 보호하도록 Spring Boot 애플리케이션을 구성하는 것까지 모든 것을 다루었습니다. OAuth 2.0을 처음 사용하거나 이를 프로젝트에 통합하려는 경우 이러한 단계는 안전하고 확장 가능한 인증 시스템을 구축하는 데 도움이 됩니다.
보안은 끝없는 여정이지만 올바른 도구와 방법을 사용하면 안전하고 사용자 친화적인 애플리케이션을 구축할 수 있습니다. 이제 탄탄한 기반이 마련되었으므로 더 많은 공급자를 추가하거나, 사용자 경험을 사용자 정의하거나, JWT 구성에 대해 더 자세히 알아보면서 더 자세히 탐색할 수 있습니다. 즐거운 코딩하세요!
위 내용은 Spring Boot의 OAuth 인증: Google과 GitHub 로그인 통합 가이드의 상세 내용입니다. 자세한 내용은 PHP 중국어 웹사이트의 기타 관련 기사를 참조하세요!

핫 AI 도구

Undresser.AI Undress
사실적인 누드 사진을 만들기 위한 AI 기반 앱

AI Clothes Remover
사진에서 옷을 제거하는 온라인 AI 도구입니다.

Undress AI Tool
무료로 이미지를 벗다

Clothoff.io
AI 옷 제거제

AI Hentai Generator
AI Hentai를 무료로 생성하십시오.

인기 기사

뜨거운 도구

메모장++7.3.1
사용하기 쉬운 무료 코드 편집기

SublimeText3 중국어 버전
중국어 버전, 사용하기 매우 쉽습니다.

스튜디오 13.0.1 보내기
강력한 PHP 통합 개발 환경

드림위버 CS6
시각적 웹 개발 도구

SublimeText3 Mac 버전
신 수준의 코드 편집 소프트웨어(SublimeText3)

뜨거운 주제
 7315
7315
 9
9
 1625
1625
 14
14
 1348
1348
 46
46
 1260
1260
 25
25
 1207
1207
 29
29
 2025 년 상위 4 개의 JavaScript 프레임 워크 : React, Angular, Vue, Svelte
Mar 07, 2025 pm 06:09 PM
2025 년 상위 4 개의 JavaScript 프레임 워크 : React, Angular, Vue, Svelte
 카페인 또는 구아바 캐시와 같은 라이브러리를 사용하여 자바 애플리케이션에서 다단계 캐싱을 구현하려면 어떻게해야합니까?
Mar 17, 2025 pm 05:44 PM
카페인 또는 구아바 캐시와 같은 라이브러리를 사용하여 자바 애플리케이션에서 다단계 캐싱을 구현하려면 어떻게해야합니까?
 Java의 클래스로드 메커니즘은 다른 클래스 로더 및 대표 모델을 포함하여 어떻게 작동합니까?
Mar 17, 2025 pm 05:35 PM
Java의 클래스로드 메커니즘은 다른 클래스 로더 및 대표 모델을 포함하여 어떻게 작동합니까?
 Spring Boot Snakeyaml 2.0 CVE-2022-1471 문제 고정
Mar 07, 2025 pm 05:52 PM
Spring Boot Snakeyaml 2.0 CVE-2022-1471 문제 고정
 캐싱 및 게으른 하중과 같은 고급 기능을 사용하여 객체 관계 매핑에 JPA (Java Persistence API)를 어떻게 사용하려면 어떻게해야합니까?
Mar 17, 2025 pm 05:43 PM
캐싱 및 게으른 하중과 같은 고급 기능을 사용하여 객체 관계 매핑에 JPA (Java Persistence API)를 어떻게 사용하려면 어떻게해야합니까?
 고급 Java 프로젝트 관리, 구축 자동화 및 종속성 해상도에 Maven 또는 Gradle을 어떻게 사용합니까?
Mar 17, 2025 pm 05:46 PM
고급 Java 프로젝트 관리, 구축 자동화 및 종속성 해상도에 Maven 또는 Gradle을 어떻게 사용합니까?


