

TensorFlow와 JavaScript를 사용하여 기본 챗봇을 구축하는 방법

우리 모두는 다양한 사이트를 방문할 때 챗봇을 접하게 되는데, 그 중 일부는 실제 인간 상호 작용을 기반으로 작동하고 다른 일부는 AI로 구동됩니다.
이 기사에서는 TensorFlow와 JavaScript를 사용하여 간단한 AI 기반 챗봇을 구축하는 방법을 살펴보겠습니다. 챗봇은 사용자 명령을 인식하고 미리 정의된 답변으로 응답합니다.
단계별 안내
프로젝트 설정
먼저 프로젝트를 위한 새 디렉토리를 생성하고 npm으로 초기화합니다. 이 단계를 시작하기 전에 시스템에 Node.js가 설치되어 있는지 확인하세요.
mkdir chatbot
cd chatbot
npm init -y
필요한 패키지 설치
간단한 프로젝트에는 다음 npm 패키지를 사용합니다.
- tensorflow/tfjs: 기계 학습을 위한 TensorFlow.js 라이브러리입니다.
- tensorflow-models/universal-sentence-encoder: 의도 인식을 위해 사전 훈련된 Universal Sentence Encoder 모델입니다.
npm install @tensorflow/tfjs @tensorflow-models/universal sentence-encoder
-
인텐트 생성
intents.js라는 파일을 생성하여 인텐트/명령을 저장합니다. 이는 챗봇이 인식할 사용자 입력 카테고리(예: 인사말, 제품 문의, 주문 상태)입니다.
// intents.js
const intents = {
  greeting: ["hello", "hi", "hey", "good morning", "good evening", "howdy"],
  goodbye: ["bye", "goodbye", "see you later", "farewell", "catch you later"],
  thanks: ["thank you", "thanks", "much appreciated", "thank you very much"],
  product_inquiry: ["tell me about your products", "what do you sell?", "product information", "what can I buy?", "show me your products"],
  order_status: ["where is my order?", "order status", "track my order", "order tracking", "order update"],
  shipping_info: ["shipping information", "how do you ship?", "shipping methods", "delivery options", "how long does shipping take?"],
  return_policy: ["return policy", "how to return?", "return process", "can I return?", "returns"],
  payment_methods: ["payment options", "how can I pay?", "payment methods", "available payments"],
  support_contact: ["contact support", "how to contact support?", "customer support contact", "support info", "customer service contact"],
  business_hours: ["business hours", "working hours", "when are you open?", "opening hours", "store hours"]
};

module.exports = { intents }
로그인 후 복사 -
응답 만들기
response.js라는 이름의 다른 파일을 만들어 미리 정의된 응답을 저장하세요. 이는 인식된 의도에 따라 챗봇이 제공할 사전 정의된 응답입니다.
// responses.js
const responses = {
  greeting: "Hello! How can I help you today?",
  goodbye: "Goodbye! Have a great day!",
  thanks: "You're welcome! If you have any other questions, feel free to ask.",
  product_inquiry: "We offer a variety of products including electronics, books, clothing, and more. How can I assist you further?",
  order_status: "Please provide your order ID, and I will check the status for you.",
  shipping_info: "We offer various shipping methods including standard, express, and next-day delivery. Shipping times depend on the method chosen and your location.",
  return_policy: "Our return policy allows you to return products within 30 days of purchase. Please visit our returns page for detailed instructions.",
  payment_methods: "We accept multiple payment methods including credit/debit cards, PayPal, and bank transfers. Please choose the method that suits you best at checkout.",
  support_contact: "You can contact our support team via email at support@example.com or call us at 1-800-123-4567.",
  business_hours: "Our business hours are Monday to Friday, 9 AM to 5 PM. We are closed on weekends and public holidays."
};

module.exports = { responses };
로그인 후 복사 -
TensorFlow 및 문장 인코더 로드
chatbot.js라는 기본 스크립트 파일을 생성하고 필요한 라이브러리와 모델을 로드합니다. 범용 문장 인코더 모델을 비동기식으로 로드하고 모델이 로드되면 챗봇을 시작합니다.
// chatbot.js
const tf = require('@tensorflow/tfjs');
const use = require('@tensorflow-models/universal-sentence-encoder');
const { intents } = require('./intents');
const { responses } = require('./responses');
const readline = require('readline');

// Load the Universal Sentence Encoder model
let model;
use.load().then((loadedModel) => {
  model = loadedModel;
  console.log("Model loaded");
  startChatbot();
});
로그인 후 복사 -
의도 인식 구현
사용자 입력 의도를 인식하는 기능을 추가하고, 범용 인코더를 사용하여 사용자 입력을 고차원 벡터에 삽입한 다음 의도를 기반으로 가장 높은 유사도 점수를 추적합니다.
async function recognizeIntent(userInput) {
  const userInputEmb = await model.embed([userInput]);
  let maxScore = -1;
  let recognizedIntent = null;

  for (const [intent, examples] of Object.entries(intents)) {
    // Embedding the example phrases for each intent & Calculating similarity scores between the user input embedding and the example embeddings
    const examplesEmb = await model.embed(examples);
    const scores = await tf.matMul(userInputEmb, examplesEmb, false, true).data();
    const maxExampleScore = Math.max(...scores);
    if (maxExampleScore > maxScore) {
      maxScore = maxExampleScore;
      recognizedIntent = intent;
    }
  }
  return recognizedIntent;
}
로그인 후 복사 -
응답 생성
인식된 의도를 기반으로 응답을 생성하는 기능을 추가합니다.
async function generateResponse(userInput) {
  const intent = await recognizeIntent(userInput);
  if (intent && responses[intent]) {
    return responses[intent];
  } else {
    return "I'm sorry, I don't understand that. Can you please rephrase?";
  }
}
로그인 후 복사 -
챗봇 상호작용 구현
마지막으로 명령줄에서 사용자 입력을 읽고 사용자에게 입력을 요청하고 그에 따라 응답을 생성하기 위한 인터페이스를 설정하여 챗봇과의 상호 작용 루프를 구현합니다.
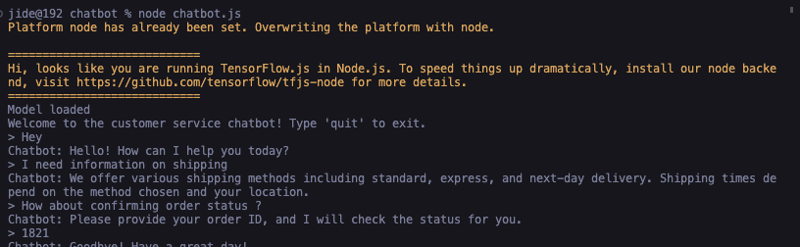
function startChatbot() {
  const rl = readline.createInterface({
    input: process.stdin,
    output: process.stdout
  });

  console.log("Welcome to the customer service chatbot! Type 'quit' to exit.");
  rl.prompt();

  rl.on('line', async (line) => {
    const userInput = line.trim();
    if (userInput.toLowerCase() === 'quit') {
      console.log("Chatbot: Goodbye!");
      rl.close();
      return;
    }

    const response = await generateResponse(userInput);
    console.log(`Chatbot: ${response}`);
    rl.prompt();
  });
}
로그인 후 복사chatbot.js의 완성된 코드는 다음과 같습니다.
// chatbot.js

const tf = require('@tensorflow/tfjs');
const use = require('@tensorflow-models/universal-sentence-encoder');
const { intents } = require('./intents');
const { responses } = require('./responses');
const readline = require('readline');

// Load the Universal Sentence Encoder model
let model;
use.load().then((loadedModel) => {
  model = loadedModel;
  console.log("Model loaded");
  startChatbot();
});

async function recognizeIntent(userInput) {
  const userInputEmb = await model.embed([userInput]);
  let maxScore = -1;
  let recognizedIntent = null;

  for (const [intent, examples] of Object.entries(intents)) {
    const examplesEmb = await model.embed(examples);
    const scores = await tf.matMul(userInputEmb, examplesEmb, false, true).data();
    const maxExampleScore = Math.max(...scores);
    if (maxExampleScore > maxScore) {
      maxScore = maxExampleScore;
      recognizedIntent = intent;
    }
  }

  return recognizedIntent;
}

async function generateResponse(userInput) {
  const intent = await recognizeIntent(userInput);
  if (intent && responses[intent]) {
    return responses[intent];
  } else {
    return "I'm sorry, I don't understand that. Can you please rephrase?";
  }
}

function startChatbot() {
  const rl = readline.createInterface({
    input: process.stdin,
    output: process.stdout
  });

  console.log("Welcome to the customer service chatbot! Type 'quit' to exit.");
  rl.prompt();

  rl.on('line', async (line) => {
    const userInput = line.trim();
    if (userInput.toLowerCase() === 'quit') {
      console.log("Chatbot: Goodbye!");
      rl.close();
      return;
    }

    const response = await generateResponse(userInput);
    console.log(`Chatbot: ${response}`);
    rl.prompt();
  });
}
로그인 후 복사 -
챗봇을 실행하려면 chatbot.js 파일을 실행하세요:
node chatbot.js
로그인 후 복사
짜잔! 명령 출력에는 챗봇이 실행되어야 합니다.
결론
이 기사에서는 TensorFlow와 JavaScript를 사용하여 간단한 고객 서비스 챗봇을 구축했습니다. 이 구현은 기본적이지만 보다 정교한 챗봇을 구축하기 위한 견고한 기반을 제공합니다. AXIOS를 사용하여 API를 통합하거나 더 많은 인텐트와 응답을 추가하거나 웹 플랫폼에 배포하여 이 프로젝트를 확장할 수 있습니다.
즐거운 코딩하세요!
?? 나에 대해 자세히 알아보세요
?? LinkedIn에 연결
?? 내 블로그 구독
위 내용은 TensorFlow와 JavaScript를 사용하여 기본 챗봇을 구축하는 방법의 상세 내용입니다. 자세한 내용은 PHP 중국어 웹사이트의 기타 관련 기사를 참조하세요!

핫 AI 도구

Undresser.AI Undress
사실적인 누드 사진을 만들기 위한 AI 기반 앱

AI Clothes Remover
사진에서 옷을 제거하는 온라인 AI 도구입니다.

Undress AI Tool
무료로 이미지를 벗다

Clothoff.io
AI 옷 제거제

Video Face Swap
완전히 무료인 AI 얼굴 교환 도구를 사용하여 모든 비디오의 얼굴을 쉽게 바꾸세요!

인기 기사
뜨거운 도구

메모장++7.3.1
사용하기 쉬운 무료 코드 편집기

SublimeText3 중국어 버전
중국어 버전, 사용하기 매우 쉽습니다.

스튜디오 13.0.1 보내기
강력한 PHP 통합 개발 환경

드림위버 CS6
시각적 웹 개발 도구

SublimeText3 Mac 버전
신 수준의 코드 편집 소프트웨어(SublimeText3)
뜨거운 주제
 7878
7878
 15
1649
14
1409
52
1301
25
1245
29
15
1649
14
1409
52
1301
25
1245
29

 프론트 엔드 열 용지 영수증에 대한 차량 코드 인쇄를 만나면 어떻게해야합니까?
Apr 04, 2025 pm 02:42 PM
프론트 엔드 열 용지 영수증에 대한 차량 코드 인쇄를 만나면 어떻게해야합니까?
Apr 04, 2025 pm 02:42 PM
프론트 엔드 개발시 프론트 엔드 열지대 티켓 인쇄를위한 자주 묻는 질문과 솔루션, 티켓 인쇄는 일반적인 요구 사항입니다. 그러나 많은 개발자들이 구현하고 있습니다 ...
 Demystifying JavaScript : 그것이하는 일과 중요한 이유
Apr 09, 2025 am 12:07 AM
Demystifying JavaScript : 그것이하는 일과 중요한 이유
Apr 09, 2025 am 12:07 AM
JavaScript는 현대 웹 개발의 초석이며 주요 기능에는 이벤트 중심 프로그래밍, 동적 컨텐츠 생성 및 비동기 프로그래밍이 포함됩니다. 1) 이벤트 중심 프로그래밍을 사용하면 사용자 작업에 따라 웹 페이지가 동적으로 변경 될 수 있습니다. 2) 동적 컨텐츠 생성을 사용하면 조건에 따라 페이지 컨텐츠를 조정할 수 있습니다. 3) 비동기 프로그래밍은 사용자 인터페이스가 차단되지 않도록합니다. JavaScript는 웹 상호 작용, 단일 페이지 응용 프로그램 및 서버 측 개발에 널리 사용되며 사용자 경험 및 크로스 플랫폼 개발의 유연성을 크게 향상시킵니다.
 누가 더 많은 파이썬이나 자바 스크립트를 지불합니까?
Apr 04, 2025 am 12:09 AM
누가 더 많은 파이썬이나 자바 스크립트를 지불합니까?
Apr 04, 2025 am 12:09 AM
기술 및 산업 요구에 따라 Python 및 JavaScript 개발자에 대한 절대 급여는 없습니다. 1. 파이썬은 데이터 과학 및 기계 학습에서 더 많은 비용을 지불 할 수 있습니다. 2. JavaScript는 프론트 엔드 및 풀 스택 개발에 큰 수요가 있으며 급여도 상당합니다. 3. 영향 요인에는 경험, 지리적 위치, 회사 규모 및 특정 기술이 포함됩니다.
 JavaScript는 배우기가 어렵습니까?
Apr 03, 2025 am 12:20 AM
JavaScript는 배우기가 어렵습니까?
Apr 03, 2025 am 12:20 AM
JavaScript를 배우는 것은 어렵지 않지만 어려운 일입니다. 1) 변수, 데이터 유형, 기능 등과 같은 기본 개념을 이해합니다. 2) 마스터 비동기 프로그래밍 및 이벤트 루프를 통해이를 구현하십시오. 3) DOM 운영을 사용하고 비동기 요청을 처리합니다. 4) 일반적인 실수를 피하고 디버깅 기술을 사용하십시오. 5) 성능을 최적화하고 모범 사례를 따르십시오.
 JavaScript의 진화 : 현재 동향과 미래 전망
Apr 10, 2025 am 09:33 AM
JavaScript의 진화 : 현재 동향과 미래 전망
Apr 10, 2025 am 09:33 AM
JavaScript의 최신 트렌드에는 Typescript의 Rise, 현대 프레임 워크 및 라이브러리의 인기 및 WebAssembly의 적용이 포함됩니다. 향후 전망은보다 강력한 유형 시스템, 서버 측 JavaScript 개발, 인공 지능 및 기계 학습의 확장, IoT 및 Edge 컴퓨팅의 잠재력을 포함합니다.
 Shiseido의 공식 웹 사이트와 같은 시차 스크롤 및 요소 애니메이션 효과를 달성하는 방법은 무엇입니까?
또는:
Shiseido의 공식 웹 사이트와 같은 페이지 스크롤과 함께 애니메이션 효과를 어떻게 달성 할 수 있습니까?
Apr 04, 2025 pm 05:36 PM
Shiseido의 공식 웹 사이트와 같은 시차 스크롤 및 요소 애니메이션 효과를 달성하는 방법은 무엇입니까?
또는:
Shiseido의 공식 웹 사이트와 같은 페이지 스크롤과 함께 애니메이션 효과를 어떻게 달성 할 수 있습니까?
Apr 04, 2025 pm 05:36 PM
이 기사에서 시차 스크롤 및 요소 애니메이션 효과 실현에 대한 토론은 Shiseido 공식 웹 사이트 (https://www.shiseido.co.jp/sb/wonderland/)와 유사하게 달성하는 방법을 살펴볼 것입니다.
 JavaScript를 사용하여 동일한 ID와 동일한 ID로 배열 요소를 하나의 객체로 병합하는 방법은 무엇입니까?
Apr 04, 2025 pm 05:09 PM
JavaScript를 사용하여 동일한 ID와 동일한 ID로 배열 요소를 하나의 객체로 병합하는 방법은 무엇입니까?
Apr 04, 2025 pm 05:09 PM
동일한 ID로 배열 요소를 JavaScript의 하나의 객체로 병합하는 방법은 무엇입니까? 데이터를 처리 할 때 종종 동일한 ID를 가질 필요가 있습니다 ...
 Console.log 출력 결과의 차이 : 두 통화가 다른 이유는 무엇입니까?
Apr 04, 2025 pm 05:12 PM
Console.log 출력 결과의 차이 : 두 통화가 다른 이유는 무엇입니까?
Apr 04, 2025 pm 05:12 PM
Console.log 출력의 차이의 근본 원인에 대한 심층적 인 논의. 이 기사에서는 Console.log 함수의 출력 결과의 차이점을 코드에서 분석하고 그에 따른 이유를 설명합니다. � ...
