부울 속성으로 명시할 수 있으며 개발자 친화적인 필수 필드라고도 합니다. 웹 페이지에 양식을 제출하기 전에 공백으로 유지되어서는 안 되는 값을 갖도록 모든 형태의 제어로 표시되어야 합니다. 필드를 필수로 만들려면 입력 필드 끝에 속성을 추가하세요. 클라이언트는 필수 필드를 채워야 한다는 팝업 경고를 받게 됩니다. 한편 HTML5의 새로운 기능이며 체크박스, 라디오 버튼, 텍스트 등과 같은 입력 필드와 잘 작동하므로 프런트엔드 유효성 검사에 도움이 될 수 있습니다.
이 문서에서는 Chrome 6, Firefox, Opera와 같은 브라우저에서 작업을 시작하고 실행하기 위한 간단한 예와 함께 필수 속성에 대한 기본 개념을 다루고 있으며 각 브라우저에는 서로 다른 기본 동작이 있습니다. 말하자면, 특별한 단어인 속성은 HTML의 모든 요소에 기능을 제공합니다. HTML5와 마찬가지로 필수 속성은 UI 도우미로 표시됩니다. 사용자가 양식을 제출하면 서버는 데이터 포함 여부에 관계없이 요청의 유효성을 검사합니다.
아래에 구문이 나와 있으며 양식에 '속성' 키워드를 사용하여 텍스트 입력 필드를 만드는 것이 약간 변경될 수 있습니다. 양식을 제출하기 전에 필수 항목을 작성해야 합니다. 이를 위해 '필수' 속성이 부여됩니다.
일반 구문: 여기에 사용 가능한 값은 null이거나 필수입니다.
<element required>
입력 요소 구문:
< input type =" " required>
텍스트 영역 구문: <텍스트 영역 필수>
<text area rows =" " cols = " " name =" " required> < /text area>
선택 영역 구문:
<select name =" "required>
<option value >
</option> </select>
HTML5에는 참 또는 거짓 값으로 표시될 수 있는 속성이 있다는 것을 알고 계셨나요? 이에 대해 더 자세히 설명하겠습니다. 이를 통해 우리는 다음을 수행할 수 있습니다.
Html 필수 속성은 아래 나열된 가장 자주 사용되는 세 가지 요소에 적용됩니다.
HTML의 필수 속성을 알아보기 위해 HTML 코드를 사용해 보겠습니다. 먼저 속성입니다.
필드를 단순으로 표시하려면 입력 요소에 '필수' 속성을 추가하세요. 사용자가 필요한 모든 필드를 완료하고 제출하면 웹 브라우저가 필요에 따라 작동합니다. 적절한 위치에 필수 속성을 추가하는지 살펴보겠습니다.
코드:
<html>
<head>
<h3>
Implementation of required attribute using input element
</h3>
<style>
div
{
padding: 12px 1;
}
</style>
<head>
<body>
<form>
<div>
<label> Full Name</label>
<input type="text" placeholder="Enter Full Name" name="name" required>
</div>
<div>
<label> E-id </label>
<input type="email" placeholder="Enter E-ID" name="email" required>
</div>
<div>
<label> Location </label>
<input type="text" placeholder="Enter the Location." name="Loc" required>
</div>
<div>
<label>Password Pin</label>
<input type="password" placeholder="Enter PIN Password" name="pwd" required>
<br>
</div>
<button type="submit" VALUE="SUBMIT"> Login </button>
</form>
</body>
</html>출력:

누군가 라디오 버튼을 선택하지 않은 상태로 두는 경우를 감지하는 데 중점을 둘 것입니다.
코드:
<!DOCTYPE html>
<html>
<head>
<h2>
Required Attribute
<h2>
<style>
h1,
h2 {
color: Orange;
font-style: Verdina;
}
body {
text-align: center;
}
</style>
</head>
<body>
<h1>EDUCBA Tutorial</h1>
<h2>
HTML required Attribute with Input
</h2>
<form action="">
<label for="name"> Full Name (5 to 9 characters): </label>
<input type="text" id="name" name=" Full name" required
minlength="5" maxlength="9" size="14">
Mandatory:
<input type="radio"
name="radiocheck"
required>
<br>
<input type="submit">
</form>
</body>
</html>출력:

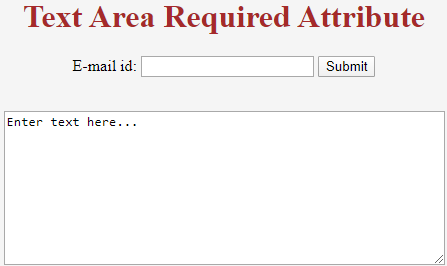
이 부울 속성은 텍스트 영역 요소가 제출 전에 단독으로 남아서는 안 됨을 지정하고 여러 줄 입력 제어도 지정합니다. 아래 예에서는 양식 외부에서 이 속성을 사용하는 방법을 보여줍니다.
코드:
<!DOCTYPE>
<html>
<head>
<title>Required Attribute implementation</title>
<style>
h1
{
color: brown;
font-style: Arial;
}
body {
text-align: center;
}
</style>
</head>
<body>
<h1> Text Area Required Attribute</h1>
<form action="updates.jsp" id="user idform">
E-mail id: <input type="text" name="username">
<input type="submit">
</form>
<br>
<textarea rows="10" cols="60" name="comment" form="user idform">
Enter text here... </textarea>출력:

위의 예에서도 min 및 max 길이 속성을 사용하여 지정할 수 있습니다.
아래 예에서는
코드:
<!DOCTYPE html>
<html>
<body>
<form action="/act_page.php">
<select required>
<option value="">Select</option>
<option value="Air India">Hadoop</option>
<option value="Emirates"> R programming</option>
<option value="Doha">PHP</option>
<option value="Spice Jet"> Java</option>
</select>
<input type="submit">
</form>
</body>
</html>
출력:
