

HTML로 웹 페이지 디자인

HyperText Markup Language로 알려진 HTML은 웹 페이지를 디자인하고 콘텐츠를 구성하는 데 사용되는 가장 널리 사용되는 언어 중 하나입니다. HTML은 태그, 요소, 이미지 및 일부 최신 구성 요소를 사용하여 웹 페이지를 더욱 매력적이고 사용자 친화적으로 만듭니다.
HTML과 CSS를 결합하면 웹페이지의 모양을 쉽게 맞춤설정할 수 있습니다. HTML은 World Wide Web에서 웹 페이지를 적절하게 구성하는 데 중요한 역할을 합니다. 간단한 텍스트 편집기를 사용하여 편집할 수 있으므로 사용자는 필요할 때마다 변경할 수 있습니다.
HTML로 웹페이지를 디자인하는 방법은 무엇입니까? (단계별)
1단계: 프로젝트 설정
- 웹페이지용 파일을 저장할 새 폴더를 컴퓨터에 만듭니다.

- HTML 코드를 작성하려면 메모장, Sublime Text 또는 Visual Studio Code와 같은 텍스트 편집기를 엽니다.

2단계: HTML 구조로 시작
- 맨 위에 선언을 추가하여 HTML 파일을 시작합니다. 이는 HTML5를 사용하고 있음을 브라우저에 알려줍니다.
- 시작 및 종료 HTML 태그를 만듭니다. .
- HTML 태그 내부에 열기 및 닫기 head 태그를 만듭니다. .
- head 태그 내에
과 같은 시작 및 종료 제목 태그를 추가합니다. 여기에 웹페이지의 제목을 작성합니다.
3단계: 본문에 콘텐츠 추가
- 닫는 head 태그 뒤에 열기 및 닫기 body 태그()를 만듭니다. 여기에 웹페이지에 표시되는 모든 콘텐츠를 넣을 수 있습니다.
- body 태그 내부에는 제목, 단락, 이미지, 링크 등의 요소를 추가할 수 있습니다.
- 제목을 추가하려면 기본 제목에 태그를 사용하고 , 을 사용하세요. 등의 부제목이 있습니다.
- 문단을 추가하려면 를 사용하세요.
- 이미지를 추가하려면
를
태그에는 이미지 파일의 위치를 가리키는 파일 경로 또는 URL이 포함되어야 하는 src 속성을 지정해야 합니다.
- 링크를 추가하려면 URL을 지정하는 href 속성과 함께 태그를 사용하세요.
더 나은 이해를 위해 코드는 다음과 같습니다.
<!DOCTYPE html>
<html>
<head>
<title>My First Web Page</title>
</head>
<body>
<h1>Unlock the Power of Online Learning</h1>
<p>Master 1000+ Tools & Technologies.</p>
<img src="C:\Users\Demo2\Desktop\HTML\webimage.PNG">
<ul>
<li>Python</li>
<li>Artificial Intelligence</li>
<li>Java</li>
</ul>
<a href="https://www.educba.com">View All 1000 Skills</a>
</body>
</html>
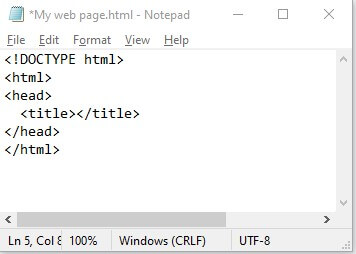
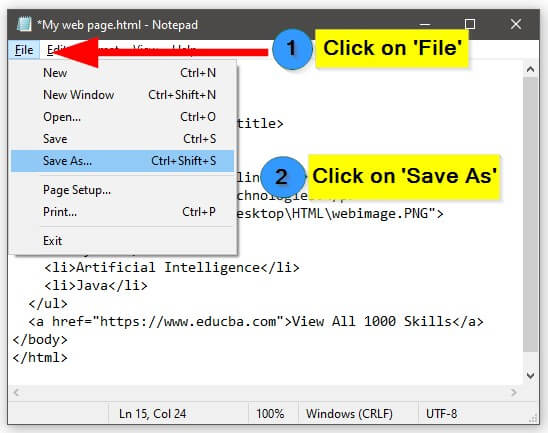
4단계: HTML 파일 저장
- 이전에 생성한 폴더에.html 확장자로 파일을 저장하세요.
- my web page.html(일반적으로 웹사이트의 메인 페이지로 사용됨)과 같이 파일을 설명하는 이름을 선택하세요.

5단계: 웹페이지 보기
- Chrome, Firefox, Safari 등의 웹 브라우저에서 HTML 파일을 엽니다.

- 우리가 추가한 콘텐츠를 보여주는 아래 웹페이지가 브라우저에 표시됩니다.
출력:

6단계: 계속해서 웹페이지 개선
- 추가 HTML 태그와 속성을 탐색하여 웹페이지의 구조와 디자인을 더욱 향상하세요.
- CSS(Cascading Style Sheets)를 배워 웹페이지 스타일을 지정하고 시각적으로 매력적으로 만드세요.
- 양식, 표, 멀티미디어 요소 등 고급 HTML 기능을 실험해 보세요.
웹 디자인을 위한 HTML 태그 및 요소
다음은 HTML로 웹페이지를 디자인하는 데 중요한 필수 HTML 태그 및 요소 목록입니다.
| HTML Tag/Element | Purpose | |||||||||||||||||||||||||||||||
to |
Define different levels of headings | |||||||||||||||||||||||||||||||
| Define paragraphs of text | ||||||||||||||||||||||||||||||||
| Create line breaks | ||||||||||||||||||||||||||||||||
| Create an ordered list | ||||||||||||||||||||||||||||||||
| Create an unordered list | ||||||||||||||||||||||||||||||||
| Define items within a list | ||||||||||||||||||||||||||||||||
| Create hyperlinks | ||||||||||||||||||||||||||||||||
| Insert images | ||||||||||||||||||||||||||||||||
Examples of Design Web Pages in HTMLLet’s create some web pages to see the resultant web page. Example #1: Travel WebpageHere, we will create an amazing travel webpage showcasing places to visit in Switzerland. We will set one background image and add some text using HTML Code and Styling. HTML Code: <head>
<style>
.card {
max-width: 380px;
margin: auto;
text-align: center;
}
#main {
background-image: url('switzerland.jpg');
background-repeat: no-repeat;
background-size: cover;
}
.price {
color: #f1294a;
font-size: 18px;
}
.card button {
padding: 10px;
color: white;
background-color: #f1294a;
text-align: center;
}
</style>
</head>
<body id="main">
<h2 style="text-align:center">Places to Visit in Switzerland</h2>
<div class="card">
<h1><b>Explore Switzerland</b></h1>
<h3 class="price">Starting from CHF 2000</h3>
<h2>
<ul>
<li>Zurich</li>
<li>Geneva</li>
<li>Lucerne</li>
<li>Interlaken</li>
<li>Zermatt</li>
</ul>
</h2>
<p><button>Book Here</button></p>
</div>
</body>로그인 후 복사 Output: Example #2: Feedback FormWe will build one Feedback form in the form of a web page in this example. <!DOCTYPE html>
<html>
<head>
<meta name="viewport" content="width=device-width, initial-scale=1">
<style>
body {
font-family: Arial, sans-serif;
}
input[type=text], select, textarea {
width: 100%;
padding: 8px;
border: 1px solid #ccc;
border-radius: 4px;
margin-top: 4px;
margin-bottom: 10px;
}
input[type=submit] {
background-color: #4CAF50;
color: white;
padding: 8px 12px;
border: none;
border-radius: 4px;
cursor: pointer;
}
.container {
width: 80%;
max-width: 500px;
margin: 0 auto;
border-radius: 6px;
background-color: #F2F2F2;
padding: 20px;
}
h3 {
text-align: center;
}
label {
font-weight: bold;
}
textarea {
resize: vertical;
}
/* Optional: Add additional styles to make it more visually appealing */
.container {
box-shadow: 0 2px 4px rgba(0, 0, 0, 0.1);
}
input[type=submit]:hover {
background-color: #45a049;
}
</style>
</head>
<body>
<h3>We Value Your Suggestions!</h3>
<div class="container">
<form>
<label for="fname">First Name</label>
<input type="text" id="fname" name="firstname" placeholder="Enter your name">
<label for="lname">Last Name</label>
<input type="text" id="lname" name="lastname" placeholder="Enter your last name">
<label for="email">Email</label>
<input type="text" id="email" name="email" placeholder="Enter your email here">
<label for="subject">Suggestion</label>
<textarea id="subject" name="subject" placeholder="Provide your suggestion" style="height: 100px"></textarea>
<input type="submit" value="Submit">
</form>
</div>
</body>
</html>로그인 후 복사 Output: Example #3: OTT Platform HomepageIn this example, we will create another web page that showcases an amazing homepage for an OTT platform. HTML Code: <!DOCTYPE html>
<html>
<head>
<title>My OTT Platform</title>
<style>
/* CSS styles for the website */
body {
font-family: Arial, sans-serif;
margin: 0;
padding: 0;
background-color: #000;
color: #fff;
}
header {
background-color: #e50914;
padding: 20px;
text-align: center;
}
header h1 {
margin: 0;
font-size: 28px;
text-transform: uppercase;
color: #fff;
}
nav {
background-color: #000;
padding: 10px;
text-align: center;
}
nav a {
text-decoration: none;
margin: 10px;
color: #fff;
font-weight: bold;
}
main {
padding: 20px;
}
footer {
background-color: #e50914;
padding: 20px;
text-align: center;
}
.video {
display: flex;
flex-wrap: wrap;
justify-content: center;
margin-bottom: 20px;
}
.video .thumbnail {
position: relative;
width: 250px;
height: 140px;
margin: 10px;
overflow: hidden;
transition: transform 0.3s;
background-color: #333;
}
.video .thumbnail img {
width: 100%;
height: 100%;
object-fit: cover;
}
.video .thumbnail:hover {
transform: scale(1.1);
}
.video .title {
position: absolute;
bottom: 0;
left: 0;
width: 100%;
background-color: rgba(0, 0, 0, 0.7);
color: #fff;
padding: 10px;
margin: 0;
font-weight: bold;
}
/* Additional styles for Netflix-like appearance */
header, nav, main, footer {
max-width: 1200px;
margin: 0 auto;
}
.video .thumbnail {
width: 275px;
height: 155px;
}
.video .title {
font-size: 14px;
padding: 8px;
}
</style>
</head>
<body>
<header>
<h1>Welcome to My OTT Platform</h1>
</header>
<nav>
<a href="#">Home</a>
<a href="#">Movies</a>
<a href="#">TV Shows</a>
<a href="#">Documentaries</a>
<a href="#">My Account</a>
</nav>
<main>
<h2>Trending Now</h2>
<div class="video">
<div class="thumbnail">
<img src="video5.jpg" alt="Video 5">
<div class="title">Movie1</div>
</div>
<div class="thumbnail">
<img src="video6.jpg" alt="Video 6">
<div class="title">Movie2</div>
</div>
<div class="thumbnail">
<img src="video7.jpg" alt="Video 7">
<div class="title">Movie3</div>
</div>
</div>
<h2>Top 3 Shows</h2>
<div class="video">
<div class="thumbnail">
<img src="video8.jpg" alt="Video 8">
<div class="title">Show1</div>
</div>
<div class="thumbnail">
<img src="video9.jpg" alt="Video 9">
<div class="title">Show2</div>
</div>
<div class="thumbnail">
<img src="video10.jpg" alt="Video 10">
<div class="title">Show3</div>
</div>
</div>
<h2>International Movies</h2>
<div class="video">
<div class="thumbnail">
<img src="video11.jpg" alt="Video 11">
<div class="title">Movie1</div>
</div>
<div class="thumbnail">
<img src="video12.jpg" alt="Video 12">
<div class="title">Movie2</div>
</div>
<div class="thumbnail">
<img src="video13.jpg" alt="Video 13">
<div class="title">Movie3</div>
</div>
</div>
</main>
<footer>
<p>© 2023 My OTT Platform. All rights reserved.</p>
</footer>
</body>
</html>로그인 후 복사 Output: Example #4 Newsletter Subscription PageIn this example, let’s create a simple subscription page where users can subscribe to a newsletter. <form action="newsletter.php" method="post" style="background-color: #f2f2f2; padding: 20px; border-radius: 10px;"> <h2 style="color: #333;">Join our Newsletter!</h2> <div class="form-group"> <label for="name" style="color: #333;">Name:</label> <input type="text" id="name" name="name" placeholder="Enter your name" required style="padding: 5px; border: 1px solid #ccc; border-radius: 5px;"> </div> <div class="form-group"> <label for="email" style="color: #333;">Email:</label> <input type="email" id="email" name="email" placeholder="Enter your email" required style="padding: 5px; border: 1px solid #ccc; border-radius: 5px;"> </div> <div class="form-group"> <label for="interests" style="color: #333;">Interests:</label> <select id="interests" name="interests" multiple style="padding: 5px; border: 1px solid #ccc; border-radius: 5px;"> <option value="technology">Technology</option> <option value="fashion">Fashion</option> <option value="food">Food</option> <option value="travel">Travel</option> <option value="sports">Sports</option> </select> </div> <button type="submit" style="background-color: #04aa6d; color: #fff; padding: 10px 20px; border: none; border-radius: 5px; cursor: pointer;">Subscribe Now!</button> </form> 로그인 후 복사 Output: Example #5: Guess the Number GameIn this instance, we will design a simple game where users have to guess the number generated by the system. <!DOCTYPE html>
<html>
<head>
<title>Guessing Game</title>
<style>
body {
text-align: center;
padding-top: 100px;
font-family: Arial, sans-serif;
background-color: #f2f2f2;
}
h1 {
color: #333333;
}
p {
color: #666666;
}
input {
padding: 10px;
font-size: 16px;
border-radius: 4px;
border: 1px solid #cccccc;
}
button {
padding: 10px 20px;
font-size: 16px;
background-color: #4CAF50;
color: white;
border-radius: 4px;
border: none;
cursor: pointer;
}
button:hover {
background-color: #45a049;
}
#result {
margin-top: 20px;
font-weight: bold;
}
</style>
</head>
<body>
<h1>Guessing Game</h1>
<p>Guess a number between 1 and 10:</p>
<input type="number" id="guess" min="1" max="10">
<button onclick="checkGuess()">Submit</button>
<p id="result"></p>
<script>
function checkGuess() {
var guess = parseInt(document.getElementById("guess").value);
var randomNumber = Math.floor(Math.random() * 10) + 1;
if (guess === randomNumber) {
document.getElementById("result").innerHTML = "Congratulations! You guessed the correct number.";
} else {
document.getElementById("result").innerHTML = "Wrong guess. The correct number was " + randomNumber + ".";
}
}
</script>
</body>
</html>로그인 후 복사 Output: ConclusionFrom all the above discussion, we can say that Web pages are created by using HTML code in a very simplified manner. Just simply put your HTML code in any one editor, save it with the .html extension, and open it within any browser. 위 내용은 HTML로 웹 페이지 디자인의 상세 내용입니다. 자세한 내용은 PHP 중국어 웹사이트의 기타 관련 기사를 참조하세요! 본 웹사이트의 성명
본 글의 내용은 네티즌들의 자발적인 기여로 작성되었으며, 저작권은 원저작자에게 있습니다. 본 사이트는 이에 상응하는 법적 책임을 지지 않습니다. 표절이나 침해가 의심되는 콘텐츠를 발견한 경우 admin@php.cn으로 문의하세요.

핫 AI 도구
Undresser.AI Undress사실적인 누드 사진을 만들기 위한 AI 기반 앱 
AI Clothes Remover사진에서 옷을 제거하는 온라인 AI 도구입니다. 
Undress AI Tool무료로 이미지를 벗다 
Clothoff.ioAI 옷 제거제 
AI Hentai GeneratorAI Hentai를 무료로 생성하십시오. 
인기 기사
R.E.P.O. 에너지 결정과 그들이하는 일 (노란색 크리스탈)
1 몇 달 전
By 尊渡假赌尊渡假赌尊渡假赌
R.E.P.O. 최고의 그래픽 설정
1 몇 달 전
By 尊渡假赌尊渡假赌尊渡假赌
어 ass 신 크리드 그림자 : 조개 수수께끼 솔루션
2 몇 주 전
By DDD
R.E.P.O. 아무도들을 수없는 경우 오디오를 수정하는 방법
1 몇 달 전
By 尊渡假赌尊渡假赌尊渡假赌
R.E.P.O. 채팅 명령 및 사용 방법
1 몇 달 전
By 尊渡假赌尊渡假赌尊渡假赌
뜨거운 도구
메모장++7.3.1사용하기 쉬운 무료 코드 편집기 
SublimeText3 중국어 버전중국어 버전, 사용하기 매우 쉽습니다. 
스튜디오 13.0.1 보내기강력한 PHP 통합 개발 환경 
드림위버 CS6시각적 웹 개발 도구 
SublimeText3 Mac 버전신 수준의 코드 편집 소프트웨어(SublimeText3)
뜨거운 주제
Gmail 이메일의 로그인 입구는 어디에 있나요?
 7545
7545
 15
15
Cakephp 튜토리얼
1381
52
Steam의 계정 이름 형식은 무엇입니까?
83
11
Win11 활성화 키 영구
55
19
NYT 연결 힌트와 답변
21
87
 HTML의 테이블 테두리
Sep 04, 2024 pm 04:49 PM
HTML의 테이블 테두리
Sep 04, 2024 pm 04:49 PM
HTML의 테이블 테두리 안내. 여기에서는 HTML의 테이블 테두리 예제를 사용하여 테이블 테두리를 정의하는 여러 가지 방법을 논의합니다.  HTML 여백-왼쪽
Sep 04, 2024 pm 04:48 PM
HTML 여백-왼쪽
Sep 04, 2024 pm 04:48 PM
HTML 여백-왼쪽 안내. 여기에서는 HTML margin-left에 대한 간략한 개요와 코드 구현과 함께 예제를 논의합니다.  HTML의 중첩 테이블
Sep 04, 2024 pm 04:49 PM
HTML의 중첩 테이블
Sep 04, 2024 pm 04:49 PM
HTML의 Nested Table에 대한 안내입니다. 여기에서는 각 예와 함께 테이블 내에 테이블을 만드는 방법을 설명합니다.  HTML 테이블 레이아웃
Sep 04, 2024 pm 04:54 PM
HTML 테이블 레이아웃
Sep 04, 2024 pm 04:54 PM
HTML 테이블 레이아웃 안내. 여기에서는 HTML 테이블 레이아웃의 값에 대해 예제 및 출력 n 세부 사항과 함께 논의합니다.  HTML 입력 자리 표시자
Sep 04, 2024 pm 04:54 PM
HTML 입력 자리 표시자
Sep 04, 2024 pm 04:54 PM
HTML 입력 자리 표시자 안내. 여기서는 코드 및 출력과 함께 HTML 입력 자리 표시자의 예를 논의합니다.  HTML 정렬 목록
Sep 04, 2024 pm 04:43 PM
HTML 정렬 목록
Sep 04, 2024 pm 04:43 PM
HTML 순서 목록에 대한 안내입니다. 여기서는 HTML Ordered 목록 및 유형에 대한 소개와 각각의 예에 대해서도 설명합니다.  HTML에서 텍스트 이동
Sep 04, 2024 pm 04:45 PM
HTML에서 텍스트 이동
Sep 04, 2024 pm 04:45 PM
HTML에서 텍스트 이동 안내. 여기서는 Marquee 태그가 구문과 함께 작동하는 방식과 구현할 예제에 대해 소개합니다.  HTML 온클릭 버튼
Sep 04, 2024 pm 04:49 PM
HTML 온클릭 버튼
Sep 04, 2024 pm 04:49 PM
HTML onclick 버튼에 대한 안내입니다. 여기에서는 각각의 소개, 작업, 예제 및 다양한 이벤트의 onclick 이벤트에 대해 설명합니다. 
|


