

GitHub Actions를 사용하여 빌드, 테스트 및 배포 프로세스 자동화

이 프로젝트는 기본 분기로 푸시할 때 스테이징 환경에 대한 애플리케이션의 빌드, 테스트 및 배포 프로세스의 자동화를 보여주는 빠른 샘플 프로젝트입니다.
CI/CD 파이프라인을 적절하게 시연하기 위해 최소한의 코드로 간단한 Python 프로젝트를 생성한 다음 이를 GitHub Actions에 통합하겠습니다.
간단한 Python 프로젝트 만들기
앞서 언급한 것처럼 파이프라인에서 사용할 간단한 프로젝트를 생성하겠습니다. 저는 특별한 이유 없이 이 작업을 Python으로 선택했습니다. 원하는 다른 프로그래밍 언어를 사용해도 됩니다. 이 프로젝트의 주요 목적은 파이프라인을 시연하는 것입니다.
프로젝트 폴더 생성
그러므로 프로젝트 폴더를 생성하고 해당 폴더로 이동하세요.
mkdir automated-testing
cd automated-testing
애플리케이션 파일 쓰기
이제 간단한 Python 애플리케이션을 작성하겠습니다. 프로젝트 폴더에 app.py라는 새 파일을 생성하세요.
touch app.py
파일에 아래 코드 블록을 추가하세요.
def hello():
  return "Hello, World!"

if __name__ == "__main__":
  print(hello())
이것은 CI 파이프라인에서 테스트할 수 있는 기본 기능의 예 역할을 하는 매우 간단한 Python "Hello world" 함수입니다.
def hello()는 인수를 사용하지 않는 hello라는 함수를 정의합니다. 이 함수가 호출되면 "Hello, World!"라는 문자열이 반환됩니다.
if __name__ == "__main__"은 파일이 직접 실행될 때만(모듈로 가져올 때가 아니라) 특정 코드가 실행되도록 하는 데 사용되는 표준 Python 구문입니다. 스크립트의 진입점 역할을 합니다.
app.py가 직접 실행되면(예: python app.py 실행) 스크립트는 hello() 함수를 호출하고 "Hello, World!"라는 결과를 인쇄합니다.
요구 사항 파일을 만듭니다.
일반적인 프로젝트에는 종속성이 있으며 Python 프로젝트에서는 일반적으로 요구사항.txt 파일에 정의됩니다.
새 파일 요구 사항.txt 만들기
touch requirements.txt
파일에 다음을 추가하세요.
pytest
단위 테스트 만들기
이제 app.py의 기능을 테스트하기 위해 기본 테스트 파일인 test_app.py를 추가하겠습니다. 파일에 아래 내용을 추가하세요:
from app import hello

def test_hello():
  assert hello() == "Hello, World!"
이제 파이프라인을 생성할 준비가 되었습니다.
CI/CD용 GitHub 작업 설정
GitHub 작업을 구성하려면 저장소 내에 .github/workflows 폴더를 만들어야 합니다. 이것이 저장소의 CI/CD 파이프라인을 GitHub에 알리는 방법입니다.
새 파일 만들기:
mkdir -p .github/workflows
하나의 저장소에 여러 파이프라인이 있을 수 있으므로 .github/workflows 폴더에 proj.yml 파일을 생성하세요. 여기에서 Python 프로젝트를 구축, 테스트 및 배포하는 단계를 정의합니다.
파일에 아래 코드를 추가하세요.
name: Build, Test and Deploy

# Trigger the workflow on pushes to the main branch
on:
  push:
    branches:
      - main

jobs:
  build-and-test:
    runs-on: ubuntu-latest

    steps:
    # Checkout the code from the repository
    - name: Checkout repo
      uses: actions/checkout@v4

    # Set up Python environment
    - name: Setup Python
      uses: actions/setup-python@v5
      with:
        python-version: '3.x'

    # Install dependencies
    - name: Install Dependecies
      run: |
        python -m pip install --upgrade pip
        pip install -r requirements.txt

    # Build (this project deosn't require a build but we will simulate a build by creating a file)
    - name: Build Project
      run: |
        mkdir -p build
        # Simulate build output by creating a file
        touch build/output_file.txt

    # Run tests using pytest
    - name: Run tests
      run:
        pytest

    # Upload the build output as an artifact (we created a file in the build step to simulate an artifact)
    - name: Upload build artifact
      uses: actions/upload-artifact@v4
      with:
        name: build-artifact
        path: build/

  deploy:
    runs-on: ubuntu-latest
    needs: build-and-test
    if: success()

    steps:
    # Download the artifact from the build stage
    - name: Download build artifact
      uses: actions/download-artifact@v4
      with:
        name: build-artifact
        path: build/

    - name: Simulate Deployment
      run: |
        echo "Deploying to staging..."
        ls build/
Breakdown of the CI/CD Pipeline Steps
- Trigger on Push to main: The pipeline is triggered whenever there is a push to the main branch.
- Checkout Code: This step uses GitHub’s checkout action to pull our code from the repository.
- Set Up Python: The pipeline sets up a Python environment on the CI runner (GitHub's virtual machine), ensuring that the correct Python version is used.
- Install Dependencies: It installs the required dependencies for our Python project (pytest in this case). This dependency was just added as an example of when a project has dependencies as this particular sample python application does not require any.
- Build: This stage was also just added for demonstration purposes, supposing this was a JavaScript/Node.js project this is where we would run the npm run build command and this will create an artifact we can upload and use in the deploy stage. Since this is a python project and it doesn't really require a build, we will create a file and folder in this stage. The file will serve as our artifact for the deploy stage.
- Run Tests: It runs the tests using pytest to validate the code.
- Upload Build Artifact: After running the tests, the build-and-test stage creates and saves a build artifact (in this case, a simulated output_file.txt in the build folder from the build step). The action upload-artifact is used to store this artifact. You can replace this with whatever actual build output your project creates.
- Deploy Stage: Our application will only be deployed if the test was successful which is why I have added the conditionals needs and if. Using “needs” we can require that the deploy job won’t even run unless the test job is successful. The download-artifact action retrieves the build artifact and the last step "Simulate Deployment" simulates deployment by printing a message and lists the artifact. If this was a live project we would have the actual deployment commands to deploy to a real staging environment here. You can replace the echo and ls commands with actual deployment commands (e.g., deploying to a cloud platform). This approach ensures that the output from the build-and-test stage is properly passed to the deploy stage, simulating how a real deployment would work with build artifacts.
Push to GitHub
If you haven't already, you need to initialize a git repository using the commands below:
git init
git add .
git commit -m "Create project as well as CI/CD pipeline"
Now we push to GitHub. Create a GitHub repository and push your code using the below commands:
git remote add origin <your-repo-url>
git push -u origin main
Verify the Pipeline
After pushing the code, you can visit the Actions tab in your GitHub repository. You should see the pipeline triggered, running the steps defined in your proj.yml file.
If everything is set up correctly, the pipeline will build, test, and simulate deployment. You can changes things around in your project and make new pushes to see the the pipeline works, create errors intentional so you can see how the pipeline works when the tests fail.
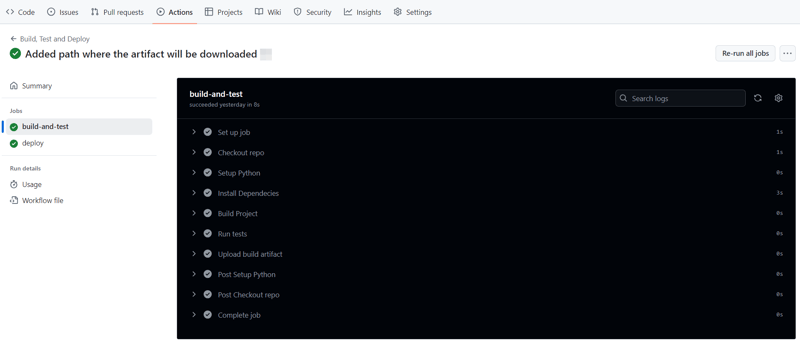
On a successful run this is how your Actions tab should look.
And that's it, this setup provides a working example of a CI/CD pipeline for a very basic Python project. If you found this helpful, please share with your connection and if you have any questions, do not hesitate to drop the question in the comments.
위 내용은 GitHub Actions를 사용하여 빌드, 테스트 및 배포 프로세스 자동화의 상세 내용입니다. 자세한 내용은 PHP 중국어 웹사이트의 기타 관련 기사를 참조하세요!

핫 AI 도구

Undresser.AI Undress
사실적인 누드 사진을 만들기 위한 AI 기반 앱

AI Clothes Remover
사진에서 옷을 제거하는 온라인 AI 도구입니다.

Undress AI Tool
무료로 이미지를 벗다

Clothoff.io
AI 옷 제거제

AI Hentai Generator
AI Hentai를 무료로 생성하십시오.

인기 기사
뜨거운 도구

메모장++7.3.1
사용하기 쉬운 무료 코드 편집기

SublimeText3 중국어 버전
중국어 버전, 사용하기 매우 쉽습니다.

스튜디오 13.0.1 보내기
강력한 PHP 통합 개발 환경

드림위버 CS6
시각적 웹 개발 도구

SublimeText3 Mac 버전
신 수준의 코드 편집 소프트웨어(SublimeText3)
뜨거운 주제
 7543
7543
 15
1381
52
83
11
55
19
21
87
15
1381
52
83
11
55
19
21
87

 Linux 터미널에서 Python 버전을 볼 때 발생하는 권한 문제를 해결하는 방법은 무엇입니까?
Apr 01, 2025 pm 05:09 PM
Linux 터미널에서 Python 버전을 볼 때 발생하는 권한 문제를 해결하는 방법은 무엇입니까?
Apr 01, 2025 pm 05:09 PM
Linux 터미널에서 Python 버전을 보려고 할 때 Linux 터미널에서 Python 버전을 볼 때 권한 문제에 대한 솔루션 ... Python을 입력하십시오 ...
 10 시간 이내에 프로젝트 및 문제 중심 방법에서 컴퓨터 초보자 프로그래밍 기본 사항을 가르치는 방법?
Apr 02, 2025 am 07:18 AM
10 시간 이내에 프로젝트 및 문제 중심 방법에서 컴퓨터 초보자 프로그래밍 기본 사항을 가르치는 방법?
Apr 02, 2025 am 07:18 AM
10 시간 이내에 컴퓨터 초보자 프로그래밍 기본 사항을 가르치는 방법은 무엇입니까? 컴퓨터 초보자에게 프로그래밍 지식을 가르치는 데 10 시간 밖에 걸리지 않는다면 무엇을 가르치기로 선택 하시겠습니까?
 한 데이터 프레임의 전체 열을 Python의 다른 구조를 가진 다른 데이터 프레임에 효율적으로 복사하는 방법은 무엇입니까?
Apr 01, 2025 pm 11:15 PM
한 데이터 프레임의 전체 열을 Python의 다른 구조를 가진 다른 데이터 프레임에 효율적으로 복사하는 방법은 무엇입니까?
Apr 01, 2025 pm 11:15 PM
Python의 Pandas 라이브러리를 사용할 때는 구조가 다른 두 데이터 프레임 사이에서 전체 열을 복사하는 방법이 일반적인 문제입니다. 두 개의 dats가 있다고 가정 해
 중간 독서를 위해 Fiddler를 사용할 때 브라우저에서 감지되는 것을 피하는 방법은 무엇입니까?
Apr 02, 2025 am 07:15 AM
중간 독서를 위해 Fiddler를 사용할 때 브라우저에서 감지되는 것을 피하는 방법은 무엇입니까?
Apr 02, 2025 am 07:15 AM
Fiddlerevery Where를 사용할 때 Man-in-the-Middle Reading에 Fiddlereverywhere를 사용할 때 감지되는 방법 ...
 정규 표현이란 무엇입니까?
Mar 20, 2025 pm 06:25 PM
정규 표현이란 무엇입니까?
Mar 20, 2025 pm 06:25 PM
정규 표현식은 프로그래밍의 패턴 일치 및 텍스트 조작을위한 강력한 도구이며 다양한 응용 프로그램에서 텍스트 처리의 효율성을 높입니다.
 Uvicorn은 Serving_forever ()없이 HTTP 요청을 어떻게 지속적으로 듣습니까?
Apr 01, 2025 pm 10:51 PM
Uvicorn은 Serving_forever ()없이 HTTP 요청을 어떻게 지속적으로 듣습니까?
Apr 01, 2025 pm 10:51 PM
Uvicorn은 HTTP 요청을 어떻게 지속적으로 듣습니까? Uvicorn은 ASGI를 기반으로 한 가벼운 웹 서버입니다. 핵심 기능 중 하나는 HTTP 요청을 듣고 진행하는 것입니다 ...
 인기있는 파이썬 라이브러리와 그 용도는 무엇입니까?
Mar 21, 2025 pm 06:46 PM
인기있는 파이썬 라이브러리와 그 용도는 무엇입니까?
Mar 21, 2025 pm 06:46 PM
이 기사는 Numpy, Pandas, Matplotlib, Scikit-Learn, Tensorflow, Django, Flask 및 요청과 같은 인기있는 Python 라이브러리에 대해 설명하고 과학 컴퓨팅, 데이터 분석, 시각화, 기계 학습, 웹 개발 및 H에서의 사용에 대해 자세히 설명합니다.
 문자열을 통해 객체를 동적으로 생성하고 방법을 파이썬으로 호출하는 방법은 무엇입니까?
Apr 01, 2025 pm 11:18 PM
문자열을 통해 객체를 동적으로 생성하고 방법을 파이썬으로 호출하는 방법은 무엇입니까?
Apr 01, 2025 pm 11:18 PM
파이썬에서 문자열을 통해 객체를 동적으로 생성하고 메소드를 호출하는 방법은 무엇입니까? 특히 구성 또는 실행 해야하는 경우 일반적인 프로그래밍 요구 사항입니다.
