

방법: Docker를 사용하여 Django 및 Postgres 앱 컨테이너화

本文原發表於船廠部落格。
當您建立 Django 和 PostgreSQL 應用程式時,您可能正在考慮希望它檢查的幾個框:
- 便攜式:我可以在機器或團隊成員之間分發它嗎?
- 可擴充:此應用程式能夠處理使用者數量、請求或一般工作負載的增加嗎?
- 雲端原生:我可以在開發、臨時、暫存和/或生產雲端環境中託管此應用程式嗎?
使用 Docker 和 Docker Compose 可以幫助您的應用程式為開發生命週期的每個階段(從本地到生產)做好準備。在這篇文章中,我們將介紹使用 Postgres 資料庫為 Django 應用程式自訂 Dockerfile 和 Compose 檔案的一些基礎知識。
TLDR: Shipyard 維護一個 Django / Postgres 入門應用程序,設定為使用 Docker 和 Docker Compose 建置和運行。在這裡分叉。您可以將其用作專案範本或作為現有應用程式的參考。
姜戈是什麼?
Django 是一個基於 Python 的開源 Web 框架。它主要用作網路應用程式的後端。 Django 遵循「自備電池」的理念——它配備了路由支援、登入框架、Web 伺服器、資料庫工具等等。 Django 經常被拿來與 Flask 進行比較,幾乎在所有方面都得分更高。
您每天都在使用 Django 應用程式。 Spotify、Doordash、Instagram、Eventbrite 和 Pinterest 都擁有 Django - 這充分說明了它的可擴展性和可擴展性。
Docker 化 Django 應用程式的好處
使用 Docker 容器運行 Django 應用程式可以解鎖多個新用例。它立即改進了您的本地開發工作流程 - 使設定更清晰、更簡單。
如果您想在雲端託管您的項目,通常需要將其容器化。 Docker 容器的優點在於它們可以在從本地到生產的每個開發階段使用。您也可以分發您的 Docker 映像,以便其他人可以立即運行它,而無需任何安裝或建置。
至少,如果您在專案中包含 Dockerfile,則可以確保它每次在每個系統上都以相同的方式建置和運行。
選擇 Python 套件管理器
我們的 Python 應用程式需要一個套件管理器來追蹤、版本控制和安裝其依賴項。這有助於我們管理依賴項初始化/更新,而不是單獨執行它們,並跨機器保留套件版本。
Pip 和 Poetry 都是 Python 流行的依賴管理器,儘管還有很多其他的依賴管理器(例如 uv、Conda、Rye)。
Pip 非常簡單。使用者可以在requirements.txt檔案中列出他們的軟體包及其各自的版本,然後執行pip install來設定它們。使用者可以透過執行 pip freeze > 來捕獲現有的依賴項及其版本。專案根目錄中的requirements.txt。
Poetry 是適用於任何規模的應用程式的高效能套件管理器,但它的配置比 Pip 稍微簡單一些(它使用帶有表、元資料和腳本的 TOML 檔案)。 Poetry 也使用鎖定檔案 (poetry.lock) 來「鎖定」目前版本的依賴項(以及按版本其依賴項)。這樣,如果您的專案在特定時間點在特定機器上運行,則該狀態將被保留。運行詩歌 init 會提示使用者一系列選項來產生 pyproject.toml 檔案。
為 Django 應用程式編寫 Dockerfile
要 Dockerize 您的 Django 應用程序,您將遵循經典的 Dockerfile 結構(設定基本映像、設定工作目錄等),然後使用特定於專案的安裝說明(可能在自述文件中找到)對其進行修改。
選擇基礎影像
我們可以選擇一個輕量級的 Python 映像作為這個 Dockerfile 的基礎。若要按標籤瀏覽版本,請查看 Docker Hub 上的 Python 頁面。我在這裡選擇 Alpine,因為它會使我們的圖像保持較小:
FROM python:3.8.8-alpine3.13
設定工作目錄
在這裡,我們將定義 Docker 容器內的工作目錄。後面提到的所有路徑都與此相關。
WORKDIR /srv
安裝系統依賴項
在設定 Poetry 之前,我們需要加入一些函式庫:
RUN apk add --update --no-cache \
  gcc \
  libc-dev \
  libffi-dev \
  openssl-dev \
  bash \
  git \
  libtool \
  m4 \
  g++ \
  autoconf \
  automake \
  build-base \
  postgresql-dev
安裝詩歌
接下來,我們將確保使用最新版本的 Pip,然後使用它在我們的容器內安裝 Poetry:
RUN pip install --upgrade pip
RUN pip install poetry
Installing our project’s dependencies
This app’s dependencies are defined in our pyproject.toml and poetry.lock files. Let’s bring them over to the container’s working directory, and then install from their declarations:
ADD pyproject.toml poetry.lock ./
RUN poetry install
Adding and installing the project itself
Now, we’ll copy over the rest of the project, and install the Django project itself within the container:
ADD src ./src
RUN poetry install
Executing the start command
Finally, we’ll run our project’s start command. In this particular app, it’ll be the command that uses Poetry to start the Django development server:
CMD ["poetry", "run", "python", "src/manage.py", "runserver", "0:8080"]
The complete Dockerfile
When we combine the snippets from above, we’ll get this Dockerfile:
FROM python:3.8.8-alpine3.13

WORKDIR /srv

RUN apk add --update --no-cache \
  gcc \
  libc-dev \
  libffi-dev \
  openssl-dev \
  bash \
  git \
  libtool \
  m4 \
  g++ \
  autoconf \
  automake \
  build-base \
  postgresql-dev

RUN pip install --upgrade pip
RUN pip install poetry

ADD pyproject.toml poetry.lock ./
RUN poetry install

ADD src ./src
RUN poetry install

CMD ["poetry", "run", "python", "src/manage.py", "runserver", "0:8080"]
Writing a Docker Compose service definition for Django
We’re going to split this app into two services: django and postgres. Our django service will be built from our Dockerfile, containing all of our app’s local files.
Setting the build context
For this app, we want to build the django service from our single Dockerfile and use the entire root directory as our build context path. We can set our build label accordingly:
django:
  build: .
Setting host and container ports
We can map port 8080 on our host machine to 8080 within the container. This will also be the port we use to access our Django app — which will soon be live at http://localhost:8080.
ports:
  - '8080:8080'
Adding a service dependency
Since our Django app is connecting to a database, we want to instruct Compose to spin up our database container (postgres) first. We’ll use the depends_on label to make sure that service is ready and running before our django service starts:
depends_on:
  - postgres
Creating a bind mount
Since we’ll be sharing files between our host and this container, we can define a bind mount by using the volumes label. To set the volume, we’ll provide a local path, followed by a colon, followed by a path within the container. The ro flag gives the container read-only permissions for these files:
volumes:
  - './src:/srv/src:ro'
The end result
Combining all the options/configurations from above, our django service should look like this:
django:
  build: .
  ports:
    - '8080:8080'
  depends_on:
    - postgres
  volumes:
    - './src:/srv/src:ro'
Adding a PostgreSQL database
Our Django app is configured to connect to a PostgreSQL database. This is defined in our settings.py:
DATABASES = {
    'default': {
        'ENGINE': 'django.db.backends.postgresql',
        'NAME': 'app',
        'USER': 'obscure-user',
        'PASSWORD': 'obscure-password',
        'HOST': 'postgres',
        'PORT': 5432,
    }
}
Pulling the Postgres image
We can migrate our existing database to its own Docker container to isolate it from the base Django app. First, let’s define a postgres service in our Compose file and pull the latest lightweight Postgres image from Docker Hub:
postgres:
  image: 'postgres:14.13-alpine3.20'
Passing in env vars
To configure our PostgreSQL database, we can pass in a few environment variables to set credentials and paths. You may want to consider using a Secrets Manager for this.
environment:
  - POSTGRES_DB=app
  - POSTGRES_USER=obscure-user
  - POSTGRES_PASSWORD=obscure-password
  - PGDATA=/var/lib/postgresql/data/pgdata
Setting host and container ports
We can expose our container port by setting it to the default Postgres port: 5432. For this service, we’re only specifying a single port, which means that the host port will be randomized. This avoids collisions if you’re running multiple Postgres instances.
ports:
  - '5432'
Adding a named data volume
In our postgres definition, we can add a named volume. This is different from the bind mount that we created for the django service. This will persist our data after the Postgres container spins down.
volumes:
  - 'postgres:/var/lib/postgresql/data'
Outside of the service definitions and at the bottom of the Compose file, we’ll declare the named postgres volume again. By doing so, we can reference it from our other services if needed.
volumes:
  postgres:
Putting it all together
And here’s the resulting PostgreSQL definition in our Compose file:
  postgres:
    image: 'postgres:14.13-alpine3.20'
    environment:
      - POSTGRES_DB=app
      - POSTGRES_USER=obscure-user
      - POSTGRES_PASSWORD=obscure-password
      - PGDATA=/var/lib/postgresql/data/pgdata
    ports:
      - '5432'
    volumes:
      - 'postgres:/var/lib/postgresql/data'

volumes:
  postgres:
Deploying our app in a Shipyard ephemeral environment
We can get our app production-ready by deploying it in a Shipyard application — this means we’ll get an ephemeral environment for our base branch, as well as environments for every PR we open.

Adding Docker Compose labels
Shipyard transpiles Compose files to Kubernetes manifests, so we’ll add some labels to make it Kubernetes-compatible.
Under our django service, we can add two custom Shipyard labels:
labels:
  shipyard.init: 'poetry run python src/manage.py migrate'
  shipyard.route: '/'
- The shipyard.init label will run a database migration before our django service starts
- The shipyard.route label will send HTTP requests to this service’s port
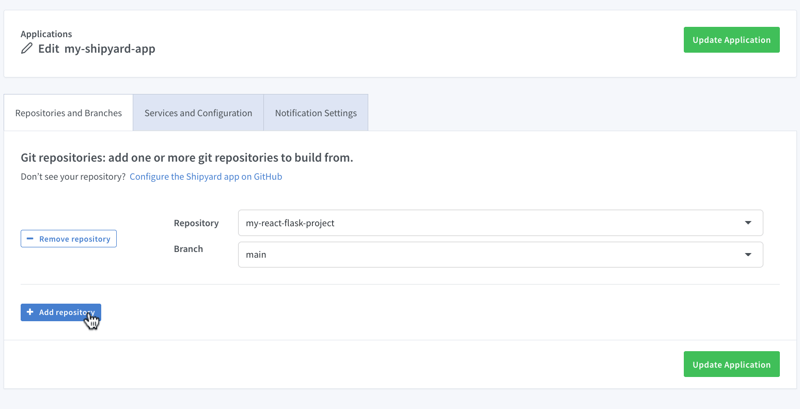
Creating a Shipyard app
Next, you can go to your Shipyard dashboard. If you haven’t already, sign up for a 30-day free trial.
Click the + Application button, then select your repo, services, and import your env vars.
Visiting the app
Once it finishes building, you can click the green Visit button to access your short-lived ephemeral environment. What comes next?
- View your app’s build, deploy, and run logs
- Use our GitHub Action or CircleCI orb to integrate with your CI/CD
- Add SSO visitors to your app
- Create a PR to see your code changes in a new environment
And that’s all!
Now you have a fully containerized Django app with a database! You can run it locally with Docker Compose, preview and test it in an ephemeral environment, and iterate until it’s production-ready.
Want to Dockerize a Yarn app next? Check out our guide!
위 내용은 방법: Docker를 사용하여 Django 및 Postgres 앱 컨테이너화의 상세 내용입니다. 자세한 내용은 PHP 중국어 웹사이트의 기타 관련 기사를 참조하세요!

핫 AI 도구

Undresser.AI Undress
사실적인 누드 사진을 만들기 위한 AI 기반 앱

AI Clothes Remover
사진에서 옷을 제거하는 온라인 AI 도구입니다.

Undress AI Tool
무료로 이미지를 벗다

Clothoff.io
AI 옷 제거제

Video Face Swap
완전히 무료인 AI 얼굴 교환 도구를 사용하여 모든 비디오의 얼굴을 쉽게 바꾸세요!

인기 기사
뜨거운 도구

메모장++7.3.1
사용하기 쉬운 무료 코드 편집기

SublimeText3 중국어 버전
중국어 버전, 사용하기 매우 쉽습니다.

스튜디오 13.0.1 보내기
강력한 PHP 통합 개발 환경

드림위버 CS6
시각적 웹 개발 도구

SublimeText3 Mac 버전
신 수준의 코드 편집 소프트웨어(SublimeText3)
뜨거운 주제
 7876
7876
 15
1649
14
1409
52
1301
25
1245
29
15
1649
14
1409
52
1301
25
1245
29

 Linux 터미널에서 Python 버전을 볼 때 발생하는 권한 문제를 해결하는 방법은 무엇입니까?
Apr 01, 2025 pm 05:09 PM
Linux 터미널에서 Python 버전을 볼 때 발생하는 권한 문제를 해결하는 방법은 무엇입니까?
Apr 01, 2025 pm 05:09 PM
Linux 터미널에서 Python 버전을 보려고 할 때 Linux 터미널에서 Python 버전을 볼 때 권한 문제에 대한 솔루션 ... Python을 입력하십시오 ...
 중간 독서를 위해 Fiddler를 사용할 때 브라우저에서 감지되는 것을 피하는 방법은 무엇입니까?
Apr 02, 2025 am 07:15 AM
중간 독서를 위해 Fiddler를 사용할 때 브라우저에서 감지되는 것을 피하는 방법은 무엇입니까?
Apr 02, 2025 am 07:15 AM
Fiddlerevery Where를 사용할 때 Man-in-the-Middle Reading에 Fiddlereverywhere를 사용할 때 감지되는 방법 ...
 한 데이터 프레임의 전체 열을 Python의 다른 구조를 가진 다른 데이터 프레임에 효율적으로 복사하는 방법은 무엇입니까?
Apr 01, 2025 pm 11:15 PM
한 데이터 프레임의 전체 열을 Python의 다른 구조를 가진 다른 데이터 프레임에 효율적으로 복사하는 방법은 무엇입니까?
Apr 01, 2025 pm 11:15 PM
Python의 Pandas 라이브러리를 사용할 때는 구조가 다른 두 데이터 프레임 사이에서 전체 열을 복사하는 방법이 일반적인 문제입니다. 두 개의 dats가 있다고 가정 해
 Uvicorn은 Serving_forever ()없이 HTTP 요청을 어떻게 지속적으로 듣습니까?
Apr 01, 2025 pm 10:51 PM
Uvicorn은 Serving_forever ()없이 HTTP 요청을 어떻게 지속적으로 듣습니까?
Apr 01, 2025 pm 10:51 PM
Uvicorn은 HTTP 요청을 어떻게 지속적으로 듣습니까? Uvicorn은 ASGI를 기반으로 한 가벼운 웹 서버입니다. 핵심 기능 중 하나는 HTTP 요청을 듣고 진행하는 것입니다 ...

 Linux 터미널에서 Python (Version 명령)을 사용할 때 권한 문제를 해결하는 방법은 무엇입니까?
Apr 02, 2025 am 06:36 AM
Linux 터미널에서 Python (Version 명령)을 사용할 때 권한 문제를 해결하는 방법은 무엇입니까?
Apr 02, 2025 am 06:36 AM
Linux 터미널에서 Python 사용 ...
 10 시간 이내에 프로젝트 및 문제 중심 방법에서 컴퓨터 초보자 프로그래밍 기본 사항을 가르치는 방법?
Apr 02, 2025 am 07:18 AM
10 시간 이내에 프로젝트 및 문제 중심 방법에서 컴퓨터 초보자 프로그래밍 기본 사항을 가르치는 방법?
Apr 02, 2025 am 07:18 AM
10 시간 이내에 컴퓨터 초보자 프로그래밍 기본 사항을 가르치는 방법은 무엇입니까? 컴퓨터 초보자에게 프로그래밍 지식을 가르치는 데 10 시간 밖에 걸리지 않는다면 무엇을 가르치기로 선택 하시겠습니까?
 Inversiting.com의 크롤링 메커니즘을 우회하는 방법은 무엇입니까?
Apr 02, 2025 am 07:03 AM
Inversiting.com의 크롤링 메커니즘을 우회하는 방법은 무엇입니까?
Apr 02, 2025 am 07:03 AM
Investing.com의 크롤링 전략 이해 많은 사람들이 종종 Investing.com (https://cn.investing.com/news/latest-news)에서 뉴스 데이터를 크롤링하려고합니다.
