안녕하세요?, 연결 목록의 이 시리즈에 다시 오신 것을 환영합니다. 지난 글에서는 연결 목록의 정의, 용어, 배열과의 차이점, 연결 목록 유형 등 연결 목록의 기본 사항에 대해 배웠습니다. 연결 목록 구현에 대해 더 자세히 알아보겠다고 약속했으니 시작해 보겠습니다.

이전 기사에서 배운 것처럼 연결 목록은 프로그래밍 세계의 기본 데이터 구조입니다. 이는 노드로 구성되며, 각 노드에는 시퀀스의 다음 노드(단일 연결 목록) 또는 다음 및 이전 노드(이중 연결 목록)에 대한 데이터와 참조(또는 링크)가 포함됩니다. 배열과 달리 연결 목록은 요소를 인접한 메모리 위치에 저장하지 않으므로 효율적인 삽입 및 삭제가 가능합니다.
데이터 구조와 알고리즘을 익히려면 연결 목록의 개념을 이해하는 것이 중요합니다. 이 글에서는 단일 연결 목록의 기본부터 시작하여 연결 목록 구현에 대해 더 자세히 살펴보겠습니다.
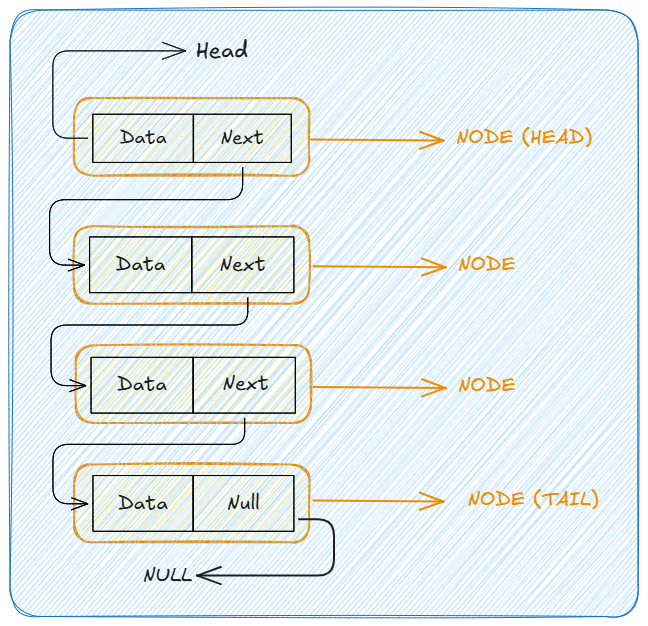
단일 연결 목록은 각 노드가 시퀀스의 다음 노드를 가리키는 가장 간단한 유형의 연결 목록입니다. 아래 이미지와 같습니다.

이제 단일 연결 목록 기본 작업 구현을 시작할 시간입니다. 할까요?
새 Node 클래스를 만드는 것부터 시작해 보겠습니다. Node 클래스에는 노드에 대한 데이터를 가져오는 생성자와 처음에 null로 설정된 다음 포인터가 있습니다.
// Node class for Singly Linked List
class Node {
  constructor(data) {
    this.data = data;
    this.next = null;
  }
}
새로 생성된 Node 클래스(연결 목록의 노드를 나타냄)는 다음과 같이 시각화할 수 있습니다.

진행하기 전에 연결 목록 작업을 보관할 SinglyLinkedList 클래스의 새 인스턴스를 만들어 보겠습니다.
// Singly Linked List class
class SinglyLinkedList {
  constructor() {
    this.head = null;
  }

  // Operations come here ?
}
class SinglyLinkedList {
  constructor() {
    this.head = null;
  }
  // Previous `SinglyLinkedList` class codes here ?
  // .
  // .
  // .
  // Insert at the beginning
  insertAtBeginning(data) {
    const newNode = new Node(data); // Create a new node with the given data
    newNode.next = this.head; // Set the new node's next pointer to the current head
    this.head = newNode; // Update the head to be the new node
  }

  // Other operations come here ?
  // .
  // .
  // .
}
설명: 처음에 삽입하는 것은 새로운 사람이 맨 앞에 줄을서는 것과 같습니다. 그들은 이전의 첫 번째 사람과 연결되어 새로운 첫 번째 사람이 됩니다.
class SinglyLinkedList {
  constructor() {
    this.head = null;
  }
  // Previous `SinglyLinkedList` class codes here ?
  // .
  // .
  // .
  // Insert at the end
  insertAtEnd(data) {
    const newNode = new Node(data); // Create a new node with the given data

    // check if the list does not have a head i.e the list is empty
    // NOTE: Every non-empty linked list will have a head
    if (!this.head) {
      this.head = newNode; // If the list is empty, set the new node as the head
      return;
    }
    let current = this.head; // Start at the head of the list
    while (current.next) {
      current = current.next; // Move to the next node in the list by updating the current node
    }
    current.next = newNode; // Set the next pointer of the last node to the new node
  }

  // Other operations come here ?
  // .
  // .
  // .
}
설명: 맨 끝에 삽입하는 것은 맨 끝에 누군가가 줄에 합류하는 것과 같습니다. 마지막 사람을 찾으려면 끝까지 걸어간 다음 새 사람과 연결해야 합니다.
class SinglyLinkedList {
  constructor() {
    this.head = null;
  }

  // Previous `SinglyLinkedList` class codes here ?
  // .
  // .
  // .

  // Delete a node
  deleteNode(data) {
    if (!this.head) return; // If the list is empty, do nothing
    if (this.head.data === data) {
      this.head = this.head.next; // If the node to delete is the head, update the head to the next node
      return;
    }
    let current = this.head;
    while (current.next) {
      if (current.next.data === data) {
        current.next = current.next.next; // If the node to delete is found, update the next pointer to skip it
        return;
      }
      current = current.next;
    }
  }

  // Other operations come here ?
  // .
  // .
  // .
}
설명: 노드를 삭제하는 것은 중간에 누군가 떠나기로 결정하는 것과 같습니다. 우리는 그 사람을 찾아서 그 사람 앞의 사람과 그 뒤의 사람을 연결합니다.
class SinglyLinkedList {
  constructor() {
    this.head = null;
  }

  // Previous `SinglyLinkedList` class codes here ?
  // .
  // .
  // .

  // Search note
  search(data) {
    let current = this.head; // Start at the head of the list
    while (current) {
      if (current.data === data) {
        // If the data is found, return true
        return true;
      }
      current = current.next; // Move to the next node
    }
    return false;
  }

  // Other operations come here ?
  // .
  // .
  // .
}
설명: 노드를 검색하는 것은 줄에서 특정 사람을 찾는 것과 같습니다. 우리는 앞에서 시작하여 찾을 때까지 또는 끝에 도달할 때까지 한 사람 한 사람에게 묻습니다.
class SinglyLinkedList {
  constructor() {
    this.head = null;
  }
  // Previous `SinglyLinkedList` class codes here ?
  // .
  // .
  // .
  traverse() {
    let current = this.head; // Start at the head of the list
    while (current) {
      console.log(current.data); // Print the data of the current node
      current = current.next; // Move to the next node
    }
  }
}

// End of class
설명: 횡단은 줄을 따라 내려가며 각 사람에게 인사하는 것과 같습니다. 우리는 앞에서 시작하여 끝까지 계속 움직입니다.
이번 글에서는 연결리스트의 기본 동작과 이를 자바스크립트로 구현하는 방법에 대해 알아봤습니다. 다음 글에서는 이중 연결 목록에 대해 알아보겠습니다.
연결된 목록을 익히려면 연습이 필요하다는 점을 기억하세요. 계속해서 문제를 해결하고 다양한 시나리오에서 이러한 데이터 구조를 구현하세요.
이 시리즈의 모든 부분을 놓치지 않도록 저와 연결하여 소프트웨어 개발(웹, 서버, 모바일 또는 스크래핑/자동화), 데이터 구조 및 알고리즘, 기타 흥미로운 기술에 대한 심층적인 토론을 원합니다. 주제에 대해서는 저를 팔로우하세요:
앞으로 계속 지켜봐 주시기 바랍니다. 즐거운 코딩 되세요 ???
위 내용은 JavaScript에서 단일 연결 목록을 구현하는 방법의 상세 내용입니다. 자세한 내용은 PHP 중국어 웹사이트의 기타 관련 기사를 참조하세요!