

NodeJS를 시작하는 방법 – 초보자를 위한 핸드북

Node란?
Node는 "웹 브라우저 외부"에서 JavaScript 코드를 실행할 수 있는 환경입니다. 노드는 다음과 같습니다. "안녕하세요. JS 코드를 저에게 주시면 제가 실행해 볼까요?" Google의 V8 엔진을 사용하여 JavaScript 코드를 기계 코드로 변환합니다.
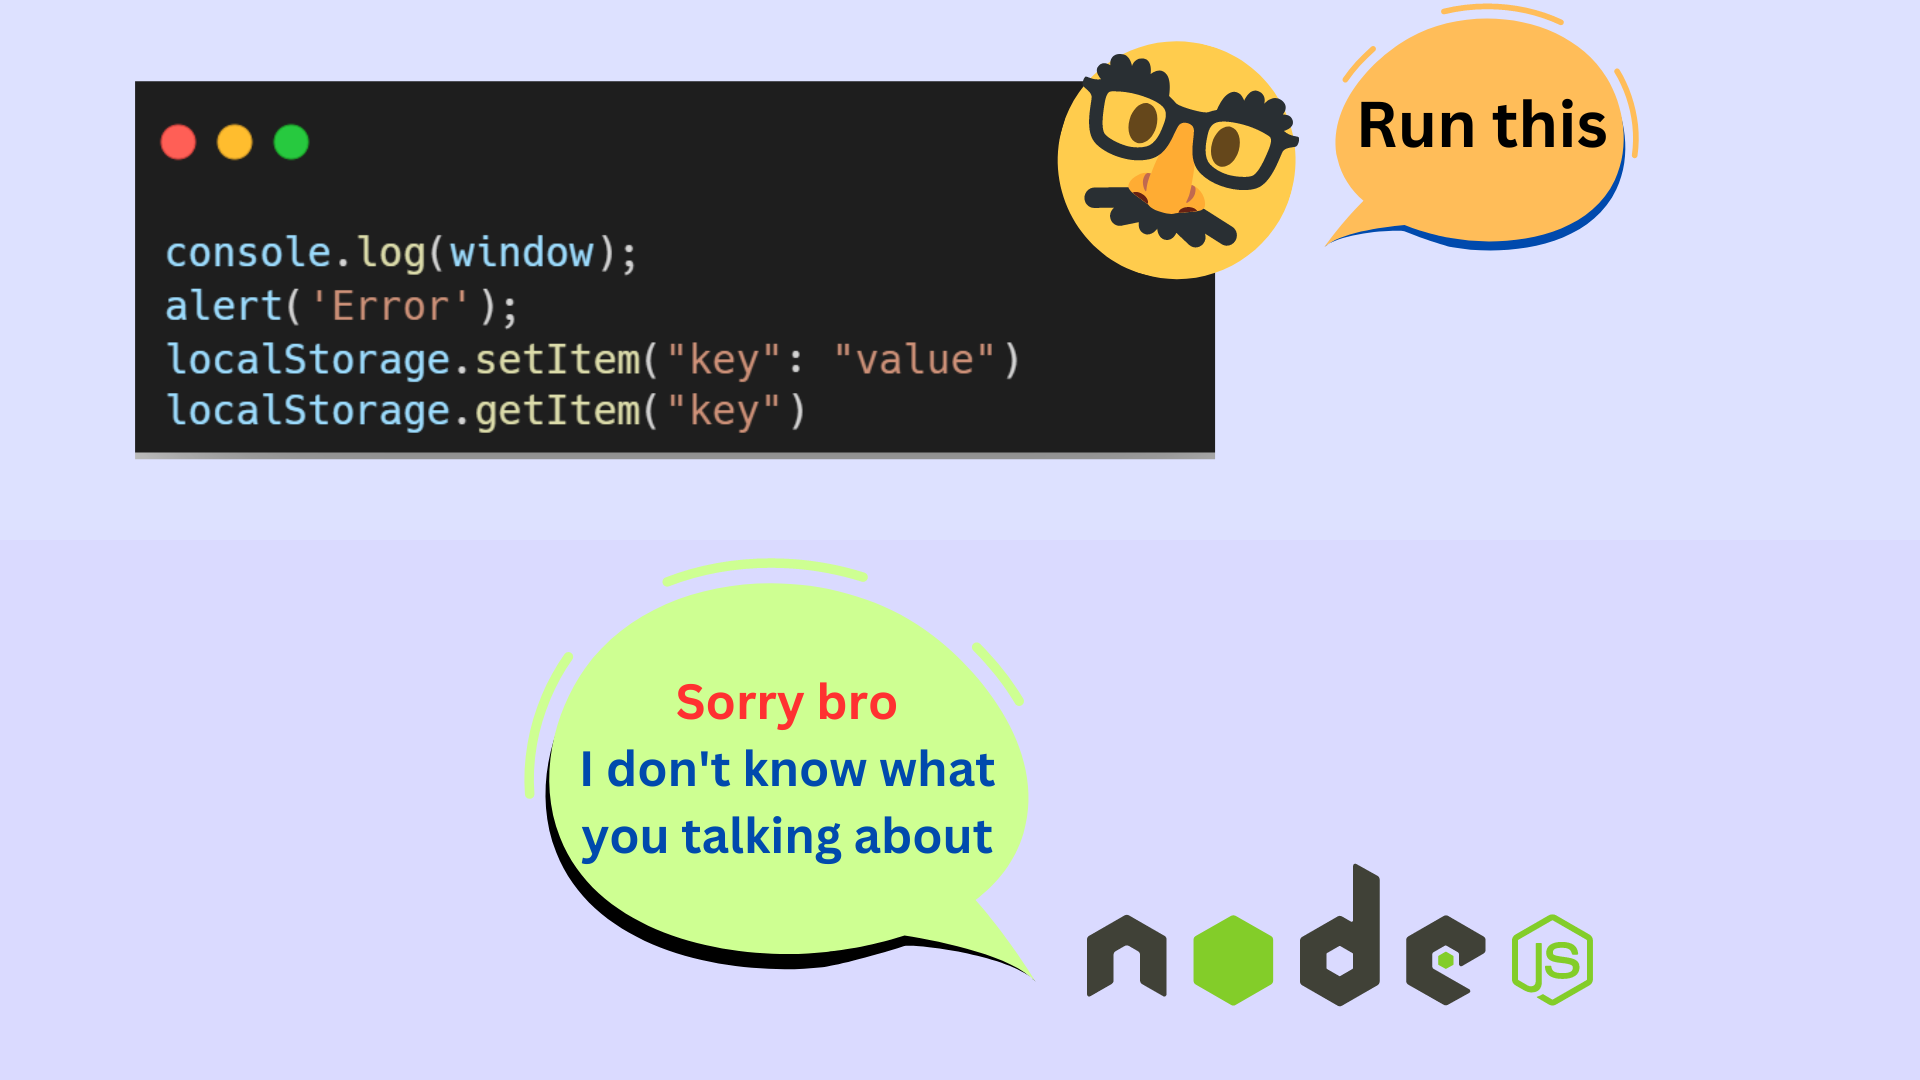
Node는 웹 브라우저 외부에서 JavaScript 코드를 실행하므로 브라우저에서만 사용할 수 있는 특정 기능에 액세스할 수 없다는 의미입니다. DOM이나 창 개체 또는 심지어 localStorage와 같은 것입니다.
즉, 코드의 어떤 지점에서든 document.querySelector() 또는 Alert()를 입력하면 오류가 발생하므로(이것은 아래 이미지에 표시된 내용입니다).
기억하세요: Node는 서버 측 프로그래밍을 위한 반면 해당 브라우저 기능은 클라이언트 측 프로그래밍을 위한 것입니다.
프론트엔드 사람들은 슬퍼하지 마세요. 더 많은 일이 있습니다! Node는 파일 처리, 서버 생성 등과 같은 다양한 작업을 수행할 수 있는 많은 API와 모듈을 제공합니다. NodeJS를 시작하기 전에 먼저 우리 컴퓨터에 설치해 봅시다.
NodeJS 설치 방법
NodeJS 설치는 간단합니다. 컴퓨터에 Node가 이미 설치되어 있는 경우 이 섹션을 건너뛸 수 있습니다. 그렇지 않다면 따라 하세요.
컴퓨터에 NodeJS를 다운로드하는 단계는 다음과 같습니다.
- https://nodejs.org/로 이동
- 다운로드 운영 체제에 맞는 NodeJS LTS 버전
- 설치 프로그램을 실행하고 설치 마법사를 따르세요. 모든 질문에 예라고 대답하면 됩니다.
- 설치가 완료되면 새 터미널이나 명령 프롬프트 창을 열고 다음 명령을 실행하여 NodeJS가 올바르게 설치되었는지 확인하세요. node -v. 터미널에 NodeJS 버전이 인쇄되어 있으면 축하합니다! 이제 컴퓨터에 NodeJS가 성공적으로 설치되었습니다.
참고: 설치 과정에서 문제가 발생하면 공식 NodeJS 설명서를 참조하여 자세한 지침과 문제 해결 팁을 확인할 수 있습니다.
전역 변수
NodeJS에 존재하는 전역 변수라고 불리는 일부 변수에 대해 알아보는 것으로 이 글을 시작하겠습니다. 이는 기본적으로 일부 데이터를 저장하고 코드의 어느 곳에서나 액세스할 수 있는 변수입니다. 코드가 얼마나 깊이 중첩되어 있는지는 중요하지 않습니다.
일반적으로 사용되는 전역 변수에 대해 알아야 합니다.
- __dirname: 현재 작업 디렉터리의 경로를 저장하는 변수입니다.
- __filename: 현재 작업 중인 파일의 경로를 저장하는 변수입니다.
이를 사용하여 살펴보겠습니다. 어떤 가치가 포함되어 있는지. 이를 위해 데스크톱에 NodeJSTut이라는 새 폴더를 만들고 즐겨 사용하는 텍스트 편집기로 엽니다(전체 튜토리얼에서는 VS Code를 사용합니다). app.js라는 새 파일을 만들고 새로운 통합 VS Code 터미널을 엽니다.
Fügen Sie den folgenden Code in die Datei „app.js“ ein und speichern Sie ihn:
// __dirname Global Variableconsole.log(__dirname);// __filename Global Variableconsole.log(__filename);
Um diesen Code mit Node auszuführen, geben Sie den folgenden Befehl in das Terminal ein und drücken Sie die Eingabetaste: node app.js. Sie sehen den absoluten Pfad zum aktuellen Arbeitsverzeichnis und der Pfad zur aktuellen Datei wird im Terminal ausgedruckt. So sieht die Ausgabe in meinem Fall aus:
C:\Desktop\NodeJSTut
C:\Desktop\NodeJSTut\app.js
Sie können fortfahren und Ihre eigenen globalen Variablen erstellen, auf die Sie von überall in Ihrem Code aus zugreifen können. Sie können dies wie folgt tun:
// Define a global variable in NodeJSglobal.myVariable = 'Hello World';// Access the global variableconsole.log(myVariable); // Output: Hello World
Module in NodeJS
In Node.js ist ein Modul im Wesentlichen ein wiederverwendbarer Codeblock, der zum Ausführen eines bestimmten Satzes von verwendet werden kann Aufgaben erledigen oder eine bestimmte Funktionalität bereitstellen. Ein Modul kann Variablen, Funktionen, Klassen, Objekte oder jeden anderen Code enthalten, der zum Ausführen einer bestimmten Aufgabe oder einer Reihe von Aufgaben verwendet werden kann.
Der Hauptzweck der Verwendung von Modulen in Node.js besteht darin, die Organisation zu erleichtern Code in kleinere, besser verwaltbare Teile. Ein Modul kann dann jederzeit importiert und flexibel verwendet werden, was bei der Erstellung wiederverwendbarer Codekomponenten hilft, die von mehreren Projekten gemeinsam genutzt werden können.
Um dies zu verstehen, betrachten Sie dieses Beispiel: Nehmen wir an, Sie haben viele Funktionen in definiert Ihr Code, der mit einer riesigen Menge an JSON-Daten funktioniert.
Schlaflosigkeit und erhöhte Angstzustände sind häufige Nebenwirkungen, wenn all diese Dinge (Funktionen, Daten, andere Logik) in einer einzigen Datei gespeichert werden.
Als cleverer Programmierer haben Sie also darüber nachgedacht, eine separate Datei für die JSON-Daten und eine separate Datei zum Speichern aller Funktionen zu erstellen. Jetzt können Sie die Daten und Funktionen einfach jederzeit importieren und entsprechend nutzen. Diese Methode erhöht die Effizienz, da sich Ihre Dateigröße drastisch verringert. Das ist das Konzept der Module!
Sehen wir uns an, wie wir unsere eigenen Module erstellen können. Dazu schreiben wir Code, in dem wir eine Funktion namens „sayHello()“ in einer Datei namens „hello.js“ definieren. Diese Funktion akzeptiert einen Namen als Parameter und gibt einfach eine Begrüßungsnachricht in der Konsole aus.
Wir importieren sie dann in eine andere Datei namens app.js und verwenden sie dort. Wie interessant, oder?? Schauen wir uns den Code an:
Dies ist der Code in der Datei „hello.js“:
function sayHello(name){
console.log(`Hello ${name}`);}module.exports = sayHelloDies ist der Code in der Datei „app.js“:
const sayHello = require('./hello.js');sayHello('John');sayHello('Peter');sayHello('Rohit');Die Datei hello.js kann in diesem Fall als Modul bezeichnet werden. Jedes Modul verfügt über ein Objekt namens „exports“, das alle Dinge enthalten sollte, die Sie aus diesem Modul exportieren möchten, z. B. Variablen oder Funktionen. In unserem Fall definieren wir eine Funktion in der Datei „hello.js“ und exportieren sie direkt.
Die Datei „app.js“ importiert die Funktion „sayHello()“ aus „hello.js“ und speichert sie in der Variablen „sayHello“. Um etwas aus einem Modul zu importieren, verwenden wir die Methode „require()“, die den Pfad zum Modul akzeptiert. Jetzt können wir einfach die Variable aufrufen und einen Namen als Parameter übergeben. Das Ausführen des Codes in der Datei „app.js“ erzeugt die folgende Ausgabe:
Hello John
Hello Peter
Hello Rohit
Kurze Anmerkung zu „module.exports“
Im vorherigen Abschnitt des Artikels haben wir gesehen, wie man das Modul verwendet. Exporte, aber ich hatte das Gefühl, dass es wichtig ist, etwas detaillierter zu verstehen, wie es funktioniert. Daher ist dieser Abschnitt des Artikels wie ein Mini-Tutorial, in dem wir sehen, wie wir mit module.exports eine Variable/Funktion sowie mehrere Variablen und Funktionen exportieren können. Also, fangen wir an:
module.exports ist ein spezielles Objekt in NodeJS, mit dem Sie Funktionen, Objekte oder Werte aus einem Modul exportieren können, damit andere Module darauf zugreifen und sie verwenden können. Hier ist ein Beispiel dafür, wie Sie mit „module.exports“ eine Funktion aus einem Modul exportieren:
// myModule.jsfunction myFunction() {
console.log('Hello from myFunction!');}module.exports = myFunction;In diesem Beispiel definieren wir eine Funktion „myFunction“ und exportieren sie dann mit „module.exports“. Andere Module können nun dieses Modul benötigen und die exportierte Funktion verwenden:
// app.jsconst myFunction = require('./myModule');myFunction(); // logs 'Hello from myFunction!'Jetzt scheint alles in Ordnung zu sein und das Leben ist gut. Das Problem entsteht jedoch, wenn wir mehrere Funktionen und Variablen aus einer einzigen Datei exportieren müssen. Der Punkt ist, dass, wenn Sie „module.exports“ mehrmals in einem einzelnen Modul verwenden, der zuvor zugewiesene Wert durch den neuen ersetzt wird. Betrachten Sie diesen Code:
// module.jsfunction myFunction() {
  console.log('Hello from myFunction!');}function myFunction2() {
console.log('Hello from myFunction2!');}// First Exportmodule.exports = myFunction;// Second Exportmodule.exports = myFunction2;In diesem Beispiel exportieren wir zuerst myFunction(). Aber wir überschreiben dann „module.exports“ mit einer neuen Funktion – „myFunction2()“. Infolgedessen wird nur die zweite Exportanweisung wirksam und die Funktion „myFunction()“ wird nicht exportiert.
Dieses Problem kann gelöst werden, wenn Sie „module.exports“ einem Objekt zuweisen, das alle von Ihnen verwendeten Funktionen enthält exportieren möchten, wie folgt:
// myModule.jsfunction myFunction1() {
  console.log('Hello from myFunction1!');}function myFunction2() {
  console.log('Hello from myFunction2!');}module.exports = {
  foo: 'bar',
  myFunction1: myFunction1,
myFunction2: myFunction2};In diesem Beispiel exportieren wir ein Objekt mit drei Eigenschaften: foo, myFunction1 und myFunction2. Andere Module können dieses Modul erfordern und auf diese Eigenschaften zugreifen:
// app.jsconst myModule = require('./myModule');console.log(myModule.foo); // logs 'bar'myModule.myFunction1(); // logs 'Hello from myFunction1!'myModule.myFunction2(); // logs 'Hello from myFunction2!'To summarize, you can use module.exports as many times as you want in your NodeJS code, but you should be aware that each new assignment will replace the previous one. You should use an object to group multiple exports together.
Types Of Modules in Node
There are 2 types of modules in NodeJS:
- Built In Modules: These are modules included in Node by default, so you can use them without installation. You just need to import them and get started.
- External Modules: These are modules created by other developers which are not included by default. So you need to install them first before using them.
Here is an image of popular built-in modules in NodeJS and what can you do using them:

Let's go over each of these in more detail so you can learn more about what they do.
The OS Module
The OS Module (as its name implies) provides you methods/functions with which you can get information about your Operating System.
To use this module, the first step is to import it like this:
const os = require('os');This is how you can use the OS Module to get information about the Operating System:?
const os = require('os')// os.uptime()const systemUptime = os.uptime();// os.userInfo()const userInfo = os.userInfo();// We will store some other information about my WindowsOS in this object:const otherInfo = {
    name: os.type(),
    release: os.release(),
    totalMem: os.totalmem(),
freeMem: os.freemem(),}// Let's Check The Results:console.log(systemUptime);console.log(userInfo);console.log(otherInfo);This is the output of the above code:
Note that the output shows information about the Windows Operating System running on my system. The output could be different from yours.
521105
{
    uid: -1,
    gid: -1,
    username: 'krish',
    homedir: 'C:\\Users\\krish',
    shell: null
}
{
    name: 'Windows_NT',
    release: '10.0.22621',
    totalMem: 8215212032,
    freeMem: 1082208256
}Let's break down the above code and output:
- os.uptime() tells the system uptime in seconds. This function returns the number of seconds the system has been running since it was last rebooted. If you check the first line of the output: 521105 is the number of seconds, my system has been running since it was last rebooted. Of course, it will be different for you.
- os.userInfo() gives the information about the current user. This function returns an object with information about the current user including the user ID, group ID, username, home directory, and default shell. Below is the breakdown of the output in my case:
    {
        uid: -1,
        gid: -1,
        username: 'krish',
        homedir: 'C:\\Users\\krish',
        shell: null
}The uid and gid is set to -1 in Windows, because Windows does not have the concept of user IDs like Unix-based systems. The username of my OS is krish and the home directory is 'C:\\Users\\krish'. The shell is set to null because the concept of a default shell does not exist on Windows. Windows has a default command interpreter program called Command Prompt (cmd.exe), which runs commands and manages the system.
The other methods related to OS Module like os.type(), os.release() and so on, which you saw in the above code has been used within the otherInfo object. Here is a breakdown of what these methods do:
- os.type() - Tells the name of the Operating System
- os.release() - Tells the release version of the Operating System
- os.totalMem() - Tells the total amount of memory available in bytes
- os.freeMem() - Tells the total amount of free memory available in bytes
This is the information which the above methods display about my OS:
{
    name: 'WindowsNT', // Name of my OS
    release: '10.0.22621', // Release Version of my OS
    totalMem: 8215212032, // Total Memory Available in bytes (~ 8 GB)
freeMem: 1082208256 // Free Memory Available in bytes (~ 1 GB) }The PATH Module
The PATH module comes in handy while working with file and directory paths. It provides you with various methods with which you can:
- Join path segments together
- Tell if a path is absolute or not
- Get the last portion/segment of a path
- Get the file extension from a path, and much more!
You an see the PATH Module in action in the code below.
Code:
// Import 'path' module using the 'require()' method:const path = require('path')// Assigning a path to the myPath variableconst myPath = '/mnt/c/Desktop/NodeJSTut/app.js'const pathInfo = {
    fileName: path.basename(myPath),
    folderName: path.dirname(myPath),
    fileExtension: path.extname(myPath),
    absoluteOrNot: path.isAbsolute(myPath),
detailInfo: path.parse(myPath),}// Let's See The Results:console.log(pathInfo);Output:
{
  fileName: 'app.js',
  folderName: '/mnt/c/Desktop/NodeJSTut',
  fileExtension: '.js',
  absoluteOrNot: true,
  detailInfo: {
    root: '/',
    dir: '/mnt/c/Desktop/NodeJSTut',
    base: 'app.js',
    ext: '.js',
    name: 'app'
  }
}Let's have a detailed breakdown of the above code and its output:
The first and foremost step to work with path module is to import it in the app.js file using the require() method.
Next, we are assigning a path of some file to a variable called myPath. This can be a path to any random file. For the purpose of understanding the path module, I chose this: /mnt/c/Desktop/NodeJSTut/app.js.
Using the myPath variable, we will understand the path module in detail. Let's check out the functions which this module has to offer and what can we do with it:
- path.basename(myPath): The basename() function accepts a path and returns the last part of that path. In our case, the last part of myPath is: app.js.
- path.dirname(myPath): The dirname() function selects the last part of the path provided to it and returns the path to it's parent's directory. In our case, since the last part of myPath is app.js. The dirname() function returns the path to the parent directory of app.js (the folder inside which app.js file lies), i.e, /mnt/c/Desktop/NodeJSTut. It can be also thought as: the dirname() function simply excludes the last part of the path provided to it and returns the leftover path.
- path.extname(myPath): This function checks for any extension on the last part of the provided path and it returns the file extension (if it exists), otherwise it returns an empty string: ''. In our case, since the last part is app.js and a file extension exists, we get '.js' as the output.
- path.isAbsolute(myPath): This tells whether the provided path is absolute or not. On Unix-based systems (such as macOS and Linux), an absolute path always starts with the forward slash (/). On Windows systems, an absolute path can start with a drive letter (such as C:) followed by a colon (:), or with two backslashes (\\). Since the value stored in myPath variable starts with /, therefore isAbsolute() returns true.
However, if you just change the myPath variable to this: Desktop/NodeJSTut/app.js (converting it to a relative path), isAbsolute() returns false.
- path.parse(myPath): This function accepts a path and returns an object which contains a detailed breakdown of the path provided to it. Here is what it returns when we provide the myPath variable to it:
- root: The root of the path (in this case, /).
- dir: The directory of the file (in this case, /mnt/c/Desktop/NodeJSTut).
- base: The base file name (in this case, app.js).
- ext: The file extension (in this case, .js).
- name: The base name of the file, without the extension (in this case, app).
Before continuing with the other functions of the path module, we need to understand something called path separator and the path structure.
You must have seen that the path to a same file looks different in different Operating Systems. For example, consider the path to a file named example.txt located in a folder called Documents on the desktop of a Windows user:
C:\Users\username\Desktop\Documents\example.txt
On the other hand, the file path to the same file for a user on a macOS system would look like this:
/Users/username/Desktop/Documents/example.txt
2 differences are to be noted here:
- Difference in path separators: In Windows, file paths use the backslash (\) as the separator between directories, while in macOS/Linux (which is a Unix-based system), file paths use the forward slash (/) as the separator.
- Difference in root directory of the users files: On Windows, the root directory for a user's files is commonly found at C:\Users\username, whereas on macOS and Linux, it is located at /Users/username/. While this holds true for most Windows, macOS, and Linux systems, there may be some variations in the exact location of the user's home directory based on the system's configuration.
With this in mind, let's move ahead and understand some other functions provided by the path module:
- path.sep: sep is a variable which contains the system specific path separator. For Windows machine: console.log(path.sep) prints \ in the console while in case of macOS or Linux, path.sep returns a forward slash ( / ).
- path.join(
): The path.join() function accepts path(s) as strings. It then joins those paths using the system specific path separator and returns the joined path. For example, consider this code:
console.log(path.join('grandParentFolder', 'parentFolder', 'child.txt'))The above code prints different results for different Operating Systems.
In Windows, it will give this output: grandParentFolder\parentFolder\child.txt while in macOS/Linux, it will give this output: grandParentFolder/parentFolder/child.txt. Note that the difference is only in the path separators - backward slash and forward slash.
- path.resolve(
): This function works in a similar way as compared to path.join(). The path.resolve() function just joins the different paths provided to it using the system specific path separator and then appends the final output to the absolute path of the present working directory.
Suppose you are a Windows user and the absolute path to your present working directory is this: C:\Desktop\NodeJSTut, If you run this code:
console.log(path.resolve('grandParentFolder', 'parentFolder', 'child.txt'));You will see the following output in the console:
C:\Desktop\NodeJSTut\grandParentFolder\parentFolder\child.txt
The same is applicable to a macOS or a Linux user. It's just the difference in the absolute path of the present working directory and the path separator.
위 내용은 NodeJS를 시작하는 방법 – 초보자를 위한 핸드북의 상세 내용입니다. 자세한 내용은 PHP 중국어 웹사이트의 기타 관련 기사를 참조하세요!

핫 AI 도구

Undresser.AI Undress
사실적인 누드 사진을 만들기 위한 AI 기반 앱

AI Clothes Remover
사진에서 옷을 제거하는 온라인 AI 도구입니다.

Undress AI Tool
무료로 이미지를 벗다

Clothoff.io
AI 옷 제거제

Video Face Swap
완전히 무료인 AI 얼굴 교환 도구를 사용하여 모든 비디오의 얼굴을 쉽게 바꾸세요!

인기 기사
뜨거운 도구

메모장++7.3.1
사용하기 쉬운 무료 코드 편집기

SublimeText3 중국어 버전
중국어 버전, 사용하기 매우 쉽습니다.

스튜디오 13.0.1 보내기
강력한 PHP 통합 개발 환경

드림위버 CS6
시각적 웹 개발 도구

SublimeText3 Mac 버전
신 수준의 코드 편집 소프트웨어(SublimeText3)
뜨거운 주제
 7913
7913
 15
1652
14
1411
52
1303
25
1248
29
15
1652
14
1411
52
1303
25
1248
29

 nodejs와 vuejs의 차이점
Apr 21, 2024 am 04:17 AM
nodejs와 vuejs의 차이점
Apr 21, 2024 am 04:17 AM
Node.js는 서버측 JavaScript 런타임인 반면, Vue.js는 대화형 사용자 인터페이스를 생성하기 위한 클라이언트측 JavaScript 프레임워크입니다. Node.js는 백엔드 서비스 API 개발, 데이터 처리 등 서버 측 개발에 사용되고, Vue.js는 단일 페이지 애플리케이션, 반응형 사용자 인터페이스 등 클라이언트 측 개발에 사용됩니다.
 nodejs는 백엔드 프레임워크인가요?
Apr 21, 2024 am 05:09 AM
nodejs는 백엔드 프레임워크인가요?
Apr 21, 2024 am 05:09 AM
Node.js는 고성능, 확장성, 크로스 플랫폼 지원, 풍부한 생태계, 개발 용이성 등의 기능을 제공하므로 백엔드 프레임워크로 사용할 수 있습니다.
 nodejs를 mysql 데이터베이스에 연결하는 방법
Apr 21, 2024 am 06:13 AM
nodejs를 mysql 데이터베이스에 연결하는 방법
Apr 21, 2024 am 06:13 AM
MySQL 데이터베이스에 연결하려면 다음 단계를 따라야 합니다. mysql2 드라이버를 설치합니다. mysql2.createConnection()을 사용하여 호스트 주소, 포트, 사용자 이름, 비밀번호 및 데이터베이스 이름이 포함된 연결 개체를 만듭니다. 쿼리를 수행하려면 Connection.query()를 사용하세요. 마지막으로 Connection.end()를 사용하여 연결을 종료합니다.
 nodejs의 전역 변수는 무엇입니까
Apr 21, 2024 am 04:54 AM
nodejs의 전역 변수는 무엇입니까
Apr 21, 2024 am 04:54 AM
Node.js에는 다음과 같은 전역 변수가 존재합니다. 전역 개체: 전역 핵심 모듈: 프로세스, 콘솔, 필수 런타임 환경 변수: __dirname, __filename, __line, __column 상수: undefine, null, NaN, Infinity, -Infinity
 nodejs 설치 디렉토리에 있는 npm과 npm.cmd 파일의 차이점은 무엇입니까?
Apr 21, 2024 am 05:18 AM
nodejs 설치 디렉토리에 있는 npm과 npm.cmd 파일의 차이점은 무엇입니까?
Apr 21, 2024 am 05:18 AM
Node.js 설치 디렉터리에는 npm과 npm.cmd라는 두 가지 npm 관련 파일이 있습니다. 차이점은 다음과 같습니다. 확장자가 다릅니다. npm은 실행 파일이고 npm.cmd는 명령 창 바로 가기입니다. Windows 사용자: npm.cmd는 명령 프롬프트에서 사용할 수 있으며, npm은 명령줄에서만 실행할 수 있습니다. 호환성: npm.cmd는 Windows 시스템에만 해당되며 npm은 크로스 플랫폼에서 사용할 수 있습니다. 사용 권장사항: Windows 사용자는 npm.cmd를 사용하고, 기타 운영 체제는 npm을 사용합니다.
 nodejs와 java 사이에 큰 차이가 있나요?
Apr 21, 2024 am 06:12 AM
nodejs와 java 사이에 큰 차이가 있나요?
Apr 21, 2024 am 06:12 AM
Node.js와 Java의 주요 차이점은 디자인과 기능입니다. 이벤트 중심 대 스레드 중심: Node.js는 이벤트 중심이고 Java는 스레드 중심입니다. 단일 스레드 대 다중 스레드: Node.js는 단일 스레드 이벤트 루프를 사용하고 Java는 다중 스레드 아키텍처를 사용합니다. 런타임 환경: Node.js는 V8 JavaScript 엔진에서 실행되는 반면 Java는 JVM에서 실행됩니다. 구문: Node.js는 JavaScript 구문을 사용하고 Java는 Java 구문을 사용합니다. 목적: Node.js는 I/O 집약적인 작업에 적합한 반면, Java는 대규모 엔터프라이즈 애플리케이션에 적합합니다.
 nodejs는 백엔드 개발 언어인가요?
Apr 21, 2024 am 05:09 AM
nodejs는 백엔드 개발 언어인가요?
Apr 21, 2024 am 05:09 AM
예, Node.js는 백엔드 개발 언어입니다. 서버 측 비즈니스 로직 처리, 데이터베이스 연결 관리, API 제공 등 백엔드 개발에 사용됩니다.
 nodejs가 프런트엔드를 작성할 수 있나요?
Apr 21, 2024 am 05:00 AM
nodejs가 프런트엔드를 작성할 수 있나요?
Apr 21, 2024 am 05:00 AM
예, Node.js는 프런트엔드 개발에 사용될 수 있으며 주요 장점은 고성능, 풍부한 생태계, 플랫폼 간 호환성입니다. 고려해야 할 사항은 학습 곡선, 도구 지원 및 소규모 커뮤니티 규모입니다.
