

데이터 구조 및 알고리즘 연결 목록

Hari 1
Struktur data asas
Kami bukan sahaja akan belajar tentang senarai terpaut dengan cara tradisional; kami juga akan meneroka kelas Node dan LinkedList, serta semua operasi yang boleh dilakukan padanya.
Apakah itu Senarai Berpaut?
Senarai terpaut ialah koleksi elemen yang dipanggil nod, di mana setiap nod mengandungi elemen data dan rujukan (atau pautan) ke nod seterusnya dalam jujukan.
Senarai terpaut ialah struktur data linear di mana elemen disimpan dalam nod. Setiap nod mengandungi dua bahagian:
Tidak seperti tatasusunan, *senarai terpaut tidak menyimpan elemen dalam lokasi memori bersebelahan.
* Sebaliknya, setiap nod menghala ke nod seterusnya, membenarkan penggunaan memori dinamik dan sisipan atau pemadaman elemen yang mudah.
perkara utama Senarai Berpaut
1. Struktur Nod: Senarai terpaut terdiri daripada nod, setiap satu mengandungi nilai dan rujukan kepada nod seterusnya. Meneroka struktur dan sifat nod membantu dalam memahami cara senarai terpaut mengatur dan menyimpan data.
2. Kepala dan Ekor: Nod pertama dalam senarai terpaut dipanggil kepala, manakala nod terakhir dirujuk sebagai ekor. Memahami ciri dan kefungsian nod kepala dan ekor adalah penting untuk traversal dan manipulasi senarai terpaut yang cekap.
Ciri-ciri Utama:
Saiz dinamik: Ia boleh membesar atau mengecut mengikut keperluan.
Akses berurutan: Mengakses elemen memerlukan merentasi dari nod pertama (kepala).
Jenis Senarai Terpaut:
Terdapat tiga bentuk asas senarai terpaut
1. Senarai pautan tunggal.
2. Senarai terpaut berganda.
3. Senarai pautan pekeliling.
Dalam artikel ini, Kami akan meneroka senarai dipautkan tunggal.
Senarai terpaut tunggal.
Setiap nod mempunyai rujukan kepada nod seterusnya.
- Setiap nod mengandungi:
- Data (nilai yang anda mahu simpan).
- Penunjuk seterusnya, yang menunjuk ke nod seterusnya dalam jujukan.
- Penunjuk seterusnya nod terakhir adalah batal kerana tiada nod selepasnya.
Analogi Kehidupan Sebenar: Anak panah – Sebaik sahaja anak panah ditembak, ia hanya boleh bergerak ke hadapan.
Sebaik sahaja anak panah dilepaskan, ia terbang dalam garis lurus tanpa keupayaan untuk kembali.
Begitu juga, dalam Senarai Pautan Tunggal, sebaik sahaja anda berpindah dari satu nod ke nod seterusnya, anda tidak boleh berundur—anda hanya boleh terus bergerak ke hadapan.
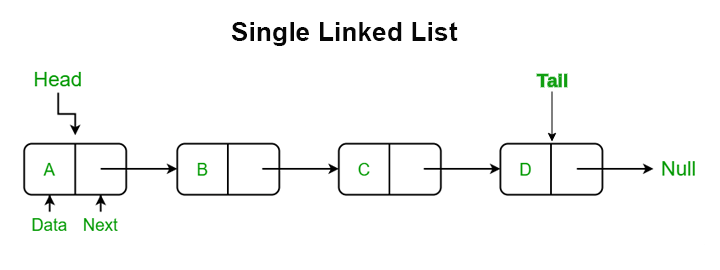
[Data | Next] -> [Data | Next] -> [Data | Next] -> null
Operasi pada Senarai Berpaut Tunggal
- Perjalanan
- Mencari
- Panjang
- Sisipan:
- Sisipkan pada permulaan
- Sisipkan di hujung
- Sisipkan pada kedudukan tertentu
- Pemadaman:
- Padam dari awal
- Padam dari penghujung
- Padamkan nod tertentu
Sisipan:
Masukkan pada permulaan
Jom buat kelas Node
class Node {
  constructor(data) {
    this.data = data;
    this.next = null;
  }
}
Mari pecahkan kelas Node.
**Kelas Node mewakili setiap elemen individu dalam senarai terpaut. Setiap nod mengandungi dua sifat:
Sifat:
- Data: Ini memegang nilai yang disimpan dalam nod (seperti nombor, rentetan atau objek).
- Seterusnya: Ini memegang rujukan (atau penuding) ke nod seterusnya dalam senarai terpaut. Pada mulanya, ia ditetapkan kepada null kerana apabila nod dibuat, ia belum dipautkan kepada mana-mana nod lain.
Pecahan:
Pembina (pembina(data)):
Ini ialah kaedah khas dalam kelas JavaScript yang dipanggil apabila tika baharu kelas Node dibuat.
Parameter data dihantar masuk apabila membuat nod baharu dan ia menyimpan nilai sebenar nod tersebut.
this.next = null; menetapkan sifat seterusnya kepada null pada mulanya kerana apabila nod dibuat, ia belum disambungkan kepada mana-mana nod lain lagi.
Contoh:
let node1 = new Node(10); // Create a node with the value 10
console.log(node1.data);  // Output: 10
console.log(node1.next);  // Output: null (because it's not linked to any other node yet)
Jom buat kelas SingleLinkList
class SinglyLinkedList {
  constructor() {
    this.head = null; // Initially, the list is empty, so the head is null.
    this.size = 0; // The size is initially 0, as there are no nodes in the list.
  }

  // Insert at the beginning
  insertAtBeginning(data) {
    let newNode = new Node(data); // Create a new node with the given data
    newNode.next = this.head; // The new node's next points to the current head
    this.head = newNode; // Update the head to be the new node
    this.size++; // Increment the size of the list
  }
}
Kelas SinglyLinkedList mewakili keseluruhan struktur senarai terpaut. Ia menguruskan berbilang objek Nod dan menyediakan kaedah untuk bekerja dengan senarai, seperti memasukkan, memadam dan melintasi nod dan sebagainya.
Sifat:
- Ketua: Ini adalah rujukan kepada nod pertama (atau "kepala") senarai terpaut. Pada mulanya, ia ditetapkan kepada null, bermakna senarai itu kosong.
- Saiz: Ini menjejaki bilangan nod yang berada dalam senarai terpaut pada masa ini. Pada mulanya, ia ditetapkan kepada 0 kerana senarai itu kosong.
Pecahan:
Pembina (pembina()):
this.head = null;: This initializes the linked list with no elements, so the head points to null.
this.size = 0;: The size starts as 0 because there are no nodes in the list.
insertAtBeginning(data): for the sake of simplicity, later on, we will Deep Dive into the insertAtBeginning(data) method
let newNode = new Node(data);: This creates a new node with the value passed in as data.
newNode.next = this.head;: This links the new node to the current head (which could be nullif the list is empty or point to an existing node if the list has elements).
this.head = newNode;: This updates the head of the list to point to the new node, making it the first node in the list.
this.size++;: The size of the linked list is increased by 1 as a new node has been added.
let's Test
let list = new SinglyLinkedList();
list.insertAtBeginning(10); // List becomes: 10
list.insertAtBeginning(20); // List becomes: 20 -> 10
console.log(list.head.data); // Output: 20 (since the head is now the first node with value 20)
console.log(list.size);      // Output: 2 (since there are two nodes in the list)
Linked List deep dive Line by Line.
let's jump into the insertAtBeginning(data) method .
class Node {
  constructor(data) {
    this.data = data;   // Store the data value (like 10, 20, etc.)
    this.next = null;   // Initialize the next pointer as null
  }
}

class SinglyLinkedList {
  constructor() {
    this.head = null;   // Initially, the list is empty, so the head is null
    this.size = 0;      // The size of the list starts at 0
  }

  // Insert at the beginning of the list
  insertAtBeginning(data) {
    // Step 1: Create a new node with the given data
    let newNode = new Node(data);

    // Explanation:
    // First time: If we insert 10, the newNode looks like this -> Node { data: 10, next: null }
    // Second time: If we insert 20, the newNode looks like this -> Node { data: 20, next: null }

    // Step 2: Point the new node's next property to the current head of the list
    newNode.next = this.head;

    // Explanation:
    // First time: Since the list is empty (this.head is null), newNode's next is set to null.
    // Second time: this.head is now the node with data 10, so newNode’s next will point to the node with data 10.
    // So it looks like this: Node { data: 20, next: Node { data: 10, next: null } }

    // Step 3: Make the new node the new head of the list
    this.head = newNode;

    // Explanation:
    // First time: Now, the new node becomes the head. The list looks like this: Node { data: 10, next: null }.
    // Second time: The new node (with data 20) becomes the head, and it points to the previous head (which is the node with data 10).

    // Step 4: Increment the size of the list
    this.size++;

    // Explanation:
    // First time: The size is now 1 because there is one node (data 10).
    // Second time: The size becomes 2 because we added another node (data 20).
  }
}

// Example Usage:
let list = new SinglyLinkedList();
list.insertAtBeginning(10);  // First insertion: the list becomes [10]
list.insertAtBeginning(20);  // Second insertion: the list becomes [20 -> 10]

console.log(list);

// Output:
// SinglyLinkedList {
//   head: Node { data: 20, next: Node { data: 10, next: null } },
//   size: 2
// }
Coming soon...
위 내용은 데이터 구조 및 알고리즘 연결 목록의 상세 내용입니다. 자세한 내용은 PHP 중국어 웹사이트의 기타 관련 기사를 참조하세요!

핫 AI 도구

Undresser.AI Undress
사실적인 누드 사진을 만들기 위한 AI 기반 앱

AI Clothes Remover
사진에서 옷을 제거하는 온라인 AI 도구입니다.

Undress AI Tool
무료로 이미지를 벗다

Clothoff.io
AI 옷 제거제

Video Face Swap
완전히 무료인 AI 얼굴 교환 도구를 사용하여 모든 비디오의 얼굴을 쉽게 바꾸세요!

인기 기사
뜨거운 도구

메모장++7.3.1
사용하기 쉬운 무료 코드 편집기

SublimeText3 중국어 버전
중국어 버전, 사용하기 매우 쉽습니다.

스튜디오 13.0.1 보내기
강력한 PHP 통합 개발 환경

드림위버 CS6
시각적 웹 개발 도구

SublimeText3 Mac 버전
신 수준의 코드 편집 소프트웨어(SublimeText3)


 JavaScript 엔진 : 구현 비교
Apr 13, 2025 am 12:05 AM
JavaScript 엔진 : 구현 비교
Apr 13, 2025 am 12:05 AM
각각의 엔진의 구현 원리 및 최적화 전략이 다르기 때문에 JavaScript 엔진은 JavaScript 코드를 구문 분석하고 실행할 때 다른 영향을 미칩니다. 1. 어휘 분석 : 소스 코드를 어휘 단위로 변환합니다. 2. 문법 분석 : 추상 구문 트리를 생성합니다. 3. 최적화 및 컴파일 : JIT 컴파일러를 통해 기계 코드를 생성합니다. 4. 실행 : 기계 코드를 실행하십시오. V8 엔진은 즉각적인 컴파일 및 숨겨진 클래스를 통해 최적화하여 Spidermonkey는 유형 추론 시스템을 사용하여 동일한 코드에서 성능이 다른 성능을 제공합니다.
 Python vs. JavaScript : 학습 곡선 및 사용 편의성
Apr 16, 2025 am 12:12 AM
Python vs. JavaScript : 학습 곡선 및 사용 편의성
Apr 16, 2025 am 12:12 AM
Python은 부드러운 학습 곡선과 간결한 구문으로 초보자에게 더 적합합니다. JavaScript는 가파른 학습 곡선과 유연한 구문으로 프론트 엔드 개발에 적합합니다. 1. Python Syntax는 직관적이며 데이터 과학 및 백엔드 개발에 적합합니다. 2. JavaScript는 유연하며 프론트 엔드 및 서버 측 프로그래밍에서 널리 사용됩니다.
 C/C에서 JavaScript까지 : 모든 것이 어떻게 작동하는지
Apr 14, 2025 am 12:05 AM
C/C에서 JavaScript까지 : 모든 것이 어떻게 작동하는지
Apr 14, 2025 am 12:05 AM
C/C에서 JavaScript로 전환하려면 동적 타이핑, 쓰레기 수집 및 비동기 프로그래밍으로 적응해야합니다. 1) C/C는 수동 메모리 관리가 필요한 정적으로 입력 한 언어이며 JavaScript는 동적으로 입력하고 쓰레기 수집이 자동으로 처리됩니다. 2) C/C를 기계 코드로 컴파일 해야하는 반면 JavaScript는 해석 된 언어입니다. 3) JavaScript는 폐쇄, 프로토 타입 체인 및 약속과 같은 개념을 소개하여 유연성과 비동기 프로그래밍 기능을 향상시킵니다.
 JavaScript 및 웹 : 핵심 기능 및 사용 사례
Apr 18, 2025 am 12:19 AM
JavaScript 및 웹 : 핵심 기능 및 사용 사례
Apr 18, 2025 am 12:19 AM
웹 개발에서 JavaScript의 주요 용도에는 클라이언트 상호 작용, 양식 검증 및 비동기 통신이 포함됩니다. 1) DOM 운영을 통한 동적 컨텐츠 업데이트 및 사용자 상호 작용; 2) 사용자가 사용자 경험을 향상시키기 위해 데이터를 제출하기 전에 클라이언트 확인이 수행됩니다. 3) 서버와의 진실한 통신은 Ajax 기술을 통해 달성됩니다.
 자바 스크립트 행동 : 실제 예제 및 프로젝트
Apr 19, 2025 am 12:13 AM
자바 스크립트 행동 : 실제 예제 및 프로젝트
Apr 19, 2025 am 12:13 AM
실제 세계에서 JavaScript의 응용 프로그램에는 프론트 엔드 및 백엔드 개발이 포함됩니다. 1) DOM 운영 및 이벤트 처리와 관련된 TODO 목록 응용 프로그램을 구축하여 프론트 엔드 애플리케이션을 표시합니다. 2) Node.js를 통해 RESTFULAPI를 구축하고 Express를 통해 백엔드 응용 프로그램을 시연하십시오.
 JavaScript 엔진 이해 : 구현 세부 사항
Apr 17, 2025 am 12:05 AM
JavaScript 엔진 이해 : 구현 세부 사항
Apr 17, 2025 am 12:05 AM
보다 효율적인 코드를 작성하고 성능 병목 현상 및 최적화 전략을 이해하는 데 도움이되기 때문에 JavaScript 엔진이 내부적으로 작동하는 방식을 이해하는 것은 개발자에게 중요합니다. 1) 엔진의 워크 플로에는 구문 분석, 컴파일 및 실행; 2) 실행 프로세스 중에 엔진은 인라인 캐시 및 숨겨진 클래스와 같은 동적 최적화를 수행합니다. 3) 모범 사례에는 글로벌 변수를 피하고 루프 최적화, Const 및 Lets 사용 및 과도한 폐쇄 사용을 피하는 것이 포함됩니다.
 Python vs. JavaScript : 커뮤니티, 라이브러리 및 리소스
Apr 15, 2025 am 12:16 AM
Python vs. JavaScript : 커뮤니티, 라이브러리 및 리소스
Apr 15, 2025 am 12:16 AM
Python과 JavaScript는 커뮤니티, 라이브러리 및 리소스 측면에서 고유 한 장점과 단점이 있습니다. 1) Python 커뮤니티는 친절하고 초보자에게 적합하지만 프론트 엔드 개발 리소스는 JavaScript만큼 풍부하지 않습니다. 2) Python은 데이터 과학 및 기계 학습 라이브러리에서 강력하며 JavaScript는 프론트 엔드 개발 라이브러리 및 프레임 워크에서 더 좋습니다. 3) 둘 다 풍부한 학습 리소스를 가지고 있지만 Python은 공식 문서로 시작하는 데 적합하지만 JavaScript는 MDNWebDocs에서 더 좋습니다. 선택은 프로젝트 요구와 개인적인 이익을 기반으로해야합니다.
 Python vs. JavaScript : 개발 환경 및 도구
Apr 26, 2025 am 12:09 AM
Python vs. JavaScript : 개발 환경 및 도구
Apr 26, 2025 am 12:09 AM
개발 환경에서 Python과 JavaScript의 선택이 모두 중요합니다. 1) Python의 개발 환경에는 Pycharm, Jupyternotebook 및 Anaconda가 포함되어 있으며 데이터 과학 및 빠른 프로토 타이핑에 적합합니다. 2) JavaScript의 개발 환경에는 Node.js, VScode 및 Webpack이 포함되어 있으며 프론트 엔드 및 백엔드 개발에 적합합니다. 프로젝트 요구에 따라 올바른 도구를 선택하면 개발 효율성과 프로젝트 성공률이 향상 될 수 있습니다.
