

Janus B: 다중 모드 이해 및 생성 작업을 위한 통합 모델

야누스 1.3B
Janus는 다중 모드 이해와 생성을 통합하는 새로운 자동 회귀 프레임워크입니다. 이해 및 생성 작업 모두에 단일 시각적 인코더를 사용했던 이전 모델과 달리 Janus는 이러한 기능을 위해 두 가지 별도의 시각적 인코딩 경로를 도입합니다.
이해와 생성을 위한 인코딩의 차이점
- 다중 모드 이해 작업에서 시각적 인코더는 객체 카테고리 및 시각적 속성과 같은 높은 수준의 의미 정보를 추출합니다. 이 인코더는 복잡한 의미를 추론하는 데 중점을 두고 고차원 의미 요소를 강조합니다.
- 반면, 시각적 생성 작업에서는 미세한 디테일을 생성하고 전체적인 일관성을 유지하는 데 중점을 둡니다. 따라서 공간구조와 질감을 포착할 수 있는 저차원 인코딩이 필요합니다.
환경 설정
Google Colab에서 Janus를 실행하는 단계는 다음과 같습니다.
git clone https://github.com/deepseek-ai/Janus
cd Janus
pip install -e .
# If needed, install the following as well
# pip install wheel
# pip install flash-attn --no-build-isolation
비전과제
모델 로드
다음 코드를 사용하여 비전 작업에 필요한 모델을 로드합니다.
import torch
from transformers import AutoModelForCausalLM
from janus.models import MultiModalityCausalLM, VLChatProcessor
from janus.utils.io import load_pil_images

# Specify the model path
model_path = "deepseek-ai/Janus-1.3B"
vl_chat_processor = VLChatProcessor.from_pretrained(model_path)
tokenizer = vl_chat_processor.tokenizer

vl_gpt = AutoModelForCausalLM.from_pretrained(model_path, trust_remote_code=True)
vl_gpt = vl_gpt.to(torch.bfloat16).cuda().eval()
인코딩을 위한 이미지 로드 및 준비
다음으로 이미지를 로드하고 모델이 이해할 수 있는 형식으로 변환합니다.
conversation = [
    {
        "role": "User",
        "content": "<image_placeholder>\nDescribe this chart.",
        "images": ["images/pie_chart.png"],
    },
    {"role": "Assistant", "content": ""},
]

# Load the image and prepare input
pil_images = load_pil_images(conversation)
prepare_inputs = vl_chat_processor(
    conversations=conversation, images=pil_images, force_batchify=True
).to(vl_gpt.device)

# Run the image encoder and obtain image embeddings
inputs_embeds = vl_gpt.prepare_inputs_embeds(**prepare_inputs)
응답 생성
마지막으로 모델을 실행하여 응답을 생성합니다.
# Run the model and generate a response
outputs = vl_gpt.language_model.generate(
    inputs_embeds=inputs_embeds,
    attention_mask=prepare_inputs.attention_mask,
    pad_token_id=tokenizer.eos_token_id,
    bos_token_id=tokenizer.bos_token_id,
    eos_token_id=tokenizer.eos_token_id,
    max_new_tokens=512,
    do_sample=False,
    use_cache=True,
)

answer = tokenizer.decode(outputs[0].cpu().tolist(), skip_special_tokens=True)
print(f"{prepare_inputs['sft_format'][0]}", answer)
예제 출력

The image depicts a pie chart that illustrates the distribution of four different categories among four distinct groups. The chart is divided into four segments, each representing a category with a specific percentage. The categories and their corresponding percentages are as follows:

1. **Hogs**: This segment is colored in orange and represents 30.0% of the total.
2. **Frog**: This segment is colored in blue and represents 15.0% of the total.
3. **Logs**: This segment is colored in red and represents 10.0% of the total.
4. **Dogs**: This segment is colored in green and represents 45.0% of the total.

The pie chart is visually divided into four segments, each with a different color and corresponding percentage. The segments are arranged in a clockwise manner starting from the top-left, moving clockwise. The percentages are clearly labeled next to each segment.

The chart is a simple visual representation of data, where the size of each segment corresponds to the percentage of the total category it represents. This type of chart is commonly used to compare the proportions of different categories in a dataset.

To summarize, the pie chart shows the following:
- Hogs: 30.0%
- Frog: 15.0%
- Logs: 10.0%
- Dogs: 45.0%

This chart can be used to understand the relative proportions of each category in the given dataset.
출력물은 색상과 텍스트를 포함하여 이미지를 적절하게 이해하고 있음을 보여줍니다.
이미지 생성 작업
모델 로드
다음 코드를 사용하여 이미지 생성 작업에 필요한 모델을 로드합니다.
import os
import PIL.Image
import torch
import numpy as np
from transformers import AutoModelForCausalLM
from janus.models import MultiModalityCausalLM, VLChatProcessor

# Specify the model path
model_path = "deepseek-ai/Janus-1.3B"
vl_chat_processor = VLChatProcessor.from_pretrained(model_path)
tokenizer = vl_chat_processor.tokenizer

vl_gpt = AutoModelForCausalLM.from_pretrained(model_path, trust_remote_code=True)
vl_gpt = vl_gpt.to(torch.bfloat16).cuda().eval()
프롬프트 준비
다음으로 사용자의 요청에 따라 프롬프트를 준비합니다.
# Set up the prompt
conversation = [
    {
        "role": "User",
        "content": "cute japanese girl, wearing a bikini, in a beach",
    },
    {"role": "Assistant", "content": ""},
]

# Convert the prompt into the appropriate format
sft_format = vl_chat_processor.apply_sft_template_for_multi_turn_prompts(
    conversations=conversation,
    sft_format=vl_chat_processor.sft_format,
    system_prompt="",
)

prompt = sft_format + vl_chat_processor.image_start_tag
이미지 생성
이미지 생성에는 다음과 같은 기능이 사용됩니다. 기본적으로 16개의 이미지가 생성됩니다.
@torch.inference_mode()
def generate(
    mmgpt: MultiModalityCausalLM,
    vl_chat_processor: VLChatProcessor,
    prompt: str,
    temperature: float = 1,
    parallel_size: int = 16,
    cfg_weight: float = 5,
    image_token_num_per_image: int = 576,
    img_size: int = 384,
    patch_size: int = 16,
):
    input_ids = vl_chat_processor.tokenizer.encode(prompt)
    input_ids = torch.LongTensor(input_ids)

    tokens = torch.zeros((parallel_size*2, len(input_ids)), dtype=torch.int).cuda()
    for i in range(parallel_size*2):
        tokens[i, :] = input_ids
        if i % 2 != 0:
            tokens[i, 1:-1] = vl_chat_processor.pad_id

    inputs_embeds = mmgpt.language_model.get_input_embeddings()(tokens)

    generated_tokens = torch.zeros((parallel_size, image_token_num_per_image), dtype=torch.int).cuda()

    for i in range(image_token_num_per_image):
        outputs = mmgpt.language_model.model(
            inputs_embeds=inputs_embeds,
            use_cache=True,
            past_key_values=outputs.past_key_values if i != 0 else None,
        )
        hidden_states = outputs.last_hidden_state

        logits = mmgpt.gen_head(hidden_states[:, -1, :])
        logit_cond = logits[0::2, :]
        logit_uncond = logits[1::2, :]

        logits = logit_uncond + cfg_weight * (logit_cond - logit_uncond)
        probs = torch.softmax(logits / temperature, dim=-1)

        next_token = torch.multinomial(probs, num_samples=1)
        generated_tokens[:, i] = next_token.squeeze(dim=-1)

        next_token = torch.cat([next_token.unsqueeze(dim=1), next_token.unsqueeze(dim=1)], dim=1).view(-1)
        img_embeds = mmgpt.prepare_gen_img_embeds(next_token)
        inputs_embeds = img_embeds.unsqueeze(dim=1)

    dec = mmgpt.gen_vision_model.decode_code(
        generated_tokens.to(dtype=torch.int),
        shape=[parallel_size, 8, img_size // patch_size, img_size // patch_size],
    )
    dec = dec.to(torch.float32).cpu().numpy().transpose(0, 2, 3, 1)
    dec = np.clip((dec + 1) / 2 * 255, 0, 255)

    visual_img = np.zeros((parallel_size, img_size, img_size, 3), dtype=np.uint8)
    visual_img[:, :, :] = dec

    os.makedirs('generated_samples', exist_ok=True)
    for i in range(parallel_size):
        save_path = os.path.join('generated_samples', f"img_{i}.jpg")
        PIL.Image.fromarray(visual_img[i]).save(save_path)

# Run the image generation
generate(vl_gpt, vl_chat_processor, prompt)
생성된 이미지는 generate_samples 폴더에 저장됩니다.
생성된 결과 샘플
다음은 생성된 이미지의 예입니다.
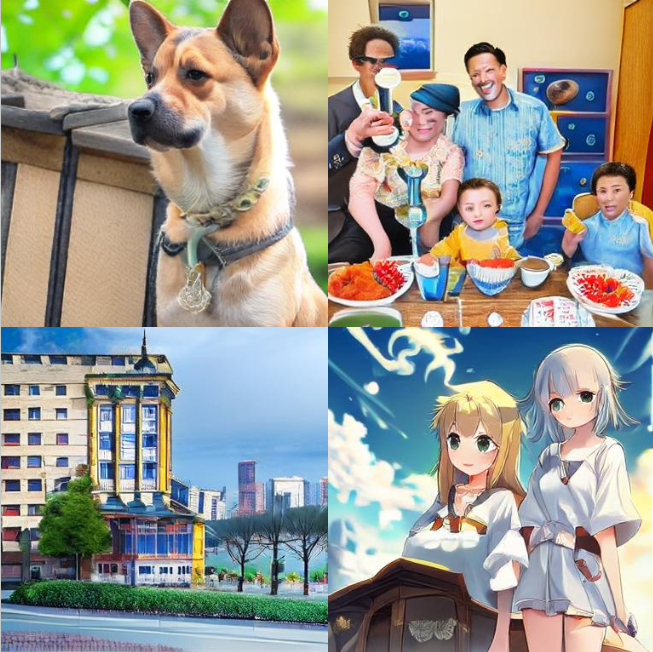
- 개가 비교적 잘 묘사되어 있습니다.
- 건물은 전체적인 모양을 유지하지만 창문과 같은 일부 세부 사항은 비현실적으로 보일 수 있습니다.
- 인간은 사실적 스타일과 애니메이션 스타일 모두 눈에 띄게 왜곡되어 제대로 생성하기가 어렵습니다.
위 내용은 Janus B: 다중 모드 이해 및 생성 작업을 위한 통합 모델의 상세 내용입니다. 자세한 내용은 PHP 중국어 웹사이트의 기타 관련 기사를 참조하세요!

핫 AI 도구

Undresser.AI Undress
사실적인 누드 사진을 만들기 위한 AI 기반 앱

AI Clothes Remover
사진에서 옷을 제거하는 온라인 AI 도구입니다.

Undress AI Tool
무료로 이미지를 벗다

Clothoff.io
AI 옷 제거제

AI Hentai Generator
AI Hentai를 무료로 생성하십시오.

인기 기사
뜨거운 도구

메모장++7.3.1
사용하기 쉬운 무료 코드 편집기

SublimeText3 중국어 버전
중국어 버전, 사용하기 매우 쉽습니다.

스튜디오 13.0.1 보내기
강력한 PHP 통합 개발 환경

드림위버 CS6
시각적 웹 개발 도구

SublimeText3 Mac 버전
신 수준의 코드 편집 소프트웨어(SublimeText3)
뜨거운 주제
 7315
7315
 9
1625
14
1348
46
1261
25
1208
29
9
1625
14
1348
46
1261
25
1208
29


 Tensorflow 또는 Pytorch로 딥 러닝을 수행하는 방법은 무엇입니까?
Mar 10, 2025 pm 06:52 PM
Tensorflow 또는 Pytorch로 딥 러닝을 수행하는 방법은 무엇입니까?
Mar 10, 2025 pm 06:52 PM
Tensorflow 또는 Pytorch로 딥 러닝을 수행하는 방법은 무엇입니까?
