Python을 사용하여 inutes에서 API 만들기
Oct 23, 2024 pm 08:07 PM"FastAPI를 사용하여 5분 만에 API를 생성하세요. 최신 고성능 Python 프레임워크인 FastAPI를 사용하면 강력한 웹 애플리케이션을 쉽게 구축할 수 있습니다."
설치
pip를 사용하여 FastAPI 및 uvicorn(ASGI 서버)을 설치합니다.
pip install fastapi uvicorn
pip 설치 fastapi
API를 만들어 보겠습니다
메모장을 열고 아래 내용을 붙여넣은 후 파일을 data.json으로 저장합니다(POST 메소드를 사용하여 이 파일에 데이터를 추가하고 GET 메소드를 사용하여 레코드를 검색합니다
data.json
[
   {
      "name": "John",
      "age": 25
   },
   {  "name": "Smith",
      "age": 27
   }
]
이제 새 Python 파일을 만들고 이름을 app.py로 지정한 후 아래 코드를 붙여넣으세요
# This section imports necessary modules and classes from the FastAPI library and Python's standard library. It imports FastAPI for creating the web application, HTTPException for raising HTTP exceptions, List for type hints, and json for working with JSON data.

from fastapi import FastAPI, HTTPException
from typing import List
import json

# This creates an instance of the FastAPI class, which will be the main application instance for handling HTTP requests.
app = FastAPI()

# This block reads the content of the "data.json" file using a context manager (with statement) and loads the JSON data into the initial_data variable.
with open("data.json", "r") as file:
    initial_data = json.load(file)

# This line initializes the data variable with the loaded JSON data, effectively creating a list of dictionaries containing user information.
data = initial_data

# This decorator (@app.get(...)) defines a GET endpoint at the "/users" URL. It uses the get_users function to handle the request. The response_model parameter specifies the expected response model, which is a list of dictionaries in this case.
@app.get("/users", response_model=List[dict])
async def get_users():
    return data

# This decorator (@app.post(...)) defines a POST endpoint at the "/users" URL. It uses the create_user function to handle the request. The response_model parameter specifies the expected response model, which is a single dictionary in this case.
# The create_user function attempts to append the received user dictionary to the data list. If successful, it constructs a response dictionary indicating the success. If an exception occurs during the attempt (e.g., due to invalid data), it constructs a response dictionary indicating an error.
@app.post("/users", response_model=dict)
async def create_user(user: dict):
    try:
        data.append(user)
        response_data = {"message": "User created successfully", "user": user}
    except:
        response_data = {"message": "Error creating user", "user": user}
    return response_data

# This function uses a context manager to open the "data.json" file in write mode and then uses json.dump to write the contents of the data list back to the file, formatting it with an indentation of 4 spaces.
def save_data():
    with open("data.json", "w") as file:
        json.dump(data, file, indent=4)

# This decorator (@app.on_event(...)) defines a function that will be executed when the FastAPI application is shutting down. In this case, it calls the save_data function to save the data back to the JSON file before the application exits.
@app.on_event("shutdown")
async def shutdown_event():
    save_data()

# This block checks if the script is being run directly (not imported as a module). If it is, it uses the uvicorn.run function to start the FastAPI application on host "0.0.0.0" and port 8000. This is how you launch the application using the Uvicorn ASGI server.
if __name__ == "__main__":
    import uvicorn
    uvicorn.run(app, host="0.0.0.0", port=8000)
app.py를 실행하면 Uvicorn 서버가 들어오는 HTTP 요청을 처리하기 위한 새로운 프로세스를 시작합니다. 서버가 실행되면 Postman을 열고 URL이 http://0.0.0.0:8000/users인 새 GET 요청을 생성한 다음 보내기를 클릭하세요


data.json 파일의 사용자 목록이 포함된 JSON 응답을 볼 수 있습니다.
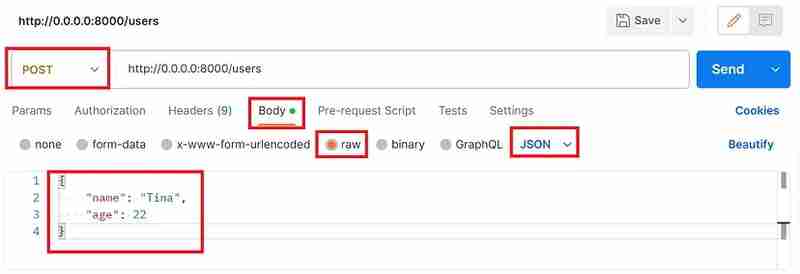
이제 POST 메소드를 사용하여 이 파일에 사용자를 추가해 보겠습니다. 새 요청을 생성하고 POST 메서드를 선택한 후 본문을 클릭하고 원시를 선택한 후 드롭다운에서 JSON을 선택하고 아래 JSON을 페이로드로 붙여넣어 새 사용자를 추가하세요
{
    "name": "Tina",
    "age": 22
}

보내기를 클릭하면 사용자가 성공적으로 추가되면 상태 코드 200 OK와 함께 응답을 받게 됩니다

이제 우리는 파일을 보고 사용자를 추가할 수 있는 GET/POST 메서드를 사용하여 API를 성공적으로 만들었습니다. GET 요청으로 돌아가서 보내기를 클릭하면 이제 API 응답에 사용자 Tina도 나열되어 있는 것을 볼 수 있습니다.
FastAPI의 놀라운 점 중 하나는 API 엔드포인트에 대한 Swagger 문서를 자동으로 생성하여 개발자가 API를 더 쉽게 이해하고 효과적으로 사용할 수 있다는 것입니다.
브라우저를 열고 http://localhost:8000/docs를 입력하면 API에 대한 Swagger 문서가 표시됩니다

이것은 Python을 사용하여 빠른 API를 생성하는 기본적인 예일 뿐이며, 특히 오류 처리, 데이터 검증 및 보안 측면에서 더 많은 구성이나 코딩을 수행해야 합니다.
위 내용은 Python을 사용하여 inutes에서 API 만들기의 상세 내용입니다. 자세한 내용은 PHP 중국어 웹사이트의 기타 관련 기사를 참조하세요!

인기 기사

인기 기사

뜨거운 기사 태그

메모장++7.3.1
사용하기 쉬운 무료 코드 편집기

SublimeText3 중국어 버전
중국어 버전, 사용하기 매우 쉽습니다.

스튜디오 13.0.1 보내기
강력한 PHP 통합 개발 환경

드림위버 CS6
시각적 웹 개발 도구

SublimeText3 Mac 버전
신 수준의 코드 편집 소프트웨어(SublimeText3)

뜨거운 주제
 7285
7285
 9
9
 1622
1622
 14
14
 1342
1342
 46
46
 1259
1259
 25
25
 1206
1206
 29
29
 Tensorflow 또는 Pytorch로 딥 러닝을 수행하는 방법은 무엇입니까?
Mar 10, 2025 pm 06:52 PM
Tensorflow 또는 Pytorch로 딥 러닝을 수행하는 방법은 무엇입니까?


