

ClassiSage: Terraform IaC 자동화된 AWS SageMaker 기반 HDFS 로그 분류 모델

클래시세이지
인프라 설정 자동화를 위해 Terraform을 사용하여 HDFS 로그를 분류하기 위해 AWS SageMaker와 해당 Python SDK로 만든 기계 학습 모델입니다.
링크: GitHub
언어: HCL(terraform), Python
콘텐츠
- 개요: 프로젝트 개요.
- 시스템 아키텍처: 시스템 아키텍처 다이어그램
- ML 모델: 모델 개요
- 시작하기: 프로젝트 실행 방법
- 콘솔 관찰: 프로젝트를 실행하면서 관찰할 수 있는 인스턴스 및 인프라의 변화.
- 종료 및 정리: 추가 비용 없음을 보장합니다.
- 자동 생성된 개체: 실행 과정에서 생성된 파일 및 폴더입니다.
- 먼저 더 나은 프로젝트 설정을 위해 디렉토리 구조를 따르세요.
- 이해를 돕기 위해 GitHub에 업로드된 ClassiSage의 프로젝트 저장소를 주요 참고자료로 삼으세요.
개요
- 모델은 HDFS 로그 분류를 위한 AWS SageMaker와 데이터 세트 저장을 위한 S3, 노트북 파일(SageMaker 인스턴스용 코드 포함) 및 모델 출력을 사용하여 만들어졌습니다.
- 인프라 설정은 HashiCorp에서 만든 코드형 인프라를 제공하는 도구인 Terraform을 사용하여 자동화됩니다.
- 사용된 데이터 세트는 HDFS_v1입니다.
- 이 프로젝트는 XGBoost 버전 1.2 모델로 SageMaker Python SDK를 구현합니다.
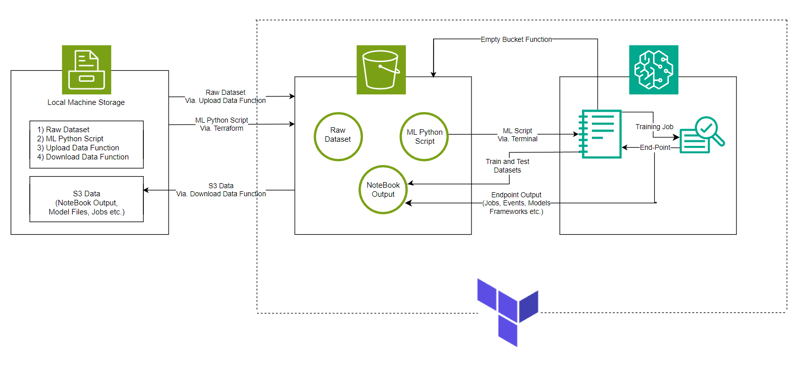
시스템 아키텍처
ML 모델
- 이미지 URI
  # Looks for the XGBoost image URI and builds an XGBoost container. Specify the repo_version depending on preference.
  container = get_image_uri(boto3.Session().region_name,
                            'xgboost',
                            repo_version='1.0-1')

- 컨테이너에 대한 Hyper Parameter 및 Estimator 호출 초기화
  hyperparameters = {
        "max_depth":"5",                ## Maximum depth of a tree. Higher means more complex models but risk of overfitting.
        "eta":"0.2",                    ## Learning rate. Lower values make the learning process slower but more precise.
        "gamma":"4",                    ## Minimum loss reduction required to make a further partition on a leaf node. Controls the model’s complexity.
        "min_child_weight":"6",         ## Minimum sum of instance weight (hessian) needed in a child. Higher values prevent overfitting.
        "subsample":"0.7",              ## Fraction of training data used. Reduces overfitting by sampling part of the data.
        "objective":"binary:logistic",  ## Specifies the learning task and corresponding objective. binary:logistic is for binary classification.
        "num_round":50                  ## Number of boosting rounds, essentially how many times the model is trained.
        }
  # A SageMaker estimator that calls the xgboost-container
  estimator = sagemaker.estimator.Estimator(image_uri=container,                  # Points to the XGBoost container we previously set up. This tells SageMaker which algorithm container to use.
                                          hyperparameters=hyperparameters,      # Passes the defined hyperparameters to the estimator. These are the settings that guide the training process.
                                          role=sagemaker.get_execution_role(),  # Specifies the IAM role that SageMaker assumes during the training job. This role allows access to AWS resources like S3.
                                          train_instance_count=1,               # Sets the number of training instances. Here, it’s using a single instance.
                                          train_instance_type='ml.m5.large',    # Specifies the type of instance to use for training. ml.m5.2xlarge is a general-purpose instance with a balance of compute, memory, and network resources.
                                          train_volume_size=5, # 5GB            # Sets the size of the storage volume attached to the training instance, in GB. Here, it’s 5 GB.
                                          output_path=output_path,              # Defines where the model artifacts and output of the training job will be saved in S3.
                                          train_use_spot_instances=True,        # Utilizes spot instances for training, which can be significantly cheaper than on-demand instances. Spot instances are spare EC2 capacity offered at a lower price.
                                          train_max_run=300,                    # Specifies the maximum runtime for the training job in seconds. Here, it's 300 seconds (5 minutes).
                                          train_max_wait=600)                   # Sets the maximum time to wait for the job to complete, including the time waiting for spot instances, in seconds. Here, it's 600 seconds (10 minutes).

- 훈련직
estimator.fit({'train': s3_input_train,'validation': s3_input_test})
- 배포
xgb_predictor = estimator.deploy(initial_instance_count=1,instance_type='ml.m5.large')

- 검증
  # Looks for the XGBoost image URI and builds an XGBoost container. Specify the repo_version depending on preference.
  container = get_image_uri(boto3.Session().region_name,
                            'xgboost',
                            repo_version='1.0-1')
시작하기
- Git Bash를 사용하여 저장소 복제/.zip 파일 다운로드/저장소 포크
- AWS Management Console로 이동하여 오른쪽 상단에 있는 계정 프로필을 클릭하고 드롭다운에서 내 보안 자격 증명을 선택하세요.
- 액세스 키 생성: 액세스 키 섹션에서 새 액세스 키 생성을 클릭하면 액세스 키 ID와 비밀 액세스 키가 포함된 대화 상자가 나타납니다.
- 키 다운로드 또는 복사: (중요) .csv 파일을 다운로드하거나 키를 안전한 위치에 복사하세요. 비밀접속키를 확인할 수 있는 유일한 시간입니다.
- 복제된 Repo를 엽니다. VS 코드에서
- ClassiSage 아래에 terraform.tfvars라는 파일을 생성하고 그 내용은 다음과 같습니다.
  hyperparameters = {
        "max_depth":"5",                ## Maximum depth of a tree. Higher means more complex models but risk of overfitting.
        "eta":"0.2",                    ## Learning rate. Lower values make the learning process slower but more precise.
        "gamma":"4",                    ## Minimum loss reduction required to make a further partition on a leaf node. Controls the model’s complexity.
        "min_child_weight":"6",         ## Minimum sum of instance weight (hessian) needed in a child. Higher values prevent overfitting.
        "subsample":"0.7",              ## Fraction of training data used. Reduces overfitting by sampling part of the data.
        "objective":"binary:logistic",  ## Specifies the learning task and corresponding objective. binary:logistic is for binary classification.
        "num_round":50                  ## Number of boosting rounds, essentially how many times the model is trained.
        }
  # A SageMaker estimator that calls the xgboost-container
  estimator = sagemaker.estimator.Estimator(image_uri=container,                  # Points to the XGBoost container we previously set up. This tells SageMaker which algorithm container to use.
                                          hyperparameters=hyperparameters,      # Passes the defined hyperparameters to the estimator. These are the settings that guide the training process.
                                          role=sagemaker.get_execution_role(),  # Specifies the IAM role that SageMaker assumes during the training job. This role allows access to AWS resources like S3.
                                          train_instance_count=1,               # Sets the number of training instances. Here, it’s using a single instance.
                                          train_instance_type='ml.m5.large',    # Specifies the type of instance to use for training. ml.m5.2xlarge is a general-purpose instance with a balance of compute, memory, and network resources.
                                          train_volume_size=5, # 5GB            # Sets the size of the storage volume attached to the training instance, in GB. Here, it’s 5 GB.
                                          output_path=output_path,              # Defines where the model artifacts and output of the training job will be saved in S3.
                                          train_use_spot_instances=True,        # Utilizes spot instances for training, which can be significantly cheaper than on-demand instances. Spot instances are spare EC2 capacity offered at a lower price.
                                          train_max_run=300,                    # Specifies the maximum runtime for the training job in seconds. Here, it's 300 seconds (5 minutes).
                                          train_max_wait=600)                   # Sets the maximum time to wait for the job to complete, including the time waiting for spot instances, in seconds. Here, it's 600 seconds (10 minutes).
- Terraform 및 Python 사용을 위한 모든 종속 항목을 다운로드하고 설치합니다.
터미널에 terraform init를 입력하거나 붙여넣어 백엔드를 초기화하세요.
그런 다음 terraform Plan을 입력/붙여넣어 계획을 보거나 단순히 terraform 검증을 수행하여 오류가 없는지 확인하세요.
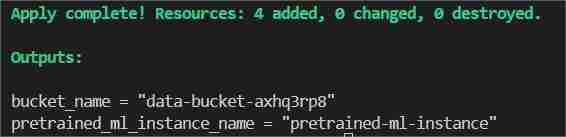
마지막으로 터미널 유형/붙여넣기 terraform Apply --auto-approve
이렇게 하면 bucket_name과 pretrained_ml_instance_name이라는 두 개의 출력이 표시됩니다(세 번째 리소스는 전역 리소스이므로 버킷에 지정된 변수 이름입니다).
- 명령 완료가 터미널에 표시되면 ClassiSage/ml_ops/function.py로 이동하여 코드가 포함된 파일의 11번째 줄에 있습니다.
estimator.fit({'train': s3_input_train,'validation': s3_input_test})
프로젝트 디렉터리가 있는 경로로 변경하고 저장하세요.
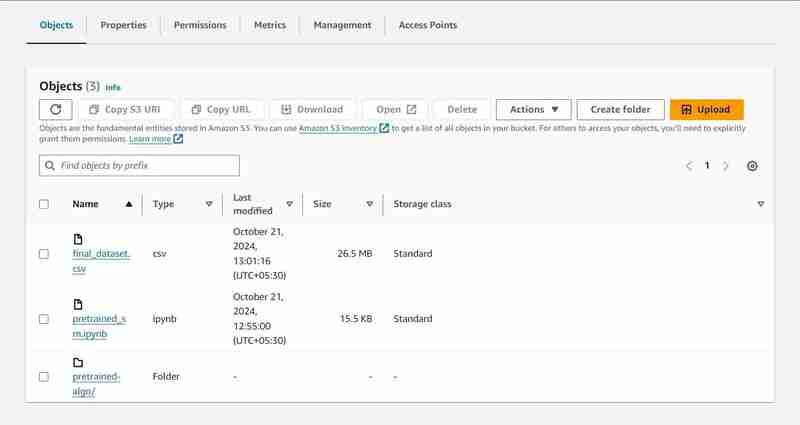
- 그런 다음 ClassiSageml_opsdata_upload.ipynb에서 코드를 사용하여 셀 번호 25까지 모든 코드 셀을 실행합니다.
xgb_predictor = estimator.deploy(initial_instance_count=1,instance_type='ml.m5.large')
S3 버킷에 데이터 세트를 업로드합니다.
- 코드셀 실행 결과

- 노트북 실행 후 AWS Management Console을 다시 엽니다.
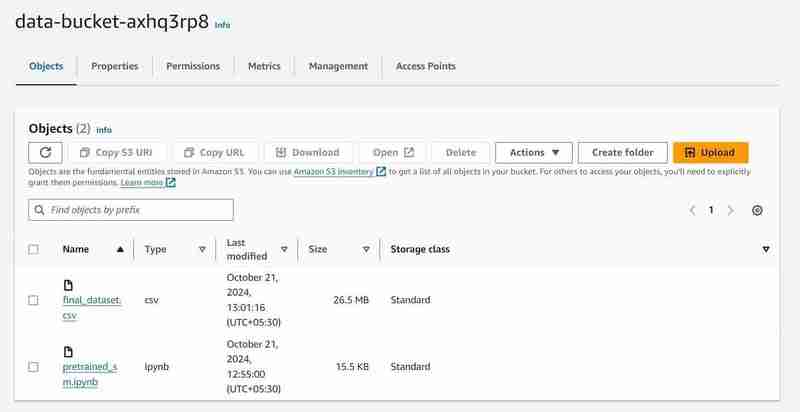
- S3 및 SageMaker 서비스를 검색하면 시작된 각 서비스의 인스턴스를 볼 수 있습니다(S3 버킷 및 SageMaker 노트북)
2개의 객체가 업로드된 'data-bucket-'이라는 이름의 S3 버킷, 데이터 세트 및 모델 코드가 포함된 pretrained_sm.ipynb 파일.

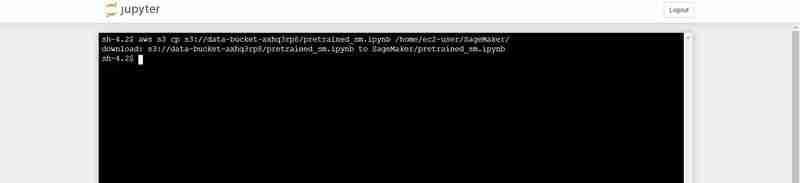
- AWS SageMaker의 노트북 인스턴스로 이동하여 생성된 인스턴스를 클릭하고 Jupyter 열기를 클릭하세요.
- 그런 다음 창 오른쪽 상단의 새로 만들기를 클릭하고 터미널에서 선택하세요.
- 새 터미널이 생성됩니다.
- 터미널에 다음을 붙여넣습니다(VS Code의 터미널 출력에 표시된 bucket_name 출력으로 대체).
  # Looks for the XGBoost image URI and builds an XGBoost container. Specify the repo_version depending on preference.
  container = get_image_uri(boto3.Session().region_name,
                            'xgboost',
                            repo_version='1.0-1')
pretrained_sm.ipynb를 S3에서 Notebook의 Jupyter 환경으로 업로드하는 터미널 명령
- 열린 Jupyter 인스턴스로 돌아가서 pretrained_sm.ipynb 파일을 클릭하여 열고 conda_python3 커널을 할당합니다.
- 네 번째 셀까지 아래로 스크롤하고 bucket_name = "
"에 대한 VS Code의 터미널 출력으로 변수 bucket_name의 값을 바꿉니다.
  hyperparameters = {
        "max_depth":"5",                ## Maximum depth of a tree. Higher means more complex models but risk of overfitting.
        "eta":"0.2",                    ## Learning rate. Lower values make the learning process slower but more precise.
        "gamma":"4",                    ## Minimum loss reduction required to make a further partition on a leaf node. Controls the model’s complexity.
        "min_child_weight":"6",         ## Minimum sum of instance weight (hessian) needed in a child. Higher values prevent overfitting.
        "subsample":"0.7",              ## Fraction of training data used. Reduces overfitting by sampling part of the data.
        "objective":"binary:logistic",  ## Specifies the learning task and corresponding objective. binary:logistic is for binary classification.
        "num_round":50                  ## Number of boosting rounds, essentially how many times the model is trained.
        }
  # A SageMaker estimator that calls the xgboost-container
  estimator = sagemaker.estimator.Estimator(image_uri=container,                  # Points to the XGBoost container we previously set up. This tells SageMaker which algorithm container to use.
                                          hyperparameters=hyperparameters,      # Passes the defined hyperparameters to the estimator. These are the settings that guide the training process.
                                          role=sagemaker.get_execution_role(),  # Specifies the IAM role that SageMaker assumes during the training job. This role allows access to AWS resources like S3.
                                          train_instance_count=1,               # Sets the number of training instances. Here, it’s using a single instance.
                                          train_instance_type='ml.m5.large',    # Specifies the type of instance to use for training. ml.m5.2xlarge is a general-purpose instance with a balance of compute, memory, and network resources.
                                          train_volume_size=5, # 5GB            # Sets the size of the storage volume attached to the training instance, in GB. Here, it’s 5 GB.
                                          output_path=output_path,              # Defines where the model artifacts and output of the training job will be saved in S3.
                                          train_use_spot_instances=True,        # Utilizes spot instances for training, which can be significantly cheaper than on-demand instances. Spot instances are spare EC2 capacity offered at a lower price.
                                          train_max_run=300,                    # Specifies the maximum runtime for the training job in seconds. Here, it's 300 seconds (5 minutes).
                                          train_max_wait=600)                   # Sets the maximum time to wait for the job to complete, including the time waiting for spot instances, in seconds. Here, it's 600 seconds (10 minutes).
코드셀 실행 결과

- 파일 상단에서 커널 탭으로 이동하여 다시 시작하세요.
- 코드 셀 번호 27까지 노트북을 실행합니다.
estimator.fit({'train': s3_input_train,'validation': s3_input_test})
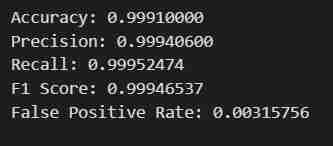
- 원하는 결과를 얻을 수 있습니다. 데이터를 가져와서 정의된 출력 경로를 사용하여 레이블 및 기능에 맞게 조정한 후 학습 및 테스트 세트로 분할합니다. 그런 다음 SageMaker의 Python SDK를 사용하는 모델을 교육하고, EndPoint로 배포하고, 검증하여 다양한 지표를 제공합니다.
콘솔 관찰 노트
8번째 셀 실행
xgb_predictor = estimator.deploy(initial_instance_count=1,instance_type='ml.m5.large')
- 모델 데이터를 저장하기 위해 S3에 출력 경로가 설정됩니다.

23번째 셀 실행
  # Looks for the XGBoost image URI and builds an XGBoost container. Specify the repo_version depending on preference.
  container = get_image_uri(boto3.Session().region_name,
                            'xgboost',
                            repo_version='1.0-1')
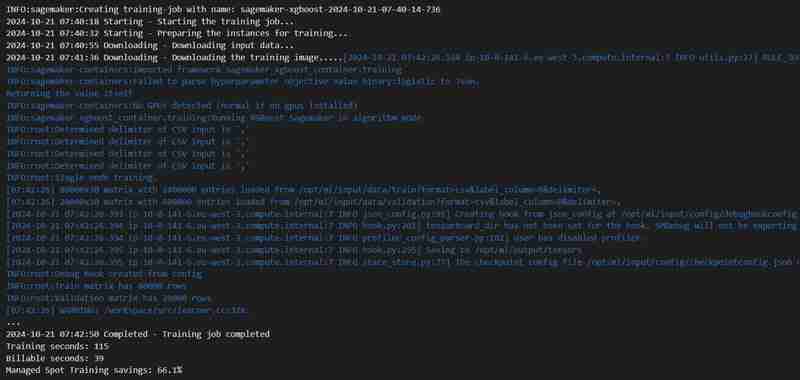
- 훈련 작업이 시작됩니다. 훈련 탭에서 확인할 수 있습니다.

- 일정 시간(3분 정도)이 지나면 완료되고 동일한 내용이 표시됩니다.

24번째 코드셀 실행
  hyperparameters = {
        "max_depth":"5",                ## Maximum depth of a tree. Higher means more complex models but risk of overfitting.
        "eta":"0.2",                    ## Learning rate. Lower values make the learning process slower but more precise.
        "gamma":"4",                    ## Minimum loss reduction required to make a further partition on a leaf node. Controls the model’s complexity.
        "min_child_weight":"6",         ## Minimum sum of instance weight (hessian) needed in a child. Higher values prevent overfitting.
        "subsample":"0.7",              ## Fraction of training data used. Reduces overfitting by sampling part of the data.
        "objective":"binary:logistic",  ## Specifies the learning task and corresponding objective. binary:logistic is for binary classification.
        "num_round":50                  ## Number of boosting rounds, essentially how many times the model is trained.
        }
  # A SageMaker estimator that calls the xgboost-container
  estimator = sagemaker.estimator.Estimator(image_uri=container,                  # Points to the XGBoost container we previously set up. This tells SageMaker which algorithm container to use.
                                          hyperparameters=hyperparameters,      # Passes the defined hyperparameters to the estimator. These are the settings that guide the training process.
                                          role=sagemaker.get_execution_role(),  # Specifies the IAM role that SageMaker assumes during the training job. This role allows access to AWS resources like S3.
                                          train_instance_count=1,               # Sets the number of training instances. Here, it’s using a single instance.
                                          train_instance_type='ml.m5.large',    # Specifies the type of instance to use for training. ml.m5.2xlarge is a general-purpose instance with a balance of compute, memory, and network resources.
                                          train_volume_size=5, # 5GB            # Sets the size of the storage volume attached to the training instance, in GB. Here, it’s 5 GB.
                                          output_path=output_path,              # Defines where the model artifacts and output of the training job will be saved in S3.
                                          train_use_spot_instances=True,        # Utilizes spot instances for training, which can be significantly cheaper than on-demand instances. Spot instances are spare EC2 capacity offered at a lower price.
                                          train_max_run=300,                    # Specifies the maximum runtime for the training job in seconds. Here, it's 300 seconds (5 minutes).
                                          train_max_wait=600)                   # Sets the maximum time to wait for the job to complete, including the time waiting for spot instances, in seconds. Here, it's 600 seconds (10 minutes).
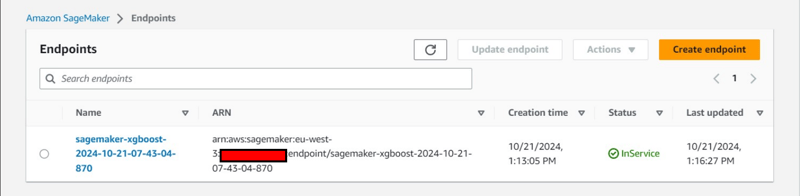
- 엔드포인트는 추론 탭 아래에 배포됩니다.
추가 콘솔 관찰:
- 추론 탭에서 엔드포인트 구성 생성

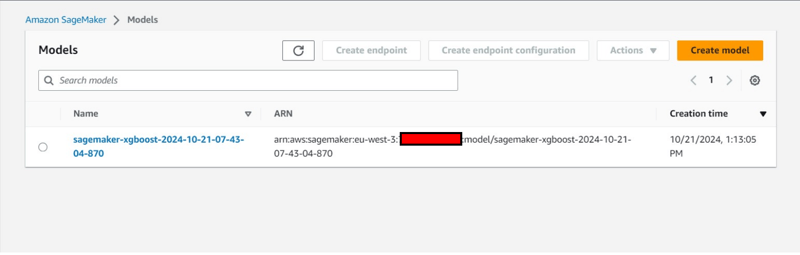
- 추론 탭에서도 모델 생성이 가능합니다.
종료 및 정리
- VS Code에서 data_upload.ipynb로 돌아와 마지막 2개의 코드 셀을 실행하여 S3 버킷의 데이터를 로컬 시스템에 다운로드합니다.
- 폴더 이름은 download_bucket_content로 지정됩니다. 다운로드된 폴더의 디렉터리 구조.
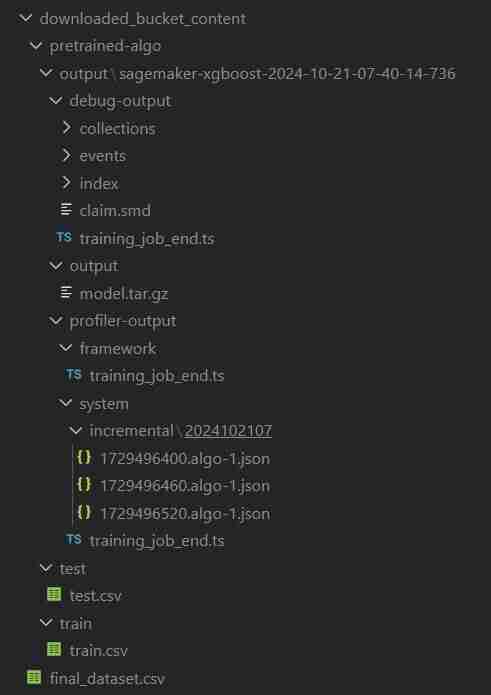
- 출력 셀에 다운로드한 파일의 로그가 표시됩니다. 여기에는 원시 pretrained_sm.ipynb, final_dataset.csv 및 Sagemaker 코드 파일의 실행 데이터가 포함된 'pretrained-algo'라는 모델 출력 폴더가 포함됩니다.
- 마지막으로 SageMaker 인스턴스 내부에 있는 pretrained_sm.ipynb로 이동하여 마지막 2개의 코드 셀을 실행합니다. 추가 비용이 발생하지 않도록 엔드포인트와 S3 버킷 내의 리소스가 삭제됩니다.
- EndPoint 삭제
estimator.fit({'train': s3_input_train,'validation': s3_input_test})

- S3 지우기: (인스턴스를 파괴하는 데 필요)
  # Looks for the XGBoost image URI and builds an XGBoost container. Specify the repo_version depending on preference.
  container = get_image_uri(boto3.Session().region_name,
                            'xgboost',
                            repo_version='1.0-1')
- 프로젝트 파일의 VS Code 터미널로 돌아온 다음 terraform destroy --auto-approve를 입력/붙여넣기하세요.
- 생성된 리소스 인스턴스가 모두 삭제됩니다.
자동 생성된 개체
ClassiSage/downloaded_bucket_content
ClassiSage/.terraform
ClassiSage/ml_ops/pycache
ClassiSage/.terraform.lock.hcl
ClassiSage/terraform.tfstate
ClassiSage/terraform.tfstate.backup
참고:
HDFS 로그 분류를 위해 AWS Cloud의 S3 및 SageMaker를 사용하고 IaC(인프라 설정 자동화)용 Terraform을 사용하는 이 기계 학습 프로젝트의 아이디어와 구현이 마음에 드셨다면 GitHub에서 프로젝트 저장소를 확인한 후 이 게시물에 좋아요를 누르고 별표를 표시해 주시기 바랍니다. .
위 내용은 ClassiSage: Terraform IaC 자동화된 AWS SageMaker 기반 HDFS 로그 분류 모델의 상세 내용입니다. 자세한 내용은 PHP 중국어 웹사이트의 기타 관련 기사를 참조하세요!

핫 AI 도구

Undresser.AI Undress
사실적인 누드 사진을 만들기 위한 AI 기반 앱

AI Clothes Remover
사진에서 옷을 제거하는 온라인 AI 도구입니다.

Undress AI Tool
무료로 이미지를 벗다

Clothoff.io
AI 옷 제거제

Video Face Swap
완전히 무료인 AI 얼굴 교환 도구를 사용하여 모든 비디오의 얼굴을 쉽게 바꾸세요!

인기 기사
뜨거운 도구

메모장++7.3.1
사용하기 쉬운 무료 코드 편집기

SublimeText3 중국어 버전
중국어 버전, 사용하기 매우 쉽습니다.

스튜디오 13.0.1 보내기
강력한 PHP 통합 개발 환경

드림위버 CS6
시각적 웹 개발 도구

SublimeText3 Mac 버전
신 수준의 코드 편집 소프트웨어(SublimeText3)
뜨거운 주제
 7906
7906
 15
1652
14
1411
52
1303
25
1248
29
15
1652
14
1411
52
1303
25
1248
29

 중간 독서를 위해 Fiddler를 사용할 때 브라우저에서 감지되는 것을 피하는 방법은 무엇입니까?
Apr 02, 2025 am 07:15 AM
중간 독서를 위해 Fiddler를 사용할 때 브라우저에서 감지되는 것을 피하는 방법은 무엇입니까?
Apr 02, 2025 am 07:15 AM
Fiddlerevery Where를 사용할 때 Man-in-the-Middle Reading에 Fiddlereverywhere를 사용할 때 감지되는 방법 ...

 Linux 터미널에서 Python (Version 명령)을 사용할 때 권한 문제를 해결하는 방법은 무엇입니까?
Apr 02, 2025 am 06:36 AM
Linux 터미널에서 Python (Version 명령)을 사용할 때 권한 문제를 해결하는 방법은 무엇입니까?
Apr 02, 2025 am 06:36 AM
Linux 터미널에서 Python 사용 ...
 10 시간 이내에 프로젝트 및 문제 중심 방법에서 컴퓨터 초보자 프로그래밍 기본 사항을 가르치는 방법?
Apr 02, 2025 am 07:18 AM
10 시간 이내에 프로젝트 및 문제 중심 방법에서 컴퓨터 초보자 프로그래밍 기본 사항을 가르치는 방법?
Apr 02, 2025 am 07:18 AM
10 시간 이내에 컴퓨터 초보자 프로그래밍 기본 사항을 가르치는 방법은 무엇입니까? 컴퓨터 초보자에게 프로그래밍 지식을 가르치는 데 10 시간 밖에 걸리지 않는다면 무엇을 가르치기로 선택 하시겠습니까?
 Python Asyncio Telnet 연결이 즉시 분리됩니다. 서버 측 차단 문제를 해결하는 방법은 무엇입니까?
Apr 02, 2025 am 06:30 AM
Python Asyncio Telnet 연결이 즉시 분리됩니다. 서버 측 차단 문제를 해결하는 방법은 무엇입니까?
Apr 02, 2025 am 06:30 AM
Pythonasyncio에 대해 ...
 Inversiting.com의 크롤링 메커니즘을 우회하는 방법은 무엇입니까?
Apr 02, 2025 am 07:03 AM
Inversiting.com의 크롤링 메커니즘을 우회하는 방법은 무엇입니까?
Apr 02, 2025 am 07:03 AM
Investing.com의 크롤링 전략 이해 많은 사람들이 종종 Investing.com (https://cn.investing.com/news/latest-news)에서 뉴스 데이터를 크롤링하려고합니다.
 Python 3.6 피클 파일로드 오류 modulenotfounderRor : 피클 파일 '__builtin__'를로드하면 어떻게해야합니까?
Apr 02, 2025 am 06:27 AM
Python 3.6 피클 파일로드 오류 modulenotfounderRor : 피클 파일 '__builtin__'를로드하면 어떻게해야합니까?
Apr 02, 2025 am 06:27 AM
Python 3.6에 피클 파일 로딩 3.6 환경 오류 : ModulenotFounderRor : nomodulename ...
 SCAPY 크롤러를 사용할 때 파이프 라인 파일을 작성할 수없는 이유는 무엇입니까?
Apr 02, 2025 am 06:45 AM
SCAPY 크롤러를 사용할 때 파이프 라인 파일을 작성할 수없는 이유는 무엇입니까?
Apr 02, 2025 am 06:45 AM
SCAPY 크롤러를 사용할 때 파이프 라인 파일을 작성할 수없는 이유에 대한 논의 지속적인 데이터 저장을 위해 SCAPY 크롤러를 사용할 때 파이프 라인 파일이 발생할 수 있습니다 ...
