데이터에서 배포까지
Nov 03, 2024 am 01:43 AMDataWhisper: DL 프로젝트 라이프사이클 마스터하기
작성자: Abdellah Hallou(LinkedIn, Twitter)
딥 러닝 프로젝트 스타터 가이드에 오신 것을 환영합니다! 이 튜토리얼은 흥미진진한 딥 러닝의 세계에 뛰어들고 싶은 모든 사람을 위한 포괄적인 리소스 역할을 합니다. 초보자이든 숙련된 개발자이든 이 가이드는 딥 러닝 프로젝트를 구축하는 과정을 처음부터 끝까지 안내합니다.
목차
- 학습 내용
- 이 튜토리얼을 따라야 할 사람
- 도움이 필요하거나 질문이 있으신가요?
- 시작해 보세요!
- 데이터세트 가져오기 및 로드
- 데이터세트 구조
- 탐색적 데이터 분석(EDA)
- 데이터 전처리
- 모델 만들기
- 정확성 평가
- 모델 저장 및 내보내기
- 예측하기
-
전개
- 새 Flutter 프로젝트 만들기
- 카메라 구성
- 카메라 화면 만들기
- 이미지 업로드 통합
- TensorFlow Lite를 사용한 객체 인식
- 이미지에서 모델 실행
- 대화상자에 결과 표시
- 사용자 인터페이스 구축
무엇을 배울 것인가
이 튜토리얼에서는 모바일 앱에서 딥 러닝 모델을 생성하고 배포하는 데 필요한 필수 단계를 알아봅니다. 우리는 다음 주제를 다룰 것입니다:
데이터 준비: 학습을 위한 강력하고 안정적인 데이터세트를 보장하기 위해 데이터 전처리를 위한 다양한 방법을 살펴보겠습니다.
모델 생성: CNN 모델을 설계하고 구축하는 방법을 알아보세요.
모델 학습: TensorFlow를 사용하여 딥 러닝 모델을 학습하는 과정을 자세히 살펴보겠습니다.
모바일 앱에 배포: 모델이 훈련되면 TensorFlow Lite를 사용하여 모델을 모바일 앱에 통합하는 단계를 안내해 드립니다. 이동 중에도 예측하는 방법을 이해할 수 있습니다!
이 튜토리얼을 따라야 할 사람
이 튜토리얼은 딥 러닝 개념과 Python 프로그래밍에 대한 기본적인 이해가 있는 초보자와 중급 개발자에게 적합합니다. 귀하가 데이터 과학자, 기계 학습 애호가 또는 모바일 앱 개발자인지 여부에 관계없이 이 가이드는 딥 러닝 프로젝트를 시작하는 데 필요한 지식을 제공합니다.
도움이 필요하거나 질문이 있으신가요?
이 튜토리얼을 진행하는 동안 문제가 발생하거나 질문이 있거나 추가 설명이 필요한 경우 주저하지 말고 이 리포지토리 From-Data-to-Deployment에서 GitHub 문제를 생성하세요. 기꺼이 도와드리고 필요한 지침을 제공해 드리겠습니다.
이슈를 생성하려면 이 저장소 페이지 상단의 "문제" 탭을 클릭하고 "새 이슈" 버튼을 클릭하세요. 현재 직면한 문제나 질문에 대해 최대한 많은 맥락과 세부 정보를 제공해 주세요. 이렇게 하면 귀하의 우려사항을 더 잘 이해하고 신속하고 정확한 답변을 드릴 수 있습니다.
귀하의 피드백은 소중하며 다른 사용자를 위해 이 튜토리얼을 개선하는 데도 도움이 됩니다. 따라서 도움이 필요하면 주저하지 말고 문의하세요. 함께 배우고 성장해요!
시작해 봅시다!
시작하려면 필수 종속성과 라이브러리가 설치되어 있는지 확인하세요. 튜토리얼은 따라하기 쉬운 섹션으로 나누어져 있으며 각 섹션은 딥 러닝 프로젝트 워크플로의 특정 측면을 다루고 있습니다. 가장 관심 있는 섹션으로 이동하거나 처음부터 끝까지 따라가 보세요.
준비됐나요?
데이터 세트 가져오기 및 로드
코드에 필요한 가져오기를 시작하겠습니다. 이 튜토리얼에서는 Fashion Mnist 데이터 세트를 사용합니다.
# Import the necessary libraries
from __future__ import print_function
import keras
from google.colab import drive
import os
import numpy as np
from keras.models import Sequential
from keras.layers import Dense, Dropout, Activation, Flatten, BatchNormalization
from keras.layers import Conv2D, MaxPooling2D
from keras.wrappers.scikit_learn import KerasClassifier
from keras import backend as K
from sklearn.model_selection import GridSearchCV
import tensorflow as tf
from keras.utils.vis_utils import plot_model
import matplotlib.pyplot as plt
데이터세트 구조
모든 딥 러닝 프로젝트에서는 데이터를 이해하는 것이 중요합니다. 모델 생성 및 학습을 시작하기 전에 먼저 데이터를 로드하고 해당 구조, 변수 및 전반적인 특성에 대한 통찰력을 얻으세요.
# Load the Fashion MNIST dataset
fashion_mnist = tf.keras.datasets.fashion_mnist
(x_train, y_train), (x_test, y_test) = fashion_mnist.load_data()
탐색적 데이터 분석(EDA)
이제 데이터가 로드되었으므로 탐색적 데이터 분석을 수행하여 해당 특성을 더 잘 이해해 보겠습니다.
print("Shape of the training data : ",x_train.shape)
print("Shape of the testing data : ",x_test.shape)
Shape of the training data :  (60000, 28, 28)
Shape of the testing data :  (10000, 28, 28)
패션 MNIST 데이터세트에는 10개 카테고리의 70,000회색조 이미지가 포함되어 있습니다. 이미지는 다음과 같이 낮은 해상도 (28 x 28 픽셀)의 개별 의류 품목을 보여줍니다.

60,000개의 이미지는 네트워크를 훈련하는 데 사용되며 10,000개의 이미지는 네트워크가 이미지 분류를 얼마나 정확하게 학습했는지 평가하는 데 사용됩니다.
# Printing unique values in training data
unique_labels = np.unique(y_train, axis=0)
print("Unique labels in training data:", unique_labels)
Unique labels in training data: [0 1 2 3 4 5 6 7 8 9]
레이블은 0에서 9까지의 정수 배열입니다. 이는 이미지가 나타내는 의류 클래스에 해당합니다.
| 라벨 | R클래스 |
| - |-|
| 0 | 티셔츠/탑|
| 1 | 바지|
| 2 |풀오버|
| 3 |드레스|
| 4 |코트|
| 5 |샌들|
| 6 |셔츠|
| 7 |운동화 |
| 8 |가방|
| 9 | 앵클부츠 |
클래스 이름은 데이터세트에 포함되지 않으므로 나중에 이미지를 그릴 때 사용할 수 있도록 여기에 저장하세요.
# Numeric labels
numeric_labels = np.sort(np.unique(y_train, axis=0))
# String labels
string_labels = np.array(['T-shirt/top', 'Trouser', 'Pullover', 'Dress', 'Coat','Sandal', 'Shirt', 'Sneaker', 'Bag', 'Ankle boot'])
# Mapping numeric labels to string labels
numeric_to_string = dict(zip(numeric_labels, string_labels))
print("Numeric to String Label Mapping:")
print(numeric_to_string)
Numeric to String Label Mapping:
{0: 'T-shirt/top', 1: 'Trouser', 2: 'Pullover', 3: 'Dress', 4: 'Coat', 5: 'Sandal', 6: 'Shirt', 7: 'Sneaker', 8: 'Bag', 9: 'Ankle boot'}
데이터 전처리
네트워크를 훈련하기 전에 데이터를 전처리해야 합니다.
먼저 데이터세트의 클래스 수(이 경우 10개)와 입력 이미지의 크기(28x28픽셀)를 정의합니다.
# Import the necessary libraries
from __future__ import print_function
import keras
from google.colab import drive
import os
import numpy as np
from keras.models import Sequential
from keras.layers import Dense, Dropout, Activation, Flatten, BatchNormalization
from keras.layers import Conv2D, MaxPooling2D
from keras.wrappers.scikit_learn import KerasClassifier
from keras import backend as K
from sklearn.model_selection import GridSearchCV
import tensorflow as tf
from keras.utils.vis_utils import plot_model
import matplotlib.pyplot as plt
이 부분은 신경망 모델의 예상 형식과 일치하도록 입력 이미지 데이터를 재구성하는 역할을 담당합니다. 형식은 사용되는 백엔드(예: TensorFlow 또는 Theano)에 따라 다릅니다. 이 스니펫에서는 K.image_data_format()을 사용하여 이미지 데이터 형식을 확인하고 결과에 따라 적절한 재구성을 적용합니다.
# Load the Fashion MNIST dataset
fashion_mnist = tf.keras.datasets.fashion_mnist
(x_train, y_train), (x_test, y_test) = fashion_mnist.load_data()
데이터에 포함된 이미지의 픽셀 값은 0~255 범위 내에 있습니다.
이 값을 CNN 모델에 공급하기 전에 0~1 범위로 조정하세요.
print("Shape of the training data : ",x_train.shape)
print("Shape of the testing data : ",x_test.shape)
클래스 레이블(정수로 표시)을 다중 클래스 분류 문제에 필요한 이진 클래스 행렬 형식으로 변환합니다.
Shape of the training data :  (60000, 28, 28)
Shape of the testing data :  (10000, 28, 28)
모델 구축
이 단계에서는 이미지 분류를 위한 CNN(컨볼루션 신경망) 모델을 정의하고 구축합니다. 모델 아키텍처는 Convolutional, Pooling, Dropout 및 Dense 레이어와 같은 여러 레이어로 구성됩니다. build_model 함수는 클래스 수, 교육 및 테스트 데이터를 입력으로 사용하고 교육 기록과 빌드된 모델을 반환합니다.
# Printing unique values in training data
unique_labels = np.unique(y_train, axis=0)
print("Unique labels in training data:", unique_labels)
Unique labels in training data: [0 1 2 3 4 5 6 7 8 9]
# Numeric labels
numeric_labels = np.sort(np.unique(y_train, axis=0))
# String labels
string_labels = np.array(['T-shirt/top', 'Trouser', 'Pullover', 'Dress', 'Coat','Sandal', 'Shirt', 'Sneaker', 'Bag', 'Ankle boot'])
# Mapping numeric labels to string labels
numeric_to_string = dict(zip(numeric_labels, string_labels))
print("Numeric to String Label Mapping:")
print(numeric_to_string)
정확성 평가
학습된 모델의 성능을 평가하기 위해 테스트 데이터를 기준으로 평가합니다. 평가 방법은 테스트 손실과 정확도를 계산하는 데 사용됩니다. 그런 다음 이러한 측정항목이 콘솔에 인쇄됩니다.
Numeric to String Label Mapping:
{0: 'T-shirt/top', 1: 'Trouser', 2: 'Pullover', 3: 'Dress', 4: 'Coat', 5: 'Sandal', 6: 'Shirt', 7: 'Sneaker', 8: 'Bag', 9: 'Ankle boot'}

num_classes = 10
# input image dimensions
img_rows, img_cols = 28, 28
if K.image_data_format() == 'channels_first':
    x_train = x_train.reshape(x_train.shape[0], 1, img_rows, img_cols)
    x_test = x_test.reshape(x_test.shape[0], 1, img_rows, img_cols)
    input_shape = (1, img_rows, img_cols)
else:
    x_train = x_train.reshape(x_train.shape[0], img_rows, img_cols, 1)
    x_test = x_test.reshape(x_test.shape[0], img_rows, img_cols, 1)
    input_shape = (img_rows, img_cols, 1)
모델 저장 및 내보내기
모델을 훈련한 후 save 메소드를 사용하여 Hierarchical Data Format(HDF5) 파일 형식으로 저장합니다. 그런 다음 move_to_drive 함수를 호출하여 모델을 Google 드라이브로 내보냅니다. 또한 h52tflite 함수를 사용하여 모델을 TensorFlow Lite 형식으로 변환하고, 결과 TFLite 모델도 Google 드라이브에 저장됩니다. 저장된 모델과 TFLite 모델의 경로가 반환됩니다.
x_train = x_train.astype('float32')
x_test = x_test.astype('float32')
x_train /= 255
x_test /= 255
예측하기
모델의 예측을 시각화하기 위해 무작위로 테스트 이미지 세트를 선택합니다. 모델은 예측 방법을 사용하여 이러한 이미지의 클래스 레이블을 예측합니다. 그런 다음 예측된 레이블을 실제 레이블과 비교하여 matplotlib.
을 사용하여 해당 예측 레이블과 함께 이미지를 표시합니다.
# convert class vectors to binary class matrices
y_train = keras.utils.to_categorical(y_train, num_classes)
y_test = keras.utils.to_categorical(y_test, num_classes)

모델에 대한 자세한 내용은 다음 리소스를 확인하세요.
- https://www.tensorflow.org/tutorials/keras/classification
- https://github.com/cmasch/zalando-fashion-mnist/tree/master
전개
새 Flutter 프로젝트 만들기
새 Flutter 프로젝트를 만들기 전에 Flutter SDK 및 기타 Flutter 앱 개발 관련 요구 사항이 제대로 설치되어 있는지 확인하세요. https://docs.flutter.dev/get-started/install/windows
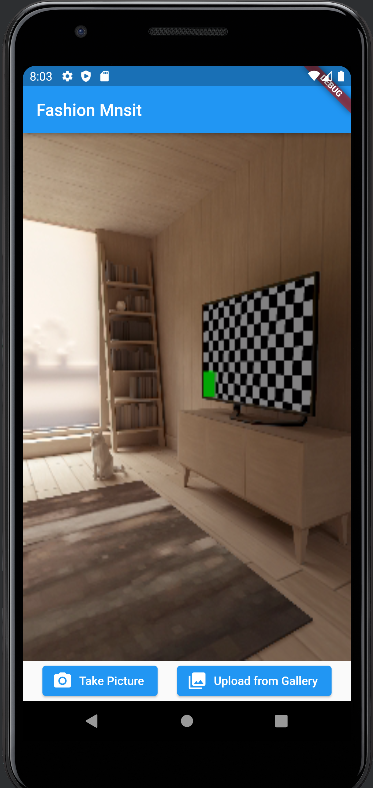
프로젝트가 설정되면 사용자가 갤러리에서 사진을 찍거나 이미지를 업로드하고 내보낸 TensorFlow Lite 모델을 사용하여 객체 인식을 수행할 수 있는 UI를 구현합니다.
먼저 다음 패키지를 설치해야 합니다.
- 카메라: 0.10.4
- 이미지 선택기:
- tflite: ^1.1.2
다음 코드 조각을 복사하여 프로젝트의 pubspec.yaml 파일에 붙여넣으세요.
# Import the necessary libraries
from __future__ import print_function
import keras
from google.colab import drive
import os
import numpy as np
from keras.models import Sequential
from keras.layers import Dense, Dropout, Activation, Flatten, BatchNormalization
from keras.layers import Conv2D, MaxPooling2D
from keras.wrappers.scikit_learn import KerasClassifier
from keras import backend as K
from sklearn.model_selection import GridSearchCV
import tensorflow as tf
from keras.utils.vis_utils import plot_model
import matplotlib.pyplot as plt
프로젝트 main.dart 파일에서 필요한 패키지를 가져옵니다
# Load the Fashion MNIST dataset
fashion_mnist = tf.keras.datasets.fashion_mnist
(x_train, y_train), (x_test, y_test) = fashion_mnist.load_data()
카메라 구성
카메라 기능을 활성화하기 위해 카메라 패키지를 활용하겠습니다. 먼저 필요한 패키지를 가져오고 카메라 컨트롤러를 인스턴스화합니다. 사용 가능한 카메라 목록을 얻으려면 availableCameras() 함수를 사용하세요. 이 튜토리얼에서는 목록의 첫 번째 카메라를 사용하겠습니다.
print("Shape of the training data : ",x_train.shape)
print("Shape of the testing data : ",x_test.shape)
카메라 화면 만들기
카메라 미리보기 및 이미지 캡처 기능을 처리할 CameraScreen이라는 새 StatefulWidget을 만듭니다. initState() 메서드에서 카메라 컨트롤러를 초기화하고 해상도 사전 설정을 설정합니다. 또한 카메라 컨트롤러를 사용하여 이미지를 캡처하는 _takePicture() 메서드를 구현하세요.
Shape of the training data :  (60000, 28, 28)
Shape of the testing data :  (10000, 28, 28)
이미지 업로드 통합
사용자가 갤러리에서 이미지를 업로드할 수 있도록 하려면 image_picker 패키지를 가져옵니다. ImagePicker 클래스를 활용하여 갤러리에서 이미지를 선택하는 _pickImage() 메서드를 구현합니다. 이미지가 선택되면 _processImage() 메소드
를 사용하여 처리할 수 있습니다.
# Printing unique values in training data
unique_labels = np.unique(y_train, axis=0)
print("Unique labels in training data:", unique_labels)
TensorFlow Lite를 사용한 객체 인식
객체 인식을 수행하기 위해 TensorFlow Lite를 사용하겠습니다. tflite 패키지를 가져오는 것부터 시작하세요. _initTensorFlow() 메서드에서 TensorFlow Lite 모델과 자산의 라벨을 로드합니다. 모델 및 레이블 파일 경로를 지정하고 스레드 수 및 GPU 대리자 사용과 같은 설정을 조정할 수 있습니다.
# Import the necessary libraries
from __future__ import print_function
import keras
from google.colab import drive
import os
import numpy as np
from keras.models import Sequential
from keras.layers import Dense, Dropout, Activation, Flatten, BatchNormalization
from keras.layers import Conv2D, MaxPooling2D
from keras.wrappers.scikit_learn import KerasClassifier
from keras import backend as K
from sklearn.model_selection import GridSearchCV
import tensorflow as tf
from keras.utils.vis_utils import plot_model
import matplotlib.pyplot as plt
이미지에서 모델 실행
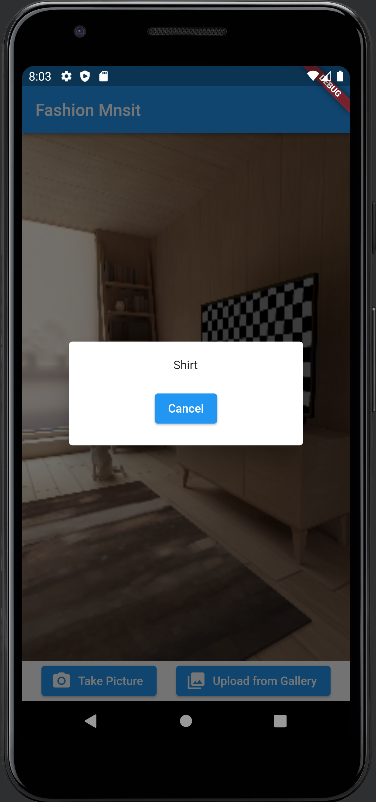
이미지 파일 경로를 입력으로 사용하고 이미지에서 TensorFlow Lite 모델을 실행하는 _objectRecognition() 메서드를 구현합니다. 이 메소드는 인식된 개체의 레이블을 반환합니다.
# Load the Fashion MNIST dataset
fashion_mnist = tf.keras.datasets.fashion_mnist
(x_train, y_train), (x_test, y_test) = fashion_mnist.load_data()
대화 상자에 결과 표시
이미지 처리가 완료되면 showDialog() 메소드를 사용하여 대화 상자에 결과를 표시합니다. 인식된 개체 라벨을 표시하고 취소 옵션을 제공하도록 대화 상자를 사용자 정의하세요.
print("Shape of the training data : ",x_train.shape)
print("Shape of the testing data : ",x_test.shape)
사용자 인터페이스 구축
Shape of the training data :  (60000, 28, 28)
Shape of the testing data :  (10000, 28, 28)


위 내용은 데이터에서 배포까지의 상세 내용입니다. 자세한 내용은 PHP 중국어 웹사이트의 기타 관련 기사를 참조하세요!

인기 기사

인기 기사

뜨거운 기사 태그

메모장++7.3.1
사용하기 쉬운 무료 코드 편집기

SublimeText3 중국어 버전
중국어 버전, 사용하기 매우 쉽습니다.

스튜디오 13.0.1 보내기
강력한 PHP 통합 개발 환경

드림위버 CS6
시각적 웹 개발 도구

SublimeText3 Mac 버전
신 수준의 코드 편집 소프트웨어(SublimeText3)

뜨거운 주제
 7133
7133
 9
9
 1534
1534
 14
14
 1256
1256
 25
25
 1205
1205
 29
29
 1153
1153
 46
46
 Tensorflow 또는 Pytorch로 딥 러닝을 수행하는 방법은 무엇입니까?
Mar 10, 2025 pm 06:52 PM
Tensorflow 또는 Pytorch로 딥 러닝을 수행하는 방법은 무엇입니까?


