API 키 입력을 허용하도록 로컬 bolt.new 인터페이스를 수정합니다.
Nov 23, 2024 pm 02:24 PMbolt.new에서는 환경변수를 이용하여 API 키를 구성할 수 있는데, 이번에는 인터페이스에서 직접 API 키를 입력할 수 있도록 수정하겠습니다.
수정 세부정보
사이드바
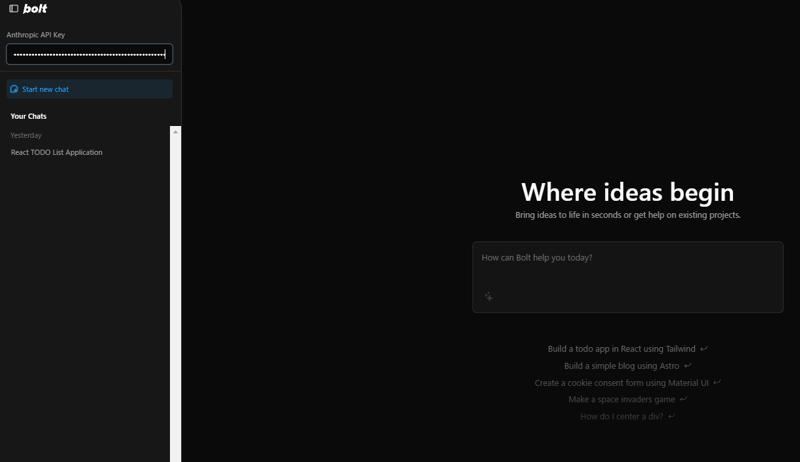
사이드바에서 직접 API 키 입력을 활성화하겠습니다.
현재 채팅 기록을 표시하는 사이드바 상단에 API 키를 입력하기 위한 새 양식을 추가합니다.
이를 달성하려면 bolt.new/app/comComponents/sidebar/Menu.client.tsx 파일을 수정하세요.
먼저 API 키 입력을 처리하는 함수를 가져옵니다.
import { ApiKeyInput } from '~/components/sidebar/ApiKeyInput';
bolt.new/app/comComponents/sidebar/ApiKeyInput.tsx 파일은 나중에 생성됩니다.
다음으로 메뉴에 API 키 입력 양식을 추가합니다.
...
  return (
      <motion.div
        ref={menuRef}
        initial="closed"
        animate={open ? 'open' : 'closed'}
        variants={menuVariants}
        className="flex flex-col side-menu fixed top-0 w-[350px] h-full bg-bolt-elements-background-depth-2 border-r rounded-r-3xl border-bolt-elements-borderColor z-sidebar shadow-xl shadow-bolt-elements-sidebar-dropdownShadow text-sm"
      >
        <div className="flex items-center h-[var(--header-height)]">{/* Placeholder */}</div>
        <div className="flex-1 flex flex-col h-full w-full overflow-hidden">
          <ApiKeyInput /> {/* Add this line */}
          <div className="p-4">
...
추가된 코드는 여기에 배치되어야 합니다.
다음으로 다음 내용으로 bolt.new/app/comComponents/sidebar/ApiKeyInput.tsx 파일을 생성합니다.
import React, { useState } from 'react';
export function ApiKeyInput() {
const [apiKey, setApiKey] = useState(localStorage.getItem('apiKey') || '');
const handleChange = (event: React.ChangeEvent<HTMLInputElement>) => {
const value = event.target.value;
setApiKey(value);
localStorage.setItem('apiKey', value);
// Trigger API key change event
window.dispatchEvent(new Event('apiKeyChanged'));
};
return (
<div className="px-4 py-3 border-b border-bolt-elements-borderColor">
<label
htmlFor="api-key"
className="block text-bolt-elements-textSecondary text-sm mb-2"
>
Anthropic API Key
</label>
<input
type="password"
>
<p>This component will allow the user to input and store the API key in localStorage and trigger a custom event when the key is changed. </p>
<h3>
Chat Screen Modification
</h3>
<p>Update the chat screen to disable message sending until an API key is entered.<br><br>
Below is the revised code for bolt.new/app/components/chat/BaseChat.client.tsx, with additions marked between // Append start and // Append end:<br>
</p>
<pre class="brush:php;toolbar:false">export const BaseChat = React.forwardRef<HTMLDivElement, BaseChatProps>(
(
{
textareaRef,
messageRef,
scrollRef,
showChat = true,
chatStarted = false,
isStreaming = false,
enhancingPrompt = false,
promptEnhanced = false,
messages,
input = '',
sendMessage,
handleInputChange,
enhancePrompt,
handleStop,
},
ref,
) => {
// Append start
const [isApiKeyMissing, setIsApiKeyMissing] = useState(true); // Track API key presence
useEffect(() => {
const checkApiKey = () => {
const apiKey = localStorage.getItem('apiKey');
console.log('apiKey:', apiKey);
setIsApiKeyMissing(!apiKey);
};
// Initial check
checkApiKey();
// Add listener for API key changes
window.addEventListener('apiKeyChanged', checkApiKey);
return () => {
window.removeEventListener('apiKeyChanged', checkApiKey);
};
}, []);
// Append end
const TEXTAREA_MAX_HEIGHT = chatStarted ? 400 : 200;
return (
<div
ref={ref}
className={classNames(
styles.BaseChat,
'relative flex h-full w-full overflow-hidden bg-bolt-elements-background-depth-1',
)}
data-chat-visible={showChat}
>
<ClientOnly>{() => <Menu />}</ClientOnly>
<div ref={scrollRef} className="flex overflow-y-auto w-full h-full">
<div className={classNames(styles.Chat, 'flex flex-col flex-grow min-w-[var(--chat-min-width)] h-full')}>
{!chatStarted && (
<div>
<p>This ensures that users cannot send messages until they enter an API key, with clear visual feedback provided.</p>
<h3>
Passing the API Key to the LLM
</h3>
<p>To ensure the API key entered on the interface is accessible to the LLM, update the file bolt.new/app/lib/.server/llm/api-key.ts as follows:<br>
</p>
<pre class="brush:php;toolbar:false">import { env } from 'node:process';
export function getAPIKey(cloudflareEnv: Env) {
// Append start
const localApiKey = typeof window !== 'undefined' ? localStorage.getItem('apiKey') : null;
return localApiKey || env.ANTHROPIC_API_KEY || cloudflareEnv.ANTHROPIC_API_KEY;
// Append end
}
이를 통해 시스템은 UI를 통해 입력된 API 키(localApiKey)에 우선순위를 부여합니다. localStorage에서 키가 발견되지 않으면 환경 변수(env.ANTHROPIC_API_KEY 또는 cloudflareEnv.ANTHROPIC_API_KEY)로 대체됩니다.
구현 테스트
수정을 완료한 후 다음 명령을 사용하여 bolt.new를 빌드하고 시작하세요.
pnpm run build
pnpm run start
확인 단계
- 브라우저에서 애플리케이션 실행 API Key를 입력하기 전에 메시지 입력이 비활성화되고 경고가 표시되는지 확인하세요.

- API 키를 입력하세요 사이드바 양식을 사용하여 API 키를 입력하세요.
- 메시지 전송 가능 여부 확인 API 키를 입력한 후 메시지 입력이 활성화되어 메시지가 성공적으로 전송되는지 확인하세요.

이러한 단계를 수행하면 수정 후 기능이 의도한 대로 작동합니다.
위 내용은 API 키 입력을 허용하도록 로컬 bolt.new 인터페이스를 수정합니다.의 상세 내용입니다. 자세한 내용은 PHP 중국어 웹사이트의 기타 관련 기사를 참조하세요!

인기 기사


인기 기사

뜨거운 기사 태그

메모장++7.3.1
사용하기 쉬운 무료 코드 편집기

SublimeText3 중국어 버전
중국어 버전, 사용하기 매우 쉽습니다.

스튜디오 13.0.1 보내기
강력한 PHP 통합 개발 환경

드림위버 CS6
시각적 웹 개발 도구

SublimeText3 Mac 버전
신 수준의 코드 편집 소프트웨어(SublimeText3)
뜨거운 주제
 7285
7285
 9
1622
14
1342
46
1259
25
1206
29
9
1622
14
1342
46
1259
25
1206
29