

Angular의 구성요소 수명주기

Angular 수명 주기 후크는 개발자가 생성부터 초기화, 변경, 소멸을 포함하는 소멸까지 Angular 구성 요소 수명 주기의 주요 순간을 활용할 수 있도록 하는 방법입니다. 가장 일반적으로 사용되는 수명 주기 후크는 다음과 같습니다.
- 생성자: 페이지가 처음 로드될 때 호출됩니다. 한 번만 호출됩니다.
- ngOnChanges: 여러 번 실행합니다. 처음에는 구성 요소가 생성/로드될 때 실행됩니다. 이 후크가 호출될 때마다 @input 데코레이터를 사용하여 사용자 정의 속성이 변경되는 경우. 인수로 작업 - 간단한 변경
- ngOnInit: 구성 요소가 초기화되면 호출됩니다. 구성 요소의 상태를 설정하는 데 적합합니다.
- ngDoCheck: 변경 사항을 수동으로 감지하는 데 사용됩니다(각 변경 감지 주기마다 호출됨).
- ngAfterContentInit: 콘텐츠가 구성 요소에 프로젝션된 후 호출됩니다.
- ngAfterContentChecked: 투영된 콘텐츠를 확인한 후 호출됩니다.
- ngAfterViewInit: 뷰가 초기화된 후 호출됩니다.
- ngAfterViewChecked: Angular가 구성요소의 뷰를 확인한 후 호출됩니다.
- ngOnDestroy: 구성 요소가 삭제되기 직전에 호출됩니다. Observable 구독 취소와 같이 리소스를 정리하는 데 사용하세요.

들어가기 전에 필수 프로젝트를 만들어 보겠습니다.
부모와 자식 구성 요소가 필요합니다. 상위 구성 요소에 입력 필드가 있으며 해당 입력 값을 하위 구성 요소에 전달하고 하위 구성 요소에 표시합니다.
parent.comComponent.ts
import { Component, OnInit } from '@angular/core';

@Component({
  selector: 'app-parent',
  templateUrl: './parent.component.html',
  styleUrls: ['./parent.component.css']
})
export class ParentComponent implements OnInit {

  constructor() { }

  ngOnInit(): void {
  }

  value:string = '';
  SubmitValue(val: any) {
    this.value = val.value;
  }

}
parent.comComponent.html
<h1>Lifecycle Hooks</h1>

<input type="text" placeholder="Input here..." #val>
<button (click)="SubmitValue(val)">Submit Value</button>

<br><br>
<app-child [inputValue]="value"></app-child>
child.comComponent.ts
import { Component, Input, OnInit } from '@angular/core';

@Component({
  selector: 'app-child',
  templateUrl: './child.component.html',
  styleUrls: ['./child.component.css']
})
export class ChildComponent implements OnInit {

  constructor() { }

  @Input() inputValue: string = "LifeCycle Hooks";

  ngOnInit(): void {
  }

}
child.comComponent.html
<div>
    Input Value: <strong>{{inputValue}}</strong>
</div>
다음과 같이 출력됩니다.

1.생성자
- 생성자는 구성 요소를 초기화하는 데 사용되는 TypeScript 클래스 메서드입니다. Angular 수명 주기 후크 이전에 호출됩니다.
- 주요 용도: 종속성 주입을 초기화하고 변수를 설정합니다.
export class ChildComponent implements OnInit {

  constructor() {
    **console.log("Constructor Called");**
  }

  @Input() inputValue: string = "LifeCycle Hooks";

  ngOnInit(): void {}

}

2.ngOnChanges
- 구성요소의 입력 속성이 변경될 때 호출됩니다.
- 입력 속성의 이전 값과 현재 값을 포함하는 SimpleChanges 객체를 제공합니다.
- 사용법: 이 후크를 트리거하려면 상위 구성 요소의 데이터 입력 속성을 업데이트하세요.
import { Component, OnInit } from '@angular/core';

@Component({
  selector: 'app-parent',
  templateUrl: './parent.component.html',
  styleUrls: ['./parent.component.css']
})
export class ParentComponent implements OnInit {

  constructor() { }

  ngOnInit(): void {
  }

  value:string = '';
  SubmitValue(val: any) {
    this.value = val.value;
  }

}

다시 값을 입력하고 다시 ngOnChanges를 호출했지만 생성자는 한 번만 호출되었습니다.

changes 인수에 무엇이 있는지 살펴보겠습니다.
<h1>Lifecycle Hooks</h1>

<input type="text" placeholder="Input here..." #val>
<button (click)="SubmitValue(val)">Submit Value</button>

<br><br>
<app-child [inputValue]="value"></app-child>

몇 가지 값을 넣어 살펴보겠습니다.

3.ngOnInit
- 첫 번째 ngOnChanges 이후 한 번 호출됩니다.
- 주요 용도: 구성 요소를 초기화하고 렌더링에 필요한 데이터를 설정합니다.
import { Component, Input, OnInit } from '@angular/core';

@Component({
  selector: 'app-child',
  templateUrl: './child.component.html',
  styleUrls: ['./child.component.css']
})
export class ChildComponent implements OnInit {

  constructor() { }

  @Input() inputValue: string = "LifeCycle Hooks";

  ngOnInit(): void {
  }

}

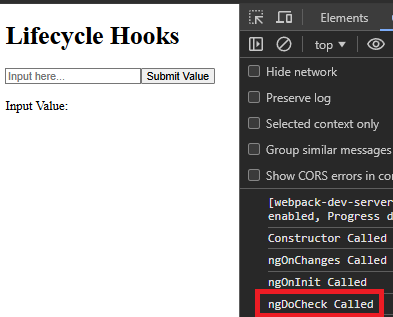
4.ngDoCheck
- Angular가 구성 요소나 해당 하위 항목의 변경 사항을 감지할 때마다 실행됩니다.
- 사용자 정의 변경 감지 로직에 사용하세요.
<div>
    Input Value: <strong>{{inputValue}}</strong>
</div>
5.ngAfterContentInit
- 콘텐츠(예:
)가 구성 요소에 프로젝션된 후 한 번 호출됩니다.
child.comComponent.html
export class ChildComponent implements OnInit {

  constructor() {
    **console.log("Constructor Called");**
  }

  @Input() inputValue: string = "LifeCycle Hooks";

  ngOnInit(): void {}

}
parent.comComponent.html
export class ChildComponent implements OnInit, OnChanges {

  constructor() {
    console.log("Constructor Called");
  }

  ngOnChanges(changes: SimpleChanges): void {
    console.log("ngOnChanges Called");
  }

  @Input() inputValue: string = "LifeCycle Hooks";

  ngOnInit(): void {}

}
child.comComponent.ts
 ngOnChanges(changes: SimpleChanges): void {
    console.log("ngOnChanges Called", changes);
  }

6.ng콘텐츠 확인 후
- 투영된 내용을 확인할 때마다 호출됩니다.
- 성능 문제를 방지하려면 드물게 사용하세요.
export class ChildComponent implements OnInit, OnChanges {

  constructor() {
    console.log("Constructor Called");
  }
  ngOnChanges(changes: SimpleChanges): void {
    console.log("ngOnChanges Called");
  }

  @Input() inputValue: string = "LifeCycle Hooks";

  ngOnInit(): void {
    console.log("ngOnInit Called");
  }

}

이 문제를 해결해 보겠습니다.
export class ChildComponent implements OnInit, OnChanges, DoCheck {

  constructor() {
    console.log("Constructor Called");
  }
  ngOnChanges(changes: SimpleChanges): void {
    console.log("ngOnChanges Called", changes);
  }

  @Input() inputValue: string = "LifeCycle Hooks";

  ngOnInit(): void {
    console.log("ngOnInit Called");
  }

  ngDoCheck() {
    console.log("ngDoCheck Called");
  }

}
ng-content에 다시 변경이 있으면 ngAfterContentChecked가 호출됩니다.

7.ngAfterViewInit
- 구성요소의 뷰와 해당 하위 뷰가 초기화된 후 한 번 호출됩니다.
- 타사 라이브러리 초기화 또는 DOM 조작에 유용합니다.

8.ngViewChecked
- 구성 요소의 뷰와 해당 하위 뷰를 확인할 때마다 호출됩니다.

9.ngOnDestroy
- 컴포넌트가 소멸되기 직전에 호출됩니다.
- Observable 구독 취소 또는 이벤트 리스너 분리와 같은 정리 작업에 사용하세요.
ngOnDestroy는 구성 요소를 삭제할 때만 호출되므로 구성 요소 삭제 버튼을 클릭하면 하위 구성 요소를 제거해 보겠습니다.
준비합시다:
parent.comComponent.ts
import { Component, OnInit } from '@angular/core';

@Component({
  selector: 'app-parent',
  templateUrl: './parent.component.html',
  styleUrls: ['./parent.component.css']
})
export class ParentComponent implements OnInit {

  constructor() { }

  ngOnInit(): void {
  }

  value:string = '';
  SubmitValue(val: any) {
    this.value = val.value;
  }

}
parent.comComponent.html
<h1>Lifecycle Hooks</h1>

<input type="text" placeholder="Input here..." #val>
<button (click)="SubmitValue(val)">Submit Value</button>

<br><br>
<app-child [inputValue]="value"></app-child>
구성요소 삭제 버튼을 클릭하기 전에:

구성요소 삭제 버튼을 클릭한 후:

수명주기 후크 순서:
- 건축자
- ngOnChanges(@Input 속성이 있는 경우)
- ngOnInit
- ngDoCheck
- ngAfterContentInit
- 콘텐츠 확인 후
- ngAfterViewInit
- ngAfterViewChecked
- ngOnDestroy
이러한 후크를 효과적으로 이해하고 사용하면 수명 주기의 다양한 단계에서 구성 요소의 동작을 관리할 수 있습니다.
위 내용은 Angular의 구성요소 수명주기의 상세 내용입니다. 자세한 내용은 PHP 중국어 웹사이트의 기타 관련 기사를 참조하세요!

핫 AI 도구

Undresser.AI Undress
사실적인 누드 사진을 만들기 위한 AI 기반 앱

AI Clothes Remover
사진에서 옷을 제거하는 온라인 AI 도구입니다.

Undress AI Tool
무료로 이미지를 벗다

Clothoff.io
AI 옷 제거제

Video Face Swap
완전히 무료인 AI 얼굴 교환 도구를 사용하여 모든 비디오의 얼굴을 쉽게 바꾸세요!

인기 기사
뜨거운 도구

메모장++7.3.1
사용하기 쉬운 무료 코드 편집기

SublimeText3 중국어 버전
중국어 버전, 사용하기 매우 쉽습니다.

스튜디오 13.0.1 보내기
강력한 PHP 통합 개발 환경

드림위버 CS6
시각적 웹 개발 도구

SublimeText3 Mac 버전
신 수준의 코드 편집 소프트웨어(SublimeText3)
뜨거운 주제
 7873
7873
 15
1649
14
1409
52
1301
25
1245
29
15
1649
14
1409
52
1301
25
1245
29

 프론트 엔드 열 용지 영수증에 대한 차량 코드 인쇄를 만나면 어떻게해야합니까?
Apr 04, 2025 pm 02:42 PM
프론트 엔드 열 용지 영수증에 대한 차량 코드 인쇄를 만나면 어떻게해야합니까?
Apr 04, 2025 pm 02:42 PM
프론트 엔드 개발시 프론트 엔드 열지대 티켓 인쇄를위한 자주 묻는 질문과 솔루션, 티켓 인쇄는 일반적인 요구 사항입니다. 그러나 많은 개발자들이 구현하고 있습니다 ...
 Demystifying JavaScript : 그것이하는 일과 중요한 이유
Apr 09, 2025 am 12:07 AM
Demystifying JavaScript : 그것이하는 일과 중요한 이유
Apr 09, 2025 am 12:07 AM
JavaScript는 현대 웹 개발의 초석이며 주요 기능에는 이벤트 중심 프로그래밍, 동적 컨텐츠 생성 및 비동기 프로그래밍이 포함됩니다. 1) 이벤트 중심 프로그래밍을 사용하면 사용자 작업에 따라 웹 페이지가 동적으로 변경 될 수 있습니다. 2) 동적 컨텐츠 생성을 사용하면 조건에 따라 페이지 컨텐츠를 조정할 수 있습니다. 3) 비동기 프로그래밍은 사용자 인터페이스가 차단되지 않도록합니다. JavaScript는 웹 상호 작용, 단일 페이지 응용 프로그램 및 서버 측 개발에 널리 사용되며 사용자 경험 및 크로스 플랫폼 개발의 유연성을 크게 향상시킵니다.
 누가 더 많은 파이썬이나 자바 스크립트를 지불합니까?
Apr 04, 2025 am 12:09 AM
누가 더 많은 파이썬이나 자바 스크립트를 지불합니까?
Apr 04, 2025 am 12:09 AM
기술 및 산업 요구에 따라 Python 및 JavaScript 개발자에 대한 절대 급여는 없습니다. 1. 파이썬은 데이터 과학 및 기계 학습에서 더 많은 비용을 지불 할 수 있습니다. 2. JavaScript는 프론트 엔드 및 풀 스택 개발에 큰 수요가 있으며 급여도 상당합니다. 3. 영향 요인에는 경험, 지리적 위치, 회사 규모 및 특정 기술이 포함됩니다.
 JavaScript는 배우기가 어렵습니까?
Apr 03, 2025 am 12:20 AM
JavaScript는 배우기가 어렵습니까?
Apr 03, 2025 am 12:20 AM
JavaScript를 배우는 것은 어렵지 않지만 어려운 일입니다. 1) 변수, 데이터 유형, 기능 등과 같은 기본 개념을 이해합니다. 2) 마스터 비동기 프로그래밍 및 이벤트 루프를 통해이를 구현하십시오. 3) DOM 운영을 사용하고 비동기 요청을 처리합니다. 4) 일반적인 실수를 피하고 디버깅 기술을 사용하십시오. 5) 성능을 최적화하고 모범 사례를 따르십시오.
 JavaScript의 진화 : 현재 동향과 미래 전망
Apr 10, 2025 am 09:33 AM
JavaScript의 진화 : 현재 동향과 미래 전망
Apr 10, 2025 am 09:33 AM
JavaScript의 최신 트렌드에는 Typescript의 Rise, 현대 프레임 워크 및 라이브러리의 인기 및 WebAssembly의 적용이 포함됩니다. 향후 전망은보다 강력한 유형 시스템, 서버 측 JavaScript 개발, 인공 지능 및 기계 학습의 확장, IoT 및 Edge 컴퓨팅의 잠재력을 포함합니다.
 JavaScript를 사용하여 동일한 ID와 동일한 ID로 배열 요소를 하나의 객체로 병합하는 방법은 무엇입니까?
Apr 04, 2025 pm 05:09 PM
JavaScript를 사용하여 동일한 ID와 동일한 ID로 배열 요소를 하나의 객체로 병합하는 방법은 무엇입니까?
Apr 04, 2025 pm 05:09 PM
동일한 ID로 배열 요소를 JavaScript의 하나의 객체로 병합하는 방법은 무엇입니까? 데이터를 처리 할 때 종종 동일한 ID를 가질 필요가 있습니다 ...
 Shiseido의 공식 웹 사이트와 같은 시차 스크롤 및 요소 애니메이션 효과를 달성하는 방법은 무엇입니까?
또는:
Shiseido의 공식 웹 사이트와 같은 페이지 스크롤과 함께 애니메이션 효과를 어떻게 달성 할 수 있습니까?
Apr 04, 2025 pm 05:36 PM
Shiseido의 공식 웹 사이트와 같은 시차 스크롤 및 요소 애니메이션 효과를 달성하는 방법은 무엇입니까?
또는:
Shiseido의 공식 웹 사이트와 같은 페이지 스크롤과 함께 애니메이션 효과를 어떻게 달성 할 수 있습니까?
Apr 04, 2025 pm 05:36 PM
이 기사에서 시차 스크롤 및 요소 애니메이션 효과 실현에 대한 토론은 Shiseido 공식 웹 사이트 (https://www.shiseido.co.jp/sb/wonderland/)와 유사하게 달성하는 방법을 살펴볼 것입니다.
 Console.log 출력 결과의 차이 : 두 통화가 다른 이유는 무엇입니까?
Apr 04, 2025 pm 05:12 PM
Console.log 출력 결과의 차이 : 두 통화가 다른 이유는 무엇입니까?
Apr 04, 2025 pm 05:12 PM
Console.log 출력의 차이의 근본 원인에 대한 심층적 인 논의. 이 기사에서는 Console.log 함수의 출력 결과의 차이점을 코드에서 분석하고 그에 따른 이유를 설명합니다. � ...
