

Outlook에서 이메일 및 첨부 파일을 인쇄하는 방법

Printing emails in Microsoft Outlook is a simple task once you know the steps. This comprehensive guide will help you navigate the Outlook interface with ease, select the right print settings and bring a message to life on paper.
Imagine that you've received an email that captures everything you've been discussing in a recent thread. It's the kind of email you want to pin on your noticeboard, tuck into your planner, or hand out in your next team meeting. But how do you take this digital message and give it a physical presence? Let's delve into the simple steps to transform your virtual conversations into tangible documents that you can touch, feel, and share around the coffee table or conference room.
How to print an email on Outlook
To print an email in the classic desktop Outlook app, follow the steps below:

- Open an email. Double-click the email of interest in your Inbox, Sent Items, or any other folder where you've stored it. This will open the message in a new window.
- Access the Print menu. Click on the File tab in the upper-left corner of the Outlook ribbon, and then select Print from the list of options. Or, use the keyboard shortcut Ctrl + P to open the print menu directly.
- Select the printer. Pick the printer you want to use from the list of available devices.
- Choose style. Under Settings, select the print style. Different emails may have different style options. In most cases, you will be able to choose from the two most common styles, such as Table and Memo.
-
Adjust the settings. For further adjustments, click Print Options. In the Print dialog box that opens, you can specify the print range and the number of copies. Additionally, you can:
- Click Page Setup to specify fonts, formats, paper, or add a header and/or footer.
- Click Define Styles to edit a specific style or save your own custom one.
The screenshot below shows the default settings.

- Preview. Before printing, you can preview the email to ensure it looks as expected. The print preview section in the right part of the Print menu shows you how the email will appear on the printed page.
- Print the email. Once you're satisfied with the settings and preview, click the Print button to bring your email onto paper.

Done! Now, your emails are not confined to your screen but can be shared and preserved in physical form.
Tip. If you regularly print emails from Outlook, consider adding the Print button to the ribbon or Quick Access Toolbar. We have comprehensive end-to-end guides for Excel: Adding a command to ribbon and Adding a button to Quick Access Toolbar. Customizing Outlook's ribbon and QAT is essentially the same process.
Quick Print in Outlook
Quick Print in Outlook lets you print emails swiftly without the need to open each one in a separate window. Here's how to use it:
- Right-click an email you're interested in.
- From the context menu that appears, choose Quick Print.
That's it! The message will be sent straight to your default printer, saving you time and clicks.

This feature is perfect for those moments when you need a hard copy of an email quickly, such as before a meeting or when you're compiling documents for reference. Remember, it uses the print settings you've set as default. If you need to make adjustments such as selecting a different printer or changing the number of copies, then use the regular Print option instead.
Tips and notes:
- Currently, the Quick Print option is only available in the classic desktop Outlook app.
- This method can also be used for printing attachments and multiple emails.
How to print emails in new Outlook and web
Printing emails in the new Outlook and Outlook 365 online can be done with ease. Here's how to do it:
- Whether you're using the new Outlook app or accessing your mail on the web, start by opening the email.
- Look for the Print button on the top toolbar. If it's not immediately visible, check under the More options menu represented by three dots or an ellipsis.
- Your message will pop up in a new window, formatted for printing. At the top-left corner of this window, click Print.
- In the dialog box that appears, select your desired printer. Here, you can also choose your preferred style and adjust settings. With everything set up, hit Print.


Please keep in mind that the exact settings and interface may vary slightly, as the new Outlook and its web counterpart are frequently updated.
Note. The new Outlook and web app lack the option to print attachments directly from an email. You have to download the attached file to your computer first. After that, you can print the file using its default app, such as Microsoft Word, Excel, or a PDF editor.
How to print Outlook email to PDF
Printing an Outlook email to a PDF is a convenient way to save a digital copy of your correspondence that's easy to share and archive. Here's how you can do it:
- Open the email you want to save as a PDF.
- On the File tab, choose Print, or simply press Ctrl + P on your keyboard.
- In the printer selection dropdown, choose Microsoft Print to PDF.
- If you need to change any settings, like adding a header or footer, click on Print Options.
- After setting everything up, click Print.
- The Save Print Output As dialog box will appear asking you to choose a location for your PDF and name it. Once you've done this, click Save.


And now, you can navigate to the folder where you saved the file and check if it has been converted correctly. This method ensures that your email is not just a fleeting message in your inbox but a document that can be stored, shared, and accessed independently of your email client.
It's also possible to combine multiple emails into one PDF file and convert attachments to individual PDFs. For full details, check out How to save Outlook email as PDF.
Tips and notes:
- Outlook's Print to PDF option is only available in Windows 10 and Windows 11. If you're using an earlier version of Windows that doesn't have this feature, you can save your email as an HTML file. Then, open that file in Microsoft Word and save the document as PDF using the standard Save As
- In the new Outlook and the online version of Outlook 365 (web app), there is a direct Save to PDF option, making it even easier to convert your emails to PDF format without additional steps.
How to print part of email in Outlook
Sometimes, you only need a snippet of your email conversation - a crucial detail, a specific instruction, or a particular quote. Printing the entire email might be overkill, so here's how to print just the part you need.
Print part of email in browser
If your browser displays .mht files correctly, then you can print a portion of an email in this way:
- Open the email. Begin by opening the email in Outlook.
-
View in browser. On the Message tab, in the Move group, click Actions > View in Browser. If you see a security message, click OK to continue. This will open the message in your default web browser.
- Select part of email. Use your mouse to select the needed part of the message directly in the browser window.
- Access the browser's print function. Right-click the selection and choose Print, or press Ctrl + P, or use the browser's top menu.
-
Print the selection. In the Print dialog, find the Selection only or a similar option.


With these steps, you can print just the part of the email that matters to you, saving ink and paper.
Note. This method does not work correctly in the current versions of some popular internet browsers. If you find that the email opens as plain text instead of html, then use the method described below for a more reliable result.
Convert to PDF and print selection
These days, printing only a part of an Outlook email can be a bit tricky. Due to changes in how browsers interpret email files, the email.mht file, which used to display as a formatted HTML document, now often presents itself as plain text. This change makes it challenging to print just a specific section of an email directly from the browser, as the email's formatting and structure are lost in the conversion to text.
However, there's no need to worry - we have a workaround that will let you print part of your email:
- Use Outlook's Print to PDF option to convert your message to a .pdf file.
- Open the PDF file in your preferred reader.
- Highlight the text you want to print.
- Access the print menu in your PDF reader and look for the Print Selection or similar option.
- Adjust any print settings, then print your selected text.
For example, in Adobe Acrobat or Acrobat Reader (free version), you can print the desired part of a PDF file in this way:
- Click the hamburger menu (three horizontal lines) in the upper-left corner.
- Navigate to Undo, Redo & more> Take a snapshot.
- Select a rectangle around the desired portion of your email.
- Click the printer icon in the top toolbar.
- In the Print dialog box, click More Options under the Pages to Print, and then choose Selected graphic.


While it's unfortunate that the good old method of opening the message in a browser doesn't work as well in the current versions, saving the email as a PDF provides a reliable alternative to print only the parts you need.
How to print attachments in Outlook
Printing attachments in Outlook is a useful feature when you need physical copies of documents, images, or other files that come with an email. Here's how to manage this task efficiently:
Printing an attachment from Outlook email
The fastest way to print a certain attached file is this:
- Open an email in the Outlook desktop app.
- Right-click the attachment icon, then choose Quick Print from the drop-down menu.
- If the file type requires it, Outlook may prompt you to open or save the attachment before printing. Choose the option that best suits your needs.


The attachment will be sent to the default printer without any further action needed.
Printing attachments along with email
To include attachments in the message printout, follow these steps:
- Open the message that contains the attachments.
- Click the File tab and select Print.
- In the dialog box that opens, click Print Options.
- Under Print options, select the Print attached files check box.

This way, you can print both the email and its attachments in one go. Once this setting is enabled, it will remain active until you choose to turn it off.
Notes:
- Attachments will always print to the default printer. If you wish to send the attachment to a different printer, double-click the attached file to open it, and then use the print command in the application where the attachment opens.
- Some file types must be opened before they can be printed. For these, Outlook will display a message asking you to open or save the attachment before it can be printed.
- Unfortunately, in the new Outlook and web app, it's not possible to print attachments directly from an email. You'll need to first open each attachment in the application it corresponds to, such as a PDF reader for .pdf files or Microsoft Word for .docx files, and then print it separately from there.
How to print multiple Outlook emails at once
When you need hard copies of several messages, perform these simple steps:
- Select the emails. Start by selecting all the messages you want to print. To do this, click on each email while holding down the Ctrl key. You can also use the Shift key to select a range of emails.
- Quick Print. Right-click the selection and choose Quick Print from the context menu.
And that's all there is to it! The selected emails will go directly to your default printer with no extra moves.

Tips and notes:
- To configure various options and preferences before printing, use the Ctrl + P shortcut to access the print menu.
- To print several emails together with all their attachments, make sure the Print attached files option is selected in your settings (see the previous section).
- In the new Outlook and web app, the Quick Print feature is not available and the print shortcut does not work for multiple emails, which means you'll need to print each message individually.
And there you have it - printing emails in Outlook made simple. These methods should cover all your needs, be it dealing with a single message or a batch of emails with attachments. So go ahead, give it a try, and take control of your emails in a way that suits your needs, whether it's for archiving, referencing, or presenting.
위 내용은 Outlook에서 이메일 및 첨부 파일을 인쇄하는 방법의 상세 내용입니다. 자세한 내용은 PHP 중국어 웹사이트의 기타 관련 기사를 참조하세요!

핫 AI 도구

Undresser.AI Undress
사실적인 누드 사진을 만들기 위한 AI 기반 앱

AI Clothes Remover
사진에서 옷을 제거하는 온라인 AI 도구입니다.

Undress AI Tool
무료로 이미지를 벗다

Clothoff.io
AI 옷 제거제

Video Face Swap
완전히 무료인 AI 얼굴 교환 도구를 사용하여 모든 비디오의 얼굴을 쉽게 바꾸세요!

인기 기사
뜨거운 도구

메모장++7.3.1
사용하기 쉬운 무료 코드 편집기

SublimeText3 중국어 버전
중국어 버전, 사용하기 매우 쉽습니다.

스튜디오 13.0.1 보내기
강력한 PHP 통합 개발 환경

드림위버 CS6
시각적 웹 개발 도구

SublimeText3 Mac 버전
신 수준의 코드 편집 소프트웨어(SublimeText3)
뜨거운 주제
 7786
7786
 15
1644
14
1400
52
1297
25
1234
29
15
1644
14
1400
52
1297
25
1234
29

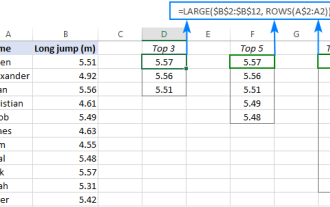 열 또는 행에서 상위 3, 5, 10 값을 찾는 Excel 공식
Apr 01, 2025 am 05:09 AM
열 또는 행에서 상위 3, 5, 10 값을 찾는 Excel 공식
Apr 01, 2025 am 05:09 AM
이 튜토리얼은 데이터 세트 내에서 상단 N 값을 효율적으로 찾아 Excel 공식을 사용하여 관련 데이터를 검색하는 방법을 보여줍니다. 최고, 최저 또는 특정 기준을 충족하는 경우이 안내서는 솔루션을 제공합니다. findi
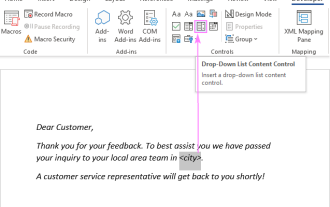 Outlook 이메일 템플릿에 드롭 다운 목록을 추가하십시오
Apr 01, 2025 am 05:13 AM
Outlook 이메일 템플릿에 드롭 다운 목록을 추가하십시오
Apr 01, 2025 am 05:13 AM
이 자습서는 여러 선택 및 데이터베이스 모집단을 포함하여 Outlook 이메일 템플릿에 드롭 다운 목록을 추가하는 방법을 보여줍니다. Outlook은 드롭 다운을 직접 지원하지 않지만이 안내서는 창의적인 해결 방법을 제공합니다. 이메일 템플릿 저장
 플래시 채우기를 사용하는 방법 예제와 함께 Excel
Apr 05, 2025 am 09:15 AM
플래시 채우기를 사용하는 방법 예제와 함께 Excel
Apr 05, 2025 am 09:15 AM
이 튜토리얼은 데이터 입력 작업을 자동화하기위한 강력한 도구 인 Excel의 Flash Clone 기능에 대한 포괄적 인 안내서를 제공합니다. 정의 및 위치에서 고급 사용 및 문제 해결에 이르기까지 다양한 측면을 다룹니다. Excel의 FLA 이해
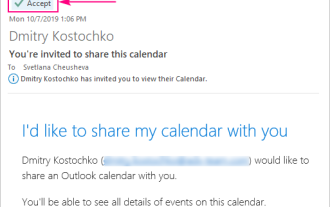 Outlook에 캘린더를 추가하는 방법 : 공유, 인터넷 캘린더, ical 파일
Apr 03, 2025 am 09:06 AM
Outlook에 캘린더를 추가하는 방법 : 공유, 인터넷 캘린더, ical 파일
Apr 03, 2025 am 09:06 AM
이 기사에서는 Outlook Desktop 응용 프로그램 내에서 ICalendar 파일 가져 오기를 포함하여 공유 캘린더에 액세스하고 활용하는 방법을 설명합니다. 이전에는 Outlook 캘린더를 공유했습니다. 이제 공유 된 캘린더를 보는 방법을 살펴 보겠습니다
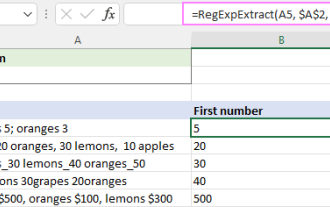 Excel에서 문자열을 추출하는 동정인 (하나 또는 모두 일치)
Mar 28, 2025 pm 12:19 PM
Excel에서 문자열을 추출하는 동정인 (하나 또는 모두 일치)
Mar 28, 2025 pm 12:19 PM
이 튜토리얼에서는 Excel에서 일반 표현식을 사용하여 주어진 패턴과 일치하는 하위 문자열을 찾아 추출하는 방법을 배웁니다. Microsoft Excel은 셀에서 텍스트를 추출하는 여러 기능을 제공합니다. 이러한 기능은 대부분에 대처할 수 있습니다
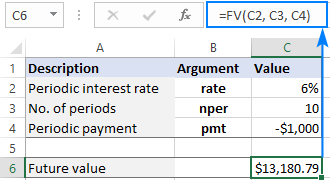 미래의 값을 계산하기위한 엑셀 기능
Apr 01, 2025 am 04:57 AM
미래의 값을 계산하기위한 엑셀 기능
Apr 01, 2025 am 04:57 AM
이 튜토리얼은 Excel의 FV 기능을 사용하여 정기적 인 지불과 덩어리 험 예금을 모두 포함하는 미래의 투자 가치를 결정하는 방법을 설명합니다. 효과적인 재무 계획은 투자 성장 이해에 달려 있으며이 안내서
 Excel의 중간 공식 - 실제 예
Apr 11, 2025 pm 12:08 PM
Excel의 중간 공식 - 실제 예
Apr 11, 2025 pm 12:08 PM
이 튜토리얼은 중간 기능을 사용하여 Excel에서 수치 데이터의 중앙값을 계산하는 방법을 설명합니다. 중앙 경향의 주요 척도 인 중앙값은 데이터 세트의 중간 값을 식별하여 Central Tenden의보다 강력한 표현을 제공합니다.
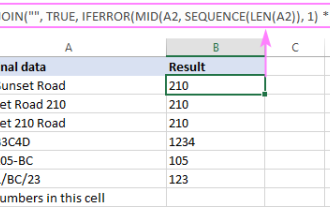 Excel 셀에서 텍스트 및 숫자를 제거 / 분할하는 방법
Apr 01, 2025 am 05:07 AM
Excel 셀에서 텍스트 및 숫자를 제거 / 분할하는 방법
Apr 01, 2025 am 05:07 AM
이 튜토리얼은 내장 기능과 사용자 정의 VBA 기능을 모두 사용하여 Excel 셀 내에서 텍스트와 숫자를 분리하는 몇 가지 방법을 보여줍니다. 텍스트를 제거하는 동안 숫자를 추출하는 방법을 배웁니다.
