

Codefresh- Gitops가있는 최고의 CI \/CD 플랫폼

Codefresh is a continuous integration and delivery (CI/CD) platform specifically designed to support the development and deployment of cloud-native applications.
Codefresh allows developers to automate the process of integration, testing, and deployment, making it easier to ensure consistent, high-quality releases. It comes with a built-in Docker registry and Helm repository, which allows you to manage all aspects of your Docker images and Helm charts in one place.
By combining a Docker-native CI/CD pipeline with a private Docker registry and Helm repository, Codefresh provides a comprehensive toolset for organizations that are migrating to microservices architectures using Docker and Kubernetes.
Built specifically with Docker and Kubernetes in mind, Codefresh provides a robust platform that is designed to simplify the process of building, testing, and deploying Docker containers within your software development life cycle.
For a seamless CI/CD experience, Codefresh offers native integrations with almost every major Git or Cloud provider. It allows for easy connections with Git providers, registry providers, storage providers, secret stores, and notification channels. This makes for a more streamlined and efficient CI/CD process by reducing the need for third-party plugins or workarounds.
Table of Contents
Features
Codefresh has several key features:
- Docker Native: Codefresh was built with Docker in mind from the beginning. It can build, test, and push Docker images to any Docker registry.
- Kubernetes Deployment: Codefresh has first-class support for Kubernetes, making it easier to deploy and manage applications on Kubernetes clusters.
- Git Integration: Codefresh integrates with several popular Git hosting providers like GitHub, GitLab, and Bitbucket. It can automatically trigger pipelines based on Git events such as commits and pull requests.
- Pipelines: Codefresh uses pipelines to define the steps needed to build, test, and deploy your application. Pipelines are defined using YAML, a human-readable data serialization language.
- Helm Chart Support: Codefresh supports Helm, a package manager for Kubernetes. This simplifies the process of deploying and managing applications on Kubernetes.
- Monitoring and Logging: Codefresh provides built-in monitoring and logging capabilities to help you troubleshoot issues with your applications and pipelines.
Codefresh CLI
The Codefresh CLI is a tool that allows users to interact with the Codefresh platform directly from their command line or terminal. This tool provides a robust and flexible way to access and control Codefresh's features and functionality, without the need to use the web interface.
Users can perform a variety of tasks with the CLI such as creating, managing, and running pipelines, managing resources, and much more. It's designed to support complex automation scenarios and can also be used within pipeline steps for more advanced use cases.
In summary, Codefresh CLI is a powerful tool for developers who want to have more control and flexibility when working with the Codefresh platform.
Install Codefresh CLI in Linux
There are several methods to install the Codefresh CLI:
- NPM: If you have Node.js installed on your machine, you can install Codefresh CLI using NPM, Node's default package manager.
- Yarn: Alternatively, you can install Codefresh CLI using the Yarn package manager.
- Direct Download: If you do not have Node.js installed, you can download the CLI directly from Codefresh's website or repository.
- Docker: It's also possible to run the CLI using a pre-built Docker image.
1. Install Codefresh CLI using NPM
First, make sure Node.js and npm (Node Package Manager) are installed on your system. If not, you can download and install Node.js, which also includes npm, as described in our Nodejs Installation guide.
To install the Codefresh CLI globally using npm, run the following command:
$ npm install -g codefresh
If you want to install a specific version of Codefresh CLI, replace {VERSION} with the version number you want and run:
$ npm install -g codefresh@{VERSION}To update the Codefresh CLI to the latest version, execute the following command:
$ npm install -g codefresh
If you wish to update to a specific version of Codefresh CLI, replace ${VERSION} with the version number you desire and run:
$ npm install -g codefresh@${VERSION}After installation, you can check if the Codefresh CLI was installed correctly by running:
$ codefresh version
2. Install Codefresh CLI using Yarn
To install the Codefresh CLI using Yarn, follow the steps given below.
First, ensure that Yarn is installed on your system. If not, follow our Yarn installation instructions guide.
Once Yarn is installed, you can install Codefresh CLI globally using the following command:
$ yarn global add codefresh
If you want to install a specific version of Codefresh CLI, you can do so by specifying the version number. Replace {VERSION} with the version number you want to install:
$ yarn global add codefresh@{VERSION}To update Codefresh CLI to the latest version, use the following command:
$ yarn global upgrade codefresh
If you need to upgrade to a specific version of Codefresh CLI, you can specify the version number. Replace {VERSION} with the desired version number:
$ yarn global upgrade codefresh@{VERSION}To verify that Codefresh CLI is installed properly, run the following command:
$ codefresh version
3. Direct Install
Download the latest version of Codefresh CLI from the codefresh official releases page. You can do this using wget command like below:
$ wget https://github.com/codefresh-io/cli/releases/download/v0.84.2/codefresh-v0.84.2-linux-x64.tar.gz
After the download is complete, you'll need to extract the binary from the tar.gz file. Use the tar command for this:
$ tar -zxvf codefresh-v0.84.2-linux-x64.tar.gz
Once extracted, you'll have a binary file named codefresh. To make this command easily accessible, move it to a directory in your PATH. A common choice is /usr/local/bin/:
$ sudo mv codefresh /usr/local/bin/
Verify that the command is available by running:
$ codefresh version
client version: 0.84.2
With these steps, you should now have Codefresh CLI installed on your Linux system and be able to use it from any location in your terminal.
4. Install Codefresh CLI Using Docker
First, ensure Docker is installed on your system. If not, follow the instructions on our Docker installation guide to install Docker in Ubuntu.
Once Docker is installed, you can pull the latest version of the Codefresh CLI image from Docker Hub using the following command:
$ docker pull codefresh/cli
If you want to pull a specific version of the Codefresh CLI image, replace ${VERSION} with the version number you want and run:
$ docker pull codefresh/cli:${VERSION}After pulling the image, you can run the Codefresh CLI in a Docker container using the following command:
$ docker run codefresh/cli codefresh version
If you pulled a specific version, use the following command to run it:
$ docker run codefresh/cli:${VERSION} codefresh versionConfigure Codefresh Completion
Codefresh needs a shell to be associated with it. So once the Codefresh is installed, it has to be associated with a selective shell and in this case it is "bash".
$ codefresh completion bash
Sample output:
###-begin-codefresh-completions-###
#
# codefresh command completion script
#
# Installation: codefresh completion >> ~/.bashrc
#    or codefresh completion >> ~/.bash_profile on OSX.
#
_codefresh_completions()
{
    local cur args type_list

    cur="${COMP_WORDS[COMP_CWORD]}"
    args=("${COMP_WORDS[@]}")

    # ask codefresh to generate completions.
    type_list=$(codefresh --get-yargs-completions "${args[@]}")

    if [[ ${type_list} == '__files_completion__' ]]; then
        _filedir "@(yaml|yml|json)"
    else
        COMPREPLY=( $(compgen -W "${type_list}" -- ${cur}) )
    fi

    return 0
}
complete -F _codefresh_completions codefresh
###-end-codefresh-completions-###Generating the Codefresh API key
The API key required for authentication can be generated using the Codefresh web interface.
1. Start by creating a Codefresh account using your Gmail or Github ID. After creating your account, log in to Codefresh.

2. Navigate to the "User Settings" page.

3. On the "User Settings" page, go to the "API Keys" section and click GENERATE button.

Once the API key is generated, it can be used for authenticating with Codefresh via the command line.
Codefresh offers a comprehensive API which you can use it to integrate with any other application or solution you already have.
Setting up Authentication for Codefresh CLI
After successfully installing and configuring Codefresh, the next step involves setting up authentication for future applications you wish to integrate.
Checking existing authentication contexts:
Start by checking if there are any existing authentication contexts using the command:
$ codefresh auth get-contexts
If there are no pre-existing contexts, the output will be:
No authentication contexts. Please create an authentication context (see codefresh auth create-context --help)
Creating a new authentication context:
Since we don't have any existing authentication contexts, we'll need to create a new one. Authentication contexts allow you to work with multiple accounts.
Create a new context using the command:
$ codefresh auth create-context --api-key <xxxxxxxxxxxxxxxxxxxxxxxxxxxxxxx>

Replace "xxxxxxxxxxxxxxxxxxxxxxxxx" with your actual key that you've created earlier.
Once this command is executed, Codefresh CLI will be fully authenticated. The API key will generally be stored in the ~/.cfconfig file. This command only needs to be run once, and it allows for the management of multiple authentications with different Codefresh accounts.
You can verify the existing authentication contexts using the command:
$ codefresh auth get-contexts
Sample Output:
CURRENT NAME    URL                    ACCOUNT   STATUS
*       default https://g.codefresh.io ostechnix Valid
And that's it! Your Codefresh CLI should now be ready for action, fully authenticated and equipped to work with multiple accounts.
For usage details, refer the Codefresh help section by entering the following command:
$ codefresh --help
You can also read official documentation provided at the end.
Frequently Asked Questions
Here's a list of most commonly asked FAQ about Codefresh.
1. What is Codefresh?Codefresh is a modern Continuous Integration and Continuous Delivery (CI/CD) platform designed to streamline the process of building, testing, and deploying applications. Its architecture supports Docker, Kubernetes, and Helm, making it a preferred choice for cloud-native development.
2. What are some key features of Codefresh?Codefresh's key features include a modern, Docker-native pipeline builder, Kubernetes and Helm support, integrated private Docker registry, visual debugging tools for Kubernetes, on-demand test environments, and easy integration with popular developer tools and platforms.
3. What are the different editions of Codefresh?Codefresh is available in two editions: the Community edition, which is free, and the Enterprise edition. The free edition is a great way to get started with Codefresh and has certain usage limits, while the Enterprise edition offers more advanced features and capabilities, better suited for larger organizations with more complex needs.
4. What is Codefresh CLI?The Codefresh CLI (Command Line Interface) is a powerful tool that allows you to interact with Codefresh's platform directly from your command line. It provides a flexible and extensive interface, enabling a wide range of operations, such as automation creation, complex pipeline executions, and performing tasks that can also be done through the UI.
5. How do I install Codefresh CLI?Codefresh CLI can be installed in a few different ways, including via NPM, Yarn, tarball download from the GitHub release page, or using a Docker image.
6. How do I use the Codefresh CLI?The Codefresh CLI provides various commands to interact with the platform, including commands for tagging and untagging images, annotating resources, managing authentication contexts, creating and deleting resources, generating Kubernetes image pull secrets, retrieving build logs, running pipelines, and managing Helm releases.
7. How can I get help with Codefresh commands?You can use the --help flag with any Codefresh command to get detailed help. For example, 'codefresh auth --help' provides help for the auth command.
8. How do I authenticate with Codefresh?You can authenticate with Codefresh by creating an authentication context using your API key. This API key can be generated via the Codefresh Web UI. Once generated, this key is used to authenticate the Codefresh CLI with your Codefresh account.
9. Can I manage multiple authentication contexts with Codefresh?Yes, Codefresh enables you to create and manage multiple authentication contexts, enabling you to work with multiple accounts.
10. Does Codefresh integrate with all major Git platforms and cloud providers?Yes, Codefresh is designed to work seamlessly with all major Git platforms and cloud providers. It offers a vendor-agnostic approach, unlike other CI/CD platforms that may be tightly coupled to a specific Git provider, vendor, or set of tools. This ensures that there is no lock-in with any particular vendor, providing you with more flexibility and control over your development and deployment processes.
Conclusion
Codefresh is a great choice for teams that are looking for a powerful and easy-to-use CI/CD platform. Codefresh can help teams build, test, and deploy cloud-native applications faster and more reliably.
Resources:
- Codefresh Website
- Codefresh Official Documentation
- Codefresh CLI GitHub Repository
위 내용은 Codefresh- Gitops가있는 최고의 CI \/CD 플랫폼의 상세 내용입니다. 자세한 내용은 PHP 중국어 웹사이트의 기타 관련 기사를 참조하세요!

핫 AI 도구

Undresser.AI Undress
사실적인 누드 사진을 만들기 위한 AI 기반 앱

AI Clothes Remover
사진에서 옷을 제거하는 온라인 AI 도구입니다.

Undress AI Tool
무료로 이미지를 벗다

Clothoff.io
AI 옷 제거제

AI Hentai Generator
AI Hentai를 무료로 생성하십시오.

인기 기사
뜨거운 도구

메모장++7.3.1
사용하기 쉬운 무료 코드 편집기

SublimeText3 중국어 버전
중국어 버전, 사용하기 매우 쉽습니다.

스튜디오 13.0.1 보내기
강력한 PHP 통합 개발 환경

드림위버 CS6
시각적 웹 개발 도구

SublimeText3 Mac 버전
신 수준의 코드 편집 소프트웨어(SublimeText3)
뜨거운 주제
 7545
7545
 15
1381
52
83
11
55
19
21
87
15
1381
52
83
11
55
19
21
87

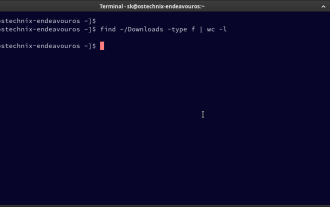 Linux에서 파일 및 디렉토리 계산 방법 : 초보자 안내서
Mar 19, 2025 am 10:48 AM
Linux에서 파일 및 디렉토리 계산 방법 : 초보자 안내서
Mar 19, 2025 am 10:48 AM
Linux에서 파일 및 폴더를 효율적으로 계산 : 포괄적 인 가이드 Linux에서 파일과 디렉토리를 빠르게 계산하는 방법을 아는 것은 시스템 관리자 및 대규모 데이터 세트를 관리하는 사람에게 중요합니다. 이 안내서는 Simple Command-L을 사용합니다
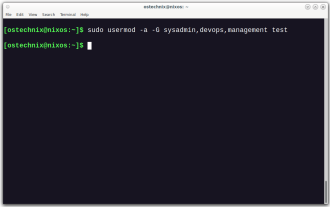 Linux의 여러 그룹에 사용자를 추가하는 방법
Mar 18, 2025 am 11:44 AM
Linux의 여러 그룹에 사용자를 추가하는 방법
Mar 18, 2025 am 11:44 AM
Linux/UNIX 시스템 관리에는 사용자 계정 및 그룹 멤버십을 효율적으로 관리하는 것이 중요합니다. 이를 통해 적절한 리소스 및 데이터 액세스 제어를 보장합니다. 이 자습서는 Linux 및 UNIX 시스템의 여러 그룹에 사용자를 추가하는 방법에 대해 자세히 설명합니다. 우리
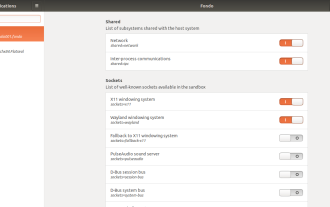 Flatseal을 사용하여 FlatPak 앱 권한을 쉽게 구성하는 방법
Mar 22, 2025 am 09:21 AM
Flatseal을 사용하여 FlatPak 앱 권한을 쉽게 구성하는 방법
Mar 22, 2025 am 09:21 AM
Flatpak 응용 프로그램 권한 관리 도구 : Flatseal 사용자 안내서 Flatpak은 Linux 소프트웨어 배포 및 사용을 단순화하도록 설계된 도구입니다. 가상 샌드 박스의 애플리케이션을 안전하게 캡슐화하여 사용자는 시스템 보안에 영향을주지 않고 루트 권한없이 응용 프로그램을 실행할 수 있습니다. Flatpak 응용 프로그램은이 샌드 박스 환경에 있으므로 운영 체제의 다른 부분, 하드웨어 장치 (예 : Bluetooth, Network 등) 및 소켓 (예 : Pulseaudio, SSH-Auth, Cups 등)에 액세스하는 권한을 요청해야합니다. 이 안내서는 Linux에서 Flatseal을 사용하여 Flatpak을 쉽게 구성하는 방법을 안내합니다.
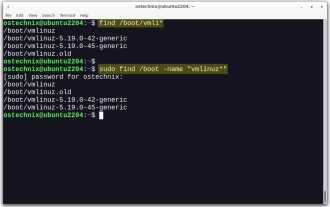 CommandLine에서 설치된 모든 Linux 커널을 나열하거나 확인하는 방법
Mar 23, 2025 am 10:43 AM
CommandLine에서 설치된 모든 Linux 커널을 나열하거나 확인하는 방법
Mar 23, 2025 am 10:43 AM
Linux 커널은 GNU/Linux 운영 체제의 핵심 구성 요소입니다. 1991 년 Linus Torvalds가 개발 한이 도시는 무료, 오픈 소스, 모 놀리 식, 모듈 식 및 멀티 태스킹 UNIX와 같은 커널입니다. Linux에서는 노래에 여러 커널을 설치할 수 있습니다.
 우분투 리눅스에 인도 루피 기호를 입력하는 방법
Mar 22, 2025 am 10:39 AM
우분투 리눅스에 인도 루피 기호를 입력하는 방법
Mar 22, 2025 am 10:39 AM
이 간단한 가이드는 Linux 운영 체제에 Indian Rupee 기호를 입력하는 방법을 설명합니다. 다른 날, 나는 단어 문서에 "Indian Rupee Symbol (₹)을 입력하고 싶었습니다. 내 키보드에는 루피 기호가 있지만 입력하는 방법을 모르겠습니다. 후에
 가장 잘 사용되는 Linux는 무엇입니까?
Apr 03, 2025 am 12:11 AM
가장 잘 사용되는 Linux는 무엇입니까?
Apr 03, 2025 am 12:11 AM
Linux는 서버 관리, 임베디드 시스템 및 데스크탑 환경으로 사용되는 것이 가장 좋습니다. 1) 서버 관리에서 Linux는 웹 사이트, 데이터베이스 및 응용 프로그램을 호스팅하는 데 사용되어 안정성과 안정성을 제공합니다. 2) 임베디드 시스템에서 Linux는 유연성과 안정성으로 인해 스마트 홈 및 자동차 전자 시스템에서 널리 사용됩니다. 3) 데스크탑 환경에서 Linux는 풍부한 응용 프로그램과 효율적인 성능을 제공합니다.
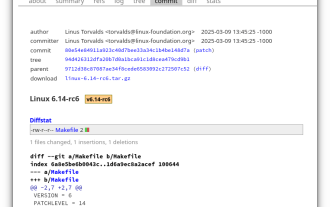 Linux 커널 6.14 RC6 출시
Mar 24, 2025 am 10:21 AM
Linux 커널 6.14 RC6 출시
Mar 24, 2025 am 10:21 AM
Linus Torvalds는 Linux Kernel 6.14 릴리스 후보 6 (RC6)을 출시하여 중대한 문제를보고하지 않고 릴리스를 추적했습니다. 이 업데이트에서 가장 주목할만한 변경 사항은 AMD 마이크로 코드 서명 문제를 해결하고 나머지 업데이트는
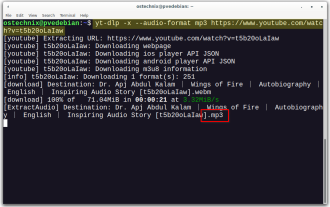 YT-DLP 명령 : 초보자를위한 완전한 튜토리얼 (2025)
Mar 21, 2025 am 11:00 AM
YT-DLP 명령 : 초보자를위한 완전한 튜토리얼 (2025)
Mar 21, 2025 am 11:00 AM
인터넷에서 좋아하는 비디오를 저장하고 싶었던 적이 있습니까? 재미있는 고양이 비디오이든 나중에보고 싶은 튜토리얼이든, YT-DLP는 여기에 있습니다! 이 포괄적 인 YT-DLP 튜토리얼에서는 YT-DLP가 무엇인지 설명 할 것입니다.
