다음과 같습니다
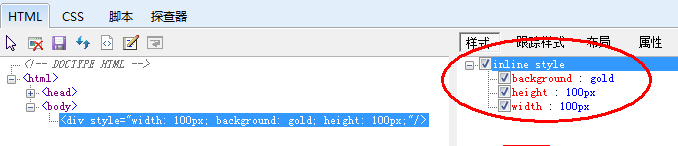
IE 개발자 도구 또는 IE8과 함께 제공되는 개발자 도구를 사용하세요. 구조는 그림 1과 같습니다.

빨간색 원 안에는 div에 추가된 인라인 스타일의 너비, 높이, 배경이 순서대로 정렬되어 있는 것을 볼 수 있습니다. 정상!
그러나 div에 filter:alpha(opacity=20)를 추가한 후
그림 2와 같이 상황이 바뀌었습니다.
빨간색 원에 표시된 것처럼 너비와 필터가 한 줄로 압축됩니다. 일반적인 상황에서는 너비가 새 줄에서 시작되어야 합니다.
페이지 요소의 올바른 렌더링에 영향을 주지 않는 한 이는 단지 개발자 도구가 올바르게 표시되지 않는 것이라고 말하는 사람들도 있습니다.
실제로 IE6/7/8/9에서는 이 요소의 너비, 높이, 배경색 및 투명도가 설정에 따라 예상대로 렌더링되고 표시될 수 있습니다. 사진과 같이:
또한, 스타일 태그나 CSS 파일에 스타일을 작성하는 경우에도 위와 같은 현상이 발생합니다.
JS 설정 필터를 다시 보면 상황이 조금 다릅니다. 코드는 다음과 같습니다.
IE 6/ 9월 7일 <br></head> <br><body> <br><div id="d1" style="width:100px;height:100px; background:gold"> /div> <br> <script type="text/javascript"> <br>var d1 = document.getElementById('d1') <br>d1.style.filter = 'alpha(opacity=20)' ; <br>< /script> <br></body> <br><br><br>IE의 구조를 보면 그림 2와 같습니다. 즉, 필터와 너비가 한 줄에 있습니다. <br>
</div>위 html의 마지막 js 코드에 주목하세요 <br><br><br><br><div class="codetitle">코드 복사<span><a style="CURSOR: pointer" data="98542" class="copybut" id="copybut98542" onclick="doCopy('code98542')"><u> 코드는 다음과 같습니다. </u></a> </span>d1.style.filter = 'alpha(opacity=20)'; </div>
<div class="codebody" id="code98542"> <br>오른쪽 괄호 뒤에는 세미콜론이 없습니다. 이제 문장을 살짝 바꿔보세요(실제로는 약간의 변화입니다. 세미콜론만 추가하시면 됩니다) <br>
</div>
<br><br><div class="codetitle">코드 복사<span><a style="CURSOR: pointer" data="79979" class="copybut" id="copybut79979" onclick="doCopy('code79979')"><u> 코드는 다음과 같습니다 :</u></a> </span>d1.style.filter = 'alpha(opacity=20);'; </div>
<div class="codebody" id="code79979"> <br>즉, 괄호 뒤에 세미콜론 ";"이 추가됩니다. 이때 그림 3과 같이 IE 개발자 도구를 봅니다. <br>
</div>
<br><br>
<p>빨간색 원으로 둘러싸인 네 가지 CSS 속성인 배경, 필터, 높이, 너비가 별도의 줄에 표시되는 것을 볼 수 있습니다. 그림 2와 같이 한 줄에 필터와 너비가 표시되지 않습니다. <img src="/static/imghw/default1.png" data-src="http://files.jb51.net/upload/201104/20110407231031740.png" class="lazy" style="max-width:90%" style="max-width:90%" alt="transparent_javascript 기술을 설정하기 위해 필터를 사용하여 발생한 IE 6/7/8/9 구문 분석 예외에 대한 솔루션" >
</p>PS: 많은 인기 JS 라이브러리에서는 투명도를 설정하기 위해 알파(불투명도=20) 뒤에 세미콜론을 추가하지 않습니다. <p></p>
</div>
</div>
<div class="wzconShengming_sp">
<div class="bzsmdiv_sp">본 웹사이트의 성명</div>
<div>본 글의 내용은 네티즌들의 자발적인 기여로 작성되었으며, 저작권은 원저작자에게 있습니다. 본 사이트는 이에 상응하는 법적 책임을 지지 않습니다. 표절이나 침해가 의심되는 콘텐츠를 발견한 경우 admin@php.cn으로 문의하세요.</div>
</div>
</div>
<ins class="adsbygoogle"
style="display:block"
data-ad-format="autorelaxed"
data-ad-client="ca-pub-5902227090019525"
data-ad-slot="2507867629"></ins>
<script>
(adsbygoogle = window.adsbygoogle || []).push({});
</script>
<div class="AI_ToolDetails_main4sR">
<ins class="adsbygoogle"
style="display:block"
data-ad-client="ca-pub-5902227090019525"
data-ad-slot="3653428331"
data-ad-format="auto"
data-full-width-responsive="true"></ins>
<script>
(adsbygoogle = window.adsbygoogle || []).push({});
</script>
<!-- <div class="phpgenera_Details_mainR4">
<div class="phpmain1_4R_readrank">
<div class="phpmain1_4R_readrank_top">
<img onerror="this.onerror=''; this.src='/static/imghw/default1.png'"
onerror="this.onerror=''; this.src='/static/imghw/default1.png'"
src="/static/imghw/hotarticle2.png" alt="" />
<h2>인기 기사</h2>
</div>
<div class="phpgenera_Details_mainR4_bottom">
<div class="phpgenera_Details_mainR4_bottoms">
<a href="https://www.php.cn/ko/faq/1796785841.html" title="어 ass 신 크리드 그림자 : 조개 수수께끼 솔루션" class="phpgenera_Details_mainR4_bottom_title">어 ass 신 크리드 그림자 : 조개 수수께끼 솔루션</a>
<div class="phpgenera_Details_mainR4_bottoms_info">
<span>3 몇 주 전</span>
<span>By DDD</span>
</div>
</div>
<div class="phpgenera_Details_mainR4_bottoms">
<a href="https://www.php.cn/ko/faq/1796789525.html" title="Windows 11 KB5054979의 새로운 기능 및 업데이트 문제를 해결하는 방법" class="phpgenera_Details_mainR4_bottom_title">Windows 11 KB5054979의 새로운 기능 및 업데이트 문제를 해결하는 방법</a>
<div class="phpgenera_Details_mainR4_bottoms_info">
<span>2 몇 주 전</span>
<span>By DDD</span>
</div>
</div>
<div class="phpgenera_Details_mainR4_bottoms">
<a href="https://www.php.cn/ko/faq/1796785857.html" title="Atomfall에서 크레인 제어 키 카드를 찾을 수 있습니다" class="phpgenera_Details_mainR4_bottom_title">Atomfall에서 크레인 제어 키 카드를 찾을 수 있습니다</a>
<div class="phpgenera_Details_mainR4_bottoms_info">
<span>3 몇 주 전</span>
<span>By DDD</span>
</div>
</div>
<div class="phpgenera_Details_mainR4_bottoms">
<a href="https://www.php.cn/ko/faq/1796784440.html" title="<s> : 데드 레일 - 모든 도전을 완료하는 방법" class="phpgenera_Details_mainR4_bottom_title"><s> : 데드 레일 - 모든 도전을 완료하는 방법</a>
<div class="phpgenera_Details_mainR4_bottoms_info">
<span>4 몇 주 전</span>
<span>By DDD</span>
</div>
</div>
<div class="phpgenera_Details_mainR4_bottoms">
<a href="https://www.php.cn/ko/faq/1796784000.html" title="Atomfall Guide : 항목 위치, 퀘스트 가이드 및 팁" class="phpgenera_Details_mainR4_bottom_title">Atomfall Guide : 항목 위치, 퀘스트 가이드 및 팁</a>
<div class="phpgenera_Details_mainR4_bottoms_info">
<span>4 몇 주 전</span>
<span>By DDD</span>
</div>
</div>
</div>
<div class="phpgenera_Details_mainR3_more">
<a href="https://www.php.cn/ko/article.html">더보기</a>
</div>
</div>
</div> -->
<div class="phpgenera_Details_mainR3">
<div class="phpmain1_4R_readrank">
<div class="phpmain1_4R_readrank_top">
<img onerror="this.onerror=''; this.src='/static/imghw/default1.png'"
onerror="this.onerror=''; this.src='/static/imghw/default1.png'"
src="/static/imghw/hottools2.png" alt="" />
<h2>핫 AI 도구</h2>
</div>
<div class="phpgenera_Details_mainR3_bottom">
<div class="phpmain_tab2_mids_top">
<a href="https://www.php.cn/ko/ai/undresserai-undress" title="Undresser.AI Undress" class="phpmain_tab2_mids_top_img">
<img onerror="this.onerror=''; this.src='/static/imghw/default1.png'"
onerror="this.onerror=''; this.src='/static/imghw/default1.png'"
class="lazy" data-src="https://img.php.cn/upload/ai_manual/001/246/273/173411540686492.jpg?x-oss-process=image/resize,m_fill,h_50,w_50" src="/static/imghw/default1.png" alt="Undresser.AI Undress" />
</a>
<div class="phpmain_tab2_mids_info">
<a href="https://www.php.cn/ko/ai/undresserai-undress" title="Undresser.AI Undress" class="phpmain_tab2_mids_title">
<h3>Undresser.AI Undress</h3>
</a>
<p>사실적인 누드 사진을 만들기 위한 AI 기반 앱</p>
</div>
</div>
<div class="phpmain_tab2_mids_top">
<a href="https://www.php.cn/ko/ai/ai-clothes-remover" title="AI Clothes Remover" class="phpmain_tab2_mids_top_img">
<img onerror="this.onerror=''; this.src='/static/imghw/default1.png'"
onerror="this.onerror=''; this.src='/static/imghw/default1.png'"
class="lazy" data-src="https://img.php.cn/upload/ai_manual/001/246/273/173411552797167.jpg?x-oss-process=image/resize,m_fill,h_50,w_50" src="/static/imghw/default1.png" alt="AI Clothes Remover" />
</a>
<div class="phpmain_tab2_mids_info">
<a href="https://www.php.cn/ko/ai/ai-clothes-remover" title="AI Clothes Remover" class="phpmain_tab2_mids_title">
<h3>AI Clothes Remover</h3>
</a>
<p>사진에서 옷을 제거하는 온라인 AI 도구입니다.</p>
</div>
</div>
<div class="phpmain_tab2_mids_top">
<a href="https://www.php.cn/ko/ai/undress-ai-tool" title="Undress AI Tool" class="phpmain_tab2_mids_top_img">
<img onerror="this.onerror=''; this.src='/static/imghw/default1.png'"
onerror="this.onerror=''; this.src='/static/imghw/default1.png'"
class="lazy" data-src="https://img.php.cn/upload/ai_manual/001/246/273/173410641626608.jpg?x-oss-process=image/resize,m_fill,h_50,w_50" src="/static/imghw/default1.png" alt="Undress AI Tool" />
</a>
<div class="phpmain_tab2_mids_info">
<a href="https://www.php.cn/ko/ai/undress-ai-tool" title="Undress AI Tool" class="phpmain_tab2_mids_title">
<h3>Undress AI Tool</h3>
</a>
<p>무료로 이미지를 벗다</p>
</div>
</div>
<div class="phpmain_tab2_mids_top">
<a href="https://www.php.cn/ko/ai/clothoffio" title="Clothoff.io" class="phpmain_tab2_mids_top_img">
<img onerror="this.onerror=''; this.src='/static/imghw/default1.png'"
onerror="this.onerror=''; this.src='/static/imghw/default1.png'"
class="lazy" data-src="https://img.php.cn/upload/ai_manual/001/246/273/173411529149311.jpg?x-oss-process=image/resize,m_fill,h_50,w_50" src="/static/imghw/default1.png" alt="Clothoff.io" />
</a>
<div class="phpmain_tab2_mids_info">
<a href="https://www.php.cn/ko/ai/clothoffio" title="Clothoff.io" class="phpmain_tab2_mids_title">
<h3>Clothoff.io</h3>
</a>
<p>AI 옷 제거제</p>
</div>
</div>
<div class="phpmain_tab2_mids_top">
<a href="https://www.php.cn/ko/ai/video-swap" title="Video Face Swap" class="phpmain_tab2_mids_top_img">
<img onerror="this.onerror=''; this.src='/static/imghw/default1.png'"
onerror="this.onerror=''; this.src='/static/imghw/default1.png'"
class="lazy" data-src="https://img.php.cn/upload/ai_manual/001/246/273/173414504068133.jpg?x-oss-process=image/resize,m_fill,h_50,w_50" src="/static/imghw/default1.png" alt="Video Face Swap" />
</a>
<div class="phpmain_tab2_mids_info">
<a href="https://www.php.cn/ko/ai/video-swap" title="Video Face Swap" class="phpmain_tab2_mids_title">
<h3>Video Face Swap</h3>
</a>
<p>완전히 무료인 AI 얼굴 교환 도구를 사용하여 모든 비디오의 얼굴을 쉽게 바꾸세요!</p>
</div>
</div>
</div>
<div class="phpgenera_Details_mainR3_more">
<a href="https://www.php.cn/ko/ai">더보기</a>
</div>
</div>
</div>
<script src="https://sw.php.cn/hezuo/cac1399ab368127f9b113b14eb3316d0.js" type="text/javascript"></script>
<div class="phpgenera_Details_mainR4">
<div class="phpmain1_4R_readrank">
<div class="phpmain1_4R_readrank_top">
<img onerror="this.onerror=''; this.src='/static/imghw/default1.png'"
onerror="this.onerror=''; this.src='/static/imghw/default1.png'"
src="/static/imghw/hotarticle2.png" alt="" />
<h2>인기 기사</h2>
</div>
<div class="phpgenera_Details_mainR4_bottom">
<div class="phpgenera_Details_mainR4_bottoms">
<a href="https://www.php.cn/ko/faq/1796785841.html" title="어 ass 신 크리드 그림자 : 조개 수수께끼 솔루션" class="phpgenera_Details_mainR4_bottom_title">어 ass 신 크리드 그림자 : 조개 수수께끼 솔루션</a>
<div class="phpgenera_Details_mainR4_bottoms_info">
<span>3 몇 주 전</span>
<span>By DDD</span>
</div>
</div>
<div class="phpgenera_Details_mainR4_bottoms">
<a href="https://www.php.cn/ko/faq/1796789525.html" title="Windows 11 KB5054979의 새로운 기능 및 업데이트 문제를 해결하는 방법" class="phpgenera_Details_mainR4_bottom_title">Windows 11 KB5054979의 새로운 기능 및 업데이트 문제를 해결하는 방법</a>
<div class="phpgenera_Details_mainR4_bottoms_info">
<span>2 몇 주 전</span>
<span>By DDD</span>
</div>
</div>
<div class="phpgenera_Details_mainR4_bottoms">
<a href="https://www.php.cn/ko/faq/1796785857.html" title="Atomfall에서 크레인 제어 키 카드를 찾을 수 있습니다" class="phpgenera_Details_mainR4_bottom_title">Atomfall에서 크레인 제어 키 카드를 찾을 수 있습니다</a>
<div class="phpgenera_Details_mainR4_bottoms_info">
<span>3 몇 주 전</span>
<span>By DDD</span>
</div>
</div>
<div class="phpgenera_Details_mainR4_bottoms">
<a href="https://www.php.cn/ko/faq/1796784440.html" title="<s> : 데드 레일 - 모든 도전을 완료하는 방법" class="phpgenera_Details_mainR4_bottom_title"><s> : 데드 레일 - 모든 도전을 완료하는 방법</a>
<div class="phpgenera_Details_mainR4_bottoms_info">
<span>4 몇 주 전</span>
<span>By DDD</span>
</div>
</div>
<div class="phpgenera_Details_mainR4_bottoms">
<a href="https://www.php.cn/ko/faq/1796784000.html" title="Atomfall Guide : 항목 위치, 퀘스트 가이드 및 팁" class="phpgenera_Details_mainR4_bottom_title">Atomfall Guide : 항목 위치, 퀘스트 가이드 및 팁</a>
<div class="phpgenera_Details_mainR4_bottoms_info">
<span>4 몇 주 전</span>
<span>By DDD</span>
</div>
</div>
</div>
<div class="phpgenera_Details_mainR3_more">
<a href="https://www.php.cn/ko/article.html">더보기</a>
</div>
</div>
</div>
<div class="phpgenera_Details_mainR3">
<div class="phpmain1_4R_readrank">
<div class="phpmain1_4R_readrank_top">
<img onerror="this.onerror=''; this.src='/static/imghw/default1.png'"
onerror="this.onerror=''; this.src='/static/imghw/default1.png'"
src="/static/imghw/hottools2.png" alt="" />
<h2>뜨거운 도구</h2>
</div>
<div class="phpgenera_Details_mainR3_bottom">
<div class="phpmain_tab2_mids_top">
<a href="https://www.php.cn/ko/toolset/development-tools/92" title="메모장++7.3.1" class="phpmain_tab2_mids_top_img">
<img onerror="this.onerror=''; this.src='/static/imghw/default1.png'"
onerror="this.onerror=''; this.src='/static/imghw/default1.png'"
class="lazy" data-src="https://img.php.cn/upload/manual/000/000/001/58ab96f0f39f7357.jpg?x-oss-process=image/resize,m_fill,h_50,w_72" src="/static/imghw/default1.png" alt="메모장++7.3.1" />
</a>
<div class="phpmain_tab2_mids_info">
<a href="https://www.php.cn/ko/toolset/development-tools/92" title="메모장++7.3.1" class="phpmain_tab2_mids_title">
<h3>메모장++7.3.1</h3>
</a>
<p>사용하기 쉬운 무료 코드 편집기</p>
</div>
</div>
<div class="phpmain_tab2_mids_top">
<a href="https://www.php.cn/ko/toolset/development-tools/93" title="SublimeText3 중국어 버전" class="phpmain_tab2_mids_top_img">
<img onerror="this.onerror=''; this.src='/static/imghw/default1.png'"
onerror="this.onerror=''; this.src='/static/imghw/default1.png'"
class="lazy" data-src="https://img.php.cn/upload/manual/000/000/001/58ab97a3baad9677.jpg?x-oss-process=image/resize,m_fill,h_50,w_72" src="/static/imghw/default1.png" alt="SublimeText3 중국어 버전" />
</a>
<div class="phpmain_tab2_mids_info">
<a href="https://www.php.cn/ko/toolset/development-tools/93" title="SublimeText3 중국어 버전" class="phpmain_tab2_mids_title">
<h3>SublimeText3 중국어 버전</h3>
</a>
<p>중국어 버전, 사용하기 매우 쉽습니다.</p>
</div>
</div>
<div class="phpmain_tab2_mids_top">
<a href="https://www.php.cn/ko/toolset/development-tools/121" title="스튜디오 13.0.1 보내기" class="phpmain_tab2_mids_top_img">
<img onerror="this.onerror=''; this.src='/static/imghw/default1.png'"
onerror="this.onerror=''; this.src='/static/imghw/default1.png'"
class="lazy" data-src="https://img.php.cn/upload/manual/000/000/001/58ab97ecd1ab2670.jpg?x-oss-process=image/resize,m_fill,h_50,w_72" src="/static/imghw/default1.png" alt="스튜디오 13.0.1 보내기" />
</a>
<div class="phpmain_tab2_mids_info">
<a href="https://www.php.cn/ko/toolset/development-tools/121" title="스튜디오 13.0.1 보내기" class="phpmain_tab2_mids_title">
<h3>스튜디오 13.0.1 보내기</h3>
</a>
<p>강력한 PHP 통합 개발 환경</p>
</div>
</div>
<div class="phpmain_tab2_mids_top">
<a href="https://www.php.cn/ko/toolset/development-tools/469" title="드림위버 CS6" class="phpmain_tab2_mids_top_img">
<img onerror="this.onerror=''; this.src='/static/imghw/default1.png'"
onerror="this.onerror=''; this.src='/static/imghw/default1.png'"
class="lazy" data-src="https://img.php.cn/upload/manual/000/000/001/58d0e0fc74683535.jpg?x-oss-process=image/resize,m_fill,h_50,w_72" src="/static/imghw/default1.png" alt="드림위버 CS6" />
</a>
<div class="phpmain_tab2_mids_info">
<a href="https://www.php.cn/ko/toolset/development-tools/469" title="드림위버 CS6" class="phpmain_tab2_mids_title">
<h3>드림위버 CS6</h3>
</a>
<p>시각적 웹 개발 도구</p>
</div>
</div>
<div class="phpmain_tab2_mids_top">
<a href="https://www.php.cn/ko/toolset/development-tools/500" title="SublimeText3 Mac 버전" class="phpmain_tab2_mids_top_img">
<img onerror="this.onerror=''; this.src='/static/imghw/default1.png'"
onerror="this.onerror=''; this.src='/static/imghw/default1.png'"
class="lazy" data-src="https://img.php.cn/upload/manual/000/000/001/58d34035e2757995.png?x-oss-process=image/resize,m_fill,h_50,w_72" src="/static/imghw/default1.png" alt="SublimeText3 Mac 버전" />
</a>
<div class="phpmain_tab2_mids_info">
<a href="https://www.php.cn/ko/toolset/development-tools/500" title="SublimeText3 Mac 버전" class="phpmain_tab2_mids_title">
<h3>SublimeText3 Mac 버전</h3>
</a>
<p>신 수준의 코드 편집 소프트웨어(SublimeText3)</p>
</div>
</div>
</div>
<div class="phpgenera_Details_mainR3_more">
<a href="https://www.php.cn/ko/ai">더보기</a>
</div>
</div>
</div>
<div class="phpgenera_Details_mainR4">
<div class="phpmain1_4R_readrank">
<div class="phpmain1_4R_readrank_top">
<img onerror="this.onerror=''; this.src='/static/imghw/default1.png'"
onerror="this.onerror=''; this.src='/static/imghw/default1.png'"
src="/static/imghw/hotarticle2.png" alt="" />
<h2>뜨거운 주제</h2>
</div>
<div class="phpgenera_Details_mainR4_bottom">
<div class="phpgenera_Details_mainR4_bottoms">
<a href="https://www.php.cn/ko/faq/gmailyxdlrkzn" title="Gmail 이메일의 로그인 입구는 어디에 있나요?" class="phpgenera_Details_mainR4_bottom_title">Gmail 이메일의 로그인 입구는 어디에 있나요?</a>
<div class="phpgenera_Details_mainR4_bottoms_info">
<div class="phpgenera_Details_mainR4_bottoms_infos">
<img src="/static/imghw/eyess.png" alt="" />
<span>7650</span>
</div>
<div class="phpgenera_Details_mainR4_bottoms_infos">
<img src="/static/imghw/tiezi.png" alt="" />
<span>15</span>
</div>
</div>
</div>
<div class="phpgenera_Details_mainR4_bottoms">
<a href="https://www.php.cn/ko/faq/cakephp-tutor" title="Cakephp 튜토리얼" class="phpgenera_Details_mainR4_bottom_title">Cakephp 튜토리얼</a>
<div class="phpgenera_Details_mainR4_bottoms_info">
<div class="phpgenera_Details_mainR4_bottoms_infos">
<img src="/static/imghw/eyess.png" alt="" />
<span>1392</span>
</div>
<div class="phpgenera_Details_mainR4_bottoms_infos">
<img src="/static/imghw/tiezi.png" alt="" />
<span>52</span>
</div>
</div>
</div>
<div class="phpgenera_Details_mainR4_bottoms">
<a href="https://www.php.cn/ko/faq/steamdzhmcssmgs" title="Steam의 계정 이름 형식은 무엇입니까?" class="phpgenera_Details_mainR4_bottom_title">Steam의 계정 이름 형식은 무엇입니까?</a>
<div class="phpgenera_Details_mainR4_bottoms_info">
<div class="phpgenera_Details_mainR4_bottoms_infos">
<img src="/static/imghw/eyess.png" alt="" />
<span>91</span>
</div>
<div class="phpgenera_Details_mainR4_bottoms_infos">
<img src="/static/imghw/tiezi.png" alt="" />
<span>11</span>
</div>
</div>
</div>
<div class="phpgenera_Details_mainR4_bottoms">
<a href="https://www.php.cn/ko/faq/winactivationkeyper" title="Win11 활성화 키 영구" class="phpgenera_Details_mainR4_bottom_title">Win11 활성화 키 영구</a>
<div class="phpgenera_Details_mainR4_bottoms_info">
<div class="phpgenera_Details_mainR4_bottoms_infos">
<img src="/static/imghw/eyess.png" alt="" />
<span>73</span>
</div>
<div class="phpgenera_Details_mainR4_bottoms_infos">
<img src="/static/imghw/tiezi.png" alt="" />
<span>19</span>
</div>
</div>
</div>
<div class="phpgenera_Details_mainR4_bottoms">
<a href="https://www.php.cn/ko/faq/nytminicrosswordanswe" title="NYT 미니 크로스 워드 답변" class="phpgenera_Details_mainR4_bottom_title">NYT 미니 크로스 워드 답변</a>
<div class="phpgenera_Details_mainR4_bottoms_info">
<div class="phpgenera_Details_mainR4_bottoms_infos">
<img src="/static/imghw/eyess.png" alt="" />
<span>36</span>
</div>
<div class="phpgenera_Details_mainR4_bottoms_infos">
<img src="/static/imghw/tiezi.png" alt="" />
<span>110</span>
</div>
</div>
</div>
</div>
<div class="phpgenera_Details_mainR3_more">
<a href="https://www.php.cn/ko/faq/zt">더보기</a>
</div>
</div>
</div>
</div>
</div>
<div class="Article_Details_main2">
<div class="phpgenera_Details_mainL4">
<div class="phpmain1_2_top">
<a href="javascript:void(0);" class="phpmain1_2_top_title">Related knowledge<img
src="/static/imghw/index2_title2.png" alt="" /></a>
</div>
<div class="phpgenera_Details_mainL4_info">
<div class="phphistorical_Version2_mids">
<a href="https://www.php.cn/ko/faq/634682.html" title="win11 투명 작업 표시줄의 검은 선 문제를 해결하는 방법" class="phphistorical_Version2_mids_img">
<img onerror="this.onerror=''; this.src='/static/imghw/default1.png'"
src="/static/imghw/default1.png" class="lazy" data-src="https://img.php.cn/upload/article/000/887/227/170325385322598.png?x-oss-process=image/resize,m_fill,h_207,w_330" alt="win11 투명 작업 표시줄의 검은 선 문제를 해결하는 방법" />
</a>
<a href="https://www.php.cn/ko/faq/634682.html" title="win11 투명 작업 표시줄의 검은 선 문제를 해결하는 방법" class="phphistorical_Version2_mids_title">win11 투명 작업 표시줄의 검은 선 문제를 해결하는 방법</a>
<span class="Articlelist_txts_time">Dec 22, 2023 pm 10:04 PM</span>
<p class="Articlelist_txts_p">translucenttb를 사용하여 투명한 작업 표시줄을 설정한 후, 많은 친구들이 win11 투명 작업 표시줄에 검은색 선이 있다는 것을 발견했는데, 이는 매우 불편해 보였습니다. 실제로 이 문제는 소프트웨어에서 해결될 수 있습니다. win11 투명 작업 표시줄에 검은색 선이 있습니다. 방법 1: 1. 사용자 피드백에 따라 translucenttb를 마우스 오른쪽 버튼으로 클릭하고 설정을 열 수 있습니다. 2. 그런 다음 아이콘 옵션의 "여백"을 "1"로 설정하여 문제를 해결합니다. 방법 2: 1. 그래도 작동하지 않으면 빈 공간을 마우스 오른쪽 버튼으로 클릭하여 "개인 설정"을 엽니다. 2. 그런 다음 시스템 기본 테마를 선택하여 변경합니다. 방법 3: 1. 모든 방법이 실패하면 translucenttb를 제거하는 것이 좋습니다. 2. 그런 다음 교체</p>
</div>
<div class="phphistorical_Version2_mids">
<a href="https://www.php.cn/ko/faq/661621.html" title="Win11에서 작업 표시줄 투명도에 줄이 생기는 문제를 해결하는 방법은 무엇입니까?" class="phphistorical_Version2_mids_img">
<img onerror="this.onerror=''; this.src='/static/imghw/default1.png'"
src="/static/imghw/default1.png" class="lazy" data-src="https://img.php.cn/upload/article/000/465/014/170650153720552.jpg?x-oss-process=image/resize,m_fill,h_207,w_330" alt="Win11에서 작업 표시줄 투명도에 줄이 생기는 문제를 해결하는 방법은 무엇입니까?" />
</a>
<a href="https://www.php.cn/ko/faq/661621.html" title="Win11에서 작업 표시줄 투명도에 줄이 생기는 문제를 해결하는 방법은 무엇입니까?" class="phphistorical_Version2_mids_title">Win11에서 작업 표시줄 투명도에 줄이 생기는 문제를 해결하는 방법은 무엇입니까?</a>
<span class="Articlelist_txts_time">Jan 29, 2024 pm 12:12 PM</span>
<p class="Articlelist_txts_p">많은 Win11 사용자는 시스템을 실행할 때 작업 표시줄을 투명하게 설정하지만, 많은 사용자는 설정 후 작업 표시줄에 검은색 선이 나타나는 것을 보게 됩니다. 사용자는 타사 소프트웨어를 사용하여 설정할 수 있습니다. 이 웹사이트에서는 win11 작업 표시줄에 선이 투명하게 나타나는 문제에 대한 해결책을 사용자에게 주의 깊게 소개합니다. win11 작업 표시줄의 투명한 선 문제 해결 방법 1: 1. 사용자 피드백에 따라 translucenttb를 마우스 오른쪽 버튼으로 클릭하고 설정을 열 수 있습니다. 2. 그런 다음 아이콘 옵션의 여백을 1로 설정하여 문제를 해결합니다. 2. 그런 다음 시스템 기본 테마를 선택하고 변경하여 문제를 해결합니다.</p>
</div>
<div class="phphistorical_Version2_mids">
<a href="https://www.php.cn/ko/faq/624060.html" title="CSS에서 투명도를 설정하는 방법" class="phphistorical_Version2_mids_img">
<img onerror="this.onerror=''; this.src='/static/imghw/default1.png'"
src="/static/imghw/default1.png" class="lazy" data-src="https://img.php.cn/upload/article/202311/01/2023110109595681412.jpg?x-oss-process=image/resize,m_fill,h_207,w_330" alt="CSS에서 투명도를 설정하는 방법" />
</a>
<a href="https://www.php.cn/ko/faq/624060.html" title="CSS에서 투명도를 설정하는 방법" class="phphistorical_Version2_mids_title">CSS에서 투명도를 설정하는 방법</a>
<span class="Articlelist_txts_time">Nov 01, 2023 am 10:00 AM</span>
<p class="Articlelist_txts_p">투명도를 설정하는 CSS 방법에는 불투명도 속성, rgba 색상 값, 배경색 속성, 의사 요소 사용 등이 포함됩니다. 자세한 소개: 1. 불투명도 속성은 투명한 효과를 얻기 위해 요소의 불투명도 속성을 설정하여 이 속성의 값 범위는 0~1입니다. 0은 완전히 투명함을 의미하고 1은 완전히 불투명함을 의미합니다. 2. RGB 색상 값, 요소의 불투명도를 설정하여 배경색이나 텍스트 색상은 투명한 효과를 얻기 위한 rgba 색상 값입니다. rgba 색상 값은 빨간색, 녹색, 파란색, 투명도 등으로 구성됩니다.</p>
</div>
<div class="phphistorical_Version2_mids">
<a href="https://www.php.cn/ko/faq/643483.html" title="Linux 시스템에서 터미널 투명성을 설정하는 방법은 무엇입니까?" class="phphistorical_Version2_mids_img">
<img onerror="this.onerror=''; this.src='/static/imghw/default1.png'"
src="/static/imghw/default1.png" class="lazy" data-src="https://img.php.cn/upload/article/000/887/227/170459411831996.jpg?x-oss-process=image/resize,m_fill,h_207,w_330" alt="Linux 시스템에서 터미널 투명성을 설정하는 방법은 무엇입니까?" />
</a>
<a href="https://www.php.cn/ko/faq/643483.html" title="Linux 시스템에서 터미널 투명성을 설정하는 방법은 무엇입니까?" class="phphistorical_Version2_mids_title">Linux 시스템에서 터미널 투명성을 설정하는 방법은 무엇입니까?</a>
<span class="Articlelist_txts_time">Jan 07, 2024 am 10:21 AM</span>
<p class="Articlelist_txts_p">Linux가 터미널에서 명령을 실행할 때 PDF, 웹 페이지 등과 같은 다른 도움말 문서를 보기 어렵게 만들기 위해 터미널 투명도를 설정하는 방법은 무엇입니까? 아래의 자세한 튜토리얼을 살펴보겠습니다. . 1. 창 특수 효과 켜기 1. 터미널의 투명도를 설정하려면 먼저 창 특수 효과를 켜야 합니다. 먼저 작업 표시줄에서 "제어 센터"를 클릭하세요. 2. 제어 센터에서 "디스플레이"를 클릭하세요. 3. "디스플레이"에서 "창 효과 켜기" 버튼이 켜져 있는지 확인하세요. 4. 또한 단축키 Shift+Win+Tab을 사용하여 창 효과를 빠르게 열거나 닫을 수도 있습니다. 2. 투명도 설정</p>
</div>
<div class="phphistorical_Version2_mids">
<a href="https://www.php.cn/ko/faq/581022.html" title="win7 작업 표시줄을 투명하게 만드는 방법에 대한 그래픽 튜토리얼" class="phphistorical_Version2_mids_img">
<img onerror="this.onerror=''; this.src='/static/imghw/default1.png'"
src="/static/imghw/default1.png" class="lazy" data-src="https://img.php.cn/upload/article/000/887/227/168981775943236.png?x-oss-process=image/resize,m_fill,h_207,w_330" alt="win7 작업 표시줄을 투명하게 만드는 방법에 대한 그래픽 튜토리얼" />
</a>
<a href="https://www.php.cn/ko/faq/581022.html" title="win7 작업 표시줄을 투명하게 만드는 방법에 대한 그래픽 튜토리얼" class="phphistorical_Version2_mids_title">win7 작업 표시줄을 투명하게 만드는 방법에 대한 그래픽 튜토리얼</a>
<span class="Articlelist_txts_time">Jul 20, 2023 am 09:49 AM</span>
<p class="Articlelist_txts_p">오늘 한 그룹의 사용자가 Windows 7을 다시 설치한 후 컴퓨터에 투명도 효과가 없는 이유를 물었습니다. 실제로 이는 컴퓨터가 그래픽 카드 드라이버를 제때에 업데이트하지 않고 Windows 7 Aero 테마를 조정하지 않기 때문에 발생합니다. 다음과 같은 방법으로 설정할 수 있습니다. 1. 먼저 컴퓨터에 새 그래픽 카드 드라이버가 설치되어 있는지 확인해야 합니다. 드라이버 마법사 또는 360 드라이버 마스터를 사용하여 그래픽 카드 드라이버를 온라인으로 업데이트할 수 있습니다. . 2. 바탕 화면의 빈 공간을 바라보고 마우스 오른쪽 버튼을 클릭한 후 개인 설정을 선택하고 엽니다. 3. 여기에서 Aero 테마를 찾아 선택하세요. 정상적인 상황에서는 투명한 유리 효과를 볼 수 있습니다. win7 작업 표시줄을 투명하게 만드는 방법에 대한 튜토리얼을 이해하셨나요? 어떻게 해야할지 모르는 학생들은 빨리 해보세요.</p>
</div>
<div class="phphistorical_Version2_mids">
<a href="https://www.php.cn/ko/faq/638954.html" title="Win11 작업 표시줄의 투명도를 조정하는 방법" class="phphistorical_Version2_mids_img">
<img onerror="this.onerror=''; this.src='/static/imghw/default1.png'"
src="/static/imghw/default1.png" class="lazy" data-src="https://img.php.cn/upload/article/000/887/227/170407906192258.png?x-oss-process=image/resize,m_fill,h_207,w_330" alt="Win11 작업 표시줄의 투명도를 조정하는 방법" />
</a>
<a href="https://www.php.cn/ko/faq/638954.html" title="Win11 작업 표시줄의 투명도를 조정하는 방법" class="phphistorical_Version2_mids_title">Win11 작업 표시줄의 투명도를 조정하는 방법</a>
<span class="Articlelist_txts_time">Jan 01, 2024 am 11:17 AM</span>
<p class="Articlelist_txts_p">많은 사용자가 페이지의 투명한 버전을 좋아합니다. win11 시스템에서는 사용자가 몇 가지 방법을 통해 투명한 작업 표시줄을 설정하여 작동 및 모양이 더 좋아 보일 수도 있습니다. win11 작업 표시줄을 투명하게 설정하는 방법 1. 시작 메뉴를 클릭한 다음 Microsoft Store를 엽니다. 2. "TranslucentTB"를 검색한 후 해당 항목을 찾아 다운로드합니다. 3. 설치하려면 여기를 클릭하세요. 4. 연 후 "데스크톱"을 선택한 다음 "지우기"를 클릭하십시오.</p>
</div>
<div class="phphistorical_Version2_mids">
<a href="https://www.php.cn/ko/faq/576836.html" title="Windows 10에서 작업 표시줄 투명도를 설정하는 방법에 대한 단계별 자습서" class="phphistorical_Version2_mids_img">
<img onerror="this.onerror=''; this.src='/static/imghw/default1.png'"
src="/static/imghw/default1.png" class="lazy" data-src="https://img.php.cn/upload/article/000/465/014/168908984151163.png?x-oss-process=image/resize,m_fill,h_207,w_330" alt="Windows 10에서 작업 표시줄 투명도를 설정하는 방법에 대한 단계별 자습서" />
</a>
<a href="https://www.php.cn/ko/faq/576836.html" title="Windows 10에서 작업 표시줄 투명도를 설정하는 방법에 대한 단계별 자습서" class="phphistorical_Version2_mids_title">Windows 10에서 작업 표시줄 투명도를 설정하는 방법에 대한 단계별 자습서</a>
<span class="Articlelist_txts_time">Jul 11, 2023 pm 11:37 PM</span>
<p class="Articlelist_txts_p">우연히 다른 사람의 win10 작업 표시줄이 투명한 것을 봤는데 너무 아름다워서 돌아와서 나도 win10 컴퓨터를 투명하게 설정하고 싶었습니다. 일반적인 상황에서는 기본 작업 표시줄에 배경이 투명하지 않으므로 설정을 조정해야 합니다.다음으로 편집기에서 Win10 작업 표시줄을 1분 안에 완전히 투명하게 만드는 방법을 자세히 설명합니다. 1. 먼저 win10 시스템을 열고 바탕 화면을 마우스 오른쪽 버튼으로 클릭한 후 오른쪽 클릭 메뉴에서 "개인 설정"을 찾습니다. 2. 그런 다음 "개인 설정" 창의 왼쪽 메뉴에서 "색상"을 선택하고 클릭합니다. 열려 있는. 3. 그런 다음 오른쪽 메뉴에서 "투명도 효과"를 찾아 "켜기"를 선택하고 "시작 메뉴, 작업 표시줄 및 알림 센터"와 "제목 표시줄"을 확인합니다. 4. 그런 다음 w로 돌아갑니다.</p>
</div>
<div class="phphistorical_Version2_mids">
<a href="https://www.php.cn/ko/faq/574350.html" title="Win10에서 작업 표시줄 투명도를 설정하는 방법" class="phphistorical_Version2_mids_img">
<img onerror="this.onerror=''; this.src='/static/imghw/default1.png'"
src="/static/imghw/default1.png" class="lazy" data-src="https://img.php.cn/upload/article/000/887/227/168871665927641.jpg?x-oss-process=image/resize,m_fill,h_207,w_330" alt="Win10에서 작업 표시줄 투명도를 설정하는 방법" />
</a>
<a href="https://www.php.cn/ko/faq/574350.html" title="Win10에서 작업 표시줄 투명도를 설정하는 방법" class="phphistorical_Version2_mids_title">Win10에서 작업 표시줄 투명도를 설정하는 방법</a>
<span class="Articlelist_txts_time">Jul 07, 2023 pm 03:57 PM</span>
<p class="Articlelist_txts_p">자세한 내용은 다음과 같습니다. 1. 앱 스토어를 엽니다. 2. transflucenttb를 검색하고 다운로드합니다(작업 표시줄을 빠르게 설정하는 데 도움이 되는 오픈 소스 도구). 3. 조립이 완료된 후 점진적인 확인이 가능합니다. 4. 이 가젯을 작동합니다. 일반적으로 작업 표시줄의 소형, 중형 및 대형 화살표 기호 사이에 숨겨져 있습니다. 5. 투명 색상을 켠 후 작업 표시줄을 설정할 수 있습니다. 완전히 투명하게 설정하고 싶다면 완전히 투명하게 설정하면 됩니다. 저는 영문버전을 설치하였기 때문에 설정은 아래 사진을 참고하시면 됩니다. 위의 내용은 Win10 작업 표시줄을 투명하게 만드는 전체 과정입니다. 매우 간단합니다. 데스크탑의 편집증적인 성격이라면 놓치지 마세요.</p>
</div>
</div>
<a href="https://www.php.cn/ko/web-designer.html" class="phpgenera_Details_mainL4_botton">
<span>See all articles</span>
<img src="/static/imghw/down_right.png" alt="" />
</a>
</div>
</div>
</div>
</main>
<footer>
<div class="footer">
<div class="footertop">
<img src="/static/imghw/logo.png" alt="">
<p>공공복지 온라인 PHP 교육,PHP 학습자의 빠른 성장을 도와주세요!</p>
</div>
<div class="footermid">
<a href="https://www.php.cn/ko/about/us.html">회사 소개</a>
<a href="https://www.php.cn/ko/about/disclaimer.html">부인 성명</a>
<a href="https://www.php.cn/ko/update/article_0_1.html">Sitemap</a>
</div>
<div class="footerbottom">
<p>
© php.cn All rights reserved
</p>
</div>
</div>
</footer>
<input type="hidden" id="verifycode" value="/captcha.html">
<script>layui.use(['element', 'carousel'], function () {var element = layui.element;$ = layui.jquery;var carousel = layui.carousel;carousel.render({elem: '#test1', width: '100%', height: '330px', arrow: 'always'});$.getScript('/static/js/jquery.lazyload.min.js', function () {$("img").lazyload({placeholder: "/static/images/load.jpg", effect: "fadeIn", threshold: 200, skip_invisible: false});});});</script>
<script src="/static/js/common_new.js"></script>
<script type="text/javascript" src="/static/js/jquery.cookie.js?1745347477"></script>
<script src="https://vdse.bdstatic.com//search-video.v1.min.js"></script>
<link rel='stylesheet' id='_main-css' href='/static/css/viewer.min.css?2' type='text/css' media='all' />
<script type='text/javascript' src='/static/js/viewer.min.js?1'></script>
<script type='text/javascript' src='/static/js/jquery-viewer.min.js'></script>
<script type="text/javascript" src="/static/js/global.min.js?5.5.53"></script>
<script>
var _paq = window._paq = window._paq || [];
/* tracker methods like "setCustomDimension" should be called before "trackPageView" */
_paq.push(['trackPageView']);
_paq.push(['enableLinkTracking']);
(function () {
var u = "https://tongji.php.cn/";
_paq.push(['setTrackerUrl', u + 'matomo.php']);
_paq.push(['setSiteId', '9']);
var d = document,
g = d.createElement('script'),
s = d.getElementsByTagName('script')[0];
g.async = true;
g.src = u + 'matomo.js';
s.parentNode.insertBefore(g, s);
})();
</script>
<script>
// top
layui.use(function () {
var util = layui.util;
util.fixbar({
on: {
mouseenter: function (type) {
layer.tips(type, this, {
tips: 4,
fixed: true,
});
},
mouseleave: function (type) {
layer.closeAll("tips");
},
},
});
});
document.addEventListener("DOMContentLoaded", (event) => {
// 定义一个函数来处理滚动链接的点击事件
function setupScrollLink(scrollLinkId, targetElementId) {
const scrollLink = document.getElementById(scrollLinkId);
const targetElement = document.getElementById(targetElementId);
if (scrollLink && targetElement) {
scrollLink.addEventListener("click", (e) => {
e.preventDefault(); // 阻止默认链接行为
targetElement.scrollIntoView({
behavior: "smooth"
}); // 平滑滚动到目标元素
});
} else {
console.warn(
`Either scroll link with ID '${scrollLinkId}' or target element with ID '${targetElementId}' not found.`
);
}
}
// 使用该函数设置多个滚动链接
setupScrollLink("Article_Details_main1L2s_1", "article_main_title1");
setupScrollLink("Article_Details_main1L2s_2", "article_main_title2");
setupScrollLink("Article_Details_main1L2s_3", "article_main_title3");
setupScrollLink("Article_Details_main1L2s_4", "article_main_title4");
setupScrollLink("Article_Details_main1L2s_5", "article_main_title5");
setupScrollLink("Article_Details_main1L2s_6", "article_main_title6");
// 可以继续添加更多的滚动链接设置
});
window.addEventListener("scroll", function () {
var fixedElement = document.getElementById("Article_Details_main1Lmain");
var scrollTop = window.scrollY || document.documentElement.scrollTop; // 兼容不同浏览器
var clientHeight = window.innerHeight || document.documentElement.clientHeight; // 视口高度
var scrollHeight = document.documentElement.scrollHeight; // 页面总高度
// 计算距离底部的距离
var distanceToBottom = scrollHeight - scrollTop - clientHeight;
// 当距离底部小于或等于300px时,取消固定定位
if (distanceToBottom <= 980) {
fixedElement.classList.remove("Article_Details_main1Lmain");
fixedElement.classList.add("Article_Details_main1Lmain_relative");
} else {
// 否则,保持固定定位
fixedElement.classList.remove("Article_Details_main1Lmain_relative");
fixedElement.classList.add("Article_Details_main1Lmain");
}
});
</script>
<script>
document.addEventListener('DOMContentLoaded', function() {
const mainNav = document.querySelector('.Article_Details_main1Lmain');
const header = document.querySelector('header');
if (mainNav) {
window.addEventListener('scroll', function() {
const scrollPosition = window.scrollY;
if (scrollPosition > 84) {
mainNav.classList.add('fixed');
} else {
mainNav.classList.remove('fixed');
}
});
}
});
</script>
</body>
</html>