

CI调整Smarty

CI整合Smarty
1.到相应的站点下载smarty模板;
2.将源代码中的libs目录复制到项目的libraries目录下,改名为smarty3.0

3.在项目目录的libraries文件夹内新建文件ci_smarty.php,里面的内容如下:
defined('BASEPATH') OR exit('No direct script access allowed');
require_once(APPPATH . 'libraries/smarty3.0/Smarty.class.php');
class ci_smarty extends Smarty
{
protected $ci;
public function __construct(){
$this->ci = & get_instance();
$this->ci->load->config('smarty');//加载smarty的配置文件
//获取相关的配置项
$this->template_dir = $this->ci->config->item('template_dir');
$this->complie_dir = $this->ci->config->item('compile_dir');
$this->cache_dir = $this->ci->config->item('cache_dir');
$this->config_dir = $this->ci->config->item('config_dir');
$this->template_ext = $this->ci->config->item('template_ext');
$this->caching = $this->ci->config->item('caching');
$this->cache_lifetime = $this->ci->config->item('lefttime');
}
}
4.在项目目录的config文件夹内新建文件smarty.php文件,里面的内容如下:

5.在入口文件所在目录新建文件夹templates_c
6.在项目的配置文件夹下,autoload.php文件中加入
$autoload['libraries'] = array('ci_smarty');

7.在项目目录的core文件夹中新建文件MY_Controller.php 内容如下: // 扩展核心控制类

8.测试
控制器中

视图中


핫 AI 도구

Undresser.AI Undress
사실적인 누드 사진을 만들기 위한 AI 기반 앱

AI Clothes Remover
사진에서 옷을 제거하는 온라인 AI 도구입니다.

Undress AI Tool
무료로 이미지를 벗다

Clothoff.io
AI 옷 제거제

AI Hentai Generator
AI Hentai를 무료로 생성하십시오.

인기 기사
뜨거운 도구

메모장++7.3.1
사용하기 쉬운 무료 코드 편집기

SublimeText3 중국어 버전
중국어 버전, 사용하기 매우 쉽습니다.

스튜디오 13.0.1 보내기
강력한 PHP 통합 개발 환경

드림위버 CS6
시각적 웹 개발 도구

SublimeText3 Mac 버전
신 수준의 코드 편집 소프트웨어(SublimeText3)
뜨거운 주제
 7552
7552
 15
1382
52
83
11
59
19
22
95
15
1382
52
83
11
59
19
22
95

 해결 방법: 조직에서 PIN 변경을 요구합니다.
Oct 04, 2023 pm 05:45 PM
해결 방법: 조직에서 PIN 변경을 요구합니다.
Oct 04, 2023 pm 05:45 PM
로그인 화면에 "귀하의 조직에서 PIN 변경을 요구합니다"라는 메시지가 나타납니다. 이는 개인 장치를 제어할 수 있는 조직 기반 계정 설정을 사용하는 컴퓨터에서 PIN 만료 제한에 도달한 경우 발생합니다. 그러나 개인 계정을 사용하여 Windows를 설정하는 경우 이상적으로는 오류 메시지가 나타나지 않습니다. 항상 그런 것은 아니지만. 오류가 발생한 대부분의 사용자는 개인 계정을 사용하여 신고합니다. 조직에서 Windows 11에서 PIN을 변경하도록 요청하는 이유는 무엇입니까? 귀하의 계정이 조직과 연결되어 있을 수 있으므로 이를 확인하는 것이 기본 접근 방식입니다. 도메인 관리자에게 문의하면 도움이 될 수 있습니다! 또한 잘못 구성된 로컬 정책 설정이나 잘못된 레지스트리 키로 인해 오류가 발생할 수 있습니다. 지금 바로
 Windows 11에서 창 테두리 설정을 조정하는 방법: 색상 및 크기 변경
Sep 22, 2023 am 11:37 AM
Windows 11에서 창 테두리 설정을 조정하는 방법: 색상 및 크기 변경
Sep 22, 2023 am 11:37 AM
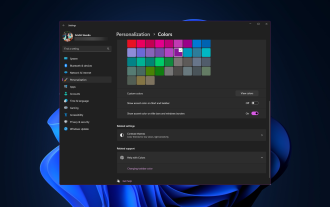
Windows 11은 신선하고 우아한 디자인을 전면에 내세웠습니다. 현대적인 인터페이스를 통해 창 테두리와 같은 미세한 세부 사항을 개인화하고 변경할 수 있습니다. 이 가이드에서는 Windows 운영 체제에서 자신의 스타일을 반영하는 환경을 만드는 데 도움이 되는 단계별 지침을 설명합니다. 창 테두리 설정을 변경하는 방법은 무엇입니까? +를 눌러 설정 앱을 엽니다. Windows개인 설정으로 이동하여 색상 설정을 클릭합니다. 색상 변경 창 테두리 설정 창 11" Width="643" Height="500" > 제목 표시줄 및 창 테두리에 강조 색상 표시 옵션을 찾아 옆에 있는 스위치를 토글합니다. 시작 메뉴 및 작업 표시줄에 강조 색상을 표시하려면 시작 메뉴와 작업 표시줄에 테마 색상을 표시하려면 시작 메뉴와 작업 표시줄에 테마 표시를 켭니다.
 Windows 11에서 제목 표시줄 색상을 변경하는 방법은 무엇입니까?
Sep 14, 2023 pm 03:33 PM
Windows 11에서 제목 표시줄 색상을 변경하는 방법은 무엇입니까?
Sep 14, 2023 pm 03:33 PM
기본적으로 Windows 11의 제목 표시줄 색상은 선택한 어두운/밝은 테마에 따라 다릅니다. 그러나 원하는 색상으로 변경할 수 있습니다. 이 가이드에서는 이를 변경하고 데스크톱 환경을 개인화하여 시각적으로 매력적으로 만드는 세 가지 방법에 대한 단계별 지침을 논의합니다. 활성 창과 비활성 창의 제목 표시줄 색상을 변경할 수 있습니까? 예, 설정 앱을 사용하여 활성 창의 제목 표시줄 색상을 변경하거나 레지스트리 편집기를 사용하여 비활성 창의 제목 표시줄 색상을 변경할 수 있습니다. 이러한 단계를 알아보려면 다음 섹션으로 이동하세요. Windows 11에서 제목 표시줄 색상을 변경하는 방법은 무엇입니까? 1. 설정 앱을 사용하여 +를 눌러 설정 창을 엽니다. Windows"개인 설정"으로 이동한 다음
 Windows 11/10 복구의 OOBELANGUAGE 오류 문제
Jul 16, 2023 pm 03:29 PM
Windows 11/10 복구의 OOBELANGUAGE 오류 문제
Jul 16, 2023 pm 03:29 PM
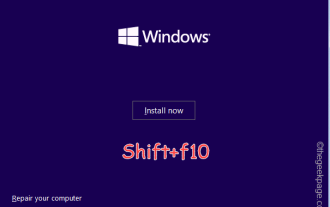
Windows Installer 페이지에 "OOBELANGUAGE" 문과 함께 "문제가 발생했습니다."가 표시됩니까? 이러한 오류로 인해 Windows 설치가 중단되는 경우가 있습니다. OOBE는 즉시 사용 가능한 경험을 의미합니다. 오류 메시지에서 알 수 있듯이 이는 OOBE 언어 선택과 관련된 문제입니다. 걱정할 필요가 없습니다. OOBE 화면 자체에서 레지스트리를 편집하면 이 문제를 해결할 수 있습니다. 빠른 수정 – 1. OOBE 앱 하단에 있는 “다시 시도” 버튼을 클릭하세요. 그러면 더 이상의 문제 없이 프로세스가 계속됩니다. 2. 전원 버튼을 사용하여 시스템을 강제 종료합니다. 시스템이 다시 시작된 후 OOBE가 계속되어야 합니다. 3. 인터넷에서 시스템 연결을 끊습니다. 오프라인 모드에서 OOBE의 모든 측면을 완료하세요.
 Windows 11에서 작업 표시줄 축소판 미리 보기를 활성화 또는 비활성화하는 방법
Sep 15, 2023 pm 03:57 PM
Windows 11에서 작업 표시줄 축소판 미리 보기를 활성화 또는 비활성화하는 방법
Sep 15, 2023 pm 03:57 PM
작업 표시줄 축소판은 재미있을 수도 있지만 주의를 산만하게 하거나 짜증나게 할 수도 있습니다. 이 영역 위로 얼마나 자주 마우스를 가져가는지 고려하면 실수로 중요한 창을 몇 번 닫았을 수도 있습니다. 또 다른 단점은 더 많은 시스템 리소스를 사용한다는 것입니다. 따라서 리소스 효율성을 높일 수 있는 방법을 찾고 있다면 비활성화하는 방법을 알려드리겠습니다. 그러나 하드웨어 사양이 이를 처리할 수 있고 미리 보기가 마음에 들면 활성화할 수 있습니다. Windows 11에서 작업 표시줄 축소판 미리 보기를 활성화하는 방법은 무엇입니까? 1. 설정 앱을 사용하여 키를 탭하고 설정을 클릭합니다. Windows에서는 시스템을 클릭하고 정보를 선택합니다. 고급 시스템 설정을 클릭합니다. 고급 탭으로 이동하여 성능 아래에서 설정을 선택합니다. "시각 효과"를 선택하세요.
 Windows 11의 디스플레이 크기 조정 가이드
Sep 19, 2023 pm 06:45 PM
Windows 11의 디스플레이 크기 조정 가이드
Sep 19, 2023 pm 06:45 PM
Windows 11의 디스플레이 크기 조정과 관련하여 우리 모두는 서로 다른 선호도를 가지고 있습니다. 큰 아이콘을 좋아하는 사람도 있고, 작은 아이콘을 좋아하는 사람도 있습니다. 그러나 올바른 크기 조정이 중요하다는 점에는 모두가 동의합니다. 잘못된 글꼴 크기 조정이나 이미지의 과도한 크기 조정은 작업 시 생산성을 저하시킬 수 있으므로 시스템 기능을 최대한 활용하려면 이를 사용자 정의하는 방법을 알아야 합니다. Custom Zoom의 장점: 화면의 텍스트를 읽기 어려운 사람들에게 유용한 기능입니다. 한 번에 화면에서 더 많은 것을 볼 수 있도록 도와줍니다. 특정 모니터 및 응용 프로그램에만 적용되는 사용자 정의 확장 프로필을 생성할 수 있습니다. 저사양 하드웨어의 성능을 향상시키는 데 도움이 될 수 있습니다. 이를 통해 화면의 내용을 더 효과적으로 제어할 수 있습니다. 윈도우 11을 사용하는 방법
 화웨이 GT3 Pro와 GT4의 차이점은 무엇입니까?
Dec 29, 2023 pm 02:27 PM
화웨이 GT3 Pro와 GT4의 차이점은 무엇입니까?
Dec 29, 2023 pm 02:27 PM
많은 사용자들이 스마트 시계를 선택할 때 Huawei 브랜드를 선택하게 됩니다. 그 중 Huawei GT3pro와 GT4가 가장 인기 있는 선택입니다. 두 제품의 차이점을 궁금해하는 사용자가 많습니다. Huawei GT3pro와 GT4의 차이점은 무엇입니까? 1. 외관 GT4: 46mm와 41mm, 재질은 유리 거울 + 스테인레스 스틸 본체 + 고해상도 섬유 후면 쉘입니다. GT3pro: 46.6mm 및 42.9mm, 재질은 사파이어 유리 + 티타늄 본체/세라믹 본체 + 세라믹 백 쉘입니다. 2. 건강한 GT4: 최신 Huawei Truseen5.5+ 알고리즘을 사용하면 결과가 더 정확해집니다. GT3pro: ECG 심전도, 혈관 및 안전성 추가
 Windows 11에서 밝기를 조정하는 10가지 방법
Dec 18, 2023 pm 02:21 PM
Windows 11에서 밝기를 조정하는 10가지 방법
Dec 18, 2023 pm 02:21 PM
화면 밝기는 최신 컴퓨팅 장치를 사용할 때 필수적인 부분이며, 특히 화면을 장시간 볼 때 더욱 그렇습니다. 눈의 피로를 줄이고, 가독성을 높이며, 콘텐츠를 쉽고 효율적으로 보는 데 도움이 됩니다. 그러나 설정에 따라 밝기 관리가 어려울 수 있으며, 특히 새로운 UI 변경이 적용된 Windows 11에서는 더욱 그렇습니다. 밝기를 조정하는 데 문제가 있는 경우 Windows 11에서 밝기를 관리하는 모든 방법은 다음과 같습니다. Windows 11에서 밝기를 변경하는 방법 [10가지 설명] 단일 모니터 사용자는 다음 방법을 사용하여 Windows 11에서 밝기를 조정할 수 있습니다. 여기에는 단일 모니터를 사용하는 데스크탑 시스템과 노트북이 포함됩니다. 시작하자. 방법 1: 알림 센터 사용 알림 센터에 액세스할 수 있습니다.
