

iPhone 筹建PHP版Push服务器 实例操作

iPhone 搭建PHP版Push服务器 实例操作
iPhone 搭建PHP版Push服务器 实例操作是本文介绍的内容。在应用里加入 Push 功能对于用户及时获取信息是非常有帮助的,以前介绍过 iPhone 的 Push (推送通知)功能原理浅析,里面提到要为自己的 App 添加推送功能,开发者先要搭建一个推送服务器。下面就介绍一个为 iPhone 应用搭建 php 版 push 服务器的流程。
0.在Mac OS X机器上安装好XCode, 连接一台正常的iPhone, 保持平和的心态
APP 开发基础设置
1.在iPhone Provisioning Portal中建立好APP ID和Device.
2. 在Keychain Access.app中生成证书请求CertificateSigningRequest.certSigningRequest(菜单 > Keychain Access > Certificate Assistant > Request a Certificate From a Certificate Authority...).
3.在iPhone Provisioning Portal > Certificates中请求一个证书(点击Request Certificate,上传CertificateSigningRequest.certSigningRequest).
4.请求完成后,将证书文件(developer_identity.cer)下载,双击导入到Key Chain中.
5.在iPhone Provisioning Portal > Provisioning 中,新建一个Profile, 选择指定的APP ID和 Devices后生成.
6.将刚刚生成的Profile下载为*_profile.mobileprovision, 双击该文件, 将profile加载到iPhone中.
Push Notification service设置
7.在iPhone Provisioning Portal > App IDs,选择需要Push服务的App ID, 进入Configure.
8.确认 Enable for Apple Push Notification service ,配置 Development Push SSL Certificate, 上传第2步生成的证书请求.
9.下载生成的aps_developer_identity.cer, 完成Push服务配置.
10.双击aps_developer_identity.cer,保存到Key Chain.
生成php Push Notification sender需要的证书文件
11.在Keychain Access.app里选定这个新证书(Apple Development Push Services*),导出到桌面,保存为Certificates.p12.
12.运行如下命令:
openssl pkcs12 -clcerts -nokeys -out cert.pem -in Certificates.p12
openssl pkcs12 -nocerts -out key.pem -in Certificates.p12
openssl rsa -in key.pem -out key.unencrypted.pem
cat cert.pem key.unencrypted.pem > ck.pem 获得php Push Notification sender所需的设备令牌:
13.新建一个View-based Application项目,在$PROJECT_NAMEAppDelegate.m中:
a.粘贴如下代码:
- (void)applicationDidFinishLaunching:(UIApplication *)app {
// other setup tasks here….
[window addSubview:viewController.view];
[self alertNotice:@"" withMSG:@"Initiating Remote Noticationss Are Active"
cancleButtonTitle:@"Ok" otherButtonTitle:@""];
[[UIApplication sharedApplication] registerForRemoteNotificationTypes:
(UIRemoteNotificationTypeAlert | UIRemoteNotificationTypeBadge |
UIRemoteNotificationTypeSound)];
}
- (void)application:(UIApplication *)app
didRegisterForRemoteNotificationsWithDeviceToken:(NSData *)deviceToken {
//NSLog(@"devToken=%@",deviceToken);
[self alertNotice:@"" withMSG:[NSString stringWithFormat:@"devToken=%@",deviceToken]
cancleButtonTitle:@"Ok" otherButtonTitle:@""];
}
- (void)application:(UIApplication *)app
didFailToRegisterForRemoteNotificationsWithError:(NSError *)err {
NSLog(@"Error in registration. Error: %@", err);
[self alertNotice:@"" withMSG:[NSString stringWithFormat:@"Error in registration.
Error: %@", err] cancleButtonTitle:@"Ok" otherButtonTitle:@""];
} .
-(void)alertNotice:(NSString *)title withMSG:(NSString *)msg cancleButtonTitle:(NSString
*)cancleTitle otherButtonTitle:(NSString *)otherTitle{
UIAlertView *alert;
if([otherTitle isEqualToString:@""])
alert = [[UIAlertView alloc] initWithTitle:title message:msg delegate:self
cancelButtonTitle:cancleTitle otherButtonTitles:nil,nil];
else
alert = [[UIAlertView alloc] initWithTitle:title message:msg delegate:self
cancelButtonTitle:cancleTitle otherButtonTitles:otherTitle,nil];
[alert show];
[alert release];
}
b.在 - (BOOL)application:(UIApplication *)application didFinishLaunchingWithOptions:(NSDictionary *)launchOptions { 方法中增加
[self alertNotice:@"" withMSG:@"Initiating Remote Noticationss Are Active" cancleButtonTitle:@"Ok" otherButtonTitle:@""];
[[UIApplication sharedApplication] registerForRemoteNotificationTypes: (UIRemoteNotificationTypeAlert | UIRemoteNotificationTypeBadge |UIRemoteNotificationTypeSound)];
14.项目设置
a.Targets > $APP_NAME > context menu > Properties > Identifier
修改
identifier
为
App ID
b.Targets > $APP_NAME > context menu > Build > Code Signing > Code Signing Identifier > Any iPhone OS Device
指定 iPhone Developer 为开发用机,编译并运行后会在iPhone上显示设备令牌
php Push Notification sender代码如下:
deviceToken = "设备令牌";
$body = array("aps" => array
("alert" => 'message', "badge" => 1, "sound" => 'received5.caf'));
$ctx = stream_context_create();
stream_context_set_option($ctx, "ssl", "local_cert", "ck.pem");
$fp = stream_socket_client
("ssl://gateway.sandbox.push.apple.com:2195", $err, $errstr, 60, STREAM_CLIENT_CONNECT, $ctx);
if (!$fp) {
print "Failed to connect $err $errstrn";
return;
}
print "Connection OK\n";
payload = json_encode($body);
$msg = chr(0) . pack("n",32) . pack("H*", $deviceToken) . pack("n",strlen($payload)) . $payload;
rint "sending message :" . $payload . "\n";
fwrite($fp, $msg); fclose($fp);
?>
iPhone 搭建PHP版Push服务器 实例操作的内容介绍完

핫 AI 도구

Undresser.AI Undress
사실적인 누드 사진을 만들기 위한 AI 기반 앱

AI Clothes Remover
사진에서 옷을 제거하는 온라인 AI 도구입니다.

Undress AI Tool
무료로 이미지를 벗다

Clothoff.io
AI 옷 제거제

AI Hentai Generator
AI Hentai를 무료로 생성하십시오.

인기 기사
뜨거운 도구

메모장++7.3.1
사용하기 쉬운 무료 코드 편집기

SublimeText3 중국어 버전
중국어 버전, 사용하기 매우 쉽습니다.

스튜디오 13.0.1 보내기
강력한 PHP 통합 개발 환경

드림위버 CS6
시각적 웹 개발 도구

SublimeText3 Mac 버전
신 수준의 코드 편집 소프트웨어(SublimeText3)
뜨거운 주제
 7569
7569
 15
1386
52
87
11
61
19
28
107
15
1386
52
87
11
61
19
28
107

 새로운 카메라, A18 Pro SoC 및 더 큰 화면을 갖춘 iPhone 16 Pro 및 iPhone 16 Pro Max 공식
Sep 10, 2024 am 06:50 AM
새로운 카메라, A18 Pro SoC 및 더 큰 화면을 갖춘 iPhone 16 Pro 및 iPhone 16 Pro Max 공식
Sep 10, 2024 am 06:50 AM
Apple은 마침내 새로운 고급 iPhone 모델의 덮개를 해제했습니다. iPhone 16 Pro 및 iPhone 16 Pro Max는 이제 이전 세대 제품(Pro는 6.3인치, Pro Max는 6.9인치)에 비해 더 큰 화면을 제공합니다. 그들은 향상된 Apple A1을 얻습니다
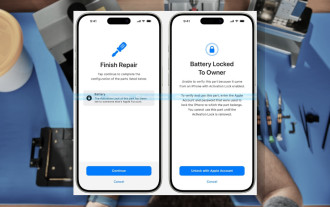 iOS 18 RC에서 발견된 iPhone 부품 활성화 잠금 - 사용자 보호를 가장하여 판매된 수리 권리에 대한 Apple의 최근 타격일 수 있습니다.
Sep 14, 2024 am 06:29 AM
iOS 18 RC에서 발견된 iPhone 부품 활성화 잠금 - 사용자 보호를 가장하여 판매된 수리 권리에 대한 Apple의 최근 타격일 수 있습니다.
Sep 14, 2024 am 06:29 AM
올해 초 Apple은 활성화 잠금 기능을 iPhone 구성 요소로 확장할 것이라고 발표했습니다. 이는 배터리, 디스플레이, FaceID 어셈블리 및 카메라 하드웨어와 같은 개별 iPhone 구성 요소를 iCloud 계정에 효과적으로 연결합니다.
 iPhone 부품 활성화 잠금은 사용자 보호를 가장하여 판매된 수리 권리에 대한 Apple의 최근 타격일 수 있습니다.
Sep 13, 2024 pm 06:17 PM
iPhone 부품 활성화 잠금은 사용자 보호를 가장하여 판매된 수리 권리에 대한 Apple의 최근 타격일 수 있습니다.
Sep 13, 2024 pm 06:17 PM
올해 초 Apple은 활성화 잠금 기능을 iPhone 구성 요소로 확장할 것이라고 발표했습니다. 이는 배터리, 디스플레이, FaceID 어셈블리 및 카메라 하드웨어와 같은 개별 iPhone 구성 요소를 iCloud 계정에 효과적으로 연결합니다.
 Gate.io 거래 플랫폼 공식 앱 다운로드 및 설치 주소
Feb 13, 2025 pm 07:33 PM
Gate.io 거래 플랫폼 공식 앱 다운로드 및 설치 주소
Feb 13, 2025 pm 07:33 PM
이 기사는 Gate.io의 공식 웹 사이트에서 최신 앱을 등록하고 다운로드하는 단계에 대해 자세히 설명합니다. 먼저, 등록 정보 작성, 이메일/휴대 전화 번호 확인 및 등록 완료를 포함하여 등록 절차가 소개됩니다. 둘째, iOS 장치 및 Android 장치에서 Gate.io 앱을 다운로드하는 방법을 설명합니다. 마지막으로, 공식 웹 사이트의 진위를 검증하고, 2 단계 검증을 가능하게하고, 피싱 위험에 대해 사용자 계정 및 자산의 안전을 보장하는 등 보안 팁이 강조됩니다.
 여러 iPhone 16 Pro 사용자가 터치스크린 정지 문제를 보고했습니다. 이는 손바닥 거부 감도와 관련이 있을 수 있습니다.
Sep 23, 2024 pm 06:18 PM
여러 iPhone 16 Pro 사용자가 터치스크린 정지 문제를 보고했습니다. 이는 손바닥 거부 감도와 관련이 있을 수 있습니다.
Sep 23, 2024 pm 06:18 PM
Apple의 iPhone 16 라인업, 특히 16 Pro/Pro Max 기기를 이미 사용해 본 적이 있다면 최근에 터치스크린과 관련된 문제에 직면했을 가능성이 높습니다. 다행스러운 점은 당신이 혼자가 아니라는 것입니다. 보고서
 ANBI 앱 공식 다운로드 v2.96.2 최신 버전 설치 Anbi 공식 안드로이드 버전
Mar 04, 2025 pm 01:06 PM
ANBI 앱 공식 다운로드 v2.96.2 최신 버전 설치 Anbi 공식 안드로이드 버전
Mar 04, 2025 pm 01:06 PM
Binance App 공식 설치 단계 : Android는 공식 웹 사이트를 방문하여 다운로드 링크를 찾아야합니다. Android 버전을 선택하여 IOS를 설치하십시오. 모두 공식 채널을 통해 계약에주의를 기울여야합니다.
 PHP를 사용하여 Alipay EasySDK를 호출 할 때 '정의되지 않은 배열 키 '부호''오류 문제를 해결하는 방법은 무엇입니까?
Mar 31, 2025 pm 11:51 PM
PHP를 사용하여 Alipay EasySDK를 호출 할 때 '정의되지 않은 배열 키 '부호''오류 문제를 해결하는 방법은 무엇입니까?
Mar 31, 2025 pm 11:51 PM
문제 설명 PHP를 사용하여 Alipay EasysDK를 호출 할 때, 공식 코드에 따라 매개 변수를 작성한 후, 작동 중에 오류 메시지 가보고되었습니다. "정의되지 않은 ...
 Beats, 라인업에 휴대폰 케이스 추가: iPhone 16 시리즈용 MagSafe 케이스 공개
Sep 11, 2024 pm 03:33 PM
Beats, 라인업에 휴대폰 케이스 추가: iPhone 16 시리즈용 MagSafe 케이스 공개
Sep 11, 2024 pm 03:33 PM
Beats는 Bluetooth 스피커 및 헤드폰과 같은 오디오 제품을 출시하는 것으로 알려져 있지만, 가장 놀랍게도 Apple 소유 회사는 iPhone 16 시리즈를 시작으로 휴대폰 케이스 제작에 진출했습니다. 비츠 아이폰
