

jquery_jquery를 기반으로 한 그림 호버 플러그인

먼저 사용법을 살펴보겠습니다.
데모 주소http://demo.jb51.net/js/jCutter_jquery/demo.htm
HTML 파일 내용은 다음과 같습니다.

클릭 후의 내용입니다
options={
'speedIn':600, //그림이 들어갈 때 애니메이션 속도
'speedOut ':400, //그림이 종료될 때의 애니메이션 Speed
'easeIn':'easeOutBounce', //그림이 들어갈 때의 애니메이션 효과 이 효과에는 easing 라이브러리가 필요합니다
'easeOut':'' //애니메이션 그림이 종료될 때 효과
}
$('.jcutter').jCutter(options)
})
1. jQuery 플러그인 작성 방법
jQuery 플러그인을 작성하려면 먼저 아래와 같은 필수 구조가 필요합니다.
$.fn.jCutter = function(o){
o = $.extend({
speedIn: 300,
speedOut: 300,
easeIn: '',
easeOut: ''
}, o || {}); };
})(jQuery );
이 구조는 최종 결과와 약간 다르지만 일반적으로 jQuery 플러그인의 구조는 다음과 같습니다.
2. 작성 시작
이 예에서는 선택기를 사용해야 하므로 일부 수정하고 구조를 다음과 같이 변경합니다.
o = $.extend({
speedIn: 300,
speedOut: 300,
easeIn: '',
easeOut: ''
}, o || {});
var that = this;
that.init = function(){
}
that.generate = function(){
};
that.cutter = function(){
};
that.init()
};
$.fn.jCutter = function(o){
this.each(function(i){
$.jCutter(this,o);
})
}
})(jQuery); $.jCutter 좀 더 편리하게 작업할 수 있도록 jQuery에 클래스를 추가한다는 의미입니다. 위의 구조를 통해 프로그램의 논리를 명확하게 볼 수 있습니다. init()는 일부 초기화 작업을 수행하는 데 사용되고, generate()는 필요한 구조를 생성하는 데 사용되며, 마지막으로 Cutter()는 애니메이션과 이벤트를 완료하는 데 사용됩니다. 효과.
3. 초기화 절차
초기화해야 할 것은 주로 일부 매개 변수이며, 수정해야 할 그림을 찾아서 최종적으로 렌더링합니다. 그것들은 모두 비교적 간단한 작업입니다.
코드 복사
that.easeIn = o.easeIn;
that.generate()
}; 🎜>
4. 필요한 구조 생성
이 효과의 원리는 그림을 4개의 레이어로 복사한 다음 4개의 레이어를 상대적으로 배치한 다음 그림을 합치는 것입니다. 달성 .
코드 복사
코드는 다음과 같습니다.
that.generate = function(){
var w = that.node.width() / 2;
var h = that.node.height() / 2;
that.imga = [];
for (var i = 0; i < 4; i ) {
that.imga[i] = document.createElement('div');
that.imga[i] = $(that.imga[i]);
that.imga[i].css({
'위치': '절대',
'z-index': '2',
'너비': w,
' 높이': h,
'배경': 'url("' that.img.attr("src") '") 반복 없음'
});
$(that.node).append(that.imga[i]);
}
that.imga[0].css({
'왼쪽': '0px',
'top': '0px'
});
that.imga[1].css({
'right': '0px',
'top': '0px',
'Background-position': '-' w 'px ' ' 0px'
});
that.imga[2].css({
'왼쪽': '0px',
'하단': '0px',
'배경 위치': '0px' ' -' h 'px'
});
that.imga[3].css({
'오른쪽': '0px',
'하단': '0px',
'배경 위치': '-' w 'px ' '-' h 'px'
});
that.img.remove();
};
这里的代码也比较简单, 首先得到外审层titude and高titude,然后计算,再生成 4个层,给四个层写入应的位置代码,需要注의미있는是, 외부 위치는 상대적인 위치에 있으며, 要么么面的层就无法准确定位了.晰,我们采用了比较明朗的写法,先生成一个div,然后赋给他一些css属性.
5、添加动画效果,注册事件处理程序
完成了结构的任务,下一步就是给他添加动画效果了,我们只需要将这4个图层在鼠标经过的时候移开的时候再复位就可以了,写起来也是不常的简单,看代码:
that.cutter = function(){
var w = that.node.width() / 2;
var h = that.node.height() / 2;
that.node.hover(function(){
that.imga[0].stop().animate({
'left': '-' w,
'top': ' -' h
}, that.speedOut, that.easeOut)
that.imga[1].stop().animate({
'right': '-' w,
' top': '-' h
}, that.speedOut, that.easeOut)
that.imga[2].stop().animate({
'left': '-' w,
'하단': '-' h
}, that.speedOut, that.easeOut)
that.imga[3].stop().animate({
'right': ' -' w,
'bottom': '-' h
}, that.speedOut, that.easeOut)
}, function(){
that.imga[0].stop( ).animate({
'왼쪽': 0,
'top': 0
}, that.speedIn, that.easeIn)
that.imga[1].stop(). animate({
'right': 0,
'top': 0
}, that.speedIn, that.easeIn)
that.imga[2].stop().animate( {
'왼쪽': 0,
'하단': 0
}, that.speedIn, that.easeIn)
that.imga[3].stop().animate({
'오른쪽': 0,
'하단': 0
}, that.speedIn, that.easeIn)
})
};
.stop()函数에 맞는 작업을 수행하는 도구는 다음과 같습니다.更加自然一些。that.easeIn과 that .easeOut은 jQuery를 사용하여 더 많은 정보를 제공합니다.
这样就完成了这个插件的编写,完整的代码如下:
(함수($){
$.jCutter = 함수(노드, o){
o = $.extend({
speedIn: 300,
speedOut: 300,
easeIn: '',
easeOut: ''
}, o || {})
var that = this
that.init = function(){
that .node = $(노드);
that.img = that.node.find('img');
that.speedIn = o.speedIn;
that.speedOut
that.easeIn = o.easeIn;
that.easeOut;
that.generate()
that.cutter()
that.generate = function(){
var w = that.node.width() / 2;
var h = that.node.height() / 2
that.imga = []
; (var i = 0; i < 4; i ) {
that.imga[i] = document.createElement('div')
that.imga[i] = $(that.imga[i ]);
that.imga[i].css({
'위치': '절대',
'z-index': '2',
'너비': w,
'높이': h,
'배경': 'url("' that.img.attr("src") '") 반복 없음'
})
$(that. node).append(that.imga[i]);
}
that.imga[0].css({
'왼쪽': '0px',
'top': '0px '
})
that.imga[1].css({
'right': '0px',
'top': '0px',
'배경 위치' : '-' w 'px' ' 0px'
});
that.imga[2].css({
'왼쪽': '0px',
'하단': '0px',
'배경 위치': '0px' ' -' h 'px'
});
that.imga[3].css({
'오른쪽': '0px',
'하단': '0px',
'배경 위치': '-' w 'px ' '-' h 'px'
});
that.img.remove();
};
that.cutter = function(){
var w = that.node.width() / 2;
var h = that.node.height() / 2;
that.node.hover(function(){
that.imga[0].stop().animate({
'left': '-' w,
'top': ' -' h
}, that.speedOut, that.easeOut)
that.imga[1].stop().animate({
'right': '-' w,
' top': '-' h
}, that.speedOut, that.easeOut)
that.imga[2].stop().animate({
'left': '-' w,
'하단': '-' h
}, that.speedOut, that.easeOut)
that.imga[3].stop().animate({
'right': ' -' w,
'bottom': '-' h
}, that.speedOut, that.easeOut)
}, function(){
that.imga[0].stop( ).animate({
'왼쪽': 0,
'top': 0
}, that.speedIn, that.easeIn)
that.imga[1].stop(). animate({
'right': 0,
'top': 0
}, that.speedIn, that.easeIn)
that.imga[2].stop().animate( {
'왼쪽': 0,
'하단': 0
}, that.speedIn, that.easeIn)
that.imga[3].stop().animate({
'오른쪽': 0,
'하단': 0
}, that.speedIn, that.easeIn)
})
};
that.init();
};
$.fn.jCutter = function(o){
return this.each(function(i){
$.jCutter(this,o);
});
};
})(jQuery);
打包下载地址
http://www.jb51.net /jiaoben /26031.html

핫 AI 도구

Undresser.AI Undress
사실적인 누드 사진을 만들기 위한 AI 기반 앱

AI Clothes Remover
사진에서 옷을 제거하는 온라인 AI 도구입니다.

Undress AI Tool
무료로 이미지를 벗다

Clothoff.io
AI 옷 제거제

AI Hentai Generator
AI Hentai를 무료로 생성하십시오.

인기 기사
뜨거운 도구

메모장++7.3.1
사용하기 쉬운 무료 코드 편집기

SublimeText3 중국어 버전
중국어 버전, 사용하기 매우 쉽습니다.

스튜디오 13.0.1 보내기
강력한 PHP 통합 개발 환경

드림위버 CS6
시각적 웹 개발 도구

SublimeText3 Mac 버전
신 수준의 코드 편집 소프트웨어(SublimeText3)
뜨거운 주제
 7396
7396
 15
1630
14
1358
52
1268
25
1217
29
15
1630
14
1358
52
1268
25
1217
29

 Xiaohongshu에 게시할 때 사진이 자동으로 저장되는 문제를 해결하는 방법은 무엇입니까? 포스팅 시 자동으로 저장되는 이미지는 어디에 있나요?
Mar 22, 2024 am 08:06 AM
Xiaohongshu에 게시할 때 사진이 자동으로 저장되는 문제를 해결하는 방법은 무엇입니까? 포스팅 시 자동으로 저장되는 이미지는 어디에 있나요?
Mar 22, 2024 am 08:06 AM
소셜 미디어의 지속적인 발전으로 Xiaohongshu는 점점 더 많은 젊은이들이 자신의 삶을 공유하고 아름다운 것을 발견할 수 있는 플랫폼이 되었습니다. 많은 사용자들이 이미지 게시 시 자동 저장 문제로 고민하고 있습니다. 그렇다면 이 문제를 해결하는 방법은 무엇입니까? 1. Xiaohongshu에 게시할 때 사진이 자동으로 저장되는 문제를 해결하는 방법은 무엇입니까? 1. 캐시 지우기 먼저 Xiaohongshu의 캐시 데이터를 지워볼 수 있습니다. 단계는 다음과 같습니다. (1) Xiaohongshu를 열고 오른쪽 하단에 있는 "내" 버튼을 클릭합니다. (2) 개인 센터 페이지에서 "설정"을 찾아 클릭합니다. 캐시 지우기' 옵션을 선택하고 확인을 클릭하세요. 캐시를 삭제한 후 샤오홍슈에 다시 진입하여 사진을 올려 자동 저장 문제가 해결되었는지 확인해 보세요. 2. Xiaohongshu 버전을 업데이트하여 Xiaohongshu를 확인하세요.
 TikTok 댓글에 사진을 게시하는 방법은 무엇입니까? 댓글란에 있는 사진의 입구는 어디인가요?
Mar 21, 2024 pm 09:12 PM
TikTok 댓글에 사진을 게시하는 방법은 무엇입니까? 댓글란에 있는 사진의 입구는 어디인가요?
Mar 21, 2024 pm 09:12 PM
Douyin 짧은 동영상의 인기로 인해 댓글 영역의 사용자 상호 작용이 더욱 다채로워졌습니다. 일부 사용자는 자신의 의견이나 감정을 더 잘 표현하기 위해 댓글로 이미지를 공유하기를 원합니다. 그렇다면 TikTok 댓글에 사진을 게시하는 방법은 무엇입니까? 이 기사에서는 이 질문에 대해 자세히 답변하고 몇 가지 관련 팁과 예방 조치를 제공합니다. 1. Douyin 댓글에 사진을 어떻게 게시하나요? 1. Douyin 열기: 먼저 Douyin 앱을 열고 계정에 로그인해야 합니다. 2. 댓글 영역 찾기: 짧은 동영상을 탐색하거나 게시할 때 댓글을 달고 싶은 위치를 찾아 "댓글" 버튼을 클릭하세요. 3. 댓글 내용 입력: 댓글 영역에 댓글 내용을 입력합니다. 4. 사진 전송 선택: 댓글 내용 입력 인터페이스에 "사진" 버튼 또는 "+" 버튼이 표시됩니다.
 iPhone에서 사진을 더 선명하게 만드는 6가지 방법
Mar 04, 2024 pm 06:25 PM
iPhone에서 사진을 더 선명하게 만드는 6가지 방법
Mar 04, 2024 pm 06:25 PM
Apple의 최근 iPhone은 선명한 디테일, 채도 및 밝기로 추억을 포착합니다. 그러나 때로는 이미지가 덜 선명하게 보일 수 있는 몇 가지 문제가 발생할 수 있습니다. iPhone 카메라의 자동 초점 기능이 크게 발전하여 사진을 빠르게 촬영할 수 있게 되었지만, 특정 상황에서는 카메라가 실수로 잘못된 피사체에 초점을 맞춰 원치 않는 영역에서 사진이 흐릿해질 수 있습니다. iPhone의 사진이 일반적으로 초점이 맞지 않거나 선명도가 부족한 경우 다음 게시물을 통해 사진을 더 선명하게 만드는 데 도움이 될 것입니다. iPhone에서 사진을 더 선명하게 만드는 방법 [6가지 방법] 기본 사진 앱을 사용하여 사진을 정리할 수 있습니다. 더 많은 기능과 옵션을 원하신다면
 PPT 사진을 하나씩 나타나게 하는 방법
Mar 25, 2024 pm 04:00 PM
PPT 사진을 하나씩 나타나게 하는 방법
Mar 25, 2024 pm 04:00 PM
파워포인트에서는 그림을 하나씩 표시하는 것이 일반적인 기술인데, 이는 애니메이션 효과를 설정하면 가능하다. 이 가이드에서는 기본 설정, 이미지 삽입, 애니메이션 추가, 애니메이션 순서 및 타이밍 조정 등 이 기술을 구현하는 단계를 자세히 설명합니다. 또한 트리거 사용, 애니메이션 속도 및 순서 조정, 애니메이션 효과 미리보기 등의 고급 설정 및 조정이 제공됩니다. 이러한 단계와 팁을 따르면 사용자는 PowerPoint에서 그림이 차례로 표시되도록 쉽게 설정할 수 있으므로 프레젠테이션의 시각적 효과가 향상되고 청중의 관심을 끌 수 있습니다.
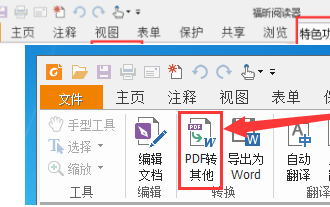 Foxit PDF Reader를 사용하여 PDF 문서를 jpg 이미지로 변환하는 방법 - Foxit PDF Reader를 사용하여 PDF 문서를 jpg 이미지로 변환하는 방법
Mar 04, 2024 pm 05:49 PM
Foxit PDF Reader를 사용하여 PDF 문서를 jpg 이미지로 변환하는 방법 - Foxit PDF Reader를 사용하여 PDF 문서를 jpg 이미지로 변환하는 방법
Mar 04, 2024 pm 05:49 PM
Foxit PDF Reader 소프트웨어도 사용하고 계십니까? 그렇다면 Foxit PDF Reader가 PDF 문서를 jpg 이미지로 변환하는 방법을 알고 계십니까? 다음 기사에서는 변환 방법에 관심이 있는 사람들을 위해 Foxit PDF Reader가 PDF 문서를 jpg 이미지로 변환하는 방법을 설명합니다. jpg 이미지를 보려면 아래를 방문하여 살펴보시기 바랍니다. 먼저 Foxit PDF Reader를 시작한 다음 상단 도구 모음에서 "기능"을 찾은 다음 "PDF를 다른 사람에게 보내기" 기능을 선택하십시오. 다음으로 "Foxit PDF 온라인 변환"이라는 웹 페이지를 엽니다. 페이지 오른쪽 상단의 "로그인" 버튼을 클릭하여 로그인한 후 "PDF를 이미지로" 기능을 활성화하세요. 그런 다음 업로드 버튼을 클릭하고 이미지로 변환하려는 PDF 파일을 추가한 후 "변환 시작"을 클릭하세요.
 wps 문서에서 두 장의 사진을 나란히 정렬하는 방법
Mar 20, 2024 pm 04:00 PM
wps 문서에서 두 장의 사진을 나란히 정렬하는 방법
Mar 20, 2024 pm 04:00 PM
WPS 사무용 소프트웨어를 사용할 때 하나의 양식만 사용되는 것이 아니라 텍스트에 표와 그림을 추가할 수 있고 표에 그림도 추가할 수 있다는 사실을 발견했습니다. 이 모든 것이 함께 사용되어 전체 문서의 내용을 구성합니다. 문서에 두 개의 그림을 삽입하고 나란히 정렬해야 하는 경우 더 풍부해 보입니다. 다음 과정에서는 이 문제를 해결할 수 있습니다: wps 문서에 두 장의 그림을 나란히 배치하는 방법입니다. 1. 먼저 WPS 소프트웨어를 열고 조정하려는 사진을 찾아야 합니다. 사진을 마우스 왼쪽 버튼으로 클릭하면 메뉴 표시줄이 나타나며 "페이지 레이아웃"을 선택합니다. 2. 텍스트 줄 바꿈에서 "Tight 줄 바꿈"을 선택합니다. 3. 필요한 모든 사진이 "단단한 텍스트 줄 바꿈"으로 설정되었는지 확인한 후 사진을 적절한 위치로 끌어서 첫 번째 사진을 클릭할 수 있습니다.
 웹페이지의 이미지를 로드할 수 없으면 어떻게 해야 합니까? 6가지 솔루션
Mar 15, 2024 am 10:30 AM
웹페이지의 이미지를 로드할 수 없으면 어떻게 해야 합니까? 6가지 솔루션
Mar 15, 2024 am 10:30 AM
일부 네티즌들은 브라우저 웹페이지를 열었을 때 웹페이지의 사진이 오랫동안 로드되지 않는다는 사실을 발견했습니다. 네트워크가 정상인지 확인했는데 무엇이 문제인가요? 아래 편집기에서는 웹 페이지 이미지를 로드할 수 없는 문제에 대한 6가지 해결 방법을 소개합니다. 웹페이지 이미지를 로드할 수 없습니다: 1. 인터넷 속도 문제 웹페이지에 이미지가 표시되지 않습니다. 이는 컴퓨터의 인터넷 속도가 상대적으로 느리고 컴퓨터에 열려 있는 소프트웨어가 더 많기 때문일 수 있습니다. 로딩 시간 초과로 인해 사진이 표시되지 않을 수 있습니다. 네트워크 속도를 차지하는 소프트웨어를 끄고 작업 관리자에서 확인할 수 있습니다. 2. 방문자가 너무 많으면 웹페이지에 사진이 표시되지 않는 경우, 우리가 방문한 웹페이지가 동시에 방문되었기 때문일 수 있습니다.
 jQuery에서 PUT 요청 방법을 사용하는 방법은 무엇입니까?
Feb 28, 2024 pm 03:12 PM
jQuery에서 PUT 요청 방법을 사용하는 방법은 무엇입니까?
Feb 28, 2024 pm 03:12 PM
jQuery에서 PUT 요청 방법을 사용하는 방법은 무엇입니까? jQuery에서 PUT 요청을 보내는 방법은 다른 유형의 요청을 보내는 것과 유사하지만 몇 가지 세부 사항과 매개 변수 설정에 주의해야 합니다. PUT 요청은 일반적으로 데이터베이스의 데이터 업데이트 또는 서버의 파일 업데이트와 같은 리소스를 업데이트하는 데 사용됩니다. 다음은 jQuery에서 PUT 요청 메소드를 사용하는 구체적인 코드 예제입니다. 먼저 jQuery 라이브러리 파일을 포함했는지 확인한 다음 $.ajax({u를 통해 PUT 요청을 보낼 수 있습니다.
