

Python读写txt文本文件的操作方法全解析

一、文件的打开和创建
>>> f = open('/tmp/test.txt')
>>> f.read()
'hello python!\nhello world!\n'
>>> f
<open file '/tmp/test.txt', mode 'r' at 0x7fb2255efc00>
二、文件的读取
步骤:打开 -- 读取 -- 关闭
>>> f = open('/tmp/test.txt')
>>> f.read()
'hello python!\nhello world!\n'
>>> f.close()
读取数据是后期数据处理的必要步骤。.txt是广泛使用的数据文件格式。一些.csv, .xlsx等文件可以转换为.txt 文件进行读取。我常使用的是Python自带的I/O接口,将数据读取进来存放在list中,然后再用numpy科学计算包将list的数据转换为array格式,从而可以像MATLAB一样进行科学计算。
下面是一段常用的读取txt文件代码,可以用在大多数的txt文件读取中
filename = 'array_reflection_2D_TM_vertical_normE_center.txt' # txt文件和当前脚本在同一目录下,所以不用写具体路径
pos = []
Efield = []
with open(filename, 'r') as file_to_read:
  while True:
    lines = file_to_read.readline() # 整行读取数据
    if not lines:
      break
      pass
     p_tmp, E_tmp = [float(i) for i in lines.split()] # 将整行数据分割处理,如果分割符是空格,括号里就不用传入参数,如果是逗号, 则传入‘,'字符。
     pos.append(p_tmp)  # 添加新读取的数据
     Efield.append(E_tmp)
     pass
   pos = np.array(pos) # 将数据从list类型转换为array类型。
   Efield = np.array(Efield)
   pass
例如下面是将要读入的txt文件
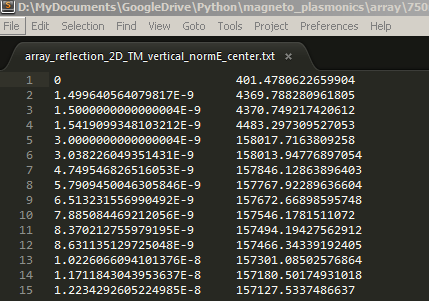
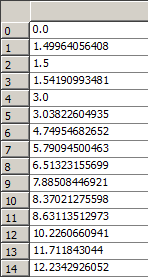
经过读取后,在Enthought Canopy的variable window查看读入的数据, 左侧为pos,右侧为Efield。

三、文件写入(慎重,小心别清空原本的文件)
步骤:打开 -- 写入 -- (保存)关闭
直接的写入数据是不行的,因为默认打开的是'r' 只读模式
>>> f.write('hello boy')
Traceback (most recent call last):
File "<stdin>", line 1, in <module>
IOError: File not open for writing
>>> f
<open file '/tmp/test.txt', mode 'r' at 0x7fe550a49d20>
应该先指定可写的模式
>>> f1 = open('/tmp/test.txt','w')
>>> f1.write('hello boy!')
但此时数据只写到了缓存中,并未保存到文件,而且从下面的输出可以看到,原先里面的配置被清空了
[root@node1 ~]# cat /tmp/test.txt
[root@node1 ~]#
关闭这个文件即可将缓存中的数据写入到文件中
>>> f1.close()
[root@node1 ~]# cat /tmp/test.txt
[root@node1 ~]# hello boy!
注意:这一步需要相当慎重,因为如果编辑的文件存在的话,这一步操作会先清空这个文件再重新写入。那么如果不要清空文件再写入该如何做呢?
使用r+ 模式不会先清空,但是会替换掉原先的文件,如下面的例子:hello boy! 被替换成hello aay!
>>> f2 = open('/tmp/test.txt','r+')
>>> f2.write('\nhello aa!')
>>> f2.close()
[root@node1 python]# cat /tmp/test.txt
hello aay!
如何实现不替换?
>>> f2 = open('/tmp/test.txt','r+')
>>> f2.read()
'hello girl!'
>>> f2.write('\nhello boy!')
>>> f2.close()
[root@node1 python]# cat /tmp/test.txt
hello girl!
hello boy!
可以看到,如果在写之前先读取一下文件,再进行写入,则写入的数据会添加到文件末尾而不会替换掉原先的文件。这是因为指针引起的,r+ 模式的指针默认是在文件的开头,如果直接写入,则会覆盖源文件,通过read() 读取文件后,指针会移到文件的末尾,再写入数据就不会有问题了。这里也可以使用a 模式
>>> f = open('/tmp/test.txt','a')
>>> f.write('\nhello man!')
>>> f.close()
>>>
[root@node1 python]# cat /tmp/test.txt
hello girl!
hello boy!
hello man!
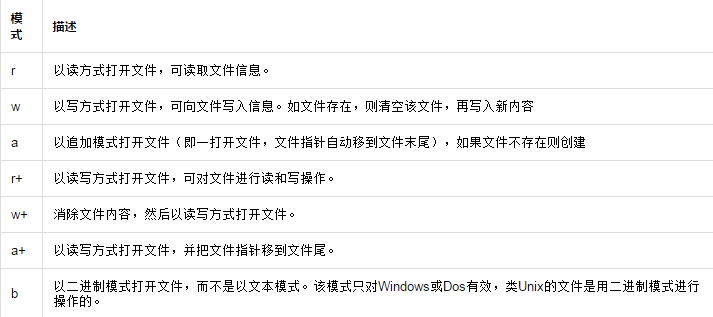
关于其他模式的介绍,见下表:
文件对象的方法:
f.readline() 逐行读取数据
方法一:
>>> f = open('/tmp/test.txt')
>>> f.readline()
'hello girl!\n'
>>> f.readline()
'hello boy!\n'
>>> f.readline()
'hello man!'
>>> f.readline()
''
方法二:
>>> for i in open('/tmp/test.txt'):
...   print i
...
hello girl!
hello boy!
hello man!
f.readlines()   将文件内容以列表的形式存放

>>> f = open('/tmp/test.txt')
>>> f.readlines()
['hello girl!\n', 'hello boy!\n', 'hello man!']
>>> f.close()
f.next() 逐行读取数据,和f.readline() 相似,唯一不同的是,f.readline() 读取到最后如果没有数据会返回空,而f.next() 没读取到数据则会报错
>>> f = open('/tmp/test.txt')
>>> f.readlines()
['hello girl!\n', 'hello boy!\n', 'hello man!']
>>> f.close()
>>>
>>> f = open('/tmp/test.txt')
>>> f.next()
'hello girl!\n'
>>> f.next()
'hello boy!\n'
>>> f.next()
'hello man!'
>>> f.next()
Traceback (most recent call last):
File "<stdin>", line 1, in <module>
StopIteration
f.writelines() 多行写入
>>> l = ['\nhello dear!','\nhello son!','\nhello baby!\n']
>>> f = open('/tmp/test.txt','a')
>>> f.writelines(l)
>>> f.close()
[root@node1 python]# cat /tmp/test.txt
hello girl!
hello boy!
hello man!
hello dear!
hello son!
hello baby!
f.seek(偏移量,选项)
>>> f = open('/tmp/test.txt','r+')
>>> f.readline()
'hello girl!\n'
>>> f.readline()
'hello boy!\n'
>>> f.readline()
'hello man!\n'
>>> f.readline()
' '
>>> f.close()
>>> f = open('/tmp/test.txt','r+')
>>> f.read()
'hello girl!\nhello boy!\nhello man!\n'
>>> f.readline()
''
>>> f.close()
这个例子可以充分的解释前面使用r+这个模式的时候,为什么需要执行f.read()之后才能正常插入
f.seek(偏移量,选项)
(1)选项=0,表示将文件指针指向从文件头部到“偏移量”字节处
(2)选项=1,表示将文件指针指向从文件的当前位置,向后移动“偏移量”字节
(3)选项=2,表示将文件指针指向从文件的尾部,向前移动“偏移量”字节
偏移量:正数表示向右偏移,负数表示向左偏移
>>> f = open('/tmp/test.txt','r+')
>>> f.seek(0,2)
>>> f.readline()
''
>>> f.seek(0,0)
>>> f.readline()
'hello girl!\n'
>>> f.readline()
'hello boy!\n'
>>> f.readline()
'hello man!\n'
>>> f.readline()
''
f.flush() 将修改写入到文件中(无需关闭文件)
>>> f.write('hello python!')
>>> f.flush()
[root@node1 python]# cat /tmp/test.txt
hello girl!
hello boy!
hello man!
hello python!
f.tell() 获取指针位置
>>> f = open('/tmp/test.txt')
>>> f.readline()
'hello girl!\n'
>>> f.tell()
12
>>> f.readline()
'hello boy!\n'
>>> f.tell()
23
四、内容查找和替换
1、内容查找
实例:统计文件中hello个数
思路:打开文件,遍历文件内容,通过正则表达式匹配关键字,统计匹配个数。
[root@node1 ~]# cat /tmp/test.txt
hello girl!
hello boy!
hello man!
hello python!
脚本如下:
方法一:
#!/usr/bin/python
import re
f = open('/tmp/test.txt')
source = f.read()
f.close()
r = r'hello'
s = len(re.findall(r,source))
print s
[root@node1 python]# python count.py
4
方法二:
#!/usr/bin/python
import re
fp = file("/tmp/test.txt",'r')
count = 0
for s in fp.readlines():
li = re.findall("hello",s)
if len(li)>0:
count = count + len(li)
print "Search",count, "hello"
fp.close()
[root@node1 python]# python count1.py
Search 4 hello
2、替换
实例:把test.txt 中的hello全部换为"hi",并把结果保存到myhello.txt中。
#!/usr/bin/python
import re
f1 = open('/tmp/test.txt')
f2 = open('/tmp/myhello.txt','r+')
for s in f1.readlines():
f2.write(s.replace('hello','hi'))
f1.close()
f2.close()
[root@node1 python]# touch /tmp/myhello.txt
[root@node1 ~]# cat /tmp/myhello.txt
hi girl!
hi boy!
hi man!
hi python!
实例:读取文件test.txt内容,去除空行和注释行后,以行为单位进行排序,并将结果输出为result.txt。test.txt 的内容如下所示:
#some words

Sometimes in life,
You find a special friend;
Someone who changes your life just by being part of it.
Someone who makes you laugh until you can't stop;
Someone who makes you believe that there really is good in the world.
Someone who convinces you that there really is an unlocked door just waiting for you to open it.
This is Forever Friendship.
when you're down,
and the world seems dark and empty,
Your forever friend lifts you up in spirits and makes that dark and empty world
suddenly seem bright and full.
Your forever friend gets you through the hard times,the sad times,and the confused times.
If you turn and walk away,
Your forever friend follows,
If you lose you way,
Your forever friend guides you and cheers you on.
Your forever friend holds your hand and tells you that everything is going to be okay.
脚本如下:
f = open('cdays-4-test.txt')
result = list()
for line in f.readlines():                # 逐行读取数据
line = line.strip()                #去掉每行头尾空白
if not len(line) or line.startswith('#'):   # 判断是否是空行或注释行
continue                  #是的话,跳过不处理
result.append(line)              #保存
result.sort()                       #排序结果
print result
open('cdays-4-result.txt','w').write('%s' % '\n'.join(result))        #保存入结果文件

핫 AI 도구

Undresser.AI Undress
사실적인 누드 사진을 만들기 위한 AI 기반 앱

AI Clothes Remover
사진에서 옷을 제거하는 온라인 AI 도구입니다.

Undress AI Tool
무료로 이미지를 벗다

Clothoff.io
AI 옷 제거제

AI Hentai Generator
AI Hentai를 무료로 생성하십시오.

인기 기사
뜨거운 도구

메모장++7.3.1
사용하기 쉬운 무료 코드 편집기

SublimeText3 중국어 버전
중국어 버전, 사용하기 매우 쉽습니다.

스튜디오 13.0.1 보내기
강력한 PHP 통합 개발 환경

드림위버 CS6
시각적 웹 개발 도구

SublimeText3 Mac 버전
신 수준의 코드 편집 소프트웨어(SublimeText3)
뜨거운 주제
 7455
7455
 15
1375
52
77
11
40
19
14
9
15
1375
52
77
11
40
19
14
9

 PS가 계속 로딩을 보여주는 이유는 무엇입니까?
Apr 06, 2025 pm 06:39 PM
PS가 계속 로딩을 보여주는 이유는 무엇입니까?
Apr 06, 2025 pm 06:39 PM
PS "로드"문제는 자원 액세스 또는 처리 문제로 인한 것입니다. 하드 디스크 판독 속도는 느리거나 나쁘다 : CrystalDiskinfo를 사용하여 하드 디스크 건강을 확인하고 문제가있는 하드 디스크를 교체하십시오. 불충분 한 메모리 : 고해상도 이미지 및 복잡한 레이어 처리에 대한 PS의 요구를 충족시키기 위해 메모리 업그레이드 메모리. 그래픽 카드 드라이버는 구식 또는 손상됩니다. 운전자를 업데이트하여 PS와 그래픽 카드 간의 통신을 최적화하십시오. 파일 경로는 너무 길거나 파일 이름에는 특수 문자가 있습니다. 짧은 경로를 사용하고 특수 문자를 피하십시오. PS 자체 문제 : PS 설치 프로그램을 다시 설치하거나 수리하십시오.
 PS가 시작될 때 로딩 문제를 해결하는 방법은 무엇입니까?
Apr 06, 2025 pm 06:36 PM
PS가 시작될 때 로딩 문제를 해결하는 방법은 무엇입니까?
Apr 06, 2025 pm 06:36 PM
부팅 할 때 "로드"에 PS가 붙어있는 여러 가지 이유로 인해 발생할 수 있습니다. 손상되거나 충돌하는 플러그인을 비활성화합니다. 손상된 구성 파일을 삭제하거나 바꾸십시오. 불충분 한 메모리를 피하기 위해 불필요한 프로그램을 닫거나 메모리를 업그레이드하십시오. 하드 드라이브 독서 속도를 높이기 위해 솔리드 스테이트 드라이브로 업그레이드하십시오. 손상된 시스템 파일 또는 설치 패키지 문제를 복구하기 위해 PS를 다시 설치합니다. 시작 오류 로그 분석의 시작 과정에서 오류 정보를 봅니다.
 PS가 파일을 열 때로드 문제를 해결하는 방법은 무엇입니까?
Apr 06, 2025 pm 06:33 PM
PS가 파일을 열 때로드 문제를 해결하는 방법은 무엇입니까?
Apr 06, 2025 pm 06:33 PM
"로드"는 PS에서 파일을 열 때 말더듬이 발생합니다. 그 이유에는 너무 크거나 손상된 파일, 메모리 불충분, 하드 디스크 속도가 느리게, 그래픽 카드 드라이버 문제, PS 버전 또는 플러그인 충돌이 포함될 수 있습니다. 솔루션은 다음과 같습니다. 파일 크기 및 무결성 확인, 메모리 증가, 하드 디스크 업그레이드, 그래픽 카드 드라이버 업데이트, 의심스러운 플러그인 제거 또는 비활성화 및 PS를 다시 설치하십시오. 이 문제는 PS 성능 설정을 점차적으로 확인하고 잘 활용하고 우수한 파일 관리 습관을 개발함으로써 효과적으로 해결할 수 있습니다.
 설치 후 MySQL을 사용하는 방법
Apr 08, 2025 am 11:48 AM
설치 후 MySQL을 사용하는 방법
Apr 08, 2025 am 11:48 AM
이 기사는 MySQL 데이터베이스의 작동을 소개합니다. 먼저 MySQLworkBench 또는 명령 줄 클라이언트와 같은 MySQL 클라이언트를 설치해야합니다. 1. MySQL-Uroot-P 명령을 사용하여 서버에 연결하고 루트 계정 암호로 로그인하십시오. 2. CreateABase를 사용하여 데이터베이스를 작성하고 데이터베이스를 선택하십시오. 3. CreateTable을 사용하여 테이블을 만들고 필드 및 데이터 유형을 정의하십시오. 4. InsertInto를 사용하여 데이터를 삽입하고 데이터를 쿼리하고 업데이트를 통해 데이터를 업데이트하고 DELETE를 통해 데이터를 삭제하십시오. 이러한 단계를 마스터하고 일반적인 문제를 처리하는 법을 배우고 데이터베이스 성능을 최적화하면 MySQL을 효율적으로 사용할 수 있습니다.
 PS 페더 링은 어떻게 전환의 부드러움을 제어합니까?
Apr 06, 2025 pm 07:33 PM
PS 페더 링은 어떻게 전환의 부드러움을 제어합니까?
Apr 06, 2025 pm 07:33 PM
깃털 통제의 열쇠는 점진적인 성격을 이해하는 것입니다. PS 자체는 그라디언트 곡선을 직접 제어하는 옵션을 제공하지 않지만 여러 깃털, 일치하는 마스크 및 미세 선택으로 반경 및 구배 소프트를 유연하게 조정하여 자연스럽게 전이 효과를 달성 할 수 있습니다.
 MySQL 설치 후 데이터베이스 성능을 최적화하는 방법
Apr 08, 2025 am 11:36 AM
MySQL 설치 후 데이터베이스 성능을 최적화하는 방법
Apr 08, 2025 am 11:36 AM
MySQL 성능 최적화는 설치 구성, 인덱싱 및 쿼리 최적화, 모니터링 및 튜닝의 세 가지 측면에서 시작해야합니다. 1. 설치 후 innodb_buffer_pool_size 매개 변수와 같은 서버 구성에 따라 my.cnf 파일을 조정해야합니다. 2. 과도한 인덱스를 피하기 위해 적절한 색인을 작성하고 Execution 명령을 사용하여 실행 계획을 분석하는 것과 같은 쿼리 문을 최적화합니다. 3. MySQL의 자체 모니터링 도구 (showprocesslist, showstatus)를 사용하여 데이터베이스 건강을 모니터링하고 정기적으로 백업 및 데이터베이스를 구성하십시오. 이러한 단계를 지속적으로 최적화함으로써 MySQL 데이터베이스의 성능을 향상시킬 수 있습니다.
 PS 카드가 로딩 인터페이스에 있으면 어떻게해야합니까?
Apr 06, 2025 pm 06:54 PM
PS 카드가 로딩 인터페이스에 있으면 어떻게해야합니까?
Apr 06, 2025 pm 06:54 PM
PS 카드의로드 인터페이스는 소프트웨어 자체 (파일 손상 또는 플러그인 충돌), 시스템 환경 (DIFE 드라이버 또는 시스템 파일 손상) 또는 하드웨어 (하드 디스크 손상 또는 메모리 스틱 고장)로 인해 발생할 수 있습니다. 먼저 컴퓨터 자원이 충분한 지 확인하고 배경 프로그램을 닫고 메모리 및 CPU 리소스를 릴리스하십시오. PS 설치를 수정하거나 플러그인의 호환성 문제를 확인하십시오. PS 버전을 업데이트하거나 폴백합니다. 그래픽 카드 드라이버를 확인하고 업데이트하고 시스템 파일 확인을 실행하십시오. 위의 문제를 해결하면 하드 디스크 감지 및 메모리 테스트를 시도 할 수 있습니다.
 PS 페더 링을 설정하는 방법?
Apr 06, 2025 pm 07:36 PM
PS 페더 링을 설정하는 방법?
Apr 06, 2025 pm 07:36 PM
PS 페더 링은 이미지 가장자리 블러 효과로, 가장자리 영역에서 픽셀의 가중 평균에 의해 달성됩니다. 깃털 반경을 설정하면 흐림 정도를 제어 할 수 있으며 값이 클수록 흐려집니다. 반경을 유연하게 조정하면 이미지와 요구에 따라 효과를 최적화 할 수 있습니다. 예를 들어, 캐릭터 사진을 처리 할 때 더 작은 반경을 사용하여 세부 사항을 유지하고 더 큰 반경을 사용하여 예술을 처리 할 때 흐릿한 느낌을줍니다. 그러나 반경이 너무 커서 가장자리 세부 사항을 쉽게 잃을 수 있으며 너무 작아 효과는 분명하지 않습니다. 깃털 효과는 이미지 해상도의 영향을받으며 이미지 이해 및 효과 파악에 따라 조정해야합니다.
