

jQuery 프롬프트 상자(팁) 플러그인_javascript 기술

플러그인은 일반적으로 사용되는 프롬프트 표시를 충족하고 12방향을 지원하며 테두리, 배경색, 텍스트 색상 사용자 정의를 지원하고 위치 미세 조정, 레벨 미세 조정, 너비 간격 및 기타 매개변수 조정을 지원합니다.
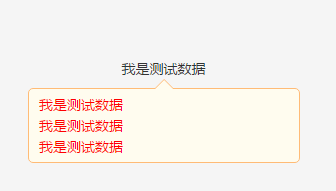
먼저 효과를 살펴보겠습니다.
팁: 프롬프트 정보 구성요소
매개변수:
- msg:'asdf', 내용
- 다이어:2, 방향
- 너비:250,너비
- _x:0, 측면 오프셋
- _y:0, 수직 오프셋
- zIndex:100000,레벨
- borderColor:#FFF, 테두리 색상
- bgColor:#FFF, 배경색
- useHover:true 호버 표시 사용 여부
- 색상: 기본 프롬프트 텍스트 색상
- 패딩: 여백
자바스크립트 코드:
(function ($) {
  var defaults = {
    dire: 12,
    w: 250,
    _x: 0,
    _y: 0,
    borderColor: '#FFBB76',
    bgColor: '#FFFCEF',
    color: '#FF0000',
    padding: [5, 10],
    arrWidth: 10,
    useHover: true,
    zIndex: 100000
  };
  $.fn.tips = function (opt) {
    var tip, opts = $.extend({}, defaults, opt);
    if (this[0]) {
      opts.tag = this;
      if (opts.useHover) {
        opts.tag.hover(function () {
          tip = new Tip(opts);
          tip.show();
        }, function () {
          tip.close();
        });
      } else {
        tip = new Tip(opts);
        tip.show();
      }
      return this;
    }
  };
  function Tip(opts) {
    this.dire = opts.dire;
    this.width = opts.w;
    this.zIndex = opts.zIndex;
    this.borderColor = opts.borderColor;
    this.bgColor = opts.bgColor;
    this.color = opts.color;
    this.padding = opts.padding;
    this.arrWidth = opts.arrWidth;
    this.offsetX = opts._x;
    this.offsetY = opts._y;
    this.tag = opts.tag;
    this.msg = opts.msg;
    this.wrap = $('<div class="tip-wrap"></div>');
    this.innerArr = $('<div class="tip-arr-a"></div>');
    this.outerArr = $('<div class="tip-arr-b"></div>');
    this.init();
  };
  Tip.prototype = {
    init: function () {
      var msg = this.tag.data('tipMsg');
      if (!this.msg) {
        this.msg = msg;
      }
      this.createTemp();
    },
    createTemp: function () {
      var t = this;
      t.createWrap();
      t.setPosition();
    },
    createWrap: function () {
      var t = this;
      t.wrap.html(t.msg);
      var wrapCSS = {
        width: t.width,
        border: '1px solid ' + t.borderColor,
        'border-radius': '5px',
        background: t.bgColor,
        color: t.color,
        padding: t.getPadding()
      };
      t.outerArr.css(t.getArrStyle(t.dire, t.arrWidth, t.borderColor));
      t.innerArr.css(t.getArrStyle(t.dire, t.arrWidth, t.bgColor));
      t.wrap.prepend(t.innerArr).prepend(t.outerArr).css(wrapCSS);
      $('body').append(t.wrap);
    },
    setPosition: function () {
      var t = this;
      var posObj = t.getPos(t.dire, t.getPosition(t.tag), t.getPosition(t.wrap), t.arrWidth), pos = posObj.pos, innerPos = posObj.innerPos, outerPos = posObj.outerPos;
      t.wrap.css({top: pos.y, left: pos.x});
      t.innerArr.css({top: innerPos.y, left: innerPos.x});
      t.outerArr.css({top: outerPos.y, left: outerPos.x});
    },
    getPadding: function () {
      var t = this, pad = '0px', padArr = t.padding, len = padArr.length;
      switch (len) {
        case 1:
          pad = padArr[0] + 'px';
          break;
        case 2:
          pad = padArr[0] + 'px ' + padArr[1] + 'px';
          break;
        case 3:
          pad = padArr[0] + 'px ' + padArr[1] + 'px ' + padArr[2] + 'px';
          break;
        case 4:
          pad = padArr[0] + 'px ' + padArr[1] + 'px ' + padArr[2] + 'px ' + padArr[3] + 'px';
          break;
      }
      return pad;
    },
    getPosition: function (tag) {
      return {t: tag.offset().top, l: tag.offset().left, h: tag.outerHeight(), w: tag.outerWidth()};
    },
    getArrStyle: function (dir, width, color) {
      var style;
      switch (dir) {
        case 11:
        case 12:
        case 1:
          style = {
            'border-bottom-style': 'solid',
            'border-width': '0px ' + width + 'px ' + width + 'px',
            'border-bottom-color': color
          };
          break;
        case 2:
        case 3:
        case 4:
          style = {
            'border-left-style': 'solid',
            'border-width': width + 'px 0px ' + width + 'px ' + width + 'px',
            'border-left-color': color
          };
          break;
        case 5:
        case 6:
        case 7:
          style = {
            'border-top-style': 'solid',
            'border-width': width + 'px ' + width + 'px 0px',
            'border-top-color': color
          };
          break;
        case 8:
        case 9:
        case 10:
          style = {
            'border-right-style': 'solid',
            'border-width': width + 'px ' + width + 'px ' + width + 'px 0px',
            'border-right-color': color
          };
          break;
      }
      return style || {};
    },
    getPos: function (d, tagPos, pos, arrWidth) {
      var _pos, _innerPos, _outerPos, l = tagPos.l, t = tagPos.t, w = tagPos.w, h = tagPos.h, ww = pos.w, hh = pos.h;
      switch (d) {
        case 0:
        case 1:
          _pos = {x: l + w / 2 + arrWidth + 20 + 1 - ww, y: t + h + arrWidth};
          _outerPos = {x: ww - 2 - 20 - arrWidth * 2, y: -arrWidth};
          _innerPos = {x: ww - 2 - 20 - arrWidth * 2, y: -arrWidth + 1};
          break;
        case 2:
          _pos = {x: l - ww - arrWidth, y: t + h / 2 - arrWidth - 20 - 1};
          _outerPos = {x: ww - 2, y: 20};
          _innerPos = {x: ww - 2 - 1, y: 20};
          break;
        case 3:
          _pos = {x: l - ww - arrWidth, y: t + h / 2 - hh / 2};
          _outerPos = {x: ww - 2, y: (hh - 2) / 2 - arrWidth};
          _innerPos = {x: ww - 2 - 1, y: (hh - 2) / 2 - arrWidth};
          break;
        case 4:
          _pos = {x: l - ww - arrWidth, y: t + h / 2 + arrWidth + 20 + 1 - hh};
          _outerPos = {x: ww - 2, y: hh - 2 - 20 - arrWidth * 2};
          _innerPos = {x: ww - 2 - 1, y: hh - 2 - 20 - arrWidth * 2};
          break;
        case 5:
          _pos = {x: l + w / 2 + arrWidth + 20 + 1 - ww, y: t - arrWidth - hh};
          _outerPos = {x: ww - 2 - 20 - arrWidth * 2, y: hh - 2};
          _innerPos = {x: ww - 2 - 20 - arrWidth * 2, y: hh - 2 - 1};
          break;
        case 6:
          _pos = {x: l + w / 2 - ww / 2, y: t - arrWidth - hh};
          _outerPos = {x: (ww - 2) / 2 - arrWidth, y: hh - 2};
          _innerPos = {x: (ww - 2) / 2 - arrWidth, y: hh - 2 - 1};
          break;
        case 7:
          _pos = {x: l + w / 2 - 20 - arrWidth, y: t - arrWidth - hh};
          _outerPos = {x: 20, y: hh - 2};
          _innerPos = {x: 20, y: hh - 2 - 1};
          break;
        case 8:
          _pos = {x: l + w + arrWidth, y: t + h / 2 + arrWidth + 20 + 1 - hh};
          _outerPos = {x: -arrWidth, y: hh - 2 - 20 - arrWidth * 2};
          _innerPos = {x: -arrWidth + 1, y: hh - 2 - 20 - arrWidth * 2};
          break;
        case 9:
          _pos = {x: l + w + arrWidth, y: t + h / 2 - hh / 2};
          _outerPos = {x: -arrWidth, y: (hh - 2) / 2 - arrWidth};
          _innerPos = {x: -arrWidth + 1, y: (hh - 2) / 2 - arrWidth};
          break;
        case 10:
          _pos = {x: l + w + arrWidth, y: t + h / 2 - arrWidth - 20 - 1};
          _outerPos = {x: -arrWidth, y: 20};
          _innerPos = {x: -arrWidth + 1, y: 20};
          break;
        case 11:
          _pos = {x: l + w / 2 - 20 - arrWidth, y: t + h + arrWidth};
          _outerPos = {x: 20, y: -arrWidth};
          _innerPos = {x: 20, y: -arrWidth + 1};
          break;
        case 12:
          _pos = {x: l + w / 2 - ww / 2, y: t + h + arrWidth};
          _outerPos = {x: (ww - 2) / 2 - arrWidth, y: -arrWidth};
          _innerPos = {x: (ww - 2) / 2 - arrWidth, y: -arrWidth + 1};
          break;
        default:
          _pos = {x: 0, y: 0};
      }
      return {
        pos: _pos,
        innerPos: _innerPos,
        outerPos: _outerPos
      };
    },
    show: function () {
      this.wrap.show();
    },
    close: function () {
      this.wrap.remove();
    }
  };
})(jQuery);CSS:
.tip-wrap {
  position: absolute;
  display: none;
}

.tip-arr-a, .tip-arr-b {
  position: absolute;
  width: 0;
  height: 0;
  line-height: 0;
  border-style: dashed;
  border-color: transparent;
}
page:

<div class="test">
  <span data-tip-msg="我是测试数据<br>我是测试数据<br>我是测试数据">我是测试数据</span>
</div>

<script>
  $('.test span').tips();
</script>
효과:
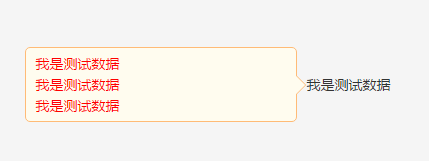
위 내용은 간단한 jQuery 프롬프트 상자(Tip) 플러그인입니다. 자신의 프로젝트에 적용하여 뭔가를 얻을 수 있기를 바랍니다.

핫 AI 도구

Undresser.AI Undress
사실적인 누드 사진을 만들기 위한 AI 기반 앱

AI Clothes Remover
사진에서 옷을 제거하는 온라인 AI 도구입니다.

Undress AI Tool
무료로 이미지를 벗다

Clothoff.io
AI 옷 제거제

Video Face Swap
완전히 무료인 AI 얼굴 교환 도구를 사용하여 모든 비디오의 얼굴을 쉽게 바꾸세요!

인기 기사
뜨거운 도구

메모장++7.3.1
사용하기 쉬운 무료 코드 편집기

SublimeText3 중국어 버전
중국어 버전, 사용하기 매우 쉽습니다.

스튜디오 13.0.1 보내기
강력한 PHP 통합 개발 환경

드림위버 CS6
시각적 웹 개발 도구

SublimeText3 Mac 버전
신 수준의 코드 편집 소프트웨어(SublimeText3)
뜨거운 주제
 7642
7642
 15
1392
52
90
11
72
19
33
150
15
1392
52
90
11
72
19
33
150

 jQuery 참조 방법에 대한 자세한 설명: 빠른 시작 가이드
Feb 27, 2024 pm 06:45 PM
jQuery 참조 방법에 대한 자세한 설명: 빠른 시작 가이드
Feb 27, 2024 pm 06:45 PM
jQuery 참조 방법에 대한 자세한 설명: 빠른 시작 가이드 jQuery는 웹 사이트 개발에 널리 사용되는 JavaScript 라이브러리로, JavaScript 프로그래밍을 단순화하고 개발자에게 풍부한 기능을 제공합니다. 이 기사에서는 jQuery의 참조 방법을 자세히 소개하고 독자가 빠르게 시작할 수 있도록 구체적인 코드 예제를 제공합니다. jQuery 소개 먼저 HTML 파일에 jQuery 라이브러리를 도입해야 합니다. CDN 링크를 통해 소개하거나 다운로드할 수 있습니다.
 jQuery에서 PUT 요청 방법을 사용하는 방법은 무엇입니까?
Feb 28, 2024 pm 03:12 PM
jQuery에서 PUT 요청 방법을 사용하는 방법은 무엇입니까?
Feb 28, 2024 pm 03:12 PM
jQuery에서 PUT 요청 방법을 사용하는 방법은 무엇입니까? jQuery에서 PUT 요청을 보내는 방법은 다른 유형의 요청을 보내는 것과 유사하지만 몇 가지 세부 사항과 매개 변수 설정에 주의해야 합니다. PUT 요청은 일반적으로 데이터베이스의 데이터 업데이트 또는 서버의 파일 업데이트와 같은 리소스를 업데이트하는 데 사용됩니다. 다음은 jQuery에서 PUT 요청 메소드를 사용하는 구체적인 코드 예제입니다. 먼저 jQuery 라이브러리 파일을 포함했는지 확인한 다음 $.ajax({u를 통해 PUT 요청을 보낼 수 있습니다.
 심층 분석: jQuery의 장점과 단점
Feb 27, 2024 pm 05:18 PM
심층 분석: jQuery의 장점과 단점
Feb 27, 2024 pm 05:18 PM
jQuery는 프런트엔드 개발에 널리 사용되는 빠르고, 작고, 기능이 풍부한 JavaScript 라이브러리입니다. 2006년 출시 이후 jQuery는 많은 개발자가 선택하는 도구 중 하나가 되었지만 실제 애플리케이션에서는 몇 가지 장점과 단점도 있습니다. 이 기사에서는 jQuery의 장점과 단점을 심층적으로 분석하고 구체적인 코드 예제를 통해 설명합니다. 장점: 1. 간결한 구문 jQuery의 구문 디자인은 간결하고 명확하여 코드의 가독성과 쓰기 효율성을 크게 향상시킬 수 있습니다. 예를 들어,
 jQuery를 사용하여 요소의 높이 속성을 제거하는 방법은 무엇입니까?
Feb 28, 2024 am 08:39 AM
jQuery를 사용하여 요소의 높이 속성을 제거하는 방법은 무엇입니까?
Feb 28, 2024 am 08:39 AM
jQuery를 사용하여 요소의 높이 속성을 제거하는 방법은 무엇입니까? 프런트엔드 개발에서는 요소의 높이 속성을 조작해야 하는 경우가 종종 있습니다. 때로는 요소의 높이를 동적으로 변경해야 할 수도 있고 요소의 높이 속성을 제거해야 하는 경우도 있습니다. 이 기사에서는 jQuery를 사용하여 요소의 높이 속성을 제거하는 방법을 소개하고 구체적인 코드 예제를 제공합니다. jQuery를 사용하여 높이 속성을 연산하기 전에 먼저 CSS의 높이 속성을 이해해야 합니다. height 속성은 요소의 높이를 설정하는 데 사용됩니다.
 jQuery 팁: 페이지에 있는 모든 태그의 텍스트를 빠르게 수정하세요.
Feb 28, 2024 pm 09:06 PM
jQuery 팁: 페이지에 있는 모든 태그의 텍스트를 빠르게 수정하세요.
Feb 28, 2024 pm 09:06 PM
제목: jQuery 팁: 페이지에 있는 모든 태그의 텍스트를 빠르게 수정하세요. 웹 개발에서는 페이지의 요소를 수정하고 조작해야 하는 경우가 많습니다. jQuery를 사용할 때 페이지에 있는 모든 태그의 텍스트 내용을 한 번에 수정해야 하는 경우가 있는데, 이는 시간과 에너지를 절약할 수 있습니다. 다음은 jQuery를 사용하여 페이지의 모든 태그 텍스트를 빠르게 수정하는 방법을 소개하고 구체적인 코드 예제를 제공합니다. 먼저 jQuery 라이브러리 파일을 도입하고 다음 코드가 페이지에 도입되었는지 확인해야 합니다. <
 jQuery를 사용하여 모든 태그의 텍스트 내용 수정
Feb 28, 2024 pm 05:42 PM
jQuery를 사용하여 모든 태그의 텍스트 내용 수정
Feb 28, 2024 pm 05:42 PM
제목: jQuery를 사용하여 모든 태그의 텍스트 내용을 수정합니다. jQuery는 DOM 작업을 처리하는 데 널리 사용되는 인기 있는 JavaScript 라이브러리입니다. 웹 개발을 하다 보면 페이지에 있는 링크 태그(태그)의 텍스트 내용을 수정해야 하는 경우가 종종 있습니다. 이 기사에서는 jQuery를 사용하여 이 목표를 달성하는 방법을 설명하고 구체적인 코드 예제를 제공합니다. 먼저 페이지에 jQuery 라이브러리를 도입해야 합니다. HTML 파일에 다음 코드를 추가합니다.
 jQuery에서 eq의 역할 및 적용 시나리오 이해
Feb 28, 2024 pm 01:15 PM
jQuery에서 eq의 역할 및 적용 시나리오 이해
Feb 28, 2024 pm 01:15 PM
jQuery는 웹 페이지에서 DOM 조작 및 이벤트 처리를 처리하는 데 널리 사용되는 인기 있는 JavaScript 라이브러리입니다. jQuery에서 eq() 메서드는 지정된 인덱스 위치에서 요소를 선택하는 데 사용됩니다. 구체적인 사용 및 적용 시나리오는 다음과 같습니다. jQuery에서 eq() 메서드는 지정된 인덱스 위치에 있는 요소를 선택합니다. 인덱스 위치는 0부터 계산되기 시작합니다. 즉, 첫 번째 요소의 인덱스는 0이고 두 번째 요소의 인덱스는 1입니다. eq() 메소드의 구문은 다음과 같습니다: $("s
 jQuery 요소에 특정 속성이 있는지 어떻게 알 수 있나요?
Feb 29, 2024 am 09:03 AM
jQuery 요소에 특정 속성이 있는지 어떻게 알 수 있나요?
Feb 29, 2024 am 09:03 AM
jQuery 요소에 특정 속성이 있는지 어떻게 알 수 있나요? jQuery를 사용하여 DOM 요소를 조작할 때 요소에 특정 속성이 있는지 확인해야 하는 상황이 자주 발생합니다. 이 경우 jQuery에서 제공하는 메소드를 사용하여 이 기능을 쉽게 구현할 수 있습니다. 다음은 jQuery 요소에 특정 속성이 있는지 확인하기 위해 일반적으로 사용되는 두 가지 방법을 특정 코드 예제와 함께 소개합니다. 방법 1: attr() 메서드와 typeof 연산자를 // 사용하여 요소에 특정 속성이 있는지 확인
