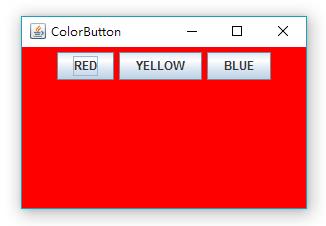
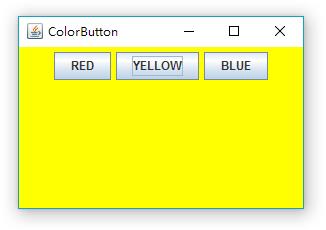
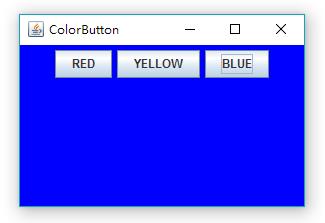
GUI 이벤트 처리 기본 사항
이벤트 처리는 이벤트가 발생하면 이 이벤트에 따라 프로그램이 응답해야 한다는 의미로 간단히 이해할 수 있습니다. 예를 들어 버튼을 통해 배경색을 변경할 수 있는 창을 만들었는데, 버튼을 클릭하면 이벤트가 발생하고 프로그램은 이 이벤트에 따라 반응, 즉 배경색을 변경하게 됩니다.
그러면 프로그램은 어떻게 반응하나요? 이를 위해서는 actionPerformed 메소드(즉, 이벤트를 기반으로 수행되는 작업)를 포함하는 인터페이스인 이벤트 리스너 ActionListener가 필요하므로 이 인터페이스를 구현(인터페이스에 actionPerformed 메소드 구현)하여 리스너 객체를 만들어야 합니다. . 버튼을 사용하여 리스너 객체를 등록하면 버튼을 클릭할 때 리스너가 호출되어 응답을 수행합니다.


코드(라인 42는 인터페이스 구현을 시작합니다): 위 코드에서는 청취자를 용이하게 하기 위해 ButtonPanel을 호출하기 위해 ColorAction을 ButtonFrame의 내부 클래스로 사용합니다. ColorAction 클래스를 분리하는 경우, ButtonPanel을 ColorAction에 전달해야 합니다. 구현은 다음과 같습니다.
package buttonPanel;

import java.awt.*;
import java.awt.event.*; //事件监听器接口ActionListener的位置。
import javax.swing.*;

public class ButtonFrame extends JFrame {
    private ButtonPanel buttonPanel;
    private static final int DEFAULT_WIDTH = 300;
    private static final int DEFAULT_HEIGHT = 200;

    public ButtonFrame() {
        setSize(DEFAULT_WIDTH,DEFAULT_HEIGHT);
        setLocationByPlatform(true);

        //构造按钮
        JButton redButton = new JButton("RED");
        JButton yellowButton = new JButton("YELLOW");
        JButton blueButton = new JButton("BLUE");

        buttonPanel = new ButtonPanel();

        //添加按钮到面板
        buttonPanel.add(redButton);
        buttonPanel.add(yellowButton);
        buttonPanel.add(blueButton);

        add(buttonPanel);

        //构造对应颜色的动作监听器
        ColorAction redAction = new ColorAction(Color.red);
        ColorAction yellowAction = new ColorAction(Color.yellow);
        ColorAction blueAction = new ColorAction(Color.blue);

        //每个按钮注册对应的监听器
        redButton.addActionListener(redAction);
        yellowButton.addActionListener(yellowAction);
        blueButton.addActionListener(blueAction);
    }

    //为了方便调用buttonPanel,将ColorAction作为ButtonFrame的内部类。
    private class ColorAction implements ActionListener {
        private Color backgroundColor;
        public ColorAction(Color c) {
            backgroundColor = c;
        }
        public void actionPerformed(ActionEvent event) {
            buttonPanel.setBackground(backgroundColor);
        }
    }

    public static void main(String[] args) {
        EventQueue.invokeLater(new Runnable() {
            public void run() {
                JFrame frame = new ButtonFrame();
                frame.setTitle("ColorButton");
                frame.setDefaultCloseOperation(EXIT_ON_CLOSE);
                frame.setVisible(true);
            }
        });
    }
}

class ButtonPanel extends JPanel {
    private static final int DEFAUT_WIDTH = 300;
    private static final int DEFAUT_HEIGHT = 200;

    @Override
    protected void paintComponent(Graphics g) {
        g.create();
        super.paintComponent(g);
    }

    @Override
    public Dimension getPreferredSize() {
        return new Dimension(DEFAUT_WIDTH,DEFAUT_HEIGHT);
    }
}package buttonPanel2;
import java.awt.*;
import java.awt.event.*;
import javax.swing.*;
public class ButtonFrame2 extends JFrame {
private ButtonPanel buttonPanel;
private static final int DEFAULT_WIDTH = 300;
private static final int DEFAULT_HEIGHT = 200;
public ButtonFrame2() {
setSize(DEFAULT_WIDTH,DEFAULT_HEIGHT);
setLocationByPlatform(true);
JButton redButton = new JButton("RED");
JButton yellowButton = new JButton("YELLOW");
JButton blueButton = new JButton("BLUE");
buttonPanel = new ButtonPanel();
buttonPanel.add(redButton);
buttonPanel.add(yellowButton);
buttonPanel.add(blueButton);
add(buttonPanel);
//将此对象通过this传到ColorAction的构造器。
ColorAction redAction = new ColorAction(this,Color.red);
ColorAction yellowAction = new ColorAction(this,Color.yellow);
ColorAction blueAction = new ColorAction(this,Color.blue);
redButton.addActionListener(redAction);
yellowButton.addActionListener(yellowAction);
blueButton.addActionListener(blueAction);
}
public void setButtonPanelsBackground(Color backgroundColor) {
buttonPanel.setBackground(backgroundColor);
}
public static void main(String[] args) {
EventQueue.invokeLater(new Runnable() {
public void run() {
JFrame frame = new ButtonFrame2();
frame.setTitle("ColorButton");
frame.setDefaultCloseOperation(EXIT_ON_CLOSE);
frame.setVisible(true);
}
});
}
}
class ColorAction implements ActionListener {
private ButtonFrame2 buttonFrame;
private Color backgroundColor;
//通过构造器的方法把ButtonFrame2对象传过来,这个对象包含了成员变量buttonPanel,以便对其更换背景色。
public ColorAction(ButtonFrame2 buttonFrame,Color c) {
this.buttonFrame = buttonFrame; //this.buttonFrame只是对象管理者,管理的还是ButtonFrame的对象frame。
backgroundColor = c;
}
public void actionPerformed(ActionEvent event) {
buttonFrame.setButtonPanelsBackground(backgroundColor);
//这是我们在ButtonFrame2中添加的新方法。
}
}
class ButtonPanel extends JPanel {
private static final int DEFAUT_WIDTH = 300;
private static final int DEFAUT_HEIGHT = 200;
public ButtonPanel() {
setBackground(Color.pink);
}
@Override
protected void paintComponent(Graphics g) {
g.create();
super.paintComponent(g);
}
@Override
public Dimension getPreferredSize() {
return new Dimension(DEFAUT_WIDTH,DEFAUT_HEIGHT);
}
}
ButtonFrame2
핫 AI 도구

Undresser.AI Undress
사실적인 누드 사진을 만들기 위한 AI 기반 앱

AI Clothes Remover
사진에서 옷을 제거하는 온라인 AI 도구입니다.

Undress AI Tool
무료로 이미지를 벗다

Clothoff.io
AI 옷 제거제

Video Face Swap
완전히 무료인 AI 얼굴 교환 도구를 사용하여 모든 비디오의 얼굴을 쉽게 바꾸세요!

인기 기사

뜨거운 도구

메모장++7.3.1
사용하기 쉬운 무료 코드 편집기

SublimeText3 중국어 버전
중국어 버전, 사용하기 매우 쉽습니다.

스튜디오 13.0.1 보내기
강력한 PHP 통합 개발 환경

드림위버 CS6
시각적 웹 개발 도구

SublimeText3 Mac 버전
신 수준의 코드 편집 소프트웨어(SublimeText3)

뜨거운 주제
 7681
7681
 15
15
 1639
1639
 14
14
 1393
1393
 52
52
 1286
1286
 25
25
 1229
1229
 29
29
 자바의 웨카
Aug 30, 2024 pm 04:28 PM
Java의 Weka 가이드. 여기에서는 소개, weka java 사용 방법, 플랫폼 유형 및 장점을 예제와 함께 설명합니다.
 Java의 스미스 번호
Aug 30, 2024 pm 04:28 PM
Java의 Smith Number 가이드. 여기서는 정의, Java에서 스미스 번호를 확인하는 방법에 대해 논의합니다. 코드 구현의 예.
 Java Spring 인터뷰 질문
Aug 30, 2024 pm 04:29 PM
이 기사에서는 가장 많이 묻는 Java Spring 면접 질문과 자세한 답변을 보관했습니다. 그래야 면접에 합격할 수 있습니다.
 Java 8 Stream foreach에서 나누거나 돌아 오시겠습니까?
Feb 07, 2025 pm 12:09 PM
Java 8은 스트림 API를 소개하여 데이터 컬렉션을 처리하는 강력하고 표현적인 방법을 제공합니다. 그러나 스트림을 사용할 때 일반적인 질문은 다음과 같은 것입니다. 기존 루프는 조기 중단 또는 반환을 허용하지만 스트림의 Foreach 메소드는이 방법을 직접 지원하지 않습니다. 이 기사는 이유를 설명하고 스트림 처리 시스템에서 조기 종료를 구현하기위한 대체 방법을 탐색합니다. 추가 읽기 : Java Stream API 개선 스트림 foreach를 이해하십시오 Foreach 메소드는 스트림의 각 요소에서 하나의 작업을 수행하는 터미널 작동입니다. 디자인 의도입니다
 Java의 날짜까지의 타임스탬프
Aug 30, 2024 pm 04:28 PM
Java의 TimeStamp to Date 안내. 여기서는 소개와 예제와 함께 Java에서 타임스탬프를 날짜로 변환하는 방법에 대해서도 설명합니다.
 캡슐의 양을 찾기위한 Java 프로그램
Feb 07, 2025 am 11:37 AM
캡슐은 3 차원 기하학적 그림이며, 양쪽 끝에 실린더와 반구로 구성됩니다. 캡슐의 부피는 실린더의 부피와 양쪽 끝에 반구의 부피를 첨가하여 계산할 수 있습니다. 이 튜토리얼은 다른 방법을 사용하여 Java에서 주어진 캡슐의 부피를 계산하는 방법에 대해 논의합니다. 캡슐 볼륨 공식 캡슐 볼륨에 대한 공식은 다음과 같습니다. 캡슐 부피 = 원통형 볼륨 2 반구 볼륨 안에, R : 반구의 반경. H : 실린더의 높이 (반구 제외). 예 1 입력하다 반경 = 5 단위 높이 = 10 단위 산출 볼륨 = 1570.8 입방 단위 설명하다 공식을 사용하여 볼륨 계산 : 부피 = π × r2 × h (4
 미래를 창조하세요: 완전 초보자를 위한 Java 프로그래밍
Oct 13, 2024 pm 01:32 PM
Java는 초보자와 숙련된 개발자 모두가 배울 수 있는 인기 있는 프로그래밍 언어입니다. 이 튜토리얼은 기본 개념부터 시작하여 고급 주제를 통해 진행됩니다. Java Development Kit를 설치한 후 간단한 "Hello, World!" 프로그램을 작성하여 프로그래밍을 연습할 수 있습니다. 코드를 이해한 후 명령 프롬프트를 사용하여 프로그램을 컴파일하고 실행하면 "Hello, World!"가 콘솔에 출력됩니다. Java를 배우면 프로그래밍 여정이 시작되고, 숙달이 깊어짐에 따라 더 복잡한 애플리케이션을 만들 수 있습니다.


