머리말
Android 맞춤 뷰의 세부 단계는 모든 Android 개발자가 숙달해야 하는 기술입니다. 개발 중에 맞춤 뷰에 대한 필요성이 항상 발생하기 때문입니다. 기술적인 수준을 높이기 위해 체계적으로 공부하고 경험한 내용을 여기에 적었습니다. 부족한 점은 시간이 지나면 지적해주셨으면 좋겠습니다.
프로세스
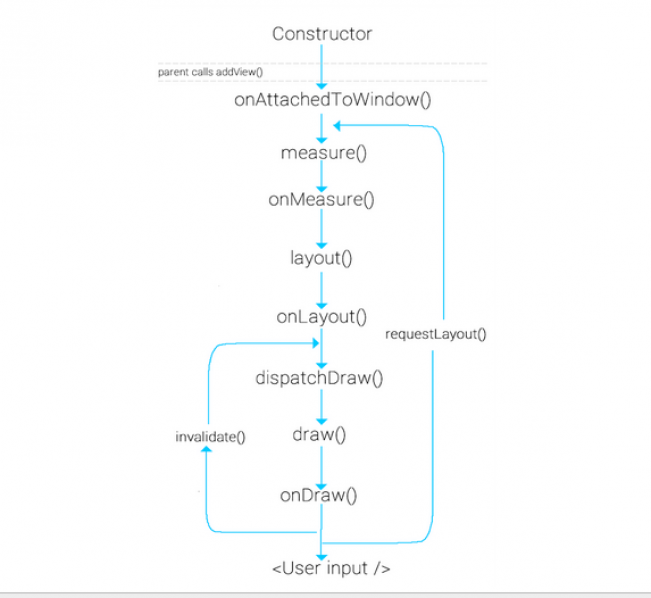
Android에서는 레이아웃 요청 그리기가 Android 프레임워크 레이어에서 시작됩니다. 그리기는 루트 노드부터 시작하여 레이아웃 트리를 측정하고 그립니다. RootViewImpl에서 PerformTraversals를 확장합니다. 이것이 수행하는 작업은 필요한 뷰에 대한 측정(뷰 크기 측정), 레이아웃(뷰 위치 결정) 및 그리기(뷰 그리기)입니다. 다음 그림은 뷰의 그리기 프로세스를 잘 보여줍니다.

사용자가 requestLayout을 호출하면 측정 및 레이아웃만 트리거되지만 그리기도 트리거됩니다. 시스템이 호출을 시작합니다.
다음은 이러한 프로세스를 자세히 소개합니다.
measure
measure는 View의 최종 메서드이며 재정의될 수 없습니다. 뷰의 크기를 측정하고 계산하지만 onMeasure 메소드를 다시 호출하므로 뷰를 사용자 정의할 때 필요에 따라 onMeasure 메소드를 재정의하여 뷰를 측정할 수 있습니다. 여기에는 widthMeasureSpec과 heightMeasureSpec의 두 가지 매개변수가 있습니다. 실제로 이 두 매개변수에는 크기와 모드라는 두 부분이 포함됩니다. size는 측정된 크기이고 mode는 뷰 레이아웃의 모드
다음 코드를 통해 얻을 수 있습니다.
int widthSize = MeasureSpec.getSize(widthMeasureSpec);
int heightSize = MeasureSpec.getSize(heightMeasureSpec);
int widthMode = MeasureSpec.getMode(widthMeasureSpec);
int heightMode = MeasureSpec.getMode(heightMeasureSpec);
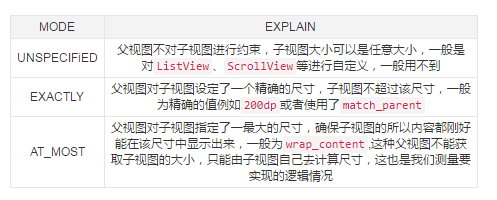
얻은 모드 유형은 다음 세 가지 유형으로 나뉩니다.

setMeasuredDimension
위 로직을 통해 뷰의 너비와 높이를 가져오고, 마지막으로 setMeasuredDimension 메서드를 호출하여 측정된 너비와 높이를 전달합니다. 실제로 마지막에는 전달된 값에 속성을 할당하기 위해 setMeasuredDimensionRaw 메서드가 호출됩니다. super.onMeasure()를 호출하는 호출 논리도 동일합니다.
다음은 인증 코드 보기를 사용자 정의하는 예입니다. onMeasure 메소드는 다음과 같습니다.
@Override
    protected void onMeasure(int widthMeasureSpec, int heightMeasureSpec) {
        int widthSize = MeasureSpec.getSize(widthMeasureSpec);
        int heightSize = MeasureSpec.getSize(heightMeasureSpec);
        int widthMode = MeasureSpec.getMode(widthMeasureSpec);
        int heightMode = MeasureSpec.getMode(heightMeasureSpec);
        if (widthMode == MeasureSpec.EXACTLY) {
            //直接获取精确的宽度
            width = widthSize;
        } else if (widthMode == MeasureSpec.AT_MOST) {
            //计算出宽度(文本的宽度+padding的大小)
            width = bounds.width() + getPaddingLeft() + getPaddingRight();
        }
        if (heightMode == MeasureSpec.EXACTLY) {
            //直接获取精确的高度
            height = heightSize;
        } else if (heightMode == MeasureSpec.AT_MOST) {
            //计算出高度(文本的高度+padding的大小)
            height = bounds.height() + getPaddingBottom() + getPaddingTop();
        }
        //设置获取的宽高
        setMeasuredDimension(width, height);
}사용자 정의 보기의 레이아웃_폭 및 레이아웃_높이에 대해 서로 다른 속성을 설정할 수 있습니다. 모드 유형이 다르면 다양한 효과를 볼 수 있습니다.
measureChildren
ViewGroup을 상속하는 뷰를 사용자 정의하는 경우 자체 크기를 측정할 때 하위 뷰의 크기도 측정해야 합니다. 일반적으로 하위 뷰의 크기는 MeasureChildren(int widthMeasureSpec, int heightMeasureSpec) 메서드를 통해 측정됩니다.
protected void measureChildren(int widthMeasureSpec, int heightMeasureSpec) {
        final int size = mChildrenCount;
        final View[] children = mChildren;
        for (int i = 0; i < size; ++i) {
            final View child = children[i];
            if ((child.mViewFlags & VISIBILITY_MASK) != GONE) {
                measureChild(child, widthMeasureSpec, heightMeasureSpec);
            }
        }
}위의 소스 코드를 통해 실제로 각 하위 뷰를 순회하는 것을 확인할 수 있습니다. 하위 뷰가 숨겨져 있지 않으면 MeasureChild 메서드가 호출됩니다.
protected void measureChild(View child, int parentWidthMeasureSpec,
            int parentHeightMeasureSpec) {
        final LayoutParams lp = child.getLayoutParams();
        final int childWidthMeasureSpec = getChildMeasureSpec(parentWidthMeasureSpec,
                mPaddingLeft + mPaddingRight, lp.width);
        final int childHeightMeasureSpec = getChildMeasureSpec(parentHeightMeasureSpec,
                mPaddingTop + mPaddingBottom, lp.height);
        child.measure(childWidthMeasureSpec, childHeightMeasureSpec);
}먼저 getChildMeasureSpec 메서드를 호출하여 너비와 높이를 각각 얻은 다음 마지막으로 View의 측정 메서드를 호출하는 것을 알 수 있습니다. 이전 분석에서 크기를 계산하는 것임을 이미 알고 있습니다. 보기의. 측정된 매개변수는 getChildMeasureSpec을 통해 얻습니다. 소스 코드를 살펴보겠습니다.
public static int getChildMeasureSpec(int spec, int padding, int childDimension) {
        int specMode = MeasureSpec.getMode(spec);
        int specSize = MeasureSpec.getSize(spec);

        int size = Math.max(0, specSize - padding);

        int resultSize = 0;
        int resultMode = 0;

        switch (specMode) {
        // Parent has imposed an exact size on us
        case MeasureSpec.EXACTLY:
            if (childDimension >= 0) {
                resultSize = childDimension;
                resultMode = MeasureSpec.EXACTLY;
            } else if (childDimension == LayoutParams.MATCH_PARENT) {
                // Child wants to be our size. So be it.
                resultSize = size;
                resultMode = MeasureSpec.EXACTLY;
            } else if (childDimension == LayoutParams.WRAP_CONTENT) {
                // Child wants to determine its own size. It can't be
                // bigger than us.
                resultSize = size;
                resultMode = MeasureSpec.AT_MOST;
            }
            break;

        // Parent has imposed a maximum size on us
        case MeasureSpec.AT_MOST:
            if (childDimension >= 0) {
                // Child wants a specific size... so be it
                resultSize = childDimension;
                resultMode = MeasureSpec.EXACTLY;
            } else if (childDimension == LayoutParams.MATCH_PARENT) {
                // Child wants to be our size, but our size is not fixed.
                // Constrain child to not be bigger than us.
                resultSize = size;
                resultMode = MeasureSpec.AT_MOST;
            } else if (childDimension == LayoutParams.WRAP_CONTENT) {
                // Child wants to determine its own size. It can't be
                // bigger than us.
                resultSize = size;
                resultMode = MeasureSpec.AT_MOST;
            }
            break;

        // Parent asked to see how big we want to be
        case MeasureSpec.UNSPECIFIED:
            if (childDimension >= 0) {
                // Child wants a specific size... let him have it
                resultSize = childDimension;
                resultMode = MeasureSpec.EXACTLY;
            } else if (childDimension == LayoutParams.MATCH_PARENT) {
                // Child wants to be our size... find out how big it should
                // be
                resultSize = View.sUseZeroUnspecifiedMeasureSpec ? 0 : size;
                resultMode = MeasureSpec.UNSPECIFIED;
            } else if (childDimension == LayoutParams.WRAP_CONTENT) {
                // Child wants to determine its own size.... find out how
                // big it should be
                resultSize = View.sUseZeroUnspecifiedMeasureSpec ? 0 : size;
                resultMode = MeasureSpec.UNSPECIFIED;
            }
            break;
        }
        //noinspection ResourceType
        return MeasureSpec.makeMeasureSpec(resultSize, resultMode);
}이해하기 더 쉽나요? 이것이 하는 일은 앞서 언급한 모드 유형에 따라 해당 크기를 얻는 것입니다. 하위 뷰가 속한 모드는 상위 뷰의 모드 유형과 하위 뷰의 LayoutParams 유형에 따라 결정되며, 마지막으로 획득된 크기와 모드를 통합하여 MeasureSpec.makeMeasureSpec 메서드를 통해 반환합니다. 마지막으로 앞서 언급한 widthMeasureSpec과 heightMeasureSpec에 포함된 두 부분의 값인 측정값으로 전달됩니다. 전체 프로세스는 MeasureChildren->measureChild->getChildMeasureSpec->measure->onMeasure->setMeasuredDimension이므로, MeasureChildren을 통해 하위 뷰를 측정하고 계산할 수 있습니다.
layout
onLayout 메서드도 내부적으로 호출됩니다. 이 메서드는 하위 뷰의 그리기 위치를 결정하는 데 사용되지만 ViewGroup에서는 추상 메서드입니다. , 따라서 보기가 ViewGroup을 상속하는 경우 사용자 정의하려면 이 메서드를 구현해야 합니다. 그러나 View를 상속받은 경우에는 View에 빈 구현이 없습니다. 서브뷰 위치 설정은 계산된 왼쪽, 위쪽, 오른쪽, 아래쪽 값을 View의 레이아웃 방법을 통해 전달하는 것으로, 이러한 값은 일반적으로 View의 너비와 높이의 도움을 받아 계산됩니다. View의 너비와 높이는 getMeasureWidth, GetMeasureHeight 메서드를 통해 계산할 수 있으며, 이 두 메서드로 얻은 값은 위의 onMeasure에서 setMeasuredDimension으로 전달된 값, 즉 하위 뷰에서 측정한 너비와 높이입니다. <… onMeasure 이후에 획득됨. 하지만 이 두 가지 방법으로 얻는 값은 대체로 동일하므로 호출 시점에 주의하세요.
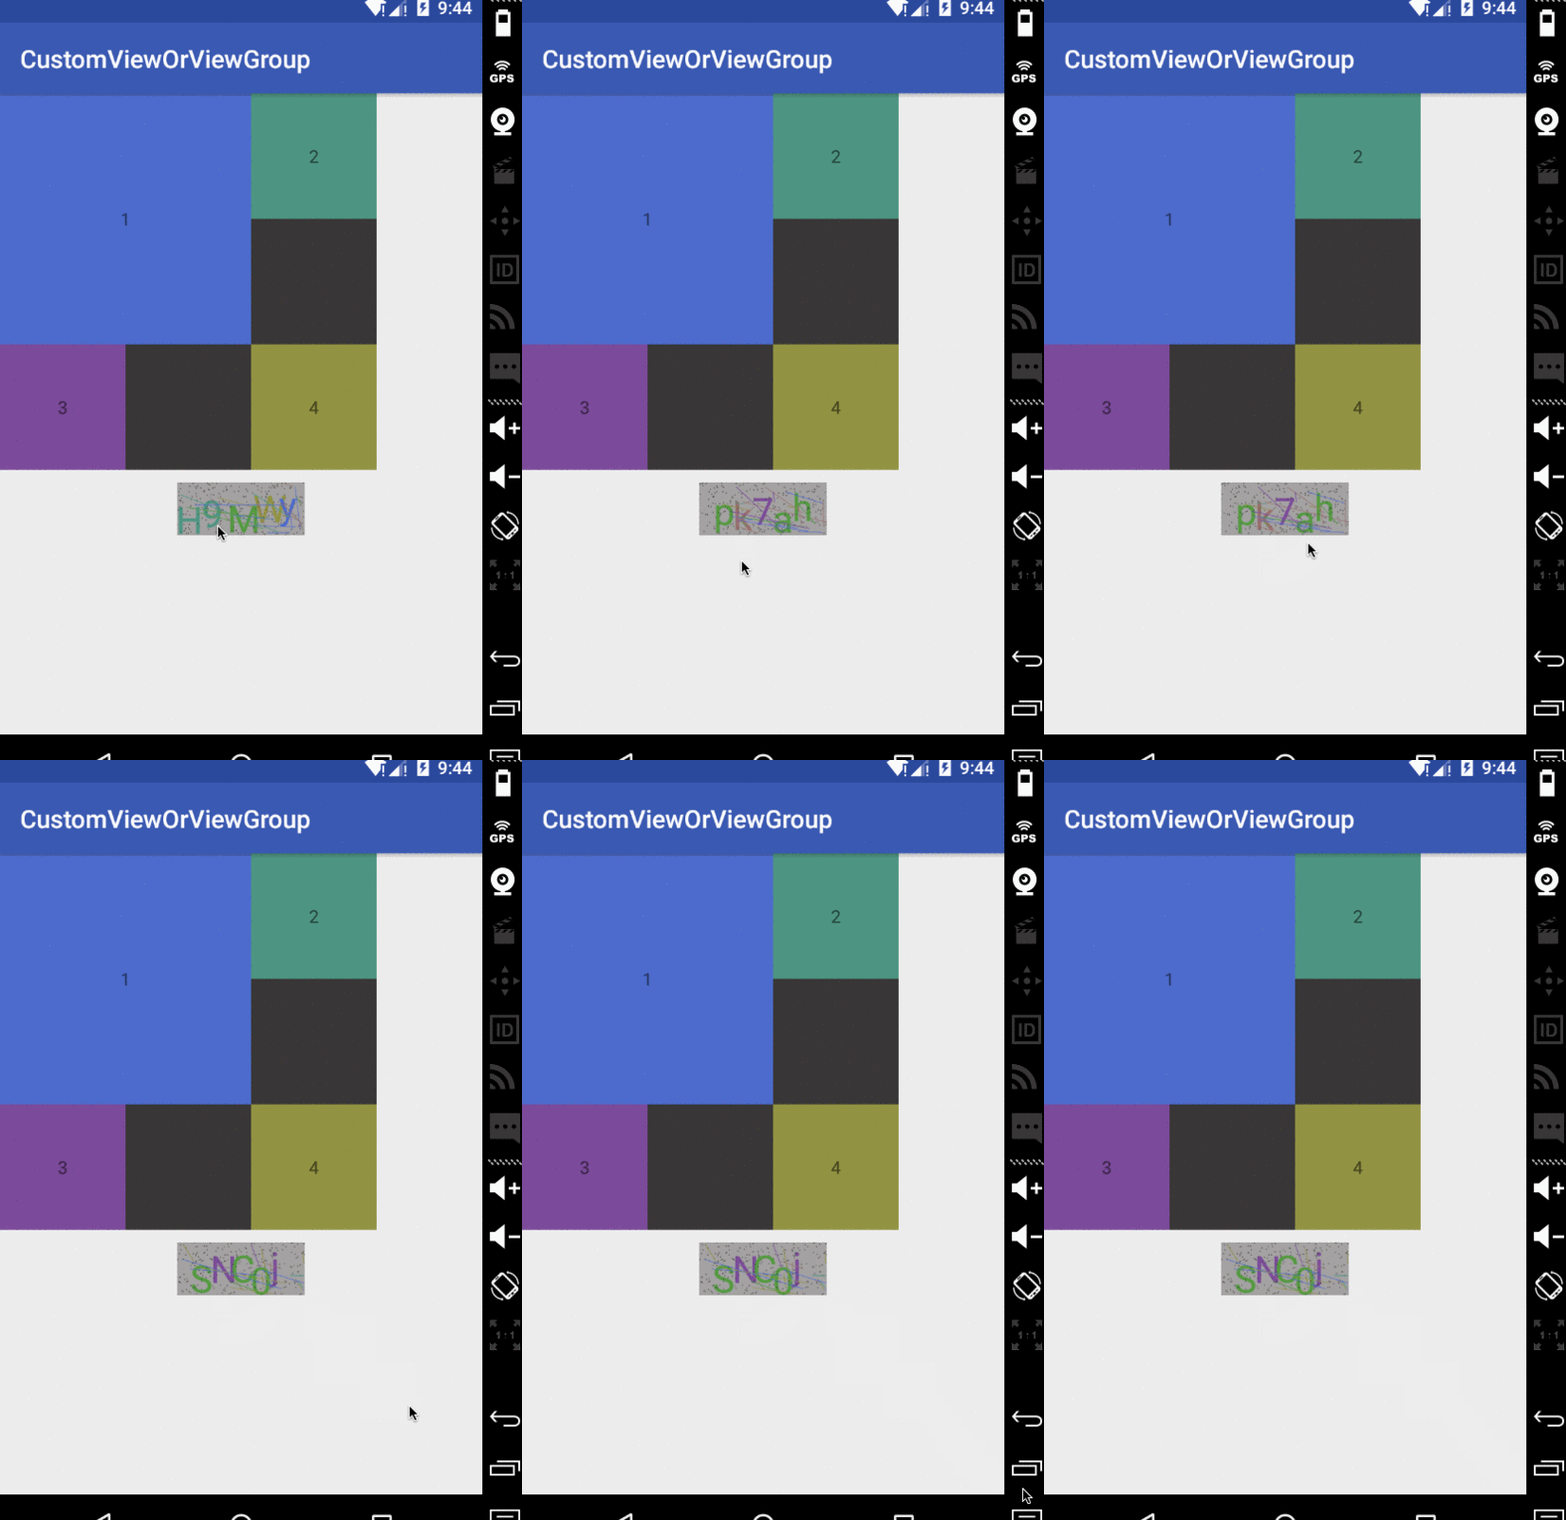
다음은 상위 뷰의 네 모서리에 하위 뷰를 배치하는 뷰를 정의하는 예입니다.
onMeasure의 구현 소스 코드는 나중에 링크하겠습니다. , 효과 보고 싶으시면 사진이면 나중에 올려드릴께요, 이전 인증코드도@Override
protected void onLayout(boolean changed, int l, int t, int r, int b) {
int count = getChildCount();
MarginLayoutParams params;
int cl;
int ct;
int cr;
int cb;
for (int i = 0; i < count; i++) {
View child = getChildAt(i);
params = (MarginLayoutParams) child.getLayoutParams();
if (i == 0) {
//左上角
cl = params.leftMargin;
ct = params.topMargin;
} else if (i == 1) {
//右上角
cl = getMeasuredWidth() - params.rightMargin - child.getMeasuredWidth();
ct = params.topMargin;
} else if (i == 2) {
//左下角
cl = params.leftMargin;
ct = getMeasuredHeight() - params.bottomMargin - child.getMeasuredHeight()
- params.topMargin;
} else {
//右下角
cl = getMeasuredWidth() - params.rightMargin - child.getMeasuredWidth();
ct = getMeasuredHeight() - params.bottomMargin - child.getMeasuredHeight()
- params.topMargin;
}
cr = cl + child.getMeasuredWidth();
cb = ct + child.getMeasuredHeight();
//确定子视图在父视图中放置的位置
child.layout(cl, ct, cr, cb);
}
}추첨
draw是由dispatchDraw发动的,dispatchDraw是ViewGroup中的方法,在View是空实现。自定义View时不需要去管理该方法。而draw方法只在View中存在,ViewGoup做的只是在dispatchDraw中调用drawChild方法,而drawChild中调用的就是View的draw方法。那么我们来看下draw的源码:
public void draw(Canvas canvas) {
        final int privateFlags = mPrivateFlags;
        final boolean dirtyOpaque = (privateFlags & PFLAG_DIRTY_MASK) == PFLAG_DIRTY_OPAQUE &&
                (mAttachInfo == null || !mAttachInfo.mIgnoreDirtyState);
        mPrivateFlags = (privateFlags & ~PFLAG_DIRTY_MASK) | PFLAG_DRAWN;

        /*
         * Draw traversal performs several drawing steps which must be executed
         * in the appropriate order:
         *
         *      1. Draw the background
         *      2. If necessary, save the canvas' layers to prepare for fading
         *      3. Draw view's content
         *      4. Draw children
         *      5. If necessary, draw the fading edges and restore layers
         *      6. Draw decorations (scrollbars for instance)
         */

        // Step 1, draw the background, if needed
        int saveCount;

        if (!dirtyOpaque) {
            drawBackground(canvas);
        }

        // skip step 2 & 5 if possible (common case)
        final int viewFlags = mViewFlags;
        boolean horizontalEdges = (viewFlags & FADING_EDGE_HORIZONTAL) != 0;
        boolean verticalEdges = (viewFlags & FADING_EDGE_VERTICAL) != 0;
        if (!verticalEdges && !horizontalEdges) {
            // Step 3, draw the content
            if (!dirtyOpaque) onDraw(canvas);

            // Step 4, draw the children
            dispatchDraw(canvas);

            // Overlay is part of the content and draws beneath Foreground
            if (mOverlay != null && !mOverlay.isEmpty()) {
                            mOverlay.getOverlayView().dispatchDraw(canvas);
            }

            // Step 6, draw decorations (foreground, scrollbars)
            onDrawForeground(canvas);

            // we're done...
            return;
        }
        //省略2&5的情况
        ....
}源码已经非常清晰了draw总共分为6步;
绘制背景
如果需要的话,保存layers
绘制自身文本
绘制子视图
如果需要的话,绘制fading edges
绘制scrollbars
其中 第2步与第5步不是必须的。在第3步调用了onDraw方法来绘制自身的内容,在View中是空实现,这就是我们为什么在自定义View时必须要重写该方法。而第4步调用了dispatchDraw对子视图进行绘制。还是以验证码为例:
@Override
    protected void onDraw(Canvas canvas) {
        //绘制背景
        mPaint.setColor(getResources().getColor(R.color.autoCodeBg));
        canvas.drawRect(0, 0, getMeasuredWidth(), getMeasuredHeight(), mPaint);

        mPaint.getTextBounds(autoText, 0, autoText.length(), bounds);
        //绘制文本
        for (int i = 0; i < autoText.length(); i++) {
             mPaint.setColor(getResources().getColor(colorRes[random.nextInt(6)]));
            canvas.drawText(autoText, i, i + 1, getWidth() / 2 - bounds.width() / 2 + i * bounds.width() / autoNum
                    , bounds.height() + random.nextInt(getHeight() - bounds.height())
                    , mPaint);
        }

        //绘制干扰点
        for (int j = 0; j < 250; j++) {
             canvas.drawPoint(random.nextInt(getWidth()), random.nextInt(getHeight()), pointPaint);
        }

        //绘制干扰线
        for (int k = 0; k < 20; k++) {
            int startX = random.nextInt(getWidth());
            int startY = random.nextInt(getHeight());
            int stopX = startX + random.nextInt(getWidth() - startX);
            int stopY = startY + random.nextInt(getHeight() - startY);
             linePaint.setColor(getResources().getColor(colorRes[random.nextInt(6)]));
            canvas.drawLine(startX, startY, stopX, stopY, linePaint);
        }
}图,与源码链接
示例图
