1. 소개
Pymsql은 MySQL을 운영하는 Python의 모듈입니다. 사용법은 MySQLdb와 거의 동일하지만, 현재 pymysql은 python3.x를 지원하고 후자는 3.x 버전을 지원하지 않습니다.
실행문은 sql 소스코드와 유사합니다
2.
사용 1. Install
pip install pymysql
사용 2. 연산
완전한 연결과 기본 연산부터 시작해 보자
import pymysql

# 创建连接
conn = pymysql.connect(host='127.0.0.1', port=3306, user='root', passwd='123', db='t1')
# 创建游标
cursor = conn.cursor()

# 执行SQL,并返回收影响行数
effect_row = cursor.execute("update hosts set host = '1.1.1.2'")

# 执行SQL,并返回受影响行数
#effect_row = cursor.execute("update hosts set host = '1.1.1.2' where nid > %s", (1,))

# 执行SQL,并返回受影响行数
#effect_row = cursor.executemany("insert into hosts(host,color_id)values(%s,%s)", [("1.1.1.11",1),("1.1.1.11",2)])


# 提交,不然无法保存新建或者修改的数据
conn.commit()

# 关闭游标
cursor.close()
# 关闭连接
conn.close()데이터베이스에 데이터를 삽입하고 try 문을 사용하고 예외가 발생하면 적극적으로 롤백한다
#!/usr/bin/python3

import pymysql

# 打开数据库连接
db = pymysql.connect("localhost","testuser","test123","TESTDB" )

# 使用cursor()方法获取操作游标
cursor = db.cursor()

# SQL 插入语句
sql = """INSERT INTO EMPLOYEE(FIRST_NAME,
         LAST_NAME, AGE, SEX, INCOME)
         VALUES ('Mac', 'Mohan', 20, 'M', 2000)"""
try:
   # 执行sql语句
   cursor.execute(sql)
   # 提交到数据库执行
   db.commit()
except:
   # 如果发生错误则回滚
   db.rollback()

# 关闭数据库连接
db.close()3. 데이터 테이블에 데이터 삽입 여러 개의 데이터를 삽입하려면 실행 환경에서 여러 개의 데이터를 삽입하려면 백그라운드에서 데이터를 가져온 후 ([('v1) ','v2'),('v3',' v4')])
# 创建连接
conn = pymysql.connect(host='127.0.0.1', port=3306, user='root', passwd='123', db='t1')
# 创建游标
cur = conn.cursor()
 if request.method == "POST":
        title = request.POST.get("title")
        title_en = request.POST.get("title_en")
        content = request.POST.get("content")
        content_en = request.POST.get("content_en")
        notification_type =request.POST.get("notification_type").strip()
        user_list = request.POST.get("user_list")
        updated_datetime = datetime.now()
        created_datetime = datetime.now()
        values_list = []
         for user in user_id_list:
                temp = updated_datetime,created_datetime,title,title_en,content,content_en,notification_type,user['id']
                values_list.append((temp))
     try:
          cur.executemany('''insert into app_notification(updated_datetime, created_datetime, title, title_en,
                                  content, content_en, notification_type, is_read, recipient_id)
                      values(%s, %s, %s, %s, %s, %s, %s, 0, %s)''',values_list)
            conn.commit()
            conn.close()

    except Exception as err:
        conn.rollback()
        logging.error(err)
        logging.error(traceback.format_exc())
conn.close()# 최신 자체 증가 ID 가져오기
new_id =cursor.lastrowid
4. 데이터베이스 쿼리 작업
Python 쿼리 Mysql은 단일 데이터를 얻기 위해 fetchone() 메서드를 사용하고, 여러 데이터를 얻기 위해 fetchall() 메서드를 사용합니다.
fetchone(): 이 메소드는 다음 쿼리 결과 세트를 가져옵니다. 결과 세트는 객체입니다.
fetchall(): 반환된 모든 결과 행을 수신합니다.
rowcount: 이는 읽기 전용 속성이며 실행( 실행 후 영향을 받은 행 수를 반환합니다. ) 방법.
import pymysql

conn = pymysql.connect(host='127.0.0.1', port=3306, user='root', passwd='123', db='t1')
cursor = conn.cursor()
cursor.execute("select * from hosts")

# 获取第一行数据
row_1 = cursor.fetchone()

# 获取前n行数据
# row_2 = cursor.fetchmany(3)
# 获取所有数据
# row_3 = cursor.fetchall()

conn.commit()
cursor.close()
conn.close()참고: 데이터를 가져올 때 다음과 같이cursor.scroll(num,mode)를 사용하여 커서 위치를 이동할 수 있습니다.
cursor.scroll(1 ,mode= 'relative') # 현재 위치를 기준으로 이동
cursor.scroll(2,mode='absolute') # 절대 위치를 기준으로 이동
5. 데이터 유형 가져오기
획득한 기본 데이터는 조상 유형입니다. 원하는 경우 사전 유형 데이터입니다. 즉,
#!/usr/bin/env python
# -*- coding:utf-8 -*-
import pymysql

conn = pymysql.connect(host='127.0.0.1', port=3306, user='root', passwd='123', db='t1')

# 游标设置为字典类型
cursor = conn.cursor(cursor=pymysql.cursors.DictCursor)
r = cursor.execute("call p1()")

result = cursor.fetchone()

conn.commit()
cursor.close()
conn.close()DB에 정의된
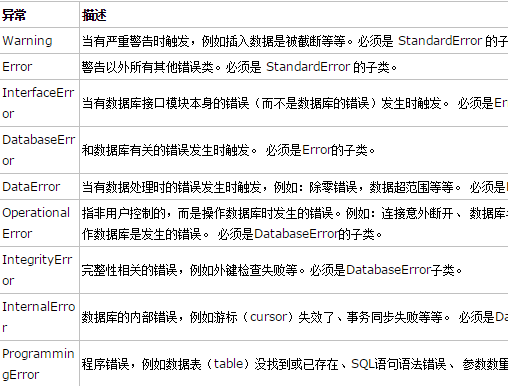
오류 처리 입니다. API 일부 데이터베이스 작업 오류 및 예외가 있습니다. 다음 표에는 이러한 오류 및 예외가 나열되어 있습니다.