BootStrap 편집 가능한 테이블
1. 데이터 표시(기본 기능)
html 페이지에 테이블의 테이블명과 컬럼명을 정의하고, 마지막으로 데이터베이스에서 쿼리한 데이터를 루프를 통해 페이지에 표시합니다. 이 시스템은 PHP의 구문을 사용하는 PHP 언어를 사용합니다. Java 언어인 경우 php를 jsp
<div class="containe">
<table class="table table-striped table-bordered table-hover">
<thead>
<tr class="success">
<th>序号</th>
<th style="display: none">ActionID</th>
<th>Category</th>
<th>SubProcess Name</th>
<th>Description</th>
<th>Do Action</th>
</tr>
</thead>
<tbody>
<?php
//遍历传递过来的变量$subprocess_info
$i=1;
foreach($subprocess_info as $_v){
?>
<tr id="">
<td><?php echo $i; ?></td>
<td style="display: none"><?php echo $_v->ActionID; ?></td>
<td><?php echo $_v->Category; ?></td>
<td><a href="#"><?php echo $_v->ActionName; ?></a></td>
<td><?php echo $_v -> Description; ?></td>
<td>
<a href="./index.php?r=subprocess/update&id=<?php echo $_v->ActionID; ?>">修改</a>
<a href="./index.php?r=subprocess/del&id=<?php echo $_v->ActionID; ?>">删除</a>
</td>
</tr>
<?php $i++; }?>
</tbody>
</table>
</div>
2의 해당 구문으로 바꾸면 됩니다. . 테이블 편집(고급 기능)
html 페이지에서 먼저 테이블을 정의한 후 js에서 초기화합니다. 이 기능은 http://bootstrap-table.wenzhixin.net.cn/zh-cn/에서 다운로드할 수 있는 타사 플러그인을 나타냅니다. 이 플러그인은 http://bootstrap의 수정된 버전입니다. -table.wenzhixin.net.cn /zh-cn/ 그 안에 있는 몇 가지 기능을 따라 구성됩니다. 사용중에 상황에 맞게 약간 변경해서 사용하시면 됩니다
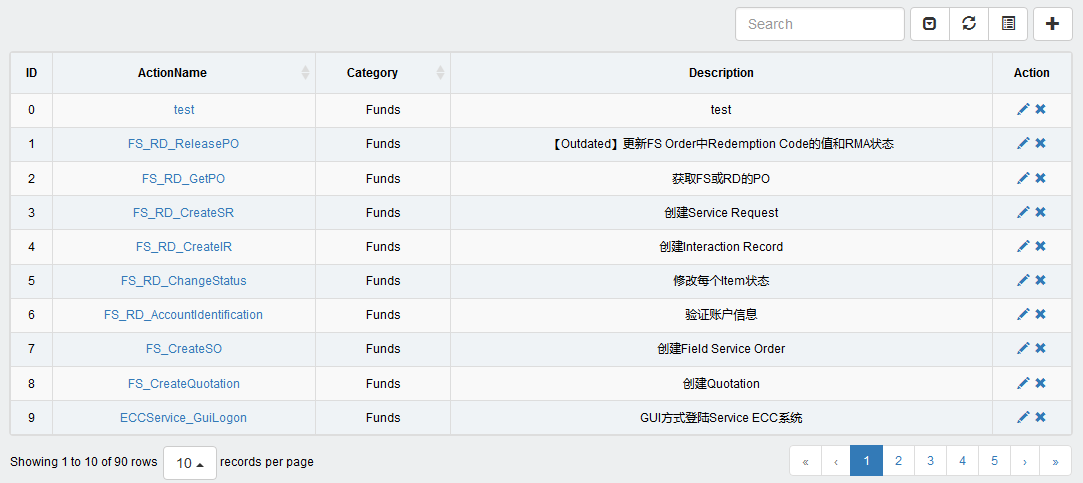
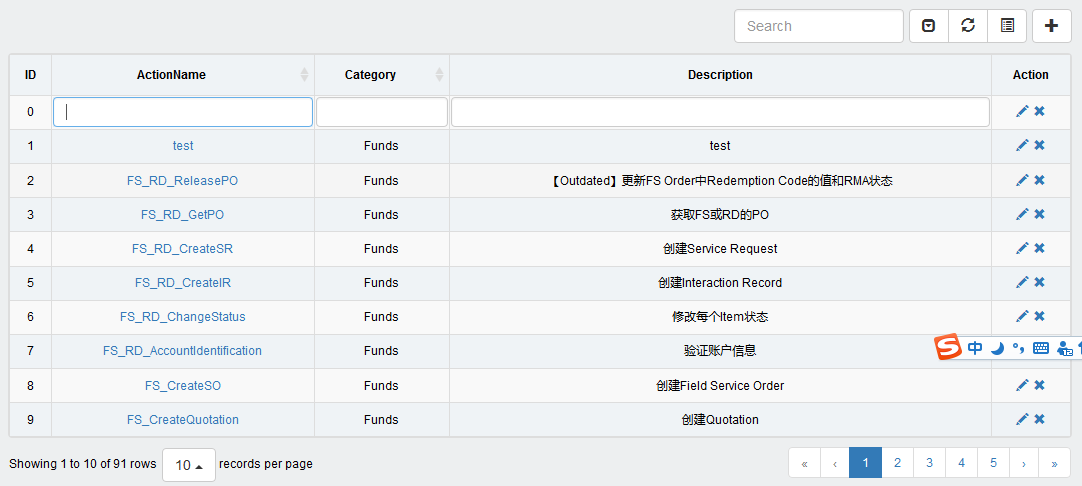
1.효과 표시
테이블 초기화 후

새 줄 추가

2. 사용 시 먼저 js를 입력 파일에 일관되게 인용했습니다.
<!--表格编辑-->
<link href="./assets/tableEdit/css/bootstrap-table.min.css" rel="stylesheet" />
<script src="./assets/tableEdit/js/bootstrap-table.js"></script>
<script src="./assets/tableEdit/js/bootstrap-table-edit.js"></script>
<script src="./assets/tableEdit/js/bootstrap-select.js"></script>
<script src="./assets/tableEdit/js/bootstrap-datetimepicker.min.js"></script>
<link href="./assets/tableEdit/css/bootstrap-datetimepicker.min.css" rel="stylesheet" />
페이지에 테이블 정의 및 맞춤 버튼 추가
<script src="./js/subprocess/subprocess.js"></script>
<div class="col-md-12">
<div style="float:right;margin:10px 0px 10px 5px">
<a title="Add" href="./index.php?r=subprocess/add">
<button type="button" class="btn btn-default" id="addData"<span style="color:#008000;background-color:#efefef;font-weight:bold;"></span>>
<span class="glyphicon glyphicon-plus"></span>
</button>
</a>
</div>
<table class="table table-striped table-bordered table-hover" id="subprocessTable"></table>
</div>
3. 초기화 테이블
$(function(){
//初始化表格
$('#subprocessTable').bootstrapTable({
method: 'get',
url:"./index.php?r=subprocess/subprocessInfo",
editable:true,//开启编辑模式
clickToSelect: true,
cache: false,
showToggle:true, //显示切换按钮来切换表/卡片视图。
showPaginationSwitch:true, //显示分页切换按钮
pagination: true,
pageList: [10,25,50,100],
pageSize:10,
pageNumber:1,
uniqueId: 'index', //将index列设为唯一索引
striped: true,
search: true,
showRefresh: true,
minimumCountColumns: 2,
smartDisplay:true,
columns: [
[
{field:"index",title:"ID",align:"center",edit:false,formatter:function(value, row, index){
return row.index=index ; //返回行号
}},
{field:"actionName",title:"ActionName",align:"center",order:"asc",sortable:"true",formatter:function(value,row,index){
var strHtml ='<a href="./index.php?r=subprocess/modify&id='+ row.actionId +'">'+ row.actionName +'</a>';
return strHtml;
}},
{field:"category",title:"Category",align:"center",sortable:"true"},
{field:"description",title:"Description",align:"center"},
{field:"action",title:"Action",align:"center",formatter:function(value,row,index){
var strHtml ='<a href="./index.php?r=subprocess/modify&id='+ row.actionId +'"><li class="glyphicon glyphicon-pencil"></li></a>'+
'<a href="javascript:void(0);" onclick="removeData('+ index +')" style="margin-left:5px;"><li class="glyphicon glyphicon-remove"></li></a>';
return strHtml;
},edit:false},
{field:"actionId",title:"ActionID",align:"center",edit:false,visible:false,searchable:false}
]
]
});
/**
* add a new row
*/
$('#addData').click(function(){
$('#subprocessTable').bootstrapTable('selectPage', 1); //Jump to the first page
var data = {actionId: '', actionName: '',category:'', description: ''}; //define a new row data,certainly it's empty
$('#subprocessTable').bootstrapTable('prepend', data); //the method of prepend must defined all fields,but append needn't
//$('#dataTable').bootstrapTable('append',data);
$("#dataTable tr:eq(1) td:eq(0)").trigger("dblclick");
$("#dataTable input")[0].focus();
});
});
은 드롭다운 목록을 사용해야 하는데,
{field:"toRun",title:"Run Flag",align:"center",edit:{
type:'select',//下拉框
url:'./index.php?r=dictionary/dictionaryInfo&type='+"run",
//data:[{id:1,text:'hello'},{id:2,text:'hi'}],
valueField:'id',
textField:'text',
editable : false,
onSelect:function(val,rec){
//console.log(val,rec);
}
},sortable:true}컬럼 정의 시 이렇게 정의하세요. 🎜>
효과는 다음과 같습니다
$(function(){
var columnsAll = new Array(); //定义一个新的列集合,用来保存返回的数据
//把列数据封装到一个对象中
var col = {};
col["field"] = "index";
col["title"] = "ID";
col["align"] = 'center';
col["formatter"] = function(value, row, index){
return row.index=index ; //返回行号
};
col["edit"] = false;
columnsAll.push(col); //把这个对象添加到列集合中
var col2 = {};
col2["field"] = "scenarioId";
col2["title"] = "haha";
col2["align"] = 'center';
col2["edit"] = false;
columnsAll.push(col2); //把这个对象添加到列集合中
//表格数据
$('#detailTable').bootstrapTable({
method: 'get',
url:"./index.php?r=session/sessionInfo",
editable:true,//开启编辑模式
clickToSelect: true,
cache: false,
uniqueId: 'index', //将index列设为唯一索引
striped: true,
minimumCountColumns: 2,
smartDisplay:true,
columns: [
columnsAll
]
});
});

핫 AI 도구

Undresser.AI Undress
사실적인 누드 사진을 만들기 위한 AI 기반 앱

AI Clothes Remover
사진에서 옷을 제거하는 온라인 AI 도구입니다.

Undress AI Tool
무료로 이미지를 벗다

Clothoff.io
AI 옷 제거제

AI Hentai Generator
AI Hentai를 무료로 생성하십시오.

인기 기사

뜨거운 도구

메모장++7.3.1
사용하기 쉬운 무료 코드 편집기

SublimeText3 중국어 버전
중국어 버전, 사용하기 매우 쉽습니다.

스튜디오 13.0.1 보내기
강력한 PHP 통합 개발 환경

드림위버 CS6
시각적 웹 개발 도구

SublimeText3 Mac 버전
신 수준의 코드 편집 소프트웨어(SublimeText3)

뜨거운 주제
 7557
7557
 15
15
 1384
1384
 52
52
 83
83
 11
11
 59
59
 19
19
 28
28
 96
96
 부트 스트랩 검색 창을 얻는 방법
Apr 07, 2025 pm 03:33 PM
부트 스트랩을 사용하여 검색 표시 줄의 값을 얻는 방법 : 검색 표시 줄의 ID 또는 이름을 결정하십시오. JavaScript를 사용하여 DOM 요소를 얻으십시오. 요소의 값을 가져옵니다. 필요한 작업을 수행하십시오.
 Vue에서 부트 스트랩을 사용하는 방법
Apr 07, 2025 pm 11:33 PM
vue.js에서 bootstrap 사용은 5 단계로 나뉩니다 : Bootstrap 설치. main.js.의 부트 스트랩 가져 오기 부트 스트랩 구성 요소를 템플릿에서 직접 사용하십시오. 선택 사항 : 사용자 정의 스타일. 선택 사항 : 플러그인을 사용하십시오.
 부트 스트랩에 분할 라인을 작성하는 방법
Apr 07, 2025 pm 03:12 PM
부트 스트랩 분할 라인을 만드는 두 가지 방법이 있습니다 : 태그를 사용하여 수평 분할 라인이 생성됩니다. CSS 테두리 속성을 사용하여 사용자 정의 스타일 분할 라인을 만듭니다.
 부트 스트랩의 수직 중심을 수행하는 방법
Apr 07, 2025 pm 03:21 PM
부트 스트랩을 사용하여 수직 센터링을 구현하여 : Flexbox Method : D-Flex, 정당화 컨텐츠 중심 및 정렬 중심 센터 클래스를 사용하여 Flexbox 컨테이너에 요소를 배치하십시오. Align-Items-Center 클래스 방법 : Flexbox를 지원하지 않는 브라우저의 경우 상위 요소의 높이가 정의 된 경우 Align-Items 중심 클래스를 사용하십시오.
 부트 스트랩을위한 프레임 워크를 설정하는 방법
Apr 07, 2025 pm 03:27 PM
부트 스트랩 프레임 워크를 설정하려면 다음 단계를 따라야합니다. 1. CDN을 통해 부트 스트랩 파일 참조; 2. 자신의 서버에서 파일을 다운로드하여 호스팅하십시오. 3. HTML에 부트 스트랩 파일을 포함; 4. 필요에 따라 Sass/Less를 컴파일하십시오. 5. 사용자 정의 파일을 가져옵니다 (선택 사항). 설정이 완료되면 Bootstrap의 그리드 시스템, 구성 요소 및 스타일을 사용하여 반응 형 웹 사이트 및 응용 프로그램을 만들 수 있습니다.
 부트 스트랩에 사진을 삽입하는 방법
Apr 07, 2025 pm 03:30 PM
Bootstrap에 이미지를 삽입하는 방법에는 여러 가지가 있습니다. HTML IMG 태그를 사용하여 이미지를 직접 삽입하십시오. 부트 스트랩 이미지 구성 요소를 사용하면 반응 형 이미지와 더 많은 스타일을 제공 할 수 있습니다. 이미지 크기를 설정하고 IMG-Fluid 클래스를 사용하여 이미지를 적응할 수 있도록하십시오. IMG 통과 클래스를 사용하여 테두리를 설정하십시오. 둥근 모서리를 설정하고 IMG 라운드 클래스를 사용하십시오. 그림자를 설정하고 그림자 클래스를 사용하십시오. CSS 스타일을 사용하여 이미지를 조정하고 배치하십시오. 배경 이미지를 사용하여 배경 이미지 CSS 속성을 사용하십시오.
 부트 스트랩 테이블이 ajax를 사용하여 데이터를 잡아 당기면해야 할 일
Apr 07, 2025 am 11:54 AM
서버에서 데이터를 얻기 위해 ajax를 사용하는 시점에 달린 부트 스트랩 코드에 대한 솔루션 : 1. 서버 측 코드 (예 : UTF-8)의 올바른 문자 인코딩을 설정하십시오. 2. AJAX 요청에서 요청 헤더를 설정하고 허용 된 문자 인코딩 (수락-차 세트)을 지정하십시오. 3. 부트 스트랩 테이블의 "Unescape"변환기를 사용하여 탈출 한 HTML 엔티티를 원래 문자로 해독하십시오.


