phpmailer 바인딩 메일함을 구현하는 방법
이 기사의 예에서는 phpmailer를 사용하여 메일함을 바인딩하는 구현 방법을 설명합니다. 참고하실 수 있도록 모두와 공유하세요. 자세한 내용은 다음과 같습니다.
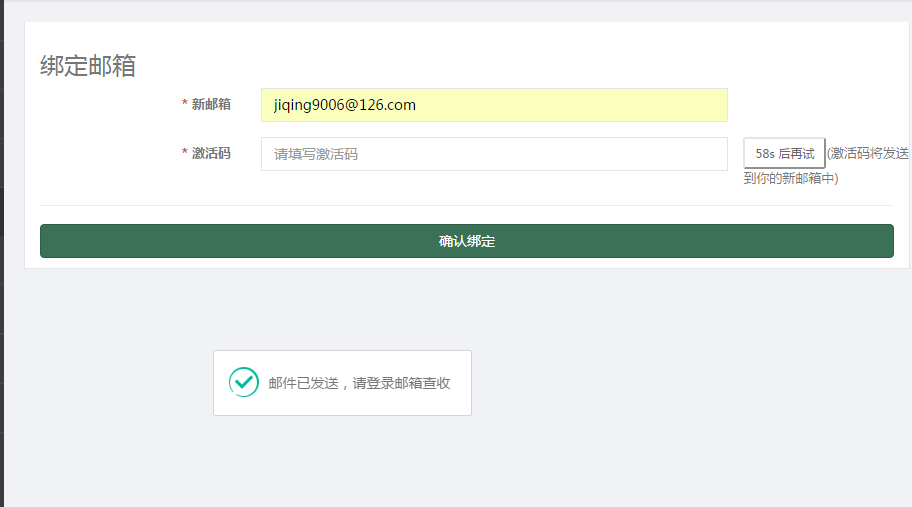
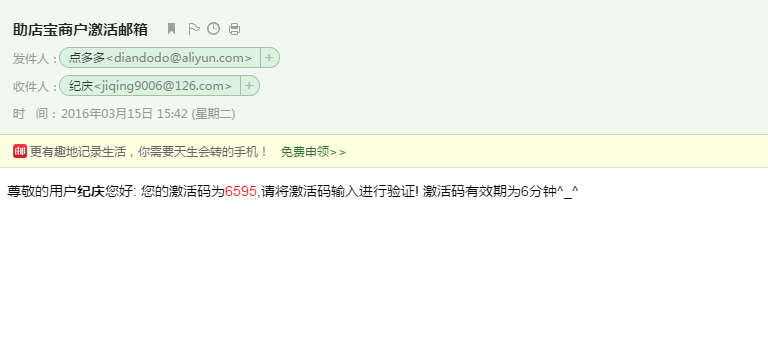
효과는 다음과 같습니다.


1. 설정
<?php
return array (
'email_host' => 'smtp.aliyun.com',
'email_port' => '25',
'email_username' => 'diandodo@aliyun.com',
'email_password' => 'xxxxxx',
'email_from' => 'diandodo@aliyun.com',
'email_fromname' => '点多多',
'email_subject' => '助店宝商户激活邮箱',
'email_body' => "尊敬的用户{$username}您好:
您的激活码为<font color='red'>{$code}</font>,请将激活码输入进行验证! 激活码有效期为6分钟^_^",
);2. 보내기 기능
// 发送邮件
private function _sendEmail($email,$code,$username = '') {
import('@.ORG.phpmailer');
$mail = new PHPMailer(); //建立邮件发送类,类名不一定与引入的文件名相同
$mail->CharSet = "UTF-8";
$mail->IsSMTP(); // 使用SMTP方式发送
$mail->Host = C('email_host'); // 您的企业邮局域名
$mail->SMTPAuth = true; // 启用SMTP验证功能
$mail->Username = C('email_username'); // 邮局用户名(请填写完整的email地址)
$mail->Password = C('email_password'); // 邮局密码
$mail->Port=C('email_port');
$mail->From = C('email_from'); //邮件发送者email地址
$mail->FromName = C('email_fromname');
$mail->AddAddress("$email", "$username");
$mail->IsHTML(true); // set email format to HTML //是否使用HTML格式
$mail->Subject = C('email_subject'); //邮件标题
$email_body = "尊敬的用户<strong>{$username}</strong>您好:
您的激活码为<font color='red'>{$code}</font>,请将激活码输入进行验证! 激活码有效期为6分钟^_^";
$mail->Body = $email_body; //邮件内容,上面设置HTML,则可以是HTML
if(!$mail->Send())
{
return array('status'=>2,'info'=>$mail->ErrorInfo);
} else {
return array('status'=>1,'info'=>'发送成功');;
}
}3. 인증코드를 생성하고 세션에 저장한 후 보내기
// 发送邮箱激活码
public function sendActivationcode() {
    session($this->activationtime, null);
    $activationtime = session($this->activationtime);
    $email = $this->_post('email', 'trim');
    if (IS_AJAX && (!$activationtime || time() > $activationtime)) {
      $activationcode = rand(1000, 9999);
      $res = $this->_sendEmail($email,$activationcode,$this->user['username']);
      if($res['status'] == 1) {
        //设置发送限制时间
        session($this->activationtime, time() + 50);
        session($this->activationcode, array('code' => $activationcode, 'time' => time() + 600));
        $this->ajaxReturn(array('result' => true));
      } else {
        //发送失败写入日志文件
        $log = date('Y-m-d H:i:s') . " 发送失败:{$res['info']}" . PHP_EOL;
        file_put_contents(RUNTIME_PATH . 'Log/activationcode.log', $log, FILE_APPEND);
        $this->ajaxReturn(array('result' => false, 'error' => $res['info']));
      }
    } else {
      $this->ajaxReturn(array('result' => false, 'error' => '错误的请求'));
    }
}4. 그리고 바인딩
// 绑定邮箱
public function bind_email() {
    if (IS_POST) {
      // 获取验证码
      $activationcode = $this->_post('activationcode','trim');
      $email = $this->_post('email','trim');
      $session_activationcode = session($this->activationcode);
      if (time() > $session_activationcode['time'] || $activationcode != $session_activationcode['code']) {
        $this->error('验证码有误');
      } else {
        M('User')->where(array('id'=>$this->user['id']))->save(array('email'=>$email));
        $this->success('绑定成功',U('Account/my'));
      }
    } else {
      $this->display();
    }
}요약:
1. 휴대폰 인증번호를 보내는 것과 비슷한 아이디어입니다.
2. 차이점은 하나는 문자 메시지 전송용이고 다른 하나는 이메일 전송용입니다.
3. 둘, 보내는 제목 하나는 알리바바다유, 또 하나는 회사에서 적용한 이메일 주소입니다.
4. 문자 발송은 유료이며, 이메일 발송은 무료입니다.
이 글이 PHP 프로그래밍에 종사하는 모든 분들께 도움이 되기를 바랍니다.
phpmailer 바인딩 메일함 구현 방법과 관련된 더 많은 기사를 보려면 PHP 중국어 웹사이트를 주목하세요!

핫 AI 도구

Undresser.AI Undress
사실적인 누드 사진을 만들기 위한 AI 기반 앱

AI Clothes Remover
사진에서 옷을 제거하는 온라인 AI 도구입니다.

Undress AI Tool
무료로 이미지를 벗다

Clothoff.io
AI 옷 제거제

Video Face Swap
완전히 무료인 AI 얼굴 교환 도구를 사용하여 모든 비디오의 얼굴을 쉽게 바꾸세요!

인기 기사

뜨거운 도구

메모장++7.3.1
사용하기 쉬운 무료 코드 편집기

SublimeText3 중국어 버전
중국어 버전, 사용하기 매우 쉽습니다.

스튜디오 13.0.1 보내기
강력한 PHP 통합 개발 환경

드림위버 CS6
시각적 웹 개발 도구

SublimeText3 Mac 버전
신 수준의 코드 편집 소프트웨어(SublimeText3)

뜨거운 주제
 7681
7681
 15
15
 1393
1393
 52
52
 1209
1209
 24
24
 91
91
 11
11
 73
73
 19
19
 ALIPAY PHP SDK 전송 오류 : '클래스 부호 데이터를 선언 할 수 없음'의 문제를 해결하는 방법은 무엇입니까?
Apr 01, 2025 am 07:21 AM
Alipay PHP ...
 세션 납치는 어떻게 작동하며 PHP에서 어떻게 완화 할 수 있습니까?
Apr 06, 2025 am 12:02 AM
세션 납치는 다음 단계를 통해 달성 할 수 있습니다. 1. 세션 ID를 얻으십시오. 2. 세션 ID 사용, 3. 세션을 활성 상태로 유지하십시오. PHP에서 세션 납치를 방지하는 방법에는 다음이 포함됩니다. 1. 세션 _regenerate_id () 함수를 사용하여 세션 ID를 재생산합니다. 2. 데이터베이스를 통해 세션 데이터를 저장하십시오.
 JWT (JSON Web Tokens) 및 PHP API의 사용 사례를 설명하십시오.
Apr 05, 2025 am 12:04 AM
JWT는 주로 신분증 인증 및 정보 교환을 위해 당사자간에 정보를 안전하게 전송하는 데 사용되는 JSON을 기반으로 한 개방형 표준입니다. 1. JWT는 헤더, 페이로드 및 서명의 세 부분으로 구성됩니다. 2. JWT의 작업 원칙에는 세 가지 단계가 포함됩니다. JWT 생성, JWT 확인 및 Parsing Payload. 3. PHP에서 인증에 JWT를 사용하면 JWT를 생성하고 확인할 수 있으며 사용자 역할 및 권한 정보가 고급 사용에 포함될 수 있습니다. 4. 일반적인 오류에는 서명 검증 실패, 토큰 만료 및 대형 페이로드가 포함됩니다. 디버깅 기술에는 디버깅 도구 및 로깅 사용이 포함됩니다. 5. 성능 최적화 및 모범 사례에는 적절한 시그니처 알고리즘 사용, 타당성 기간 설정 합리적,
 확실한 원칙과 PHP 개발에 적용되는 방법을 설명하십시오.
Apr 03, 2025 am 12:04 AM
PHP 개발에서 견고한 원칙의 적용에는 다음이 포함됩니다. 1. 단일 책임 원칙 (SRP) : 각 클래스는 하나의 기능 만 담당합니다. 2. Open and Close Principle (OCP) : 변경은 수정보다는 확장을 통해 달성됩니다. 3. Lisch의 대체 원칙 (LSP) : 서브 클래스는 프로그램 정확도에 영향을 미치지 않고 기본 클래스를 대체 할 수 있습니다. 4. 인터페이스 격리 원리 (ISP) : 의존성 및 사용되지 않은 방법을 피하기 위해 세밀한 인터페이스를 사용하십시오. 5. 의존성 반전 원리 (DIP) : 높고 낮은 수준의 모듈은 추상화에 의존하며 종속성 주입을 통해 구현됩니다.
 시스템 재시작 후 UnixSocket의 권한을 자동으로 설정하는 방법은 무엇입니까?
Mar 31, 2025 pm 11:54 PM
시스템이 다시 시작된 후 UnixSocket의 권한을 자동으로 설정하는 방법. 시스템이 다시 시작될 때마다 UnixSocket의 권한을 수정하려면 다음 명령을 실행해야합니다.
 phpstorm에서 CLI 모드를 디버그하는 방법은 무엇입니까?
Apr 01, 2025 pm 02:57 PM
phpstorm에서 CLI 모드를 디버그하는 방법은 무엇입니까? PHPStorm으로 개발할 때 때때로 CLI (Command Line Interface) 모드에서 PHP를 디버그해야합니다 ...
 PHP에서 늦은 정적 결합을 설명하십시오 (정적 : :).
Apr 03, 2025 am 12:04 AM
정적 바인딩 (정적 : :)는 PHP에서 늦은 정적 바인딩 (LSB)을 구현하여 클래스를 정의하는 대신 정적 컨텍스트에서 호출 클래스를 참조 할 수 있습니다. 1) 구문 분석 프로세스는 런타임에 수행됩니다. 2) 상속 관계에서 통화 클래스를 찾아보십시오. 3) 성능 오버 헤드를 가져올 수 있습니다.
 PHP의 CURL 라이브러리를 사용하여 JSON 데이터가 포함 된 게시물 요청을 보내는 방법은 무엇입니까?
Apr 01, 2025 pm 03:12 PM
PHP 개발에서 PHP의 CURL 라이브러리를 사용하여 JSON 데이터를 보내면 종종 외부 API와 상호 작용해야합니다. 일반적인 방법 중 하나는 컬 라이브러리를 사용하여 게시물을 보내는 것입니다 ...


