ActionBarDrawerToggle:
이전 그림에서는 drawLayout.setDrawerListener()를 사용하지 않았습니다.
해당 매개변수 개체는 DrawerLayout.DrawerListener입니다.
public interface DrawerListener {
   void onDrawerSlide(View var1, float var2);

   void onDrawerOpened(View var1);

   void onDrawerClosed(View var1);

   void onDrawerStateChanged(int var1);
 }
이 문서에서는 drawLayout.setDrawerListener(toggle) 메서드에 대해 설명합니다. 그의 주요 역할은 다음과 같습니다.
•ActionBar(android.R.id.home)에서 뒤로 버튼 이미지를 변경합니다.
•Drawer를 열고 닫을 때 ActionBar의 복귀 아이콘에 애니메이션 효과가 적용됩니다.
• 사이드바 열기 및 닫기 모니터링
사이드 메뉴 옵션을 클릭할 때 전체 메뉴의 해당 내용을 표시하기 위해 메뉴를 숨겨야 하는 경우가 많습니다. ActionBarDrawerToggle은 이러한 방법 중 하나입니다.
ActionBarDrawerToggle 없이 import android.support.v4.widget.DrawerLayout.DrawerListener를 직접 사용할 수도 있습니다.
그러면 DrawerLayout은 이전 글에서 소개한 바 있으므로 하나씩 설명하지 않겠습니다. DrawerLayout의 모니터링부터 시작해 보겠습니다.
오늘 사용한 패키지는 다음과 같습니다.
import android.support.v4.app.ActionBarDrawerToggle;
먼저 ActionBarDrawerToggle을 초기화합니다.
toggle = new ActionBarDrawerToggle(
    this,         /* host Activity */
    mDrawerLayout,     /* DrawerLayout object */
    R.drawable.ic_drawer, /* nav drawer image to replace 'Up' caret */
    R.string.drawer_open, /* "open drawer" description for accessibility */
    R.string.drawer_close /* "close drawer" description for accessibility */
    ) {
  public void onDrawerClosed(View view) {
    getActionBar().setTitle(mTitle);
    invalidateOptionsMenu(); // creates call to onPrepareOptionsMenu()
  }
  public void onDrawerOpened(View drawerView) {
    getActionBar().setTitle(mDrawerTitle);
    invalidateOptionsMenu(); // creates call to onPrepareOptionsMenu()
  }
};
초기화는 비교적 간단합니다. 댓글만 읽어보세요. 수신 콜백 메소드에서는 InvalidateOptionsMenu를 사용하여 활동에 메뉴를 다시 그리도록 알린 다음 활동은 onPrepareOptionsMenu 메소드에서 메뉴 요소의 표시 및 숨기기를 업데이트할 수 있는 기회를 갖습니다.
다음으로 ActionBar를 설정해야 합니다.
private void initActionBar() {

 // enable ActionBar app icon to behave as action to toggle nav drawer
    ActionBar actionBar = getActionBar();
    actionBar.setDisplayHomeAsUpEnabled(true);
    actionBar.setHomeButtonEnabled(true);
  }
메뉴 키가 표시되고 메뉴 키가 표시되는 것을 보는 것은 어렵지 않습니다. 클릭이 가능하도록 설정되었습니다.
ActionBar 관련 설정:
•setHomeButtonEnabled //4.0보다 작은 버전에서는 기본값이 true입니다. 그러나 4.0 이상에서는 false입니다. 이 메서드의 기능은 왼쪽 상단에 있는 아이콘을 클릭할 수 있는지 여부를 결정하는 것입니다. 왼쪽 아이콘이 없습니다. 아이콘을 클릭할 수 있으면 true, 클릭할 수 없으면 false입니다.
•actionBar.setDisplayHomeAsUpEnabled(true) // 왼쪽 상단 모서리 아이콘 왼쪽에 반환된 아이콘을 추가합니다. ActionBar.DISPLAY_HOME_AS_UP
에 해당합니다. •actionBar.setDisplayShowCustomEnabled(true) // 제목 표시줄에 사용자 정의 일반 보기가 표시되도록 합니다. 즉, ActionBar.DISPLAY_SHOW_CUSTOM
에 해당하는 actionBar.setCustomView가 작동할 수 있습니다. •actionBar. setDisplayShowTitleEnabled(true) //ActionBar.DISPLAY_SHOW_TITLE에 해당합니다.
그런 다음 이 리스너를 바인딩해야 합니다.
mDrawerLayout.setDrawerListener(toggle)
이를 사용하려면 다음 Activity 코드를 구현해야 합니다.
@Override
  protected void onPostCreate(Bundle savedInstanceState) {
    super.onPostCreate(savedInstanceState);
    // Sync the toggle state after onRestoreInstanceState has occurred.
     toggle.syncState();
  }

  @Override
  public void onConfigurationChanged(Configuration newConfig) {
    super.onConfigurationChanged(newConfig);
    // Pass any configuration change to the drawer toggls
     toggle.onConfigurationChanged(newConfig);
  }

  @Override
  public boolean onOptionsIwotemSelected(MenuItem item) {
    // The action bar home/up action should open or close the drawer.
    // ActionBarDrawerToggle will take care of this.
     if (toggle.onOptionsItemSelected(item)) {
     return true;
     }
    return super.onOptionsItemSelected(item);
  }
여기서 onOptionsIwotemSelected에 코드를 구현하지 않으면 메뉴를 클릭해도 아무런 효과가 없습니다.
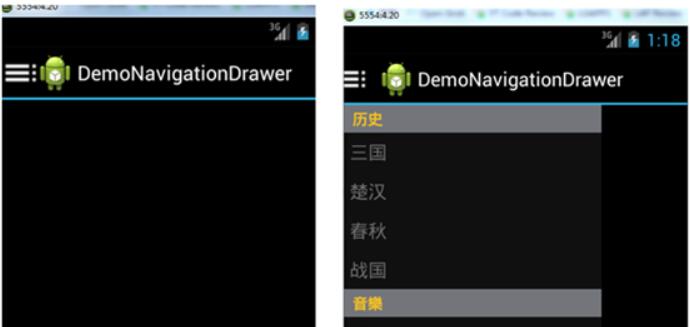
이제 코드를 실행하면 다음 효과를 볼 수 있습니다.

android.support.v7.app.ActionBarDrawerToggle의 세 번째 ActionBarDrawerToggle; 매개변수
는 다음과 같습니다. R.drawable.ic_drawer, /* 'Up' 캐럿을 대체할 탐색 서랍 이미지 */
Toolbar를 사용자 정의하여 더 아름다운 UI를 만들 수 있도록 Toolbar 객체로 대체합니다.
위 내용이 이 글의 전체 내용입니다. 모든 분들의 학습에 도움이 되기를 바랍니다. 또한 PHP 중국어 웹사이트를 구독하시기 바랍니다.
사이드 슬라이딩 기능이 있는 더 많은 Android DrawerLayout 레이아웃 클래스(2)를 보려면 PHP 중국어 웹사이트에서 관련 기사를 주목하세요!